X

Sign up to receive exclusive recipes, tips, updates and other goodies from Aliya!

  • Home
  • Blog
    • All
    • Recipes
    • Spices + Ingredients
    • Lifestyle, etc.
    • Travel
  • The Cookbook
  • The App
  • Media
    • All Media
    • Video
  • About
  • Passions
Aliya LeeKong
  • Home
  • Blog
    • All
    • Recipes
    • Spices + Ingredients
    • Lifestyle, etc.
    • Travel
  • The Cookbook
  • The App
  • Media
    • All Media
    • Video
  • About
  • Passions

Lemon-Fennel Israeli Couscous Risotto

View fullsize risotto4-500x333.jpg
View fullsize risotto-pic2-500x333.jpg
View fullsize risotto-pic3-500x333.jpg

Lemon-Fennel Israeli Couscous Risotto

Risotto is one of my favorite things in the world to make.  It’s one of those dishes that has endless permutations.  It can take on any flavors you desire, can be simplified as a side dish, beefed up for a main, and is always creamy and satisfying.  I can get a bit heavy-handed with my risottos (a jumbo lump crab and smoked mozzarella iteration comes to mind…), so I wanted to create a slightly lighter dish here.

Israeli couscous is a tiny, pearl-shaped pasta that was created during a period in Israel when rice was scarce.  It has a slightly toothsome texture when cooked and a nutty flavor.  Because of its small size, it cooks up a lot quicker than most pastas.  That’s why I decided to use it here – instead of 30 plus minutes of constant stirring, you get a similarly delicious dish in about 15 minutes from start to finish.  You definitely still want to stir to develop the creamy texture, but it requires a lot less maintenance and time than traditional risotto.

When thinking about this dish, my mind immediately went to fennel since it’s in season.  Paired with bright lemon zest and a bit of juice, the result is a much lighter and fresher risotto than I typically make.  I cooked up a simply seared piece of fish, and it worked perfectly with the light and creamy, lemon-y couscous “risotto”.  Enjoy!

Ingredients

4 tbsps unsalted butter

2 small shallots, medium dice (2/3 cup)

½ medium fennel bulb, medium dice (2/3 cup)

3 or 4 garlic cloves, minced

2 cups toasted Israeli Couscous

1/3 cup white wine

3 cups vegetable or chicken stock

juice of half a lemon

1 tbsp lemon zest

finely chopped parsley, chives, and/or cilantro to finish

salt and freshly ground black pepper

Procedure

Heat a nonstick sauté pan over medium heat and bring the stock in a separate saucepan up to a boil.  Add 3 tablespoons of butter, and when foam subsides, add diced shallots and fennel and a pinch of salt to draw out the moisture.  Cook for 5 to 7 minutes stirring often until vegetables have softened.  Add garlic cloves and cook for 30 seconds to a minute until fragrant.

Add couscous and cook for a minute stirring to coat with the fat.  Add white wine and reduce completely.  Reduce heat to medium-low.  Add boiling stock in increments of one cup or so, stirring often.  Repeat until all stock has been incorporated and couscous has cooked for about 10 minutes.

Remove from the heat.  Stir in lemon juice and lemon zest.  Taste couscous and add salt and pepper as needed.  Add remaining tablespoon of butter and chopped herbs.  Serve immediately.

tags: israeli couscous recipes, couscous risotto, lemon risotto, risotto recipes, fennel
categories: recipes, side dishes, vegetarian, all-6
Monday 10.25.10
Posted by Aliya LeeKong
 

Celery Root Hummus

View fullsize hummus-pic1-500x333.jpg
View fullsize hummus-pic2-500x333.jpg
View fullsize hummus-pic3-500x333.jpg

Celery Root Hummus

It’s amazing to me how ubiquitous hummus has become in the last 10 years.  I remember making it from scratch as a child to be served to guests when they’d come over (alongside this delicious, buttery, puff pastry-encased, baked brie…), and then all of a sudden it was in every super market…everywhere.  A cultural explosion of sorts with every variation you could ask for: roasted garlic, salsa-infused, greek olive, or roasted red pepper…Now, it’s been further gourmet-ified, and I’ve seen chickpeas substituted with everything from avocado to squash.

If you’ve been reading my posts over the past few months, I am always inspired by different cultures’ foods, but also by seasonality.  I love the freshness and flavor that comes from the farmers’ market – thus my version of hummus uses seasonal celery root, a fantastic Fall, root vegetable.  It looks pretty scary but, once you get passed peeling it, it cooks up quickly and easily to delicious results.

I adore basic hummus, but sometimes it just sits like a weight in my stomach.  It can be really heavy at times, so I decided to forgo chickpeas altogether, which actually resulted in the lightest, fluffiest hummus I’ve ever eaten!  The celery root provides a gently sweet, tangy, celery-like flavor that blends seamlessly with the sesame tahini, garlic, and lemon juice.  The cumin and cayenne give it smokiness and kick, and the result is a beautiful incarnation of hummus that was incredible slathered on a bit of pita.  Enjoy!

Ingredients

Yields approximately 2 ½ cups

2 baseball sized celery roots, peeled and cut into a 3/4” dice (approximately 3 ½ cups)

1 tbsp butter

3 garlic cloves

1 ½ tbsps tahini

½ tsp cumin

¼ tsp cayenne

½ tsp salt

juice of half a lemon

extra virgin olive oil

paprika

Procedure

Place celery root dice in a stock pot and cover with cold water.  Bring up to a boil uncovered and boil 13-15 minutes until the celery root is very tender.

Using a slotted spoon, transfer celery root into a blender, reserving the cooking liquid.  Add butter and let melt.  Add garlic cloves, tahini, cumin, cayenne, salt, and lemon juice.

Ladle in a bit of the cooking liquid and blend.  Continue adding cooking liquid a little bit at a time until desired texture is achieved.  It took about 2 full ladles (of a 4 oz. ladle) to get to the puree I desired.

Transfer to a bowl and make a well in the center.  Pour a little extra virgin olive oil in the well and sprinkle hummus with paprika.  I love to eat this warm or cold, so serve as you like!

tags: hummus, celery root, recipes for fall
categories: all-6, appetizers, recipes, vegetarian-1
Wednesday 10.20.10
Posted by Aliya LeeKong
 

Sumptuous Beef & Rice Casserole w/ Raw Mango Salad

View fullsize pilau-pic1-500x333.jpg
View fullsize pilau-pic2-500x333.jpg
View fullsize pilau-pic3-500x333.jpg
View fullsize pilau-pic4-500x333.jpg
View fullsize pilau-pic5-500x333.jpg

Sumptuous Beef & Rice Casserole w/ Raw Mango Salad

The first time my mom made my husband pilau we were having a party at my place in NYC.  There were around 25 people over, celebrating, drinking wine and eating standing up because I didn’t have enough chairs for everyone.  The layout of my apartment is pretty open with the kitchen, dining, and living rooms all visible.  No joke, at the end of his 4th helping of the dish, my husband stood up abruptly, pronounced my mom had purposefully “roofied” him…and promptly went to sleep on the couch in front of the other 20-some-odd people!

In the spirit of dishes that work well for the holidays, I thought I would put this recipe out since it’s a delicious communal or even potluck dish.  Hanging with my parents this weekend meant my mom and I were seriously throwing down in the kitchen, and pilau was definitely on the menu.  Typically, there’s so much “a little of this, a little of that” that it’s pretty close to impossible to get a solid recipe out of the whole affair.   But I managed to pry this one out.  And even with this dish, it takes a bit of intuition and a little praying to get the beef and the rice to be cooked perfectly at the same time.  But it is so worth it.  For me, it’s old school comfort food, a taste memory that dates back to my early childhood.

I did a little research, and pilau = pilaf which is actually Turkish!  And this is extraordinarily exciting for me because I am planning a trip to Turkey later this year.  Cannot wait to cook their version…Much like another rice casserole I’ve mentioned, biryani, this dish originated in Persia and can be found throughout the world, taking its individual form in different cultures.   Afghani palau has carrots, raisins, and nuts; in parts of East Africa, coconut milk is included.  And West Indian pelau is closer to their peas and rice with the inclusion of chicken or another protein.

This version is a true combination of my mom and I.  The ingredients are largely hers, but I changed the technique to try to create the best textures and flavors possible.  I made a raw mango salad to go along with it, which provides the perfect cool and acidic balance to the warmly spiced rice and beef that melts in your mouth.  Enjoy!

Ingredients

Yields 6 to 8 servings

Pilau:

2 lbs beef chuck, cut into 1 ½ inch cubes

5 tbsps canola oil

1 stick of cinnamon

3 whole cloves

3 whole black peppercorns

3 whole cardamom pods, cracked open

1 ½ tsps cumin seeds

2 tsps black mustard seeds

1 large yellow onion, finely chopped

1-3 green chilies, finely chopped

½ tsp grated ginger

½ tsp of ground cumin

¼ tsp of ground coriander

4 cloves of garlic, minced

1 ½ bunches of fresh cilantro, chopped (including stems)

1 marrow bone (totally optional, I added it for extra flavor)

4 ½ cups light beef stock or beef stock + water

3 ½ cups of basmati rice

Salt and pepper to taste

Raw Mango Salad:

juice of 1 lime

2 ½ tsps rice wine vinegar

½ tsp salt

¼ tsp cayenne

1 raw mango, peeled, seeded and diced

1 cucumber, peeled, seeded and diced

1 apple, peeled, seeded and diced

½ red onion, minced

2 small sweet red peppers, minced

4 to 6 mint leaves, chiffonade

small handful of cilantro, finely chopped

Procedure

For the Pilau:

Preheat the oven to 325° F.

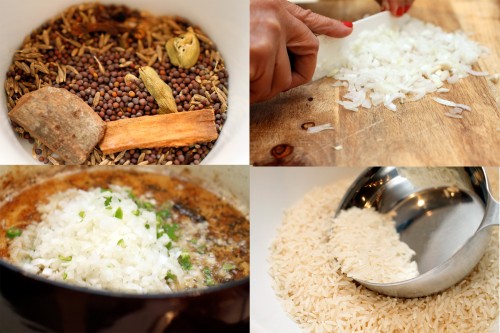
Thoroughly wash the basmati rice until the water runs clear.  You want to remove as much starch as possible.  Set aside.

Heat a large Dutch oven over high heat.  Liberally season the cubed beef.  Add oil to the pot and sauté beef for 2 to 3 minutes in batches.  You don’t want to overcrowd the pot or the meat won’t brown.  Also, you don’t want to cook the beef all the way through – just enough to brown the outside.  Using a slotted spoon, spoon beef onto an unlined plate and set aside.

Turn the heat down slightly to a medium heat and add all of the whole spices.  When they start to pop, add onions, chilies, ginger, ground cumin and ground coriander and cook for 6 to 8 minutes.  Lower the heat if necessary – you want the onions to turn translucent but not brown.   Add the garlic and ½ of the chopped cilantro and cook for another minute.  Add beef back to the pot along with any juices that have accumulated on the plate and the marrow bone if using.

This is where it gets slightly tricky.  Pre-measure the 4 ½ cups of liquid – you can use a light stock, water or some combination of the two.  You want to keep track of how much liquid you’ve added because the rice will become sticky if you end up adding too much and will be dry if not enough is used.  Add liquid to the pot to just cover the meat.  Place the lid on the pot, and turn the heat up.  When the temperature comes up and it’s about to boil, place covered pot in the oven and cook for about 1 ½ hours or until the meat is fork tender.

Once meat is cooked, add rice and the remaining liquid to get to 4 ½ cups.  Re-season if necessary and place back in the oven for another 30 to 35 minutes until rice is cooked and fluffy.  Rice may take a little less or more time depending on the type of rice you are using, type of pot in which you are cooking, etc., so I would advise checking it at intervals.

When serving, use the other half of the chopped cilantro to garnish the top.

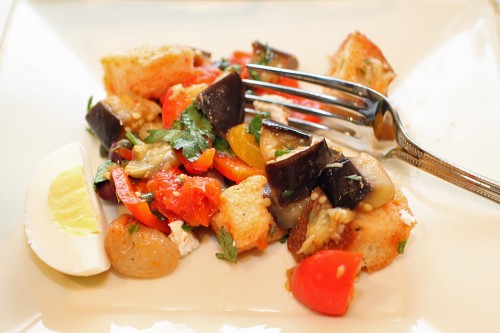
For the Raw Mango Salad:

Combine lime juice, rice wine vinegar, cayenne and salt in a small bowl to create a dressing.

In a separate bowl, toss together raw mango, cucumber, apple, red onion, sweet red pepper, mint and cilantro.  Add dressing and adjust seasoning if necessary.

tags: casserole, pilau, beef and rice casserole, comfort food, holiday recipes
categories: recipes, all-6, soups & salads, main dishes-1, man-friendly
Monday 10.18.10
Posted by Aliya LeeKong
 

Trini-style Macaroni Pie

View fullsize mac-pie-pic1-500x333.jpg
View fullsize mac-pie-pic2-500x333.jpg
View fullsize mac-pie-pic3-500x333.jpg
View fullsize mac-pie-pic4-500x166.jpg

Trini-style Macaroni Pie

Thanksgiving is by far my favorite holiday of the year.  My family always does it big down in Florida, and I love the coming together of friends and family of all ages, the hustle in the kitchen with my mom and me and other intruders…I mean, helpers..., the beautiful cool, fall weather (yes, even in Florida).  Ours is a whole day affair with people stopping by at different points in the meal, card games at the kitchen table later followed by a second session of eating in the evening.

Our table is a complete mash-up!  A humungous turkey filled with my mom’s famous stuffing that my dad carves to perfection, a plethora of South Asian, African and other international dishes to complement, one definite chocolate dessert as well as everything else under the sun.  Thanksgiving isn’t too far away, and I’m inspired by my table to bring dishes to you that you might want to try for your own Thanksgiving.  This gives you ample time to do a trial run and see what you like.

My husband’s family always does the most delicious macaroni pie, a staple dish from Trinidad.  It’s a delectably spicy mac and cheese that is baked and served casserole-style.  It’s great because it can be assembled ahead of time if you are going over to someone else’s house.

Macaroni pie is like a blank slate that you can totally personalize.  Traditionally, this pie uses full-on spaghetti, but I personally prefer penne because it’s easy to eat, and I love when the center fills with the creamy sauce.  I also use a half of a habanero pepper here, but feel free to use as much or as little as your heat tolerance permits – other peppers would work well here too.  I’ve seen macaroni pie made with a bunch of different cheeses; I’m partial to gruyere because it’s nutty and works really well with the spices.  Again, you can use whatever grated cheese is your preference.  The herbs really boost the flavor, and I love the crunchy breadcrumb topping.  This is the perfect side dish, truly.  Creamy, cheesy, crunchy with a bit of a kick.  Enjoy!

Ingredients

Serves 6 to 8 (yields 1 3 quart baking dish)

olive oil or butter

1 yellow onion, finely diced

½ habanero pepper, seeded and ribbed, minced

3 garlic cloves, minced

1 stick unsalted butter

½ cup all-purpose flour

1 quart milk

½ tsp powdered mustard

1 tsp paprika

½ tsp white pepper

½ tsp black pepper

2 tsps salt

2 ½ cups grated gruyère

2 eggs

1 lb pasta (I used penne but anything you like)

1 tbsp + 1 tsp fresh chives, finely chopped

1 ½ tsps fresh thyme, finely chopped

¾ cup breadcrumbs

Procedure

Preheat oven to 350° F.

Heat a medium skillet over medium-low heat.  Add olive oil, and, when hot, add onion and pepper.  You want the onions to be pretty finely diced, so they will spread easily throughout the dish and cook quickly.  Cook for 3 to 5 minutes until the onions are translucent.  Add garlic and cook for 30 seconds or so until fragrant.  Remove from heat and cool in a bowl.

In a sauté pan over medium heat, melt butter.  Add flour all at once and whisk vigorously to avoid lumps.  Cook for 2 to 3 minutes.  You just want to remove the raw taste.  Add milk and spices and continue to whisk to prevent lumps (remember to get the corners!).  Once the mixture starts to bubble, reduce heat to low and cook for 8 to 10 minutes whisking often.  You want this to simmer gently while it’s thickening.  Remove from heat.

To the onion mixture in the bowl, add 2 cups of the grated cheese as well as the eggs.  Add a ladle full of the béchamel (milk mixture) and stir.  Continue to add ladlefuls until the egg mixture is up to temperature with the béchamel.  Add everything back to the béchamel in the sauté pan and stir to combine thoroughly and insure cheese is completely melted.

Add pasta to boiling, heavily salted water and cook until it’s a bit underdone.  It depends on what type of pasta you are using.  I used penne and cooked it for about 9 or 10 minutes.  It’s going to continue cooking in the oven.  Drain pasta and add to the béchamel/cheese mixture.  Add 1 tablespoon of the chopped chives and 1 teaspoon of the chopped thyme and combine thoroughly.  Pour into a heavily greased 3 quart baking dish.

In a bowl, combine remaining herbs, ½ cup of cheese, and breadcrumbs.  Sprinkle on top of macaroni and either dot with butter or drizzle with olive oil.  Bake for 35 minutes until top is browned and bubbly.

tags: macaroni pie, trini-style cooking, comfort food
categories: side dishes, recipes, all-6, vegetarian-1
Wednesday 10.13.10
Posted by Aliya LeeKong
 

Mushroom and Ajwain Pissaladière

View fullsize mushroom-pic1-500x333.jpg
View fullsize pissaladiere-pic2-500x333.jpg
View fullsize mushroom-pic3-500x333.jpg
View fullsize mushroom-pic5-500x333.jpg

Mushroom and Ajwain Pissaladière

A few weeks ago, I was flipping through a food magazine and came across a recipe for a traditional pissaladière.  Of course, now I can’t find the article amongst the heaping piles of magazines I accumulate!  Probably need a better reference system around here…Anyway, the dish is a Provençal pizza-like tart, a yeast-based dough typically topped with onions, anchovies and French oil-cured olives.  No cheese, but for a pizza addict like myself (once a week!), this dish completely hits the spot.

I decided, of course, that a blank canvas like this needs – is basically crying for – an exotic twist.  Wild mushrooms are in season, and I picked up these beautiful, feathery oyster mushrooms from the farmers’ market.  In a previous post, I mention a spice, ajwain seeds, and how they pair gorgeously with mushrooms.  Therein, lies the inspiration for this pissaladière.

Instead of making pizza dough from scratch, I like to use puff pastry because I’m a bit obsessed, but also because it saves time and forms the most perfectly thin, buttery, crunchy layer.  And not to stray too far from the original, caramelized onions still form the base layer and work incredibly well with the spices and the sautéed mushrooms.  The ajwain and cumin give a smoky, thyme-like kick, and the dish just pops with flavor.

I use this recipe all the time for entertaining because you can pre-cook the topping, assemble, pop it in the oven, and have the most delicious and elegant tart in 15 minutes.   I sometimes pre-cut the pastry into little squares before cooking to make it easier.  Put this out next to a cheese plate, and you are all set.  Or whip it up for an easy weeknight app.  Enjoy!

Ingredients

Serves 6 as an appetizer / Makes about 8 squares for hors d’oeuvres

1 sheet frozen puff pastry, thawed according to package directions

olive or canola oil

3 tbsps unsalted butter

2 ½ cups sliced mixed mushrooms (I used a mixture of cremini, shiitake and oysters)

¼ tsp ajwain seeds

¼ tsp cumin seeds

2-3 medium-sized Spanish onions, thinly sliced

¼ tsp crushed red pepper

scant ½ tsp black pepper

scant ½ tsp chili powder

scant ½ tsp ground cumin

1 egg + 1 tbsp heavy cream

fresh thyme leaves

Salt to taste

Procedure

Preheat oven to 400° F.

Heat a medium-sized skillet over medium-high heat.  Cover bottom of pan with oil and add 1 tablespoon of butter.  Once foam has subsided, add mushrooms and toss to coat.  Cook for about 2 to 3 minutes until well-browned, season lightly with salt and place in a colander over a bowl to drain excess liquid and oil.

Wipe off skillet and set back over medium heat.  Add oil again to coat the bottom of the pan and, when oil begins to shimmer, add ajwain and cumin seeds.  Fry spices for about a minute being careful not to burn.  Turn heat down to medium-low, add 2 tablespoons of butter, onions, crushed red pepper, black pepper, chili powder, and a generous pinch of salt.  Cook on low for 15 to 20 minutes, stirring frequently until onions soften and caramelize. Taste and adjust seasoning.  Set aside to cool for about 10 minutes.

On a floured surface, roll out the puff pastry to fit the baking sheet; it will shrink a bit as it cooks.  Place on a parchment-lined baking sheet, and prick all over with a fork to prevent it from puffing too much.  In a bowl, beat together the egg and heavy cream and brush puff pastry with egg wash.  Bake for 10 minutes, and remove from the oven.  Let sit for 2 minutes to deflate.

Using tongs, spread onion mixture onto pastry being sure to leave an uncovered edge around the outside.  Try not to get any excess oil or butter on the pastry.  Spread browned mushrooms on top, sprinkle with thyme leaves and bake for another 10-15 minutes until crust is golden brown.

Let cool slightly before cutting.  I like to sprinkle a little fresh fleur de sel on top before serving.


tags: mushrooms, ajwain, pissaladiere
categories: appetizers, recipes, all-6, vegetarian-1
Monday 10.11.10
Posted by Aliya LeeKong
 

Smoked Earl Grey Tea Cocktail

View fullsize tea-cocktail-pic1-500x333.jpg
View fullsize tea-cocktail-pic2-500x333.jpg
View fullsize tea-cocktail-pic3-500x333.jpg

Smoked Earl Grey Tea Cocktail

A few weeks back, I was chatting with a friend of mine, John-Paul, who owns a really cool tea company and promised him I’d come up with an interesting tea cocktail.  This smoked earl grey tea cocktail was the result and is a delicious combination of smokiness, citrus and ginger that works for both guys and gals.

John-Paul runs Tavalon, a tea company he founded about 5 years ago when an “aha” moment in London inspired him to forge a new face for tea in America.  Their teas are incredible, yes, because they have a tea sommelier who travels all over the world sampling different teas, buy directly from tea farms, only source “premium” loose teas, and use numerous focus groups to test their over 80 blends (which they blend here in NJ).  But, beyond that, their teas are really flavorful, fun, lifestyle-oriented and, like here, work wonderfully with a little booze!

I have to admit – I am completely addicted to Tavalon’s Smoked Earl Grey Reserve Tea.  It’s incredibly complex, woodsy with citrusy floral notes.  I’ve been drinking it nonstop.  When I was coming up with this recipe, I wanted something that wasn’t too sweet and really highlighted the tea flavor rather than masking it with a heavy alcohol flavor.  This Domaine de Canton ginger liqueur I picked up (yes, because Oprah said to) worked perfectly.  The cognac base blends seamlessly with the smokiness of the tea, and the ginger is delicate enough to compliment it without taking over.  I’m ginger-light with my cooking precisely because it so easily can overpower.  Not here.  The lemon juice provides the perfect tangy balance, and using a lemon sugar on the rim provides just the right amount of sweetness.  This is a seriously good cocktail and will definitely be served at my next dinner party – enjoy!

Ingredients

Serves 1

Rim:

sugar

lemon zest

½ lemon

Cocktail:

3 ounces cold, brewed smoked earl grey tea

1 tbsp freshly squeezed lemon juice

2 ounces Domaine de Canton Ginger Liqueur

Ice

Procedure

In a small bowl, add sugar and as much lemon zest as you desire.  Mix thoroughly and transfer to a plate.  Rub the ½ lemon along the rim of a rocks glass.  Dip glass face down into lemon sugar to create an even coating along the rim.

To the glass, add cold, brewed smoked earl grey tea, lemon juice, and ginger liqueur.  Stir to combine and add a few ice cubes.

tags: smoked earl grey tea, Tavalon, tea cocktail
categories: all-6, drinks & cocktails, recipes
Wednesday 10.06.10
Posted by Aliya LeeKong
 

Crispy Salt and Pepper French Toast

View fullsize toast-pic1-500x333.jpg
View fullsize toast-pic2-500x333.jpg
View fullsize toast-pic3-500x166.jpg

Crispy Salt and Pepper French Toast

Savoury, crispy French toast. Salty, with a heavy hit of black pepper.  This was one of my favorite Sunday breakfasts growing up, the smell of the toasts frying up a scent memory that still takes me back.

This fried bread I grew up eating, called khara pao (khara means “spicy”), is South Asia’s answer to French toast, typically served with a kicked-up tomato ketchup.  My family was partial to black pepper, but I’ve seen turmeric, chili powder, cayenne and even cumin added.  And South Asia’s not the only one that goes the savoury route.  In other cultures, they do similar-style “eggy toasts” – Italy’s has mozzarella and tomato sauce, Russia’s is simple salt, egg and milk, and Hungary serves theirs with onions, tomatoes, ketchup and even mayonnaise…

This version is so ridiculously easy to make, and requires ingredients we all usually have on hand.  I’m a savoury brunch person myself, and this is such a delicious alternative to sweet French toast.  The crispy, salty, pepper-heavy toast dipped in a cool, spicy, slightly sweet, tomato-ey ketchup is a truly heavenly combination that will quickly move into your go-to, I-have-leftover-bread-and-don’t-know-what-to-do-with-it rotation.  Breakfast or even as a mid-afternoon snack – enjoy!

Ingredients

Serves 4 to 6

French Toast:

5 eggs

3 tbsps half-and-half

1 tsp salt

2 tsps black pepper

1 ½ tbsps green onions, finely chopped (optional)

1 ½ tbsps cilantro, finely chopped (optional)

vegetable oil

butter

8 (½”) slices day-old bread*, cut on the diagonal

Sauce:

Ketchup

Sriracha or your favorite hot sauce

Procedure

In a bowl or baking dish, beat together eggs with half-and-half, salt, pepper, green onions, and cilantro.

Heat a medium or large skillet over medium-high heat.  Cover the bottom of the skillet with vegetable oil and add a tablespoon or two of butter for taste.

Dip the bread triangles into the egg batter, drain off any excess, and place straight into the hot pan.  Fry for 2 to 3 minutes on each side – you want to develop a golden-brown color and the texture should be crispier than traditional French toast.  Place cooked toasts on a paper towel-lined plate or rack to drain.

In a small bowl, mix together ketchup and hot sauce to your desired heat tolerance.

Serve toasts warm with a side of the spicy ketchup.

*I like to use a country or pullman loaf for this.  You want it to stand up to the egg batter and not get mushy, so I always go for a day-old loaf.

tags: french toast, savoury french toast, khara pao, South Asian french toast
categories: all-6, breakfast, recipes, vegetarian-1
Monday 10.04.10
Posted by Aliya LeeKong
 

Exotic Homemade Baby Food

View fullsize baby-food-pic-1-500x333.jpg
View fullsize baby-food-pic2-500x333.jpg
View fullsize baby-food-pic-3-500x333.jpg
View fullsize baby-food-pic-4-500x333.jpg
View fullsize baby-food-pic-5-500x333.jpg
View fullsize baby-food-pic-6-500x750.jpg

Exotic Homemade Baby Food

How adorable is my godson Uri?  He was all about the banana tapioca pudding here…AND the camera.  I’ll be posting more ridiculously cute pictures of Uri, his beautiful mother, and my attempts at getting all of the baby food in his mouth on my facebook page.

So why exotic baby food…I remember growing up I had an incredible tolerance for spicy food.  My mom would always tell me that, after I was born, she had no desire to cook multiple meals or make her food more bland when I could finally eat solids, so she ramped me up by adding cayenne and other spices to my baby food.  Genius!

In many cultures, baby food is by default homemade, and ingredients being what they are, things like cumin, cilantro, coconut milk, and even lemongrass are added.  Doctors do say that babies learns to tolerate certain spices through the breast milk, so it makes sense to get them adjusted to flavorful foods early.

I told my girlfriend that I wanted to cook for my godson and try out a few flavors.  So, not having a baby myself, I did a ton of research to figure out what was safe – I was paranoid!

-       So first, a baby should be over 8 months old before introducing different spices (pediatricians’ recommendation).

-       Next, no sugar or salt should be added.

-       Spices like cinnamon should be avoided because they can cause allergic reactions.  And no using extracts that contain alcohol (like vanilla).

-       Fruits, other than bananas or avocados, and vegetables should be peeled and cooked – roasting or baking is the best way to develop flavor and avoid total nutrient loss.

-       If you are introducing milk, it’s best to cook the milk to break down some of the milk proteins to aid in digestion.

These are only a few of the do’s and dont’s…

I went with one sweet and one savoury baby food for little Uri.  I thought the roasted butternut squash with rice, coconut milk and cilantro was a hit until I gave him the banana tapioca pudding with star anise and vanilla.  He went literally bananas for it!  And, quite frankly, I found myself sneaking in a few more tastes than I needed to…I love to cook, and I can’t tell you how rewarding it was to see a baby honestly love what you made him…it was great.  Enjoy!

Butternut Squash Homemade Baby Food with Rice, Coconut Milk, & Cilantro:

Ingredients

Yields 1 ¼ cups

1 small butternut squash, peeled, seeded and cut into a small dice (approx. 3 cups diced squash)

olive oil

½ cup cooked white or brown rice

¼ cup coconut milk

1 – 2 tbsps cilantro, finely chopped

Procedure

Preheat oven to 400° F.

In a bowl, toss squash with a little bit of olive oil to coat.  Transfer to a baking sheet making sure squash is in a single later.  Roast in the oven for 25 minutes until soft.

In a food mill or food processor, process squash with rice, coconut milk and cilantro to desired texture.  Serve warm.

Banana Tapioca Pudding with Star Anise and Vanilla

Ingredients

Yields 2 cups

¼ cup tapioca

1 ½ cups milk

1 star anise

1/8 tsp vanilla bean powder or ½ vanilla bean (no extract!!)

1 ½ bananas mashed

Procedure

In a saucepan, bring tapioca with milk, anise, and vanilla to a boil over medium-high heat.  Reduce to a low simmer and simmer uncovered 5 to 7 minutes until tapioca is soft.  Remove star anise.

In a bowl, mash bananas to desired consistency.  Add tapioca mixture and stir to combine.  Serve warm.


Photos of me and Uri: Izaz Rony / http://www.methodizaz.com/

tags: baby food, exotic baby food, homemade baby food recipes, butternut squash for babies, banana tapioca pudding for babies
categories: baby food, lifestyle, recipes, all-6
Wednesday 09.29.10
Posted by Aliya LeeKong
 

Crispy Piri Piri Wings

View fullsize wings-pic-4-500x333.jpg
View fullsize wings-pic2-500x333.jpg
View fullsize wings-pic-3-500x166.jpg
View fullsize wings-pic-1-500x333.jpg

Crispy Piri Piri Wings

I decided fall and the arrival of football season were good enough reasons to think about wings that are decidedly man-friendly but also perfectly delectable for my girlfriends and I to munch on.  I didn’t want to diverge so far from hot wings, but wanted more flavor beyond simple, vinegar-y heat.  I wanted crisp without deep-frying (it’s a pain) and, because I like my couch to stay clean, wings that weren’t too-too saucy or messy.

“Piri piri” (sometimes peri peri or pili pili) is the Swahili reference for pepper, specifically the African bird’s-eye chili.  Piri piri sauce and dishes originated in Mozambique and Angola, ex-Portuguese colonies.  The peppers were brought to Africa by Portuguese traders and are a big part of Portuguese cuisine.  Piri piri can also be found in parts of West Africa, Cape Verde, South Africa, Southern India and Brazil.

African bird’s eyes have ridiculous heat, so I took it down a few notches using fresnos and cherry peppers.  These cherry peppers were actually pretty hot, so I only used one – you can use your own discretion and whatever red peppers you like for your heat tolerance here.  The marinade is fantastic, infusing incredible flavor into the chicken, and with a bit more acid can be used as a sauce by itself.

Dredging the chicken and basting it in the spiced butter results in an amazing crust with juicy, flavorful, tender chicken underneath.  Literally, the smell while they were cooking in the oven drove me (and my two dogs who were doing crazy circles) insane.  Crunchy, spicy, garlicky, salty with a cool contrast from the dollop of crème fraiche I served alongside.  Great for a party, a football game, or any night of the week…Enjoy!

Ingredients

Makes approximately 26 wings

Marinade:

2 lbs chicken wings, drummettes separated and tips reserved for another use

1 cherry pepper

2 fresno peppers

6 garlic cloves

½“ piece of ginger, peeled

1 small shallot

½ tsp salt

½ tsp black pepper

1 ½  tbsps brown sugar

handful of cilantro

juice of ½ a lime

2 tbsps vegetable oil

Coating:

1 ½ cups all-purpose flour

1 ½ tsps salt

½ tsp black pepper

2 tsps garlic powder

1 ½ tsps paprika

½ cup butter

Procedure

Place all of the marinade ingredients (except wings) in a food processor and process until pureed.  In a baking dish or nonreactive bowl, combine wings with the marinade so that all are completely coated.  Cover with plastic wrap and refrigerate for a minimum of 2 hours and up to 1 day in advance.

Preheat oven to 400° F.

In a resealable plastic bag, add flour, salt, pepper, garlic powder and paprika.  Seal and shake to combine.  Remove chicken wings from marinade, wiping off and reserving any excess marinade, and place in the plastic bag.  Seal bag and shake to coat.  Remove wings, shaking off any excess flour and place on a rack on a baking sheet.

In a small saucepan, heat butter with a few teaspoons of remaining marinade until completely melted.  Using a pastry brush, brush both sides of wings with spiced butter.  Bake (on the rack on a baking sheet) at 400° F for 30 minutes.  Lower temperature to 375° F, flip wings over, and bake another 20 minutes until golden and crispy.

Serve with a side of crème fraiche.

tags: wings, crispy wings, piri piri, hot wings, African bird's-eye chili
categories: all-6, appetizers, recipes
Monday 09.27.10
Posted by Aliya LeeKong
 

Sweet Apple Couscous

View fullsize couscous-pic1-500x333.jpg
View fullsize couscous-pic2-500x333.jpg
View fullsize couscous-pic3-500x333.jpg
View fullsize couscous-pic4-500x333.jpg

Sweet Apple Couscous

I sort of jumped the gun and went apple picking this past weekend.  I couldn’t help myself.  I’m a sucker for fall, the first cool change of temperature and all the apple picking, pumpkin patch wandering, and wine-tasting (I threw that in there…).  It’s a bit early in the season, so where I usually come back with several different varieties I ended up with who-knows-how-many pounds of Honeycrisps.  They are literally overflowing in my kitchen, so I’m pressed to find ways to use them up…Luckily, they are delicious, the perfect balance of sweet and tart, and hold up well to cooking.

Couscous, while a North African staple, has truly become popularized and is found throughout parts of France, Spain, Portugal, Italy, Eastern Europe, and across the Middle East.  Here, in the States, I’ve seen it creep onto dinner tables because of its incredible versatility and high nutritional content compared to rice and pasta.  North African cooking, particularly Moroccan, is full of sweet and savoury dishes – with spices like cardamom or cinnamon bridging the gap.  So couscous as a sweet side dish or a dessert does exist, though I surely haven’t seen any Berber recipes with apples…

For this dish, I was inspired by (obviously) the mass of apples in my kitchen, the sweet couscous recipes of North Africa involving dried fruits and nuts, and even the rice puddings of American and South Asian cultures (though this has no cream or milk).  This dish is extraordinarily simple, healthy and delicious.  It’s basically cooking a warm, buttery apple pie filling, folding it in to light, fluffy, sweetened couscous, and topping it with nutty, crunchy thin almond slices.  The textures are beautiful and who can resist the combination of apples and cinnamon.  A great fall dish… enjoy!

Ingredients

Serves 4 to 6

2-3 tbsps butter

5 cups apples, peeled, cored, and cut into a small/medium dice

½ cup brown sugar

¾ tsp cinnamon

¼ tsp nutmeg

¼ tsp salt

½ tsp vanilla extract

2 cups couscous*

2 cups water

3 tbsps butter

1/3 cup sugar

½ tsp salt

½ cup sliced almonds, toasted

Procedure

Place a skillet on the stove over medium heat and melt the butter.  When the foam subsides, add the diced apples and stir to coat.  Turn temperature slightly down and cook on medium-low heat for 10 minutes, stirring every few minutes to make sure the apples evenly cook.  Add brown sugar, cinnamon, nutmeg, salt, and vanilla to the apples and stir to coat.  Cook for another 5 minutes.  The apples should be soft but still hold their shape (not complete mush).

In a casserole dish, spread couscous out to an even layer.  Cooking it in this type of dish will increase surface area and keep the resulting texture light and fluffy.  In a saucepan, bring water, butter, sugar and salt to a boil.  Pour over couscous, stir briefly with a fork, cover tightly with plastic wrap, and let sit 5 minutes.  After the 5 minutes, remove the plastic wrap and fluff couscous with a fork – the butter should keep the grains separate and prevent any clumping.

In the same dish or another serving bowl, mix together the couscous with the apple mixture and top with the toasted sliced almonds.  Serve warm.

*I used the typical, plain, non-whole wheat, pre-steamed variety from the grocery store.  Be careful not to use the tri-color type, which has spinach and tomato flavoring, or Israeli couscous, which is larger and requires a longer cooking time.

tags: couscous, sweet couscous, apple couscous, recipes for fall, apple recipes
categories: all-6, desserts-1, side dishes, vegetarian, recipes, breakfast
Wednesday 09.22.10
Posted by Aliya LeeKong
 

Tunisian Bread Salad

View fullsize bread-salad-pic1-500x333.jpg
View fullsize Bread-salad-pic2-500x333.jpg
View fullsize bread-salad-pic3-500x333.jpg

Tunisian Bread Salad

I am completely in love with the concept of “bread salad”.  It feels like cheating.  Like you have this healthy bunch of vegetables and you just make them so much tastier by adding chunks of rustic bread that soak up all the lovely dressing.  But you still feel healthy doing it because you call it a salad.  I am famous for taking leftover cornbread and making a cornbread-bread salad with honey balsamic dressing.  And sometimes I even throw in a few vegetables too.

Most people know about panzanella or Tuscan bread salad, which is made from crusty Italian bread mixed with tomatoes, red onions, cucumbers and basil.  Delicious.  But Tunisian bread salad or even Mediterranean bread salad (similar) is less well known and equally (if not slightly more…) tasty.  You take beautiful seasonal vegetables – eggplant, peppers, tomatoes – and roast them off with some aromatics.  Mix those in with olives, herbs, capers, fresh cheese, and chunks of stale bread and toss with a delicious, harissa dressing and you have a beautiful, alternative, light and flavorful, bread salad.

This is a fantastic way to use up old bread (or so we all tell ourselves…).  But I’ve actually seen this as a roasted vegetable salad on its own, so if no bread is at hand or you want to be even healthier, you can leave it out and still have a delectable salad.  Store-bought harissa is fine, but I would suggest making your own like I do in my homemade harissa recipe; it’s cheaper, fresher, and healthier without the preservatives.

I love harissa in a salad dressing, and my dressing here has honey and harissa which, by the way, is a fantastic combination – I like to just slather the two on bread as a crostini or as an hors d’oeuvre to spruce up a weeknight dinner.  In any case, this salad is bright, flavorful and beautiful – great for entertaining.  Enjoy!

Ingredients

Yields 4 to 6 servings

Salad:

1 eggplant, cut into a medium (bite-sized) dice

1 red bell pepper, cut into a medium (bite-sized) dice

1 yellow bell pepper, cut into a medium (bite-sized) dice

8 oz mini sweet or cherry tomatoes

3 small shallots, quartered

3 or 4 whole garlic cloves

Olive oil

Salt & freshly ground black pepper

¼ cup niçoise olives, pitted

A generous handful of fresh mint, roughly chopped

A generous handful of fresh cilantro, roughly chopped

1 day-old round loaf of bread or whatever rustic bread you have on hand, cut into medium-sized cubes*

Garnish:

Fresh cheese (feta, goat or bocconcini will do), torn or crumbled into small pieces

2 tsps capers, rinsed and drained

1 or 2 hard-boiled eggs, quartered

Dressing:

¼ cup rice vinegar

1 tbsp harissa**

1 ½ tbsps honey

¼ cup extra virgin olive oil

Procedure

Preheat oven to 400° F.

In a bowl, toss together eggplant, bell peppers, tomatoes, shallots and garlic with olive oil, salt and pepper to coat.  On a baking sheet, arrange vegetables in a single layer.  Roast for 25 minutes until lightly browned.

For the dressing, whisk together the rice vinegar, harissa and honey in a bowl.  Drizzle in extra virgin olive oil, whisking to incorporate.

Using a slotted spoon, transfer roasted vegetables to a large bowl.  Add olives, herbs, and bread and toss with dressing.  Garnish with cheese, capers, and hard-boiled eggs.

*If you have fresh bread, just put the cubes of bread on a baking sheet, drizzle with olive oil, and bake at 350° F until lightly browned.  You just want it to be crisp enough to stand up to the salad dressing and not turn to mush.

**For harissa you can use my version here or use the store-bought kind.

tags: bread salad, Tunisian cooking, harissa, vegetarian sides, recipes for entertaining
categories: all-6, side dishes, recipes, salads, vegetarian-1, soups & salads
Monday 09.20.10
Posted by Aliya LeeKong
 

Exotic Fried Green Tomatoes

View fullsize tomato-pic1-500x333.jpg
View fullsize tomato-pic2-500x333.jpg
View fullsize tomato-pic3-500x166.jpg

Exotic Fried Green Tomatoes

A friend of mine has a farm in upstate New York, and he generously dropped off a CSA-like box of his vegetables – tomatoes, green peppers, cucumbers, celery, and parsley (more pics on my FB page).   There were a ton of tomatoes, and he suggested ripening them by placing them on a sunny windowsill.  I thought I would reserve a few of the green ones to recreate classic, Southern fried green tomatoes.

So, interestingly enough, although green tomatoes are known as a Southern specialty, they do pop up in other cultures.  They can be found throughout the Mediterranean; Italy, Greece, Turkey – all have their versions.  I’ve seen green tomato pickles, green tomato sauces for pasta, delicious cold soups, and beautiful casserole dishes with green and red tomatoes.

For my fried green tomatoes, I like to crush up some pistachios with panko bread crumbs for the crust in place of traditional cornmeal.  It gives a nutty bite and a hint of sweetness that works well with the acidity of the green tomatoes.  You can stop right there after frying in the recipe if you like – they taste lovely just like that.  But I took it a step further and chopped up a bunch of herbs, mixed them up with shredded mozzarella, and baked them to bubbly, cheesy perfection.  You can, of course, use whatever herbs you like – any combination of chives, parsley, mint, thyme, and even oregano would be fantastic.  Enjoy!

Ingredients

Yields 4 to 6 servings

4 medium, firm green tomatoes

½ cup shelled pistachios

1 ½ cups panko bread crumbs

2 tsps garlic powder

1 tsp onion powder

½ tsp cayenne

½ tsp black pepper

½ tsp salt

¾ cup buttermilk

Canola or olive oil

1 tbsp butter

2 tbsps chopped herbs (I used chives, parsley & mint)

1 cup low-moisture shredded mozzarella*

Preheat the oven to 400° F.

Trim the ends off of the tomatoes, and cut into 1/4 “ slices.  In the food processor, pulse pistachios, until they are almost a coarse meal.  Add bread crumbs, garlic powder, onion powder, cayenne, black pepper, and salt and pulse until the mixture looks like a fine crumb.  Pour breading mixture into a bowl or baking dish.

Pour buttermilk into a separate bowl.  Dip tomato slices in the buttermilk and then dredge in the breading mixture.  Pat the breading mixture on to create an even coat that sticks.  Place on a rack on a baking sheet.

Heat a ½“ of oil with butter over medium-high heat in a Dutch oven or cast iron skillet.  Fry tomatoes in batches for 1 to 2 minutes on each side.  Place back on the rack over the baking sheet.

In a bowl, combine chopped herbs and mozzarella.  Sprinkle over fried tomato slices and bake in the oven for 5 to 7 minutes until the cheese is melted and bubbly.  Serve immediately.

*I used low-moisture, shredded mozzarella in place of slices of buffalo mozzarella here in order to keep the tomatoes crispy.


tags: fried green tomatoes, recipes for summer, recipes for fall
categories: all-6, appetizers, recipes, vegetarian-1, side dishes
Wednesday 09.15.10
Posted by Aliya LeeKong
 

Pomegranate-Rose Milk Pudding

View fullsize pom-pudding-pic1-500x333.gif
View fullsize pom-pudding-pic2-500x166.jpg
View fullsize pom-pudding-pic3a-500x166.jpg
View fullsize pom-pudding-pic3-500x333.jpg

Pomegranate-Rose Milk Pudding

A few weeks back, I read two separate articles that helped inspire this dish.  One discussed Sephardic culinary traditions that originated in North Africa, and the other addressed using rose water in modern cooking.  Milk pudding thickened with rice flour, and often scented with rose water, is a traditional North African and Middle Eastern dish called malabi (in Israel), sutlage (in Turkey and the Balkans) or muhallabeya (in North Africa and rest of the Middle East).  With the Jewish New Year passing and Yom Kippur coming up, I thought this could be a beautiful, sweet dish for the Break Fast meal.

Before starting this dish, I decided to dig a bit deeper and chatted with a friend of mine whose family comes from Sephardic culture, and she clued me in on a few things.  First, her family eats something sweet immediately after the fast to get their blood sugar up.  She also said her family clears the table after, so a dish like this, which has dairy, is totally fine.  For a parve version, coconut milk (regular, lite or even half diluted with water) would work well as a substitute for milk.

But it was the symbolism I found even more interesting.  Pomegranates have special significance because the number of seeds in the fruit corresponds with the mitzvots, or commandments of the Torah.  Fascinating!  Also, I plated these in individual, circular bowls to signify the full circle of the coming year, another symbolic gesture.

After all of the importance, the taste just seems secondary…but thank goodness because it is tasty!  The fruity tartness of the pomegranate is offset by the sweet milk and the vanilla notes, and the rose comes later…almost like you are smelling it rather than tasting it.  I love sprinkling the pomegranate arils on top for a juicy crunch to offset the texture of the pudding.  This is delicious regardless of time of year!  Enjoy…

Ingredients

Yields 4 to 6 servings

3 pomegranates, juiced, or 3/4 cup unsweetened pomegranate juice*

½ cup rice flour

4 cups milk

½ cup + 2 tbsps sugar

½ tsp vanilla extract

1 ½ tbsps rosewater

½ tsp salt

1 tbsp pomegranate molasses (optional)

Procedure

Place a medium-sized bowl over a pot of simmering water (not touching the water and at a medium heat) or use a double-boiler for this recipe.

In a small bowl, add the rice flour to the pomegranate juice in increments, whisking until thoroughly combined.  You don’t want any lumps.

Heat the milk in the top of the double boiler.  You should see bubbles around the edges, but the milk shouldn’t be boiling.  Add pomegranate juice with rice flour, sugar, vanilla extract, rosewater, salt, and pomegranate molasses if using.  Cook for 15 to 20 minutes until thickened.

Again, there shouldn’t be any lumps, so blend with a hand blender if you happen to have a few.  Ladle into serving cups or one large bowl and chill in the refrigerator for 4 to 5 hours.

Serve garnished with pomegranate arils.

*For the recipe, I seeded (messily…) 3 pomegranates, blended the arils, and strained out the juice.  You can more easily do this in a juicer if you have one.  If using bottled pomegranate juice, it’s definitely more concentrated than juicing the fruit, so I wouldn’t add the optional pomegranate molasses.  Also, be careful of the sweetness if the pomegranate juice has added sugars…

tags: pomegranate, milk pudding, Yom Kippur recipes, pudding, sweet pudding, pomegranate-rose, rosewater
categories: all-6, breakfast, desserts-1, recipes
Monday 09.13.10
Posted by Aliya LeeKong
 

Warm Ethiopian Steak Tartare

View fullsize kitfo-pic1-500x333.jpg
View fullsize kitfo-pic-2-500x170.jpg
View fullsize kitfo-pic3-500x333.jpg

Warm Ethiopian Steak Tartare

When I go out to eat, typically, my eyes are way bigger than my stomach.  I have to control my (over)ordering and have this mildly obsessive habit of going through each menu item and doing a process of elimination. It’s never about what I want to eat, but rather, what I DON’T want to eat…Steak tartare almost never makes the cut.  It always seems like a bland caloric waste when there are other tastier options to choose from.  That is, until I tasted kitfo.

Kitfo happens to be one of Ethiopia’s most popular dishes.  It’s a steak tartare that has been warmed in butter infused with a bunch of spices – amazing.  It’s typically served with the country’s famous flatbread, injera, and a side of spiced collards.  The first time I tried it, I was in sensory overload.  The warm creaminess of the butter, the texture of the meat, the strong heat hitting me at the back of my tongue, the spice combo – it was, by far, the most delicious and unexpected steak tartare I had ever had.

For my version, I used top round from Dickson Farmstand Meats.  All of their beef is dry-aged, all natural, humanely raised – basically fantastic quality.  For working with a raw product like this, I wanted to make sure I was using a high quality source.  They coarse ground the top round for me, and I would never advise using ground beef for a raw application.  Ground beef has a higher bacterial count; you’re better off using a steak you’d feel comfortable eating rare and grinding as close to consumption as possible.  I chose top round over sirloin or tenderloin because it keeps a great texture.  It stays a bit toothsome and doesn’t become mushy, which I can’t stand.

This dish is extremely easy to make, and there are limited ingredients.  So it’s important to develop the flavors.  Mine differs from authentic kitfo with the addition of shallots and garlic and because I like to toast up the spices first in the butter. Browning the butter, making beurre noisette, adds even greater complexity.  I typically serve this on a sliced baguette sprinkled with chives, but it would be equally delicious on toast or pita points.  Oh, and Ethiopians eat the tartare several different ways –t’ire (raw) or leb leb (medium rare) and sometimes cooked further, so go ahead and cook to your preference.  Enjoy!

Ingredients

Yields 4 to 6 servings

1 stick butter

¼ tsp cardamom, ground

½ tsp black pepper, finely ground

1 ½ tsps cayenne pepper, ground

1 shallot, minced

2 garlic cloves, minced

1 lb top round, freshly ground to your desired texture

Salt to taste

Chives, minced

Procedure

Let the beef come to room temperature.  Adding it to the pot cold brings down the temperature of the butter and would necessitate reheating, which could then overcook the beef.

Heat butter on low-medium heat.  When it melts add the cardamom, black pepper, and cayenne pepper.  Cook stirring for a few minutes and notice how the smell becomes nuttier.  Add the shallots and garlic and cook another few minutes until softened.  Butter should brown, and this is actually desired.  Crank the heat a little if it hasn’t.

Let the butter cool slightly.  You should be able to dip your finger in the pot without burning yourself.  Add beef and stir to combine thoroughly.  You don’t want to cook the meat (if serving rare), just warm through, so make sure the heat is off.  Add salt to taste and serve sprinkled with chives.  You won’t be disappointed.

tags: steak tartare recipes, Ethiopian cooking, tartare recipes, kitfo
categories: appetizers, recipes, all-6
Thursday 09.09.10
Posted by Aliya LeeKong
 

Smoky Spicy Corn Pudding

View fullsize corn-pudding-pic1-500x268.jpg
View fullsize corn-pudding-pic2-500x333.jpg
View fullsize corn-pudding-pic3-500x171.jpg

Smoky Spicy Corn Pudding

Seriously.  I had a somewhat interesting story for how I came up with this recipe, but I keep going to the fridge and sticking a fresh spoon into this now cold, smoky, spicy corn pudding and taking a bite.  Then, tossing the spoon into the sink to prevent a second bite.  I’m hedging because I don’t want to admittedly portion a piece out, heat it up and eat it (after the three helpings I had last night), but I seriously can’t help myself.  It is that tasty…even cold and semi-solid in the fridge.

Growing up in Florida (yes, it’s still the South!), I developed such a weakness for southern food, and corn pudding, itself, is classic, southern comfort food at its best.  And I know I did some corn fritters not too long ago and repeating corn might be a sin, but it’s such a seasonal staple in my house.  and this is just too good not to share.

There are tons of variations and no real right way to make corn pudding, but I prefer this method because it stays creamy, sweet, with a caramelized top, and it still cuts easily without being bread-like.  I mention the combo of mustard seeds and curry leaves in a previous post, and this marries incredibly well with the spiciness from the peppers, the sweet tang of the sundried tomatoes, and the deep, lovely smokiness from the mozzarella.  I wanted smokiness without bacon-y flavor (for once), and the result here is divine.  I’m likely making this for Thanksgiving this year, which is always a cultural trip!  Enjoy!

Ingredients

Yields 1 2-quart baking dish

4 to 6 medium ears of corn (you want 3 ½ cups of the kernels), husks and silk removed

olive oil

salt & pepper

1 tbsp canola or vegetable oil

2 tbsps butter

1 ½ tbsps brown mustard seeds

10 curry leaves

2 shallots, finely chopped

1 red cherry, fresno or jalapeno pepper, minced (seeded and ribbed only if you can’t take the heat!)

3 garlic cloves, minced

1 tbsp finely chopped sundried tomatoes (either packed in oil or rehydrated)

¼ cup all-purpose flour

3 eggs

2 cups heavy cream

a couple dashes of Tabasco

1 ¼ tsp salt

½ tsp black pepper

1 ¼ cups grated smoked mozzarella

¼ cup sliced green onions, dark and light green parts only

Procedure

The first step of this dish is roasting or grilling the corn.  Brush the corn with olive oil and season with salt and pepper.  Place cobs on a hot grill or a grill pan and cook for 20 minutes, rotating every few minutes to cook all sides.  If you don’t have a grill, you can place the seasoned corn on a baking sheet under the broiler for the same amount of time (still rotating).  Let cool slightly, cut the kernels from the cobs, and reserve kernels in a separate bowl.

Preheat the oven to 350° F.

In a medium skillet, heat oil and butter on medium-high heat.  Once foam subsides, add mustard seeds and curry leaves.  Once the seeds start to sputter and pop, lower the heat to medium-low and add shallots, peppers and a pinch of salt.  Cook for a few minutes until shallots are translucent.  Add garlic and cook 30 seconds until fragrant.  Add sundried tomatoes, corn kernels, and flour and stir to coat.  Cook for another 30 seconds, stirring.  Remove from heat and transfer to a large bowl.

In a separate bowl, beat together eggs, cream, Tabasco, salt, and pepper.  Add this along with the grated smoked mozzarella and the green onions to the corn mixture and combine thoroughly.  Transfer to a greased 2-quart baking dish and bake for 50 minutes or until an inserted knife comes out clean.

Let cool slightly before serving.

tags: corn pudding, southern food, comfort food, southern comfort food, spicy corn pudding
categories: side dishes, recipes, all-6, vegetarian-1
Tuesday 09.07.10
Posted by Aliya LeeKong
 

Squash Blossom Dolmas

View fullsize Squash-pic1-500x333.jpg
View fullsize Squash-pic2-500x333.jpg
View fullsize Squash-pic3-500x333.jpg
View fullsize Squash-pic4-500x169.jpg

Squash Blossom Dolmas

What is a “dolma” you might be asking?  A dolma is any number of stuffed vegetables – squash, onions, peppers, tomatoes, leafy greens or even eggplants.  It’s a tradition of the Ottoman Empire found throughout Greece, Turkey, the rest of the Mediterranean and the Middle East.  Think grape leaves, which are one of the more recognizable forms, found at the late-night gyro spot (is that just me??).  The stuffing is usually rice and/or lamb with nuts, dried fruits, spices and herbs.  When in a small form like a grape leaf or like these, they are pretty snackable.

I picked up some beautiful, delicate squash blossoms from the farmer’s market and was debating what to do with them.  They have a bit of that elusive, squash-like flavor and are visually captivating.  I’ve seen squash blossoms everywhere fried – tempura-fried, stuffed and fried, lightly batter fried.  And, yes, they do taste delicious fried.  That said, I wanted a bit of crunch but without the headache (and fattiness) of frying.  Making a squash blossom dolma, stuffed with a subtle, flavorful rice mixture and baked to lightly-crisped perfection, was the answer.

I must say the spices are pretty light here, which adds to the delicate nature of this dish.  For that reason, I like to be generous with the herbs because they lend such brightness to the dolmas.  These make a lovely (and conversation-provoking I can assure you) party appetizer, served alongside a dill-yogurt-dipping sauce.  They taste best warm though – once they cool, they lose a bit of their edge.  Also, this stuffing is pretty universal – if no squash blossoms are on hand, you could easily stuff peppers or blanched, swiss chard leaves with this.  Enjoy!

Ingredients

Yields 4 servings as a side or an appetizer

16 Squash blossoms, stems trimmed and stamens removed

2 tbsps butter

1 shallot, minced

¼ fennel bulb, minced

½ tsp ground coriander

¼ tsp ground cinnamon

pinch of ground cloves

2 garlic cloves, minced

½ cup white rice (jasmine or basmati are both fantastic)

¾ cup water or vegetable stock

1 ½ tbsps chopped, toasted pine nuts

½ tsp lemon zest

a generous handful of mint & dill, finely chopped

salt & freshly ground pepper

melted butter for greasing

Procedure

Preheat the oven to 400° F.

Rinse the squash blossoms gently and leave to dry fully in a colander or over paper towels while preparing the stuffing.

In a small saucepan, heat butter.  When foam subsides, add shallot, fennel, coriander, cinnamon and clove.  Sauté for a few minutes until shallots are translucent (will happen quickly because of how finely chopped they are).  Add garlic and sauté another 30 seconds or so until the garlic becomes fragrant.

Add rice and let toast with the butter and vegetables, stirring frequently.  Add water or vegetable stock and increase temperature.  Bring up to a boil, lower to a simmer, and cook covered for 20-25 minutes.   When rice is cooked, fluff with a fork, add pine nuts, lemon zest, chopped herbs, and salt and pepper to taste.

Carefully, stuff the squash blossoms with the rice mixture using a small spoon or even a melon baller.  Don’t overfill – allow the ends of the flowers to close.  Transfer to a greased baking sheet and drizzle with a little melted butter.  Season with a few pinches of salt, and bake for 15 minutes.  The outside should brown and be a bit crispy.  Serve warm!

tags: squash blossoms, dolmas, squash blossom recipes, recipes for summer
categories: appetizers, recipes, vegetarian-1, all-7
Thursday 08.26.10
Posted by Aliya LeeKong
 

Deadly Cape Malva Pudding

View fullsize malva-pic1-500x333.jpg
View fullsize Malva-pic2-500x333.jpg
View fullsize malva-pic3-500x333.jpg
View fullsize Malva-pic3-rev-500x168.jpg

Deadly Cape Malva Pudding

In a previous post on luscious bobotie, I mentioned some fun cooking I did while travelling around South Africa and a dessert I had there, Cape Malva pudding.  When Americans think pudding, it’s usually the sweet, cornstarch-thickened milk kind or, more often, the Jell-O sort.  But, historically, puddings are sweet or savoury and actually take a more solid form (like a Yorkshire or even a bread pudding).  In Europe or in places where Europeans migrated, these sorts of puddings are really popular, and this one is Dutch in origin, brought to South Africa sometime after the Dutch East India Company established Cape Town in the 1600’s.

At some point during try # 572 (exaggeration but it took me fooorever to create a recipe that I was 100% happy with), I was texting with a girlfriend who spent some time modeling in South Africa.  She’s always interesting to talk to because she was born in Somalia, spent the early part of her life in Kenya, and then grew up in Seattle.  She has travelled all over the world, and unlike the rest of us, can eat things like Malva pudding and still stay thin enough to model!  Anyway, when I mentioned that I was making it, she wrote back one word: DEADLY.  Can’t wait until she comes to New York in a few weeks so I can attempt to fatten her up with this…:)

This dessert is, indeed, deadly, the type that gets even better the next day.  The result is slightly spongy, super moist and buttery, with an amazing caramelized exterior.  The sauce is thin and meant to be poured over the pudding to soak in and give it added moisture and flavor.  I used brandy in my sauce, but Amarula would be fantastic here.  The sauce can easily be made as is without the alcohol if you’re serving this to kids, and it’s still lovely.  Malva pudding is typically served in the Cape warm and with a side of custard (as if it needs anything else!).  Devonshire cream, mascarpone, whipped cream, or even ice cream are the perfect accompaniments.  Delicious.  Enjoy!

Ingredients

Yields 1 10-12 cup Bundt or ring-shaped cake pan

Pudding:

1 ½ cups flour

1 ½ tbsps baking soda

2 tsps baking powder

3/4 tsp salt

3 tbsps butter, softened at room temperature

1 ½ cups sugar

4 eggs, room temperature

2 tbsps red wine vinegar, room temperature

3 ½ tbsps apricot jam, room temperature

2 tsps vanilla extract

1 ½ cups milk, room temperature

Sauce:

¾ cup fresh cream

½ cup sugar

½ stick butter

1/3 cup water

1 tsp vanilla extract

1 – 2 tbsps brandy (whatever works for your tipsy scale)

Procedure

Preheat the oven to 350° F.

In a bowl, sift together the flour, baking soda, baking powder and salt.  Set aside.

All ingredients should be at room temperature.  In a stand mixer with a paddle attachment, cream together butter and sugar.  With the mixer still running, add eggs one at a time.  Once incorporated, add vinegar, apricot jam, and vanilla extract.  With the mixer on low, add one third of the flour mixture and then one third of the milk.  Repeat process two more times.

At this point, I stop the mixer and scrape down the sides.  Then, I turn it back on long enough to make sure that all of the flour is incorporated.  You don’t want to over mix and develop the glutens in the flour, but you do want to make sure that there are no dry spots in the mixture.

Pour into a heavily greased and well-floured Bundt, or other ring-shaped pan (single piece – no detachments – and preferably non-stick) or baking dish of your choice.  It should come up a little over halfway the size of the dish as it will rise significantly.  Bake at 350° F for 45 minutes, longer if needed – until an inserted cake tester or toothpick comes out clean.  The outside should be well caramelized.

For the sauce, simply heat all of the ingredients in a small saucepan, whisking to make sure all of the sugar is dissolved.  Keep warm until you are ready to pour.  If you let this sit too long, a skin will form on top.  If this happens, just strain before pouring.

If you are unmolding the pudding, cool for about 15 minutes, run a knife around the edge if necessary and turn onto a plate.  Poke holes all over the pudding with a knife or a skewer, and slowly pour or spoon the sauce over all sides.  You want the sauce to soak in everywhere.  If you pour too quickly, the sauce will just pool and will make only the bottom part of the pudding moist.

If you are not unmolding, simply poke holes all over and pour the sauce right in.

tags: cape malva pudding, South African food, South African cooking, South African recipes
categories: breads & cakes, recipes, desserts-1, all-7
Monday 08.23.10
Posted by Aliya LeeKong
 

Black Salt 'Slaw

View fullsize slaw-pic1-500x333.jpg
View fullsize slaw-pic-2-500x358.jpg
View fullsize Slaw-pic3-500x333.jpg
View fullsize slaw-pic4-500x333.jpg

Black Salt 'Slaw

I grew up in a suburb in Florida, and, although there was a pretty large Indo-Pakistani community, the resources were very spread out.  That is to say, there was no central area to find food (think Adam’s Morgan in D.C. or Curry Hill in NYC), and there were maybe one or two good Indian grocers selling everything from spices to Indian sweets to household goods.

I used to love visiting my family in Toronto, an incredibly ethnically diverse city.  There are West Indian neighborhoods, Indian areas, Chinese, Philipino, Latin American – all distinct areas.   Ambling down Gerard Street, one of those streets that literally transport you into a different country, you can find row after row of Indian restaurants and shops– clothing, groceries, dvd’s, jewelers…you name it.

One of my favorite parts about the trip (because I can assure you shopping for clothes with the women in my family is nothing short of arduous) was visiting the various chaat houses.  Chaat is a general term and includes any Indian snacks that have puris, puffed rice, fried noodles or dumplings with potatoes, lentils, chickpeas or even mung bean, all doused in spicy, tart, tangy sauces.  “Junk food”, we’d call it.  I would devour these chaats and wash it all down with falooda (which I mentioned in my sugar plum post and which I will have to make at some point); it’s really what got me through these shopping trips.

Tamarind, cilantro, chilies, onions, and yoghurt were all featured heavily in these dishes, but it was the spice mix, the chaat masala, that really made them distinct.  Chaat masala includes a staggering number of spices, but one flavor that stands out from them all is black salt.  Black salt, or Kala Namak, is a grayish rock salt, and it, quite frankly, has a smell similar to eggs.  It has a sulphurous quality, and, although that may not sound too appealing, I assure you once mixed in it is delicious!

I thought I would make a ‘slaw for the summer that focuses on black salt.  I served it here over a beautiful, simple, grilled swordfish, but it would also be delicious with yesterday’s ribs.  The chili powder gives it a little heat, the honey sweetness, and it definitely has the tart and tangy quality of the chaats I remember as a child.  Enjoy!

Ingredients

Yields 6 to 8 Servings

For the dressing:

½ cup red wine vinegar

2 garlic cloves, minced

3 tbsps honey

3 tsps black salt

½ tsp salt, kosher or sea

½ tsp Indian chili powder or hot Hungarian paprika

½ tsp finely ground black pepper

I roughly ground the toasted seeds)

For the slaw:

½ head green cabbage

½ head red cabbage

1 or 2 carrots, julienned or shredded

1 bulb fennel, thinly sliced

2 green onions, thinly sliced (white and green parts only)

Procedure

This is super simple as most coleslaws are.  I like to combine all of the dressing ingredients, and let them marinate while I’m prepping the vegetables.

For the cabbages, wash thoroughly and remove the core.  You can either slice manually or use the slicer in your food processor to achieve the right sized pieces.  Combine with the carrots, fennel and green onions in a non-reactive bowl.

Pour the dressing over the vegetables, and keep refrigerated for 2 hours or so.  I like to toss the coleslaw every half hour  to make sure any dressing that has sunk to the bottom gets fully mixed in.  The flavors are much brighter when you let them sink in for a few hours.

tags: Black Salt, 'slaw, recipes for summer
categories: side dishes, recipes, vegetarian-1, all-7, soups & salads
Wednesday 08.18.10
Posted by Aliya LeeKong
 

Baby Back Ribs with Pomegranate Molasses

View fullsize ribs-pic1-500x333.jpg
View fullsize ribs-pic2-500x333.jpg
View fullsize ribs-pic3-500x333.jpg

Baby Back Ribs with Pomegranate Molasses

So first, I’m going to apologize.  I love taking all of the pictures for the site, and I take a lot of care in trying to bring un-stylized, real pictures that showcase what the food’s all about.  I was so looking forward to the moment I pulled these tender ribs from the broiler and took the money shot:  a whole rack of ribs, glistening and shiny, caramelized from the bbq sauce.  I couldn’t wait to post it.

Unfortunately for the photos (but not the deliciousness…), the ribs were literally so tender they fell apart!  I ended up with a mouth-watering, caramelized, heap of ribs that required only a fork (but mostly my fingers).  I legitimately ate half a rack before I even took the finished picture…

Pomegranate molasses is one of those essential ingredients in Mediterranean and Middle Eastern cooking.  It’s really just pomegranates that have been cooked down in sugar, water, and maybe a bit of lemon juice to form a syrupy concentrate.  It’s absolutely delicious in both sweet and savoury applications.  Mixed with a bit of sparkling water, it’s a refreshing drink.  It can be used in cakes, cookies, mousses, anything.  And, also, makes a lovely ingredient for sauces – would go incredibly well with duck and made a really killer bbq sauce here.

It sounds a bit scary, but I wrapped these guys up in plastic wrap and then covered them with foil, cooking them in the oven for about 4 hours at 250° F.  A bit of at-home-not-so-sous-vide.  But that’s what made them the most tender ribs I’ve ever made.  Who needs a grill in a NYC apartment!  The pomegranate molasses adds a tart and fruity kick to a really easy bbq sauce and tastes delicious with the dry-rubbed, juicy, falling-off-the-bone ribs.  Enjoy!

Ingredients

Yields 4 to 6 servings

2 whole racks baby back ribs (approximately, 5 lbs)

Dry Rub:

1 tbsp dried thyme

2 tsps ground coriander

1 ½ tbsps garlic powder

1 ½ tbsps onion powder

1 tsp cinnamon

2 tsps Spanish paprika (pimentón)

2 tsps hot Hungarian paprika

1 tsp black pepper

1 tbsp salt

1 ½ tbsps packed light brown sugar

BBQ Sauce:

3 tbsps butter

2 shallots, fine dice

4 garlic cloves, minced

1 ½ cups ketchup

¾ cup water

¼ cup red wine vinegar

3 tbsps light brown sugar

4 ½ tbsps pomegranate molasses

½ tbsp lemon juice

¾ tbsp Worcestershire sauce

¾ tsp cayenne

1 ½ tsps Dijon mustard

Procedure

In a bowl, combine all of the dry rub ingredients and mix well.

Tear two pieces of foil large enough to wrap around each rack of ribs, and place shiny side down on a surface.  Tear equal-sized pieces of plastic wrap, and place on top of the foil sheets.  Pat dry the ribs, and place each rack on the plastic wrap.  Sprinkle both sides of the ribs generously with the dry rub, and pat the dry rub into the meat.  Wrap tightly in the plastic wrap, followed by the foil.  Refrigerate the ribs for a minimum of 1 hour and up to 1 day in advance.

Preheat the oven to 250° F.  Let the ribs come up to room temperature (very important!).  Place the foil and plastic-wrapped ribs on baking sheets on the middle rack in the oven, and cook for 4 hours.  Remove, and let cool briefly.

In a saucepan, melt the butter over medium heat.  Add the shallots and garlic, and sauté for a few minutes until the shallots are translucent.  Add the rest of the sauce ingredients, lower the heat to a simmer, and cook stirring frequently for about 20 minutes.

Turn the oven temperature up to broil.  Carefully remove the ribs from the foil and plastic wrap and pour off any accumulated juices.  Place back on the backing sheet, baste with the bbq sauce, and broil for 5 to 7 minutes until caramelized.

tags: baby back ribs, pomegranate molasses
categories: recipes, main dishes-1, all-7
Tuesday 08.17.10
Posted by Aliya LeeKong
 

Crunchy Coconut Corn Fritters

View fullsize corn-fritters-pic1-500x333.jpg
View fullsize Corn-Fritter-Pic2-500x333.jpg
View fullsize Corn-Fritters-Pic3-500x166.jpg
View fullsize corn-fritters-pic4-500x333.jpg

Crunchy Coconut Corn Fritters

The combination of corn and coconut is something that will always remind me of childhood.  One of my favorite East African dishes growing up is called makai paka. It’s basically sweet corn on the cob simmered in a creamy, coconut-based broth with turmeric, garlic, green chilies, and cilantro.  The fun was in eating the corncobs; you could suck out the spicy coconut curry absorbed into the cobs, making ridiculous slurping noises.  Not something I can quite get away with these days…

Corn seems like a New World food, but it was brought to the African continent by the Portuguese in the sixteenth century.  Whether in South African mealies, West African maïs grille (basically grilled corn), or East Africa’s ugali, corn figures prominently.  In Ghana, the coconut/corn combo pops back up in a dish called abrow ne kokosi, where corn kernels are simmered in coconut milk with fresh pieces of coconut flesh.  Delicious.

I wanted to see the combo in a more familiar form, something easy to eat or serve as a snack to guests.  These fritters come out surprisingly light, not overpoweringly coconut-ey, and have a sweet and savoury quality to them.  With all of the beautiful summer corn, it’s also a great way to use up any leftovers you might have sitting around.  The fritters work really well with a cilantro aioli or even a spicy ketchup dipping sauce.  Enjoy!

Ingredients

Yields approximately 2 dozen fritters

1 cup all purpose flour

1 tsp baking powder

½ tsp salt

½ tsp sugar

½ tsp cayenne

1 egg

½ cup coconut milk

a few dashes of hot sauce

1 ½ tbsps butter, melted

1 ¼ cups fresh corn kernels (about 2 ears)

1 cup frozen, grated unsweetened coconut, thawed

¼ cup scallions, thinly sliced

1 tbsp green chilies, finely minced (optional)

salt

Procedure

In a bowl, sift together flour, baking powder, salt, sugar, and cayenne.  In another bowl, beat together egg, coconut milk, hot sauce, and butter.  Add wet ingredients to dry ingredients and mix until it comes together.  Don’t overmix.  Fold in remaining ingredients.

In a large heavy saucepan, dutch oven, or deepfryer, heat about 4 inches of vegetable oil to 325° F.    Carefully, drop spoonfuls of the batter and cook until golden brown, working in batches.  Remove to a towel-lined plate and sprinkle with salt.

A few things: (1) don’t overcrowd because it will bring the oil temperature too far down, and (2) be careful – it splatters when cooking.

Serve warm with a dipping sauce of your choice…

tags: corn fritters, coconut fritters, recipes for summer, corn recipes, savoury fritters
categories: all-7, appetizers, recipes, vegetarian-1
Wednesday 08.11.10
Posted by Aliya LeeKong
 
Newer / Older