X

Sign up to receive exclusive recipes, tips, updates and other goodies from Aliya!

  • Home
  • Blog
    • All
    • Recipes
    • Spices + Ingredients
    • Lifestyle, etc.
    • Travel
  • The Cookbook
  • The App
  • Media
    • All Media
    • Video
  • About
  • Passions
Aliya LeeKong
  • Home
  • Blog
    • All
    • Recipes
    • Spices + Ingredients
    • Lifestyle, etc.
    • Travel
  • The Cookbook
  • The App
  • Media
    • All Media
    • Video
  • About
  • Passions

Savoury Blue Cheese Kunefe

View fullsize kunefe-pic1-500x273.jpg
View fullsize kunefe-pic2-500x333.jpg
View fullsize kunefe-pic3-500x333.jpg

Savoury Blue Cheese Kunefe

This dessert I had in Turkey called kunefe has been haunting me.  Shredded phyllo (think shredded wheat texture) layered with soft cheese, melted in the center, soaked in a sugary-sweet syrup and topped with crushed pistachios.  It was insane – crunchy, creamy, sweet, nutty – and you could literally only have a small bite before immediately falling into a food coma of sorts.

Kunefe is also called kanafeh or kunafah and is found in many different cultures including Egyptian and Israeli.  I couldn’t help thinking how incredible this tradition would be in a more savoury form, something small that could work as a fun hors d’oeuvres.  Replace the soft, sweet cheese for a lovely blue, leave out the sugar syrup and drizzle instead with a touch of balsamic and honey – bite-sized deliciousness!

The “dough” that’s used here is called kadaif, kadayif or shredded phyllo and resembles vermicelli.  Most Middle Eastern grocers carry it in the frozen section, near the regular phyllo.  It’s incredibly versatile and is lovely wrapped around jumbo shrimp or even layered on top of a casserole for crunch.   Here, I combine it with a bit of butter and cream, press it into a mini muffin pan, layer with blue cheese and bake.  Once it’s cooled a few minutes, I remove and drizzle with the honey and balsamic.  This is a really quick recipe for an elegant and tasty little hors d’oeuvres.  Enjoy!

Ingredients

Yields 1 24-cup mini muffin pan

¼ box of shredded phyllo / kataifi*  (¼ lb)

½ stick butter, melted

1 ½ tbsps heavy cream

pinch of salt

¼ lb blue cheese, cut into ½-inch pieces

honey, for drizzling

balsamic vinegar, for drizzling

Procedure

Preheat oven to 375° F.  Grease the muffin pan with melted butter.

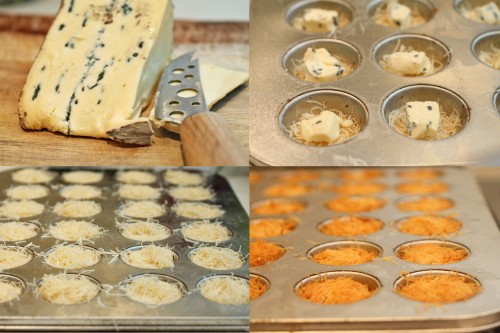
Using a sharp knife, cut the shredded phyllo lengthwise and then crosswise.  You want to create approximately ½-inch strands, so that the dough will fit easily into the muffin tins.

Place shredded phyllo in a bowl and break up strands that are stuck together using your hands.  Add melted butter, cream and salt and combine thoroughly.  (I use my hands for this to achieve even coverage).

Take small bunches of the shredded dough and press down into the individual muffin tins, so that the dough is packed tightly and comes up about 1/3rd of the way up in each one.  Place blue cheese pieces into all of the muffin tins, and top each with the remaining phyllo dough.  Pack the dough down tightly, so that it’s flush with the top of the pan.

Bake for 20 minutes.  Cool for 5 to 7 minutes, and carefully lift the little kunefes out of the tin using a small spoon.   They are delicate at this stage.  Drizzle with honey and a few drops of balsamic and serve warm.

*If you aren’t using the phyllo immediately, once removed from the box, cover with a damp paper towel.  Like regular phyllo sheets, this dough has a tendency to dry out quickly.

tags: blue cheese, kunefe, Turkish recipes, Turkish desserts, kanafeh, kunafah
categories: recipes, appetizers, vegetarian, all-5
Monday 01.24.11
Posted by Aliya LeeKong
 

Scallops with Thai Citrus Salad

View fullsize scallop-pic1-500x333.jpg
View fullsize scallop-pic2-500x333.jpg
View fullsize scallop-pic3-500x333.jpg

Scallops with Thai Citrus Salad

It’s amazing the difference a year makes.  I was actually in Thailand last winter and had the most beautiful pomelo salad, the inspiration for this recipe.  A pomelo is a huge, grapefruit-like fruit that is found all over Southeast Asia.  It’s sweet and lacks any of the bitterness typical of a grapefruit.  Pomelos have a thick, spongy pith, and the fruit shreds into segments easily, which makes it perfect for a salad.  When I got back, I had a hard time sourcing one, and then, lo and behold, a few weeks ago, I found them in Chelsea Market and on Fresh Direct!  They are a beautiful fruit, so I’m so happy they are becoming more accessible.

When I was in Bangkok, I had the opportunity to spend the day at Face Bangkok, a cool, open-air restaurant compound with a swanky bar, a Thai restaurant, an Indian restaurant, and even a spa on site!  The restaurant is part of a larger group that has branches in Jakarta, Beijing and Pudong, and is fantastic (if you happen to be visiting Bangkok) for a nice night out or drinks soaking up the chic scenery.  I did a bit of intensive Thai cooking there, and this is my version of one dish that I learned.

This salad has a few different flavors and textures that I think work really well with a beautifully-caramelized, sweet scallop (as well as on its own!).  If you can’t find a pomelo, delicious mandarins (satsumas are my fave) that are in season right now would work really well with all of the tangy and salty flavors.  The peanuts and toasted coconut provide a great texture, a little umami from the fish sauce, sweetness and tartness from the tart lime juice – it’s light and refreshing and perfect to break up winter’s heavy dishes and take in some seasonal citrus.  Enjoy!

Ingredients

Serves 4 as a main course or 6 for a starter

Salad:

¾ cup dried, unsweetened coconut (chips or shredded)

¾ cup peanuts, toasted and crushed

3 scallions, white and light green parts only, thinly sliced

½ shallot, finely minced

1 cup pomelo, segmented*

8-10 mint leaves, chiffonade

Citronette:

juice of 1 ½ limes

½ tsp salt

1 ½ tsps sugar

pinch of cayenne

1 ½ tsps fish sauce

1 ½ tbsps extra virgin olive oil

Scallops:

3 tbsps olive oil

2 lbs jumbo sea scallops

salt and freshly ground pepper to taste

1 tbsp butter

Procedure

In a skillet over medium heat, add the dried coconut and toast until the color is deep and golden.  This process happens fairly quickly, so keep your eye on it.   Add to a bowl along with the crushed peanuts, scallions, shallot and pomelo (and any juice that resulted from segmenting the pomelo).

For the dressing, combine the lime juice, sugar, salt and cayenne and whisk to dissolve thoroughly.  Add the fish sauce and then slowly drizzle in the extra virgin olive oil whisking to combine.  Toss salad with dressing, add mint, and season to taste.

For the scallops, you want to develop a nice deep color on them.  Thoroughly dry the scallops before cooking and season generously with salt and pepper.  If they are wet, they won’t caramelize and will sort of steam in the pan.  Also, if you crowd the pan, they will also steam, so work in batches if necessary.

Heat a skillet over medium-high heat and add olive oil.  When it’s just about to smoke, add the scallops, dragging a little so that the side gets coated in olive oil.  Cook for about two minutes and add the butter.  Let cook for another minute or so and then flip.  They should have a nice brown crust on them.  At this point, I turn the heat down just a tad.  Let them cook on this side for another three minutes or so until they are cooked to your desired level.  I like mine so that the middle third looks a bit translucent and the top and bottom thirds are opaque, but remember different-sized scallops will take differing cooking times. This is what I use to cook jumbo or U10-sized scallops.

Serve scallops hot with the cool salad spooned over top.

*The pomelo is a pretty unique fruit. To segment, I like to cut off as much of the rind and pith as possible.  Then, I take out the larger, membrane-enclosed segments (much like a grapefruit or orange) and slip a pairing knife under the membrane.  Once this is peeled away, the inner fruit shreds into little pieces.  I like to do this over a bowl and catch all of the residual juice, which adds great flavor to the salad.

tags: seafood recipes, scallops, Thai citrus salad, citrus
categories: salads, recipes, all-5, soups & salads, main dishes-1
Thursday 01.20.11
Posted by Aliya LeeKong
 

The Fastest Baklava Recipe Ever

View fullsize baklava-pic1-500x282.jpg
View fullsize baklava-pic2-500x333.jpg
View fullsize baklava-pic3-500x333.jpg
View fullsize baklava-pic4-500x166.jpg

The Fastest Baklava Recipe Ever

I love a rich and fulfilling cooking process and usually don’t mind taking my time. But, authentic baklava is one of the most labor-intensive desserts as proven during my trip to Turkey.  I got a hands-on cooking lesson in homemade baklava, and it’s an insanely beautiful and lengthy process. Yufka dough, similar to the store-bought phyllo we get here, comprises the layers, and each baklava has 100 of them.  Yes, 100 sheets are rolled out to create this delicious dessert.

A few things struck me as I first made balls with the dough, then rolled out 6 or 7 individually to small discs, then placed the 7 on top of each other and rolled those out to the full size (not nearly as quickly or skillfully as the ladies showing me…how many more times?).  Typically, baklava recipes require painting each sheet of pastry with butter before placing the next layer on top, which is more than tricky with the thin phyllo.  But these ladies didn’t do that – they cut the layered pastry dough into little squares and then poured the butter all over…genius!

I decided to adopt this method using store-bought phyllo, and the result is the fastest baklava ever.  Layer phyllo and chopped nuts, cut carefully, cover with clarified butter, bake, douse in syrup.  That’s it!  This syrup is simple, incredibly delicious and with my personal twist of vanilla bean.  Baklava is undoubtedly sweet, but I think this one hits just the right amount of sweetness with lovely honey, vanilla, and cinnamon undertones. I make mine into bite-sized little squares so as not to overindulge…It’s fantastic to do ahead as the flavor gets better, and it keeps for about 5 days at room temperature.  Enjoy!

Ingredients

Yields 1 9-inch round cake pan

Pastry:

¼ cup unsalted walnuts, lightly toasted

¼ cup unsalted almonds, lightly toasted

¼ cup unsalted pistachios, lightly toasted

2 tbsps light brown sugar

½ tsp ground cinnamon

¼ tsp salt

pinch of ground cloves

2 sticks of unsalted butter, clarified*

1 box phyllo dough, thawed (1 lb)

honey

Syrup:

½ cup honey

½ cup water

½ cup sugar

1 vanilla bean, split and scraped

1 (1-inch) piece of lemon or orange rind

Preheat oven to 400° F.  Grease a 9-inch cake pan.

Phyllo dough dries out pretty quickly, so, in lieu of using a damp cloth on top of the dough and going back and forth, I suggest working quickly and having all of your other ingredients for the pastry ready to go.   The most difficult part will be (carefully!) cutting the pastry before adding the butter and baking.  You need a sharp knife and a bit of patience.

Place walnuts, almonds, pistachios, brown sugar, cinnamon, salt, and cloves in a food processor, and pulse until finely chopped (not powder).

Place all of the phyllo sheets on a clean cutting board.  You have to cut the sheets to fit the cake pan.  Take the cake tin and place it on top of all of the sheets at the furthest corner possible.  Use a sharp pairing knife to cut around the tin.  Then, move the cake pan to the opposite diagonal and cut around the remaining phyllo.  You should have two, even-layered circles of phyllo dough.  If the phyllo dough is just a tad short, and it’s not exact – don’t sweat it.  Use the slightly smaller layers for the bottom part and no one knows the wiser!

You are going to make three layers of phyllo and two of nuts.  Place one of the layered circles into the greased cake pan to form the bottom.  Cover with half of the nut mixture and drizzle a little honey in very thin streams across all of the nuts.  Divide the other layered circle into two equal halves of layers.  Place one of them over the nuts, and then again cover with the remaining half of the nut mixture and a little honey.  Place the final layers of phyllo on top.

Carefully, cut down the pastry 5 times across in equal widths.  Turn the tin 90?, and repeat the process.   Immediately, drizzle the clarified butter over the pastry so that the entire top and edges are covered.  Let sit for 2 minutes so that all of the butter soaks down.

Bake for 15 minutes.  Lower the heat to 325° F, and bake for another 40 minutes.

Make the syrup in the last 10 to 15 minutes of baking.  Combine all of the syrup ingredients in a saucepan and bring up to a boil.   Lower immediately to a simmer, simmer for 5 to 7 minutes, stirring often until slightly thickened, and remove from the heat discarding the vanilla bean and rind.  Be careful – it can foam up, so stirring will help prevent it from overflowing.  Also, sugar is extremely hot when heated like this so avoid the temptation to dip your finger and taste…

Remove baklava from the oven.  Carefully, re-cut the baklava along the same lines you cut before.  Pour the warm syrup evenly over the hot baklava, and let cool completely and uncovered.  All of the syrup should soak into the pastry.  The baklava tastes better if it sits longer, so I advise making it the night before you plan to serve it.

Baklava can be stored at room temperature for about 5 days.  Make sure it has completely cooled before covering to keep a good texture.

*Because of the quick method we’re using, you don’t want the milk solids from the butter to burn on the top of the baklava, so it only takes a few minutes to clarify the butter.  You basically want to melt the butter on low and simmer for a few minutes.  The water will evaporate, and the milk solids will settle to the bottom.  Skim the foam off the top, and the butter should be relatively clear.  When you use the butter, decant it – that is, pour it without letting any of the milk solids that are settled at the bottom pour into your container.

tags: easy desserts, easy baklava recipe, fast baklava recipe, baklava
categories: all-5, recipes, desserts-1
Tuesday 01.18.11
Posted by Aliya LeeKong
 

Homemade Strained Yoghurt

View fullsize yoghurt-pic1-500x333.jpg
View fullsize yoghurt-pic2-500x333.jpg
View fullsize yoghurt-pic3-500x166.jpg
View fullsize yoghurt-pic-4-500x333.jpg

Homemade Strained Yoghurt

When I was in Bodrum, I got to visit a little agricultural village called Sazkoy, explore the area and have a delicious(!) homemade lunch with a family well-known for the Milas carpets they weave and sell.  The village is largely self-reliant, with most families having their own chickens, goats, cows, and sheep.  Many grow vegetables and some even have their own citrus trees, ripe with mandarins while I was there.

I got a tutorial in the tradition of yoghurt-making from a woman named Emine.  She also uses her fresh cows’ milk to make butter and curd cheese from whey on a regular basis, like most of the families in the area.  The yoghurt process was completely intuitive for her, reflexive after obvious years of making it.  Where I use a thermometer in my recipe, Emine dips her finger and instinctively knows the right temperature.

The key to yoghurt is that you need some to make some.  A little “starter” yoghurt is necessary and adds the appropriate bacteria.  I like to use a bit of Turkish or Greek yoghurt to start the process because they contain only live yoghurt cultures and not the preservatives, stabilizers or thickeners that other types do.  That said, basic store-bought yoghurt will work perfectly well here too.

The process is incredibly simple – heat milk almost to a boil, cool, add a bit of yoghurt, and keep warm to ferment.  To get a thicker consistency, I like to strain my yoghurt like they do in Turkey (as well as Greece, South Asia, the Middle East and even Mexico).  This yoghurt keeps for about 7 to 10 days, and you can use some of the homemade yoghurt to start the next batch!  It also has an incredibly creamy sweetness to it, slightly less tangy and fresher tasting than the store-bought kind.  Cheaper, tastier, and how cool is it to make your own.  Enjoy!

Ingredients

1 ½ quarts whole milk

2 tbsps starter plain yoghurt, room temperature

Procedure

In a saucepan, heat milk over medium heat until it starts to bubble and foam, almost at a boil.  It should reach 180° F.  Remove from heat and cool to 110° F.  (The woman I saw making this knows the temperature from dipping her finger in the milk, not from any thermometer.  It’s still hot but she could hold her finger in it comfortably.)  This temperature is important – significantly hotter and the bacteria will be killed and the yoghurt won’t set.  If the temperature is too low, again the bacteria won’t ferment, and the yoghurt won’t set.

In a ceramic bowl or pot that has a lid, add the 2 tablespoons of yoghurt.  Add a few spoonfuls of the milk to the yoghurt and whisk to combine.  Pour the rest of the milk in using a strainer to catch the skin that forms on top.  Whisk to combine thoroughly.

Cover with a lid and swaddle in thick kitchen towels or a blanket.  You want to keep this warm for the fermentation process.  I keep mine in the oven (off) with just the oven light on.

Yoghurt time can vary.  Mine took around 12 hours to set, but it all depends on the temperature, the climate, and the yoghurt starter you used.  It could take as little as 6 hours, and some people even claim as long as 24 hours.  I like to make it in the evening, so it can set overnight.

Once it’s set, refrigerate immediately.  It will firm up a bit more as it cools.  I like to then place it in a strainer lined with cheesecloth in the fridge for about 3 hours once it’s cooled to get a thicker consistency but feel free to use as is.

Store in an airtight container; it lasts for about a week.

tags: homemade yogurt, homemade yoghurt, yoghurt recipes
categories: all-5, breakfast, recipes, vegetarian
Friday 01.14.11
Posted by Aliya LeeKong
 

Sweet Bread

View fullsize sweet-bread-pic1-500x333.jpg
View fullsize sweet-bread-pic2-500x333.jpg
View fullsize sweet-bread-pic3-500x166.jpg

Sweet Bread

Welcome back! I hope that everyone had a really fantastic holiday season and New Year.  I just got back from an eye-opening culinary adventure in Turkey – exploring everything from traditional bread baking in a tandoor to how to make luscious strained Turkish yogurt to watching a woman in a village create her signature bergamot and mandarin preserves.  I’ll be posting more about Turkey in the coming weeks, but I did put a ton of pictures on Facebook if you want to check them out.

On to the usual…Sweet bread is one of those universal foods.  A quick google will generate recipes anywhere from a Romanian version to Italian panettone to Portuguese sweet bread or even our all-American banana bread.  Some include yeast and others are more of a quick bread, much like one I did a few months back.

This version is a West Indian tradition and is like a cross between a fruit cake and a bread loaf.  I’ve also seen it called coconut bread, and, although it pops up a lot around the holidays, it’s an all-occasion treat.  I love to make it for breakfast on a Sunday – a nice buttered slice of this loaf with hot coffee and fresh fruit is the perfect light meal.

Many versions of this bread I’ve seen include mixed peel, which are candied peels and fruits, a typical ingredient in fruitcake.  I like to substitute good old lemon, lime or orange zest – the flavor is natural, more subtle, and less candy-like (which makes me feel better when I have it for breakfast…).   This is a beautiful, not-too-sweet-loaf that works with afternoon coffee or even with a little vanilla sauce for dessert.  Enjoy!

Ingredients

Yields 1 8½” x 4¼” x 2¾” loaf pan

Bread:

2 cups all-purpose flour

1 ½ tsps baking powder

½ tsp baking soda

½ tsp salt

½ tsp cinnamon

¼ tsp nutmeg

¼ cup golden raisins

¼ cup dried currants

¼ cup chopped maraschino cherries

1 ½ cups grated fresh coconut

¼ tsp lemon, lime, or orange zest

½ stick unsalted butter, room temperature

1 cup sugar

2 eggs

½ tsp vanilla extract

1 tsp almond extract

2/3 cup milk

Glaze:

1 tbsp sugar

1 tbsp boiling water

Procedure

Preheat oven to 325° F.

In a bowl, sift together flour, baking powder, baking soda, salt, cinnamon and nutmeg.  Whisk ingredients to combine thoroughly.

In another bowl, combine raisins, currants, cherries, coconut, and zest.

In the bowl of a stand mixer or with a hand mixer, using the paddle attachment, cream together the butter and sugar.  With the mixer on low, add the eggs one at a time until incorporated.  Add in the extracts.

With the mixer on low, add 1/3rd of the flour mixture followed by ¼ cup of the milk.  Scrape down and repeat process another two times.  Add the dried fruit and coconut mixture, and make sure everything is fully incorporated.

Transfer to a greased loaf pan and bake for 60 to 70 minutes until an inserted toothpick comes out clean.

For the glaze, melt the sugar in the boiling water and brush onto sweet bread.  Place back in the oven for another minute or two just to develop the sheen.

Cool before unmolding and serving.

tags: sweet bread recipes, West Indian sweet bread, West Indian traditions
categories: all-5, breads & cakes, recipes, desserts-1
Monday 01.10.11
Posted by Aliya LeeKong
 

Spiced Sunchoke Soup

View fullsize sunchoke-pic1-500x333.jpg
View fullsize sunchoke-pic2-500x333.jpg
View fullsize sunchoke-pic3-500x333.jpg

Spiced Sunchoke Soup

I am still in the aftermath of my holiday party, and this is yet another dish I served that people seemed to really enjoy.  Yes, soup can be a fantastic hors d’oeuvres – I served this in little demitasse cups with some chopped cilantro and homemade croutons.  It looks elegant, and you can make it in advance and keep it warm, which for me is ideal when other items require more maintenance…

Sunchokes are root vegetables and look a lot like ginger, though taste nothing like it.  They have been popping up all over menus in NYC and Brooklyn.  My husband and I hit this adorable new place in Fort Greene called Roman’s (amazing, chocolate sorbet to die for), and he was shocked to see sunchoke soup on the menu.  He acted like they were biting my style (I almost cried laughing)…and I had to explain that they are seasonal and delicious and that’s why they are everywhere.

You might also see sunchokes labeled as Jerusalem artichokes, and their flavor does resemble the artichoke heart though they are not related at all.  I picked mine up from the Union Square Greenmarket, and they were perfectly sweet and creamy.  This soup incorporates some key spices – cumin, coriander, and turmeric – that really bring warmth to the dish but still allow the signature sunchoke flavor to shine through.  The coconut milk bumps up the sweetness and gives it a beautiful, creamy mouth-feel, and the shot of lemon juice brightens up all of the flavors.  This is easy enough as a go-to weeknight soup but refined enough for a dinner or holiday party.  Enjoy!

Ingredients

Serves 4 to 6 / Yields approximately 5 ½ cups

3 tbsps unsalted butter

1 onion, finely diced

½ tsp ginger, minced

1 small green chili, finely chopped (preferably thai or serrano, to your heat preference)

¾ tsp ground cumin

1 tsp ground coriander

¼ tsp turmeric

pinch of cayenne

3 or 4 cloves garlic, minced

7 medium-sized (12 oz) sunchokes, scrubbed, peeled, and thinly sliced*

1 bay leaf

2 ½ cups chicken or vegetable stock

1 can coconut milk

a few squeezes of fresh lemon juice

salt to taste

chopped cilantro or parsley

Procedure

Heat a dutch oven or other heavy-bottomed pot over medium-low heat and add butter.  When foam subsides, add onion and a bit of salt to draw out the moisture.  Let sweat for a minute or so.  Add ginger, green chili, cumin, coriander, turmeric and cayenne.  Cook for 5 to 7 minutes until onions are translucent and super soft.  Add garlic and cook for 1 minute until fragrant.

Add sunchokes and stir to combine.  Let cook for about 2 minutes until sunchokes begin to soften.  Add bay leaf and stock, bring up to a boil, and lower to a simmer.  Simmer covered for 20 to 25 minutes.  You want the sunchokes to easily break apart with your wooden spoon, which will really depend on how thinly you sliced them.

Remove bay leaf, and, in a blender or using a hand blender, puree until smooth.  Add coconut milk, lemon juice, and adjust seasoning to taste.  Serve hot with a little fresh chopped cilantro on top.

*After peeling the sunchokes, keep them submerged in cold water until ready to use.  Thinly slice right before throwing into the pot.

tags: soups for winter, sunchoke soup, sunchoke recipes, Jerusalem artichokes, weeknight meals, holiday recipes
categories: all-5, soups & salads, recipes, vegetarian, main dishes-1
Wednesday 12.22.10
Posted by Aliya LeeKong
 

Mango Cheesecake

View fullsize mango-pic1-500x333.jpg
View fullsize mango-pic2-500x333.jpg
View fullsize mango-pic3-500x333.jpg

Mango Cheesecake

I love this recipe.  This is surprisingly easy and straight forward to make, and mango cheesecake is one of those sleeper hits.  People who “don’t like cheesecake” will even love it.  And what I love is that it’s a fantastic do-ahead dessert for parties.  It’s always better to make this the night before, so it has a full 8 hours to cool.

I actually made it for my holiday party on Friday night but shrunk it down to miniature version.  It was the perfect poppable dessert – a creamy mango cheesecake in 1.5” pastry shell with a bit of glaze and a sweet raspberry on top.  These were inhaled – always estimate a 3-4x multiple of the number of party attendees!

The graham cracker crust is crisp and buttery, and the cheesecake comes out with a beautiful, silky, creamy texture, bright with sweet mango flavor.  I love the extra flavor and texture of this super simple glaze too.  I used alphonso mango puree because these mangoes, to me, have a truly rich, signature mango flavor.  If you are doing the tiny version, they only take 15 minutes in the oven and don’t need the water bath.  Enjoy!

Ingredients

Yields 1 9-inch springform pan

Crust:

2 cups graham cracker crumbs

1 ½ sticks of butter, melted

Filling:

2 (8-ounce) packages cream cheese, room temperature

1 cup whole milk ricotta cheese, room temperature

¾ cup sugar

4 eggs, room temperature

2 ¼ cups mango puree, preferably Ratna (from the ethnic grocer; alphonso mangoes)

Glaze:

Another ½ cup or so of mango puree

Sugar

lemon

Procedure

Preheat oven to 350° F

Wrap the springform pan tightly in foil all the way around.  You want to create a seal since we’re going to submerge it in water for cooking.  Generously grease all of the inside surfaces of the pan.

In a food processor, process crumbs with melted butter until sand-like texture.  Press firmly into the bottom of the pan and bake for 15 minutes.  Cool completely.

Blend cream cheese and ricotta with sugar until smooth and then add mango puree and eggs.  Pour mixture over cooled crust and place in a roasting pan.  We’re going to bake this in a water bath.  Add boiling water to the roasting pan until it reaches halfway up the sides of the cake pan.  Bake for an hour and 30 minutes or until slightly jiggles but starts to pull from the sides.  Cool at least 8 hours before serving.

Take remainder mango puree and add a little water in a saucepan.  Reduce by half and add sugar and lemon to taste.  The glaze should coat a spoon.  Cool completely and pour over cheesecake before serving.

tags: mango recipes, cheesecake recipes, easy desserts, holiday baking, holiday recipes
categories: all-5, breads & cakes, recipes, desserts-1
Monday 12.20.10
Posted by Aliya LeeKong
 

Berbere-Spiced Lamb Chops

View fullsize IMG_1709.JPG

Berbere-Spiced Lamb Chops

So I made this recipe (1) because it tastes ridiculously good, (2) because I’m also doing these for my holiday party this week so thought I would kill 2 birds with 1 stone and (3) because I thought I might be able to come up with an adequate substitute for berbere for those with limited access to ethnic food stores.  #3 is giving me a really hard time.

Berbere is a key ingredient in Ethiopian cooking.  It gives their stews that blood-red color and signature spiced flavor.  Berbere comes in a ground form that’s a complex blend of dried chilies, garlic, ginger and red onion with such spices as fenugreek, ajwain, cardamom, cloves, cinnamon, cumin, nutmeg, black pepper, turmeric…Sometimes it’s mixed with red wine to form a paste.  Like masala, it’s a subjective blend, and I am still perfecting mine…

Berbere as a dry rub on lamb chops is just heavenly.  This dish is truly elegant and sinfully easy to make, particularly for a party.  The chops come out a bit charred with a smoky, red pepper flavor, a bit garlicky with hints of the spice blend.  I gave a quick and dirty substitute (without measurements) below, but I would advise going and tasting the real thing.  Either pick up a packet of the spice at a local ethnic store or online or even walk into an Ethiopian restaurant and ask for a bit to try.  Enjoy!

Ingredients

Serves 4

2 tsps berbere*

½ tsp ground mustard

¼ tsp finely ground black pepper

½ tsp garlic powder

kosher salt

1 rack of lamb, frenched and cut into single or double chops

olive oil

Procedure

Preheat oven to 400° F.

Combine berbere, ground mustard, pepper, and garlic powder.  Rub onto chops.  Season both sides with salt as desired.  Let chops sit for about a half hour until they come up to room temperature.

Heat a large skillet over medium-high heat.  Add enough olive oil to thinly coat the bottom of the pan.  Place chops in pan and cook 4 minutes each side for double chops and 2 to 3 minutes each side for single chops for medium rare.

Finish in the oven to desired level of doneness.

*To approximate, start with dried New Mexican chilies, which are a great base for the blend.  I would seed and rib and then blend to a powder.  Mix with a touch of paprika, garlic powder, onion powder, fenugreek, cumin, coriander, cardamom, black pepper, and ajwain if you have it.  Good luck!

tags: Berbere, Ethiopian cooking, lamb chops, dry rub, Ethiopian spices, holiday recipes
categories: all-5, main dishes, recipes
Wednesday 12.15.10
Posted by Aliya LeeKong
 

Double Chocolate Mint Cookies

View fullsize mint-cookie-pic1-500x333.jpg
View fullsize mint-cookie-pic2-500x333.jpg
View fullsize mint-cookie-pic3-500x166.jpg
View fullsize mint-cookie-pic4-500x166.jpg

Double Chocolate Mint Cookies

So my obsession with the holidays has me thinking of more and more ways to celebrate and put my own spin on the traditions we all know and love.  I’m also in the midst of trying to plan for my holiday party this week, and I love to give my guests a little of the familiar and a little of the unexpected.  That (and a deep craving for mint and chocolate!) was the inspiration for this recipe.

To be completely truthful, this recipe, like others I’m doing for this party, is a sneaky way to save time and be efficient.  I can make this dough at the beginning of the week, freeze it in long skinny cylinders, and then cut them into little rounds.  During the party, I can throw them into the oven towards the end of the night for 5 to 10 minutes, and voila!  Everyone gets fresh-baked, mini cookies, and my apartment smells like heaven…

I wanted to create pillowy, moist, brownie-rich, chocolate chip cookies scented with peppermint.   Who doesn’t love that?  The ingredient that adds a bit of the unfamiliar is ground cardamom; the spice has a menthol-like quality that works beautifully with the mint.  I’m a dark chocolate girl myself, but I threw in some white chocolate chips for the creaminess – it helps offset the bitterness of the dark chocolate and blends seamlessly with the mint.  Enjoy!

Ingredients

Yields approximately 2 dozen cookies (size-dependent)

1 cup all-purpose flour

½ cup unsweetened cocoa powder

½ tsp baking soda

¼ tsp baking powder

½ tsp ground cardamom

½ tsp salt

1 stick unsalted butter, room temperature

½ cup white sugar

1/3  cup light brown sugar

1 egg, room temperature

1 tsp peppermint extract

1 tsp vanilla extract

½ cup dark chocolate chunks or chips

½ cup white chocolate chunks or chips

Procedure

Preheat oven to 350° F.  Line two baking sheets with parchment paper.

In a bowl, sift together flour, cocoa powder, baking soda, baking powder, cardamom and salt.

In the bowl of a stand mixer or with a hand mixer using a paddle attachment, cream together butter and both sugars.  Add the egg and peppermint and vanilla extracts.   Add flour mixture and mix until almost completely incorporated.  It should mostly be sticking to the paddle at this point.  Scrape down, add in chips and mix for another 15 to 20 seconds until uniform.

At this point, I like to turn the cookie dough out onto plastic wrap, form into a cylinder, and freeze for about 10 minutes.  This makes it easier to cut into even sized, round cookies.  Also, at this point, you can freeze the dough for later use – overnight or longer.  Conversely, you can just drop rounded spoonfuls a few inches apart onto prepared baking sheets.

Bake for 9 to 11 minutes depending on how chewy or crunchy or what size you made the cookies.  Remember to add a few more minutes if you froze the cookies ahead of time and are putting them straight in.  Cool on the baking sheets for 5 minutes and then transfer to wire racks to cool completely.

tags: chocolate desserts, chocolate mint cookies, cookies, holiday baking, chocolate cookies, mint cookies, holiday recipes
categories: all-5, desserts, recipes
Monday 12.13.10
Posted by Aliya LeeKong
 

West Indian Cassava Pone

View fullsize pone-pic1-500x333.jpg
View fullsize pone-pic2-500x333.jpg
View fullsize pone-pic3-500x167.jpg

West Indian Cassava Pone

This dish has to be one of my favorite West Indian desserts.   After my first bite of this sweet, gelatinous “cake”, I became obsessed, which culminated in some serious lessons in Trinidadian cooking from my husband’s Aunt Cherry who lives in Port-of-Spain.  I’m one of those nervous bakers – constantly peering into the oven to make sure a cake is rising well, and my heart is in my throat during the moment of truth unmolding.  When she and I made this together, she didn’t even use measuring cups!  An unnerving confidence in her years of cooking that she could eyeball the right texture…

In different West Indian counties, I’ve seen pone made with root vegetables – cassava here but also carrots and sweet potato, always with coconut, and some with pumpkin and even raisins.  What’s fascinating is that there’s a soul food iteration of pone (I’ve mostly seen the sweet potato kind) that they make in the South.  Would love to cross compare!

There are dozens of pone recipes out there.  I am one of those that absolutely love the moist, gummy texture, but find that it can be a bit too dense at times (thus in some West Indian countries it’s called “heavy cake”).  So I modified the traditional recipes a bit to make the texture a bit lighter here but still with that gelatinous bite.  I also made it thinner, to be eaten like a dessert bar rather than a cake.  Evaporated milk gives a bit of silkiness, and the vanilla, cinnamon, nutmeg and, yes, black pepper that delicious pumpkin pie-like spice.  I also saw that some Southern pone recipes use molasses, so I incorporated a few tablespoons for some beautiful, caramelized sweetness and a deeper color.  Heat it and throw a scoop of ice cream on top for serious decadence.  Enjoy!

Ingredients

Yields 1 9” x 13” x 2” 3-quart baking dish

2 cups grated cassava

1 ½ cups grated fresh coconut

1 can evaporated milk

3 tbsps unsalted butter, melted

1 ½ tsps vanilla extract

1 cup light brown sugar

3 tbsps molasses

1/3 cup all-purpose flour

½ tsp baking powder

1 ¼ tsps ground cinnamon

1/8 tsp ground nutmeg

½ tsp salt

¼ tsp ground black pepper

Procedure

Preheat oven to 350° F.

In a bowl, whisk together coconut milk, melted butter, sugar and molasses until sugar is dissolved.

In a separate bowl, sift together flour, baking powder, cinnamon, nutmeg, salt and black pepper and whisk to combine.  Add wet ingredients a little at a time to the dry ingredients whisking until batter is smooth (don’t overmix).  Fold in grated cassava, and coconut.

Transfer mixture to a greased dish and bake @ 350° F for 45 minutes.  The edges should look brown and starting to separate from the baking dish.  Remember that, if you are using a different baking dish from what I specified, cooking time will vary.  Cool completely before cutting into squares and serving.

tags: pone, West Indian desserts, West Indian recipes, Cassava recipes, Cassava
categories: all-5, breads & cakes, desserts, recipes
Monday 12.06.10
Posted by Aliya LeeKong
 

Chili Cheese Toast

View fullsize cheese-toast-pic1-500x333.jpg
View fullsize cheese-toast-pic2-500x333.jpg
View fullsize cheese-toast-pic31-500x333.jpg

Chili Cheese Toast

I absolutely love when you are feeding someone who has no idea what cooking requires, and you serve them something sinfully easy to prepare, and they take a bite and look at you as if you performed a miracle of sorts.  That’s what happened the first time I gave my husband these cheese toasts…for breakfast no less.  You would have thought I had prepared foie from scratch.

Although these might look like a kicked-up pizza of sorts, chili cheese toasts are actually a very popular South Asian snack.  Every cook has her or his own version – perhaps a dash of chili powder, a touch of turmeric , some curry leaves.  My grandmother used to make a delicious version and bound all of the ingredients together with egg.  She then fried it on the stove top for ultimate crispiness.

I kept this version relatively simple, so feel free to modify to your heart’s content.  I didn’t feel like frying as I wanted this to be a tad healthier, so these are baked.  I also used sundried tomatoes instead of fresh ones to minimize the moisture, but feel free to use fresh tomatoes  – just try to remove as much liquid as possible before adding to the cheese mixture.

You get heat from the chilies, delicious green onion flavor, a bit of sweet and tart from the tomato, of course, lovely, tangy, bubbly cheese, and a nice satisfying crunch from the toast.   These make an amazing afternoon snack, but I love them for breakfast.  If you’ve got knife skills, you can make this in 10 minutes with the cooking time!  Enjoy!

Ingredients

Serves 2 to 4

1 jalapeno or Serrano pepper, finely chopped (any chili of your choice)

2 sundried tomatoes, finely chopped

1 scallion, green and light green part only, thinly sliced

1 cup mozzarella, shredded (preferably low-moisture)

3 tbsps cream cheese, room temperature

¼ tsp salt

freshly ground black pepper

4 slices white bread, toasted

chopped cilantro or parsley

Procedure

Preheat the broiler.

In a bowl, mix together chopped chilies, sundried tomatoes, scallions, mozzarella, cream cheese, salt and pepper.  Spoon equal amounts of mixture onto 4 slices of toasted white bread.  Spread to create an even layer on each piece of toast.

Place cheese toasts on a baking sheet and place under the broiler.  Broil for anywhere from 3 to 5 minutes until cheese has melted – keep it under a bit longer if you like your cheese to brown (like I do!).  Sprinkle with a bit of fresh cilantro or parsley before serving.

tags: South Asian snacks, Chili cheese toast, cheese toast recipe, South Asian cheese toast
categories: all-5, breakfast, recipes, snacks, vegetarian
Wednesday 12.01.10
Posted by Aliya LeeKong
 

Spicy Mussels with a Kokum-Coconut Broth

View fullsize mussel-pic1-500x333.jpg
View fullsize mussel-pic2-500x333.jpg
View fullsize mussel-pic3-500x333.jpg

Spicy Mussels with a Kokum-Coconut Broth

This Goa trip I just took has inspired a host of recipes – the fresh ingredients, bright flavors and colors, interesting cultural mix.  I seriously have to restrain myself to prevent all of my recipes from being monopolized by this cuisine.  This dish is one I was dreaming about after I made traditional Goan fish curry during my first few days there – an elegant take on mussels using a popular Konkani ingredient, kokum.

I posted about kokum before I left for my trip, but it’s effectively the dried rind of a local plum-like fruit.  It adds acidity and tartness to dishes there.  It’s often interchanged with fresh tamarind, so you could add a touch of that here instead if you happen to have it on hand.  You won’t get the same flavor, but I’ll bet it’s still delicious.

I love how cheap mussels are.  I average about 1 pound per person for a main, and at $3 a pound, there’s not a better deal.  They work incredibly well for entertaining – cheap yet elegant.

The combination of coconut and kokum was really popular in Goan dishes, though they tend to use freshly grated coconut.  A lot of their dishes also had this beautiful balance of tart, creaminess from the coconut, and a bit of sweetness from jaggery, which is unrefined cane or palm sugar.  Coconut milk is a lot easier to work with, so I used that here, and I used honey instead of sugar because I love the flavor.

The resulting broth is warmly spiced, with heat from the chili, acidity and tartness from the kokum and wine, and tempered by the creamy coconut milk.  A splash of fresh lemon juice and cilantro add brightness, and the dish is surprisingly light.  I toasted up some slices of a crunchy, French loaf with olive oil and a bit of salt and used it to sop up the sauce.  Decadent. Enjoy!

Ingredients

Makes 2 to 4 servings

2 lbs fresh mussels, scrubbed and beards removed*

3 tbsps butter

2 shallots, finely chopped

1 finger chili, halved and split

½ tsp ground coriander

¼ tsp ground cinnamon

¼ tsp ground black pepper

4 cloves garlic, minced

¼ cup white wine

1 can coconut milk

1 ½ tsps honey

1 to 3 pieces of kokum (depending on the strength/souring quality of the kokum)

1 handful cilantro, finely chopped

Salt to taste

2 scallions, green and light green parts only, thinly sliced

squeeze of lemon juice

Procedure

Heat a medium-sized pot or dutch oven over medium-low heat.  Add butter and when foam subsides, add shallots and a pinch of salt to draw out the moisture.  Cook for a minute or two and add in the chili and ground spices.  When shallots are translucent, add minced garlic and cook for 30 seconds or so or until it’s fragrant.

Add white wine and reduce until very little is left.  Add coconut milk, honey, kokum pieces, and 2 tablespoons of the cilantro.  Some kokum is extremely sour, so start with 1 piece and increase up to 3 depending on how tart you’d like your broth.  Bring mixture up to a boil and lower to a simmer.  Cook for 5 to 7 minutes or until the liquid has reduced by half.  Taste and adjust seasoning at this point.

Throw in the mussels and scallions.  Bring temperature up to a simmer again, and cook covered for a few minutes until mussels open.  Mine took somewhere between 3 and 4 minutes – you don’t want to overcook.

Squeeze fresh lemon juice over mussels, transfer to a bowl, and sprinkle remaining cilantro on top.  Serve hot with big pieces of toasted, crusty bread.

*I think a key to making delicious mussels is thoroughly cleaning them.  I like to scrape around the outside of each mussel with a pairing knife, removing any debris and hairy parts (beard).  Prepare an ice- cold bowl of water and add sea salt until the water tastes pretty salty.  Rinse off mussels, place in salt water, and refrigerate for a minimum of a half hour.  The mussels will release a lot of their sand and grit this way.  Remember to rinse again before cooking and discard any open mussels.

tags: mussels, seafood recipes, spicy mussels, kokum
categories: all-5, recipes, main dishes-1
Monday 11.29.10
Posted by Aliya LeeKong
 

Saffron & Roasted Garlic Spaghetti Squash Gratin

View fullsize squash-pic1-500x333.jpg
View fullsize squash-pic2-500x333.jpg
View fullsize squash-pic3-500x166.jpg
View fullsize squash-pic4-500x333.jpg

Saffron & Roasted Garlic Spaghetti Squash Gratin

Saffron, without a doubt, is an expensive spice to work with.  I’m a bit of a deal hunter when it comes to it and always search around when I’m traveling to see if I can get it on the cheap.  I remember spotting it in the medina in Marrakech for a ridiculously low price and basically carting home a bushel full.  It wasn’t incredibly fragrant (and quite frankly the color was off) but eh, it was saffron!  It’s been sitting in my spice cabinet ever since – the lousiest, tasteless saffron I’ve ever met…and somehow I still won’t part with it.

The saffron for this dish I picked up during my visit to Mercat de la Boqueria a few months back.  I still trekked around to each stall that sold it to make sure I got the cheapest one!  Got it right this time.  This stuff has an incredible perfume and was beautiful in this dish.

When I dug deep into why I thought spaghetti squash and saffron would pair well together, I realized the mental origin of this dish might seem a bit strange.  There’s a South Asian pudding that can be made with either rice or vermicelli called kheer; it’s often scented with saffron.  This, to me, was like a savoury version of it.

The saffron, of course, compliments the flavor of the spaghetti squash, which I boost a bit with a touch of brown sugar.  The sweet, roasted garlic adds a lovely nuttiness and works incredibly well with the freshly grated parm.  I love this dish.  It’s a bit sinful, but healthier as far as gratins go since we’re using squash.  Cheesy, creamy, nutty with the perfume of saffron – Enjoy!

Ingredients

Yields 1 2-quart casserole dish

2 medium-sized spaghetti squash

5 garlic cloves

olive oil

salt and freshly ground pepper

½ stick butter

¼ cup all-purpose flour

2 cups milk

¼ cup crème fraiche

generous pinch of saffron

pinch of cayenne

a few dashes of hot sauce

1 ½ tsps light brown sugar

½ cup freshly grated parmesan

Procedure

Preheat oven to 375° F.

Poke holes with a knife into the spaghetti squash on all sides and place on a foil-lined baking sheet.  Season garlic cloves with a little olive oil, salt and pepper and wrap separately in foil.

Bake the squash for 1 hour turning every 15 to 20 minutes.  Cooking time may vary depending on the size of the squash.  Let it cool.  Split the squash lengthwise (should easily cut) and remove the seeds.  The flesh should be easy to pull out – if not, place it cut side up back on the baking sheet and cook for a bit longer.  I like to use a fork around the edges to pull out the squash flesh.  You want all of it to be separate, like spaghetti.  Reserve in a bowl.

Remove the garlic after another 15 minutes or so.  It should be soft, caramelized, and smell nutty and fragrant.

Reduce oven to 350° F.

In a saucepan over medium-low heat, melt butter.  Add flour and cook 2 to 3 minutes, whisking continuously.  Add milk, crème fraiche, saffron, cayenne, hot sauce and sugar.  At this point, you can purée the roasted garlic and add it.  I actually just added the cloves right in and used my whisk and the heat to break it up.  Continue to whisk and simmer for 5 to 6 minutes.  It should be at a slow bubble.

Combine béchamel mixture with squash and transfer to a greased 2-quart baking dish.  Sprinkle the freshly grated parmesan all over the top, and bake for 45 to 50 minutes until brown and bubbly.

tags: spaghetti squash gratin, squash recipes, spaghetti squash recipes, gratin recipes, saffron
categories: all-5, vegetarian, recipes, side dishes, main dishes-1
Monday 11.22.10
Posted by Aliya LeeKong
 

Pear-Anise Cake

View fullsize pear-cake-pic1-500x333.jpg
View fullsize pear-cake-pic2-500x333.jpg
View fullsize pear-cake-pic3-500x333.jpg

Pear-Anise Cake

Whenever I head down to visit my parents in Florida, my mom bakes this incredible apple loaf cake.  Moist, cinnamon-ey, bursting with soft, baked chunks of apple.  Warmed up with a scoop of vanilla ice cream (um, on the couch in some sweats…) – it is pure, luxurious comfort.

I thought I’d recreate a version of this loaf cake using delicious, seasonal winter pears instead of apples.  Returning from Goa, I brought back a ton of spices – turmeric, massive cinnamon sticks, woodsy black cardamom, and some beautiful anise seed.  The anise struck me as an ideal compliment to sweet, ripened pears, AND I’ve been looking for an excuse to use that Pernod liqueur that’s been sitting on the shelf for who knows how long.

I used Bosc pears here because they hold up really well to cooking and don’t turn to complete mush.  I always ripen my pears in a bag on the counter before using them to get the peak flavor because most of the ones at the farmers’ market are unripe when you get them.  Also, I macerated the diced pears with Pernod and sugar before adding to the cake batter – the liquid that’s released develops beautiful flavor in the cake and adds moisture.  Theoretically, you could leave out the Pernod as long as you still macerate the pears with sugar and enough liquid is released – but I’m disclaiming that I haven’t tried it that way so you’re on your own!  The result is a fine crumb loaf cake that is moist, full of pear flavor, scented with licorice-anise.  Enjoy!

Ingredients

Yields 1 8½” x 4¼” x 2¾” loaf pan

3 cups peeled, cored and diced bosc pears

3 tbsps Pernod liqueur

1 ¼ cups light brown sugar

1 ½ cups all-purpose flour

½ tsp salt

½ tsp cinnamon

¾ tsp anise seed, crushed (with a mortar and pestle)

½ tsp baking soda

2 tsps baking powder

½ stick butter, room temperature

1 tsp vanilla

2 eggs, room temperature

Procedure

Preheat oven to 375° F.

Place diced pears in a bowl and add Pernod along with 2 tablespoons of the sugar.   Stir to combine and let stand to macerate for 15 minutes.

In another bowl, sift together flour with salt, spices, baking soda and baking powder.

In a stand mixer, cream together remaining sugar and butter.  With mixer on medium-low, add vanilla and then the eggs one at a time.  Turn mixer down to low, and add in the dry ingredients, stopping to scrape down the sides.  Mix until almost combined.  Add in the pears with any liquid that’s accumulated and mix until thoroughly combined.

Pour batter into a greased loaf pan, and bake for 45 minutes or until a toothpick inserted into the center comes out clean.

tags: pear cake, anise recipes, pear desserts, pear-anise recipes
categories: all-5, breads & cakes, recipes, desserts-1
Wednesday 11.17.10
Posted by Aliya LeeKong
 

Scones with Sorrel Flower Jelly

View fullsize sorrel-pic1-500x333.jpg
View fullsize sorrel-pic2-500x333.jpg
View fullsize sorrel-pic3-500x333.jpg

Scones with Sorrel Flower Jelly

When someone says “sorrel” these days, what typically springs to mind is the green leafy vegetable, or herb to some, that has trendily showed up on menus in the past few years.  Though it might be delicious in jelly form, that is definitely not the sorrel in this recipe…I’m actually referring to the sorrel flower I mentioned in a previous post that’s used to make a popular West Indian drink.

The first time I tried sorrel was with my husband at the Trinidadian-Chinese spot in Brooklyn I wrote about a few months back.  It’s a blood-red drink – tart, sweet, floral with an underlying taste of cloves.  Unusually delicious.  The sorrel flower is actually hibiscus, so it’s not a far stretch from your basic hibiscus tea.  And similar to tea, sorrel is made from steeping the flower with sugar and spices.  A similar drink is also widely consumed in parts of Africa where it’s known as roselle orbissap rouge in Senegal or even karkadeh in Egypt.  Jamaicans use ginger to flavor the sorrel, but you know I had to stay true to the Trinidadians, so I stuck with their tradition of cinnamon and clove.

I actually trekked over to the (deep) BK to a small West Indian market to find dried sorrel petals for this recipe, which was totally unnecessary I found out during my last trip to some of my favorite ethnic grocers in the city.  You can typically find the dried form in health food stores and in various ethnic markets.

In any case, a jelly is a mildly unusual but interesting use of sorrel and, it turns out, delicious.  How cool is that – to make your own homemade and seasonal jellies and jams.  This one, I like to layer with a little mascarpone or Devonshire cream on the scone to balance out the sweetness.  The scone is buttery and delectable but plain Jane as far as scones go, a great basic scone recipe to which you can add any variation of ingredients.  That was purposeful – I really wanted the flavor of sorrel to shine though.  Enjoy.

Ingredients

Yields 6 ½ cups jelly and approximately a dozen scones (depending on size)

Sorrel Jelly:

4 ½ cups water

1 ½ cups dried sorrel flower

1 cinnamon stick

6 whole cloves

6 cups granulated sugar

1 3 oz pouch liquid pectin (I used Certo brand)

Basic Scone:

2 cups all-purpose flour

1 tbsp baking powder

1/3 cup granulated sugar

1 tsp salt

1 stick butter, cold, cut into cubes

2 eggs, cold

½ cup heavy cream, cold

Procedure

For the jelly, bring water to a boil with the cinnamon stick and cloves.  Add sorrel and boil for 2 minutes.  Remove from the heat and let sit overnight.  In certain places, sorrel may even be allowed to sit for several days to achieve the desired flavor.

Strain sorrel mixture into a saucepan and bring to a boil.  Add sugar, stir to dissolve, and bring back up to a boil.  Add liquid pectin and boil for 1 minute .  Be very careful at this point – it easily boils over.  Remove from the heat and immediately pour into sterilized jars.   Jars, prior to being filled, should be heated in a pot in simmering water and kept hot until filled with the jelly.

Although the sugar helps preserve the jelly, processing the jars in a boiling water bath after filling with jelly will help seal the jars for longer preservation.  Place jars back into the water pot and make sure that the water covers the jars by 1 to 2 inches.  Boil for 5 minutes, remove, and cool.  Unopened, the jellies will be good for about 1 year.  Once opened, the shelf life is about 3 weeks.

For the scones, preheat the oven to 375? F.   Combine all-purpose flour, baking powder, sugar and salt in a stand mixer.  Add diced, cold butter and mix on low until the texture resembles sandy peas.  It’s important that the ingredients stay cold as this creates a flakier texture for the resulting scone.  Combine eggs and cold, heavy cream and pour into the mixer bowl slowly with the mixer on low.   Be careful not to overmix – you just want the dough to come together.   Overmixing will also result in a tougher, less flakier scone.

Roll out dough on a floured surface with a floured rolling pin until about ½ “ thick and cut out with whatever cutter shape/size you like.  I say approximately a dozen scones because it varies with how you choose to size your scones.  You can also brush with an egg wash at this point if you like to make the tops deeper brown and shiny.  Bake for about 15-18 minutes until the scones are uniformly golden brown.  Cool on a rack for another 20 minutes or so.

Serve scones warm with a bit of the jelly and some cream.

tags: scones, sorrel flower jelly, sorrel, brunch recipes
categories: breads & cakes, breakfast, recipes, all-5
Monday 11.15.10
Posted by Aliya LeeKong
 

Pumpkin Soup with Garam Masala & Crème Fraiche

View fullsize pumpkin-soup-pic1-500x333.jpg
View fullsize pumpkin-soup-pic2-500x166.jpg
View fullsize pumpkin-soup-pic3a-500x333.jpg
View fullsize pumpkin-soup-pic3-500x333.jpg

Pumpkin Soup with Garam Masala & Crème Fraiche

A few years back I discovered the beautiful combination of pumpkin and garam masala.  I think I was making a pumpkin polenta and, like the Swedish Chef on the Muppets, kind of just threw it in.  I’ve been in love with the combo ever since.

Garam masala is a traditional South Asian spice blend.  It’s spicy and full-flavored but has no real heat to it.  The blend differs from region to region but usually includes peppercorns, cardamom, cloves, cumin, cinnamon, coriander and bay leaves but can also include nutmeg, star anise, and even saffron.  I usually make my own at home because sometimes it’s added whole and sometimes ground.  But you can find the spice blend in powdered form at most supermarkets these days.  It can completely overwhelm a dish, so the key is to use it sparingly.

I debated a lot of different forms for the spice / vegetable combo – everything from waffles to pumpkin pie.  I settled on soup because it’s the perfect fall food – warm, comforting, and aromatic.  There’s sweetness from the pumpkin, the garam masala spice in the background, a little kick from the cayenne and a fantastic tanginess and mouth-feel from the crème fraiche…really delicious.   I used smaller sugar pumpkins because they are sweeter and have a more developed flavor than the larger ones, but even butternut squash would be beautiful here if you have it on hand.  Enjoy!

Ingredients

Serves 4 to 6

2 small sugar pumpkins (3 to 4 lbs each), halved and seeded

olive oil

salt and freshly ground pepper

4 tbsps unsalted butter

2 medium onions, diced

1 tsp salt

1 tsp ground garam masala

½ tsp freshly ground black pepper

¼ tsp ground cayenne pepper

2 cloves garlic, minced

2 tsp brown sugar

few sprigs thyme

1 bay leaf

½ cup white wine

3 cups stock

1/3  cup crème fraiche

chives, for garnish

Procedure

Preheat oven to 400° F.  Drizzle the inside of the pumpkin halves with olive oil, and season with salt and pepper.  Place halves flesh side down on a foil-lined baking sheet, and roast for 45 to 50 minutes until very tender.  Let cool slightly, and then scoop out the flesh into a bowl and reserve.

In a soup pot, melt butter over medium-low heat.   Add onions, salt, garam masala, black pepper, and cayenne and cook for 3 to 4 minutes until translucent.  Add the garlic and the brown sugar and cook for another minute.

Now, add back in the pumpkin along with the thyme, bay leaf and white wine and cook for 2 to 3 minutes until the wine has mostly absorbed.  Add the stock and bring up to a simmer.  Simmer for 35 minutes partially covered to finish cooking and let all of the flavors combine.

Remove the thyme sprigs and the bay leaf.  Add the crème fraiche and either transfer to a blender or use a hand blender to puree to your desired consistency.  I like mine with a bit of texture.

Serve sprinkled with chives and a nice piece of crusty bread!

tags: pumpkin, soups, garam masala, soups for winter
categories: recipes, soups & salads, all-5, vegetarian-1
Wednesday 11.10.10
Posted by Aliya LeeKong
 

Bacon, Cheddar & Cassava Stuffing

View fullsize stuffing-pic1-500x333.jpg
View fullsize stuffing-pic2-500x333.jpg
View fullsize stuffing-pic3-500x333.jpg

Bacon, Cheddar & Cassava Stuffing

A lovely food memory of mine growing up was baked cassava with a little lime, salt and chili pepper.  It’s an incredibly versatile vegetable whether deep-fried, ground into flour, puréed or even baked into a sweet dessert – my favorite being West Indian cassava pone, a thick, moist, gelatinous cake with coconut and spices like cinnamon and nutmeg.  Yum!  I craved it just thinking about it – will definitely be making soon…

Cassava, which is also called yucca, is a staple starch in many tropical areas.  It’s found throughout South America and the Caribbean and is also a large part of sub-Saharan African cuisines.  Again, building on the Thanksgiving-preparation concept, I decided to make a stuffing.  I used the cassava here much like I would a potato – for it’s starchy binding effect, gentle flavor and texture.

The flavors that really pop in this dish are the salty, smoky bacon, tangy cheddar and green onion.  It’s like a biscuit-turned-stuffing!   Totally yummy and pairs well with just about anything.    I’m not sure why stuffing has been relegated to holiday status – I would so eat this on any given day as my carb side.  Enjoy!

Ingredients

Yields 1 9” x 13” x 2” baking dish

2 to 3 slices bacon, diced

5 tbsps butter

2 cups diced onions

1 ½ cups grated cassava

3 cloves garlic, minced

1/3 cup sliced green onions, green and light green parts only

1 ¼ cups shredded cheddar cheese

10 cups day-old white or sourdough bread, cut into 3/4 “ cubes*

1 1/4 cup chicken stock

2 eggs, beaten

Procedure

Preheat oven to 350°F.

Heat a medium skillet over medium heat.  Add diced bacon and cook for 5 to 7 minutes until crispy.  Transfer bacon using a slotted spoon to a paper towel-lined plate.  Pour out most of the rendered bacon fat save about 2 teaspoons.

Turn heat down to medium-low and add butter.  Add onions and cook 3 to 5 minutes until translucent.  Add cassava and garlic and cook for another minute.  Transfer to a bowl.

Add green onions, cheese, bread, eggs, and chicken stock to onion mixture and combine thoroughly.  Pour stuffing mixture into a greased baking dish and bake for 30 to 40 minutes until the outside is lightly browned and the stuffing is warmed through.  Serve warm.

*You want the bread to be a little crusty.  If the bread is soft, lay the cubes out on baking sheets, and bake in a 350°F oven until lightly toasted (7 to 10 minutes).

tags: bacon recipes, stuffing recipes, Cassava recipes, bacon-cheddar
categories: all-5, side dishes, recipes
Monday 11.08.10
Posted by Aliya LeeKong
 

Pork Chops with Red Onion & Apple Chutney

View fullsize pork-chop-pic1-500x333.jpg
View fullsize pork-chops-pic2-500x333.jpg
View fullsize pork-chops-pic3-500x166.jpg

Pork Chops with Red Onion & Apple Chutney

I worked at a restaurant where we used to make “marmalades”, one of which was a tomato based one.  The process called for red onions to be cooked down first, and it always amazed me what a subtle flavor it provided against the sweet backdrop.  I had to try the combination with apples just to see and what better way for the season than to prepare them as a chutney with golden, crusty pork chops.

I’m big on brining, particularly when it comes to pork chops and chicken.  I’m trying to figure out the mechanics of brining the massive turkey we’re going to prepare for Thanksgiving, but I haven’t – how we’re going to fit it all in the fridge is beyond me.  But anyway, here, the brine imparts incredible moisture to the chops.  It’s important to dry them fully before searing to achieve that beautiful caramelized exterior, the most flavorful part!

This apple chutney is a delicious addition to any pork dish really.  The sweet red onions melt into the background.  The fennel and cumin work perfectly with the pork, and the warm, mellow apples bring it all together.  I used fuji apples here because they hold their shape, but feel free to use whatever you have on hand.  This dish is incredibly versatile – it goes from simple weeknight supper to deserving holiday meal.  Enjoy!

Ingredients

Serves 4

4 pork loin or rib chops, 1” thick

olive oil

butter

Brine:

8 cups water

½ cup sea salt

¼ cup + 2 tbsps sugar

1 tsp dried thyme

½ tsp coriander seeds, crushed

½ tsp whole black peppercorns, crushed

1 bay leaf

Red Onion & Apple Chutney:

2 tbsps olive oil

1 tbsp unsalted butter

1 tsp fennel seed

½ tsp cumin seed

¼ cup red onion, finely minced

3 ½ cups apples, peeled, cored, and cut into a ½“ dice

½ tsp salt

2 tsps sugar

¼ to ½ tsp crushed red pepper

3 tbsps rice vinegar

Procedure

Brining really helps the pork chops stay juicy during the cooking process.  In a medium saucepan, heat 2 cups of water.   Add salt, sugar and brining spices and stir until all of the salt and sugar has dissolved.  Add this mixture to the remaining 6 cups of cold water.  In a baking dish, lay pork chops flat and pour brine over them.  Cover with plastic wrap and refrigerate for anywhere from 3 to 24 hours, turning chops regularly.  When ready to cook, take out from brine removing any whole spices that are stuck to the chops and dry thoroughly.  If you don’t have time to brine, feel free to skip this step altogether.  Results will still be delicious.  Make sure that chops are room temperature before cooking.

For the chutney, heat a skillet over medium heat.  Add oil and butter.  When foam subsides, add fennel seed and cumin seed.  Cook for about 1 minute until the spices are fragrant.  Add the red onion and cook for another 2 to 3 minutes until translucent.  Add apples, salt, sugar, and crushed red pepper and cook for another 3 to 4 minutes.  Add vinegar, reduce heat to low and let simmer 15 minutes, stirring frequently.  Remove from heat and adjust seasoning if necessary.

For the pork chops, preheat oven to 350° F.  Season chops lightly with salt and pepper if brined, more generously if not.  Heat a large skillet over medium-high heat.  Add oil to just coat the bottom of the skillet and a pat of butter, if desired.  When oil shimmers, add chops and cook for 2 to 3 minutes on each side.  Finish for 7 to 10 minutes in the oven depending on how well done you like your chops.  I did 2 minutes per side plus 7 in the oven for medium temperature.

Serve chops topped with chutney.

tags: pork chops, red onion & apple chutney, apple chutney, recipes for fall, holiday recipes, brined pork
categories: all-5, recipes, main dishes-1
Wednesday 11.03.10
Posted by Aliya LeeKong
 

Champurrado

View fullsize champurrado-pic1-500x333.jpg
View fullsize Champurrado-pic2-500x333.jpg

Champurrado

Seriously, I feel like I’ve been missing something.  Mexican chocolate.  I mean I’ve had a Mexican hot chocolate before but have never experienced the pure form of it.  The deliciously sugary, cinnamony thick tablets of sweet dark chocolate.  It’s a serious love affair, and I’m going to find more and more reasons to sneak these into desserts…or my morning coffee.  You’ve been warned – forgoing the recipe in favor of just eating the chocolate did not seem like an outlandish option after the first bite.

Atoles are a group of masa-based Mexican and Central American hot drinks with champurrado a specifically chocolate one.  The drink consists of water or milk with masa, spices like cinnamon and/or anise, and chocolate in the case of champurrado.  The masa acts as a thickening agent to create a drink that can range in thickness from a pudding-like consistency to a thinner liquid.

As the weather continues to cool, the thought of a warm, spicy chocolate drink crept into my mind, and I thought I would explore this version over the traditional Mexican hot chocolate.  Champurrado is actually a Christmas drink, though it’s also had for breakfast, often with churros.  That’s the breakfast of champions if I ever knew one….would not mind it myself.

I happened to find this luscious Ibarra Mexican chocolate at Whole Foods along with the masa harina I used to thicken it.  Although the chocolate is sweetened and has cinnamon, I added a touch more of both along with some vanilla bean for good measure.  The result is thick, rich, warmly spiced deep hot chocolate with a hint of that sweet corn flavor.  Totally addictive.  Enjoy!

Ingredients

Serves 4

4 cups milk

2 tablets Mexican chocolate, chopped into little pieces

1/3 cup masa harina

¼ cup light brown sugar

½ tsp salt

1 cinnamon stick (optional)

½ vanilla bean, split and scraped or ¼ tsp vanilla powder (optional)

Procedure

In a saucepan, warm 1 cup of milk on low (want it warm enough to melt the chocolate).  Pour into blender and add chocolate pieces and masa harina.  Blend on high for 30 seconds, and strain back into the saucepan.

Add remaining milk and ingredients and heat on medium-low.  You want to slowly bring the mixture up.   Once the mixture begins to bubble, reduce heat to low and let simmer 10 minutes until it thickens and the cinnamon and vanilla have infused.

Serve immediately!

FYI – It’s natural for a skin to form as you’re cooking.  Feel free to remove before pouring.

tags: Mexican chocolate, hot chocolate, chocolate recipes, holiday recipes
categories: drinks & cocktails, breakfast, recipes, all-6
Tuesday 11.02.10
Posted by Aliya LeeKong
 

North African-Inspired Chicken Terrine

View fullsize pastilla-pic1-500x333.jpg
View fullsize pastilla-pic2-500x333.jpg
View fullsize pastilla-pic4-500x166.jpg

North African-Inspired Chicken Terrine

So this friend of mine gave me this incredible book on terrines from the Phaidon bookstore in Soho which has a stunning array of recipes for different ways to make terrines.  The book was truly inspirational, and, for some reason, my mind immediately went to this tasty, Moroccan pie I had a few years ago in Marrakech.  It’s called bastilla or even pastilla, I’ve seen, and it’s traditionally a layered pie of pigeon with egg curd and sugary, cinnamon almonds all wrapped in a phyllo dough-like pastry.  A sweet and savoury pie of sorts that I thought would be fantastic as a terrine.

I spend so much time cooking for my husband – it causes me to trend towards manly food.  I.e. generally meaty, possibly in casserole form (he will take down with zeal anything layered in a casserole dish..) with some heavily starchy side.  I envisioned this dish for a girls’ brunch alongside a lightly dressed salad, and, true to form, every woman that’s eaten this has raved.   As a woman, sometimes (a lot of times…) I walk out of the house in an outfit that specifically women will appreciate.  This is my culinary version of that.

And I believe this incarnation of pastilla is an elegant one.  The pillowy puff pastry gives way to sweet, cinnamon-y crunchy almonds and then gently spiced, buttery minced chicken.  This is a great do ahead dish – I’ve actually travelled with the terrine as is (which also happens to be great cold) and when I get to a friends house, I wrap it up in puff pastry, throw it in the oven, and voilá!  20 minutes later the perfect compliment to a great bottle of wine and some cheese or even an elegant main dish.  Subtle, complex, surprising, textural, sweet and savoury all at the same time.  Enjoy!

Ingredients

Yields (1) 12” x 4” Terrine

¾ cups marcona almonds

¼ cup granulated sugar

¼ tsp ground cinnamon

3 tbsps unsalted butter

2 shallots, finely chopped

1 medium-sized leek, white and light green only, thinly sliced

¼ fennel bulb, finely chopped

¼ tsp grated ginger

½ tsp ground cinnamon

pinch ground allspice

¼ tsp turmeric

½ tsp ground coriander

½ tsp ground black pepper

1 dry bay leaf, crushed

1 pinch saffron

¼ tsp lemon zest

3 cloves garlic, minced

4 boneless, skinless chicken thighs, cut into ½” cubes

4 eggs

½ cup heavy cream

salt and pepper

1 sheet of puff pastry, thawed per package insructions

1 egg beaten with a little water or heavy cream (egg wash)

Confectioners sugar (for dusting)

Procedure

Preheat oven to 250° F.  Place almonds on a sheet pan and let toast in the oven for 50 minutes.  Cooking at a lower temperature for a longer period of time allows the nuts to toast all of the way through, not just on the outside.  Remove and cool.   Pulse in a food processor with sugar and cinnamon.  Set aside.

Turn oven temperature up to 350° F.  In a medium-sized skillet, melt butter over medium-low heat. Add shallots, leek, fennel and ginger and cook until softened (3 to 5 minutes).  Add all of the ground spices, the crushed bay leaf, the saffron and the lemon zest and continue to cook for another 2 to 3 minutes.  Add garlic and let cook for 30 seconds until fragrant.  Set aside mixture to cool.

In a food processor, add cubed chicken thighs and eggs and process until just a little chunky and transfer to a bowl.  I prefer a slightly chunky texture – feel free to process to a paste if you want a smoother consistency.  Add cream and the cooled shallot/leek mixture.

Line a terrine mold with plastic wrap so that the longer pieces of plastic wrap hang over the shorter sides of the mold.  Create a layer on the bottom with half of the almond mixture.  Add the entire chicken mixture and top with the other half of the almond mixture.

Overlap the plastic wrap across the top to cover the terrine completely.  Cover with a lid and place in a roasting pan or other baking dish.  Add boiling water until it comes halfway up the sides of the terrine mold and bake for 1 hour.  Remove from water bath and roasting pan and refrigerate.  Cool completely to unmold.  You can stop at this point in the recipe and serve the terrine either warm or cold – it’s delicious eiher way.

For those who want the extra decadence of the pastry, preheat the oven to 400° F.  Roll out the puff pastry on a lightly floured surface.  Place the cooled terrine top side down on the puff pastry.  Fold over to make a package of sorts and seal with a little water.  Flip over and transfer to a sheet pan.

Brush the egg wash over the exposed pastry and bake for 15 to 25 minutes to brown.  Dust with a little powdered sugar – slice, serve, and enjoy.

tags: chicken terrine recipe, North African cooking, bastilla, pastilla
categories: appetizers, recipes, main dishes-1, all-6
Wednesday 10.27.10
Posted by Aliya LeeKong
 
Newer / Older