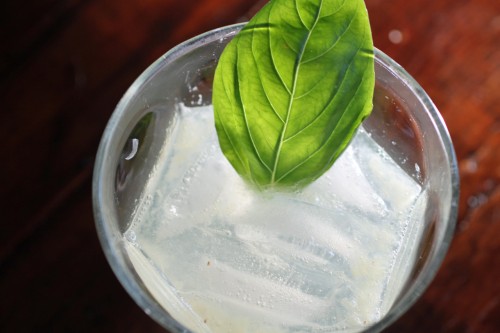
A Twist on the Classic Pisco Sour
Happy New Year! As many of you know, I spent the past few weeks doing some serious culinary exploration of Peru and Brazil (so expect me to go a bit South American-crazy with my recipes in the coming weeks). I was blown away in Peru by the incredible produce – fruits, vegetables and herbs I had never seen or heard of. The cooking was super fresh, with Lima highlighting a lot of the country’s famous seafood dishes and Cusco showing me more of the homey, Andean classics. I thought I’d start this year with a cheers to 2012, a twist on a classic Peruvian cocktail (which I drank like water…).
Pisco is a clear grape brandy produced in the winemaking regions of Peru and Chile and is the national spirit of both countries. Both also lay claim to the pisco sour, but I’ve only experienced the Peruvian version, which I was taught has 3 parts pisco to 1 part lime juice. Throw in some simple syrup for sweetness, an egg white for a bit of foamy, creaminess and a dash of bitters and you have one of the most refreshing cocktails out there.
I saw a ton of different versions while I was there, everything from passionfruit to mint. But I thought I would make something a bit more seasonally appropriate, since this mid-20’s temperature makes “refreshing” the last thing you want to think about. This is sort of a cross, a pisco sour-apple really. I used a combination of fresh fuji apple juice and lime juice and infused the simple syrup with some mulling spices – cinnamon, clove, allspice, and a star anise for good measure. The result is a cold drink with warm spices that’s totally in the winter spirit…
A few things: For pisco sours, Peruvians use the juice of a local, small lime that’s extremely aromatic. I suggest using key lime juice to get as close to that flavor as possible. Also, if you are making these for a party, I suggest making them in batches to prevent the drink getting a bit bitter or the egg white from completely separating out. Enjoy!
Ingredients
Serves 4 to 6
Spice-Infused Simple Syrup*:
Yields about ¾ cup
½ cup white sugar
½ cup water
2 cinnamon stick
3 whole cloves
3 whole dried allspice berries
2 star anise
2 bay leaf
pinch of ground nutmeg
1 inch piece of meyer lemon rind
Pisco Sour Apple:
1 ¾ cups pisco
¼ cup lime juice (preferably key lime)
1/3 cup fresh apple juice
¾ cup spice-infused simple syrup
2 egg whites
ice
angostura bitters (garnish)
Procedure
For the simple syrup, bring all ingredients in a small saucepan up to a boil, stirring so the sugar dissolves. Remove from the heat, cover and let steep for 15 minutes. Strain and cool before using.
For the pisco sour apple, pour pisco, both juices, and the simple syrup into a blender. Blend briefly. Add egg whites and blend for another 10 seconds. Pour into glasses over ice and add a few dashes of angostura bitters to each. Serve immediately.
*Feel free to use your favorite mulling spices here and make this your own. I used meyer lemon rind because I had some sitting around and felt it would work well with the lime juice. Orange rind is great too.