X

Sign up to receive exclusive recipes, tips, updates and other goodies from Aliya!

  • Home
  • Blog
    • All
    • Recipes
    • Spices + Ingredients
    • Lifestyle, etc.
    • Travel
  • The Cookbook
  • The App
  • Media
    • All Media
    • Video
  • About
  • Passions
Aliya LeeKong
  • Home
  • Blog
    • All
    • Recipes
    • Spices + Ingredients
    • Lifestyle, etc.
    • Travel
  • The Cookbook
  • The App
  • Media
    • All Media
    • Video
  • About
  • Passions

Ponche de Crème

View fullsize ponche-pic1-500x333.jpg
View fullsize ponche-pic2-500x333.jpg
View fullsize ponche-pic3-500x166.jpg

Ponche de Crème

I have a mild obsession with Christmas (and am all about West Indian dishes this week!).  I didn’t grow up with the holiday since I’m not Christian, but, as an adult, I am completely infatuated with the traditions.  This weekend I bought a massive tree and went O.C.D. decorating (my husband is not allowed to touch it) while listening to Christmas music and drinking my version of eggnog.  My mother-in-law stopped by during my decorating madness and exclaimed, after a sip or two of my eggnog, that it tasted just like ponche de crème (AND that it needed more rum…). Ponche de Crème is like West Indian eggnog – a favorite I have had at my husband’s family’s Christmas parties in the past.  It’s flavor is sweet and creamy, with a hint of spice, and that serious kick of rum.

What’s interesting to me about this recipe is how ubiquitous it is.  It’s definitely big in Trinidad and Tobago, but it is found throughout the Caribbean and even Venezuela has a version.  Theirs is called “Ponche Crema” and is a traditional drink that’s had during the festival of Navidenas.  All versions have similar ingredients – milk, eggs, sugar, rum – much like traditional egg nog in the U.S.  But the spices and aromatics differ regionally, and Venezuelans also have one that includes ground coffee or (better) coffee liqueur.  Yum!

This is now my default eggnog for the holidays.  Warning – ponche de crème  is extremely rich, indulgent and addictive.  It has a dessert-like quality that makes you feel like it’s a treat (which it is)…AND it sneaks up on you.  You might be at a party happily sipping away at this drink, chatting with friends, and then all of a sudden you’re just a liiiiittle bit too tipsy...  The ingredients that make this a stand out from traditional eggnog are aromatic bitters (which add interesting depth), lime zest (fruity brightness) and condensed milk (a luscious silky texture).  Enjoy!

Ingredients

Yields a little over 8 cups

1 quart milk

2 cups heavy cream

1 can condensed milk

zest of 1 lime

1 ½ tsps aromatic bitters

1 tsp vanilla extract

¼ tsp ground cinnamon

¼ tsp ground nutmeg

pinch of salt

7 egg yolks

¼ cup white sugar

½ cup dark rum

¼ cup brandy

Procedure

Place milk, cream, condensed milk, lime zest, bitters, vanilla extract, ground spices and salt in a pot over medium heat.  When the mixture comes up to a simmer, remove from heat.

In a bowl, beat together egg yolks and sugar until light and creamy.  Pour a little bit of the hot milk mixture into the yolks and whisk.  You want to bring the egg yolks up to temperature without cooking and solidifying the yolks.  Keep adding the milk mixture a little at a time until yolk mixture is up to the same temperature.  Return it all to the same pot and place back on the stove over medium-low heat.

Cook the mixture for about 2 to 3 minutes or until a thermometer registers 170° F – make sure to stir continuously.  Pour into a pitcher and add rum and brandy (and more than I suggested if you like it stronger of course).  Cover and refrigerate for a minimum of 4 hours or (better!) overnight.

Strain the mixture before serving to remove any pieces of zest or clumped spices.  Serve chilled over ice with a bit of fresh nutmeg on top.

tags: Christmas cocktails, eggnog, variations on egg nog, West Indian cocktails
categories: all-5, drinks & cocktails
Wednesday 12.08.10
Posted by Aliya LeeKong
 

Amigos

Amigos

I am not going to do this post, this place, this experience justice in my writing.  But I will still try.

Under the Nerul bridge in the Bardez district is a small, unpaved road that rolls down and loops around dead-ending into this amazing little restaurant, Amigos.  Across from mangroves and right at the Sinquerim river’s edge (umm, not the easiest to find), arriving there gives you the feeling that you’ve happened upon a little slice of sublime privacy, cut off from the rest of the world.   The restaurant is family run, helmed by Chef Sabitha, the matriarch of the family, and represents Goan home cooking at its finest.

This was to be the first (and best!) of a few restaurant experiences I planned during my trip.  I arrived the first day excited to see what culinary delights were in store for me.  I overzealously brought a chef’s coat and shoes, while the guys in flip flops and loose t-shirts expertly crumb-frying looked at me a bit skeptically.  But then…the power went out!  Day 1 was foiled.

I came back a few days later (more casually dressed mind you) and spent the day delving into Goan cuisine.  Sabitha and I became fast friends, and I found myself somewhere between guest chef and guest – her tying my apron on me as I’m triple-washing the greens and tea breaks to chat about her daughter’s desire to travel the world.

With 18 years of running this restaurant under her belt, Sabitha is fastidious, focused on the quality of her masalas and the freshness of the ingredients.  All of the recipes are her own – no training or cookbooks could teach her what she knows.  Her palate is expert, so that even when I came back to teach her a few dishes (my favorite part of the trip), she could identify when the spiced pumpkin soup needed more acidity or how much sweetness should be in the dark chocolate pudding we made.  And her speed?  Let’s just say working quickly because you never know when there’s going to be a power outage makes you lightning fast…

The fish recheado is judiciously made – tangy, spicy and sweet.  Recheado really means stuffed, and it’s a vestige of Portuguese culture.  The whole fish is split open and stuffed with a deep, red masala that includes kashmiri chilies, sometimes onions, garlic, ginger, cumin, cloves, cinnamon, sugar and vinegar.  I loved it rava-fried; in Goa, they use semolina instead of bread crumbs to fry, and it’s delicious.

Amigos is well-known for its fish, which is brought in fresh daily.  I know first-hand – a flapping fish unnerved me more than once when I was chopping… And the crab masala is to die for!  You have to call ahead or stop by and give them notice a day or two in advance.  You will then have some of the most delicious crab you’ve ever eaten.

This is a must if you are in Goa. It’s where the locals go to get amazingly high quality, casual home cooking. Gazing at the river, with an ice-cold shandy, and a plate of rava prawns…it doesn’t get much better.  I’m a huge fan of Sabitha, so please say hello for me if you do happen to make it there.

Amigos

Tel: +91 832 2301123

Below Nerul Bridge, Nerul, Bardez-Goa

tags: Goa
categories: all-5, travel
Tuesday 12.07.10
Posted by Aliya LeeKong
 

West Indian Cassava Pone

View fullsize pone-pic1-500x333.jpg
View fullsize pone-pic2-500x333.jpg
View fullsize pone-pic3-500x167.jpg

West Indian Cassava Pone

This dish has to be one of my favorite West Indian desserts.   After my first bite of this sweet, gelatinous “cake”, I became obsessed, which culminated in some serious lessons in Trinidadian cooking from my husband’s Aunt Cherry who lives in Port-of-Spain.  I’m one of those nervous bakers – constantly peering into the oven to make sure a cake is rising well, and my heart is in my throat during the moment of truth unmolding.  When she and I made this together, she didn’t even use measuring cups!  An unnerving confidence in her years of cooking that she could eyeball the right texture…

In different West Indian counties, I’ve seen pone made with root vegetables – cassava here but also carrots and sweet potato, always with coconut, and some with pumpkin and even raisins.  What’s fascinating is that there’s a soul food iteration of pone (I’ve mostly seen the sweet potato kind) that they make in the South.  Would love to cross compare!

There are dozens of pone recipes out there.  I am one of those that absolutely love the moist, gummy texture, but find that it can be a bit too dense at times (thus in some West Indian countries it’s called “heavy cake”).  So I modified the traditional recipes a bit to make the texture a bit lighter here but still with that gelatinous bite.  I also made it thinner, to be eaten like a dessert bar rather than a cake.  Evaporated milk gives a bit of silkiness, and the vanilla, cinnamon, nutmeg and, yes, black pepper that delicious pumpkin pie-like spice.  I also saw that some Southern pone recipes use molasses, so I incorporated a few tablespoons for some beautiful, caramelized sweetness and a deeper color.  Heat it and throw a scoop of ice cream on top for serious decadence.  Enjoy!

Ingredients

Yields 1 9” x 13” x 2” 3-quart baking dish

2 cups grated cassava

1 ½ cups grated fresh coconut

1 can evaporated milk

3 tbsps unsalted butter, melted

1 ½ tsps vanilla extract

1 cup light brown sugar

3 tbsps molasses

1/3 cup all-purpose flour

½ tsp baking powder

1 ¼ tsps ground cinnamon

1/8 tsp ground nutmeg

½ tsp salt

¼ tsp ground black pepper

Procedure

Preheat oven to 350° F.

In a bowl, whisk together coconut milk, melted butter, sugar and molasses until sugar is dissolved.

In a separate bowl, sift together flour, baking powder, cinnamon, nutmeg, salt and black pepper and whisk to combine.  Add wet ingredients a little at a time to the dry ingredients whisking until batter is smooth (don’t overmix).  Fold in grated cassava, and coconut.

Transfer mixture to a greased dish and bake @ 350° F for 45 minutes.  The edges should look brown and starting to separate from the baking dish.  Remember that, if you are using a different baking dish from what I specified, cooking time will vary.  Cool completely before cutting into squares and serving.

tags: pone, West Indian desserts, West Indian recipes, Cassava recipes, Cassava
categories: all-5, breads & cakes, desserts, recipes
Monday 12.06.10
Posted by Aliya LeeKong
 

Mace

View fullsize mace-pic1-500x333.jpg
View fullsize mace-pic2-500x333.jpg
View fullsize mace-pic3-500x333.jpg

Mace

I love this picture!  I actually took this while visiting a completely amazing spice farm in Goa.  We were walking through the lush forest of trees, examining spice by spice, and here we picked nutmeg and mace.  The brownish-black pit is the nutmeg, and the red web or aril is mace.

I was inspired to post about mace by a culturally fantastic article about nutmeg from this month’s Saveur magazine.  In it, you can see how nutmeg is used across many cuisines in so many different foods, from savoury West Indian dishes, to American desserts, to Italian greens.  And, inextricably intertwined, so it is with mace.

Mace’s flavor is quite similar to nutmeg though I would say a bit more delicate in some ways and stronger in others.  The warm, pumpkin pie-ness of nutmeg is a bit tempered here, whereas a peppery quality emerges and kind of hits you in the middle of your tongue.  It’s completely versatile like nutmeg, cinnamon or cardamom in that it’s additive to both sweet and savoury dishes. I love to throw it in to soups like a bay leaf and let the flavor permeate the liquid.  It’s also delicious in baked goods – biscotti, shortbread.  I like it in meat dishes as well – the peppery part picks up so well with beef, pork, or even game.

The crimson red of the mace lace turns to a more burnt orange through drying, but it’s one of those spices, like nutmeg, that retain its flavor well when stored ground.  So if you can only find it ground, it will still have great flavor.

tags: mace, Goa, spices
categories: all-5, spices-2
Thursday 12.02.10
Posted by Aliya LeeKong
 

Chili Cheese Toast

View fullsize cheese-toast-pic1-500x333.jpg
View fullsize cheese-toast-pic2-500x333.jpg
View fullsize cheese-toast-pic31-500x333.jpg

Chili Cheese Toast

I absolutely love when you are feeding someone who has no idea what cooking requires, and you serve them something sinfully easy to prepare, and they take a bite and look at you as if you performed a miracle of sorts.  That’s what happened the first time I gave my husband these cheese toasts…for breakfast no less.  You would have thought I had prepared foie from scratch.

Although these might look like a kicked-up pizza of sorts, chili cheese toasts are actually a very popular South Asian snack.  Every cook has her or his own version – perhaps a dash of chili powder, a touch of turmeric , some curry leaves.  My grandmother used to make a delicious version and bound all of the ingredients together with egg.  She then fried it on the stove top for ultimate crispiness.

I kept this version relatively simple, so feel free to modify to your heart’s content.  I didn’t feel like frying as I wanted this to be a tad healthier, so these are baked.  I also used sundried tomatoes instead of fresh ones to minimize the moisture, but feel free to use fresh tomatoes  – just try to remove as much liquid as possible before adding to the cheese mixture.

You get heat from the chilies, delicious green onion flavor, a bit of sweet and tart from the tomato, of course, lovely, tangy, bubbly cheese, and a nice satisfying crunch from the toast.   These make an amazing afternoon snack, but I love them for breakfast.  If you’ve got knife skills, you can make this in 10 minutes with the cooking time!  Enjoy!

Ingredients

Serves 2 to 4

1 jalapeno or Serrano pepper, finely chopped (any chili of your choice)

2 sundried tomatoes, finely chopped

1 scallion, green and light green part only, thinly sliced

1 cup mozzarella, shredded (preferably low-moisture)

3 tbsps cream cheese, room temperature

¼ tsp salt

freshly ground black pepper

4 slices white bread, toasted

chopped cilantro or parsley

Procedure

Preheat the broiler.

In a bowl, mix together chopped chilies, sundried tomatoes, scallions, mozzarella, cream cheese, salt and pepper.  Spoon equal amounts of mixture onto 4 slices of toasted white bread.  Spread to create an even layer on each piece of toast.

Place cheese toasts on a baking sheet and place under the broiler.  Broil for anywhere from 3 to 5 minutes until cheese has melted – keep it under a bit longer if you like your cheese to brown (like I do!).  Sprinkle with a bit of fresh cilantro or parsley before serving.

tags: South Asian snacks, Chili cheese toast, cheese toast recipe, South Asian cheese toast
categories: all-5, breakfast, recipes, snacks, vegetarian
Wednesday 12.01.10
Posted by Aliya LeeKong
 

Spicy Mussels with a Kokum-Coconut Broth

View fullsize mussel-pic1-500x333.jpg
View fullsize mussel-pic2-500x333.jpg
View fullsize mussel-pic3-500x333.jpg

Spicy Mussels with a Kokum-Coconut Broth

This Goa trip I just took has inspired a host of recipes – the fresh ingredients, bright flavors and colors, interesting cultural mix.  I seriously have to restrain myself to prevent all of my recipes from being monopolized by this cuisine.  This dish is one I was dreaming about after I made traditional Goan fish curry during my first few days there – an elegant take on mussels using a popular Konkani ingredient, kokum.

I posted about kokum before I left for my trip, but it’s effectively the dried rind of a local plum-like fruit.  It adds acidity and tartness to dishes there.  It’s often interchanged with fresh tamarind, so you could add a touch of that here instead if you happen to have it on hand.  You won’t get the same flavor, but I’ll bet it’s still delicious.

I love how cheap mussels are.  I average about 1 pound per person for a main, and at $3 a pound, there’s not a better deal.  They work incredibly well for entertaining – cheap yet elegant.

The combination of coconut and kokum was really popular in Goan dishes, though they tend to use freshly grated coconut.  A lot of their dishes also had this beautiful balance of tart, creaminess from the coconut, and a bit of sweetness from jaggery, which is unrefined cane or palm sugar.  Coconut milk is a lot easier to work with, so I used that here, and I used honey instead of sugar because I love the flavor.

The resulting broth is warmly spiced, with heat from the chili, acidity and tartness from the kokum and wine, and tempered by the creamy coconut milk.  A splash of fresh lemon juice and cilantro add brightness, and the dish is surprisingly light.  I toasted up some slices of a crunchy, French loaf with olive oil and a bit of salt and used it to sop up the sauce.  Decadent. Enjoy!

Ingredients

Makes 2 to 4 servings

2 lbs fresh mussels, scrubbed and beards removed*

3 tbsps butter

2 shallots, finely chopped

1 finger chili, halved and split

½ tsp ground coriander

¼ tsp ground cinnamon

¼ tsp ground black pepper

4 cloves garlic, minced

¼ cup white wine

1 can coconut milk

1 ½ tsps honey

1 to 3 pieces of kokum (depending on the strength/souring quality of the kokum)

1 handful cilantro, finely chopped

Salt to taste

2 scallions, green and light green parts only, thinly sliced

squeeze of lemon juice

Procedure

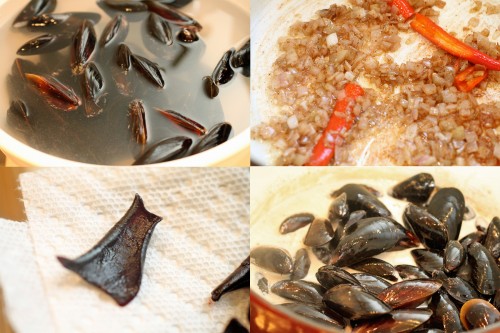
Heat a medium-sized pot or dutch oven over medium-low heat.  Add butter and when foam subsides, add shallots and a pinch of salt to draw out the moisture.  Cook for a minute or two and add in the chili and ground spices.  When shallots are translucent, add minced garlic and cook for 30 seconds or so or until it’s fragrant.

Add white wine and reduce until very little is left.  Add coconut milk, honey, kokum pieces, and 2 tablespoons of the cilantro.  Some kokum is extremely sour, so start with 1 piece and increase up to 3 depending on how tart you’d like your broth.  Bring mixture up to a boil and lower to a simmer.  Cook for 5 to 7 minutes or until the liquid has reduced by half.  Taste and adjust seasoning at this point.

Throw in the mussels and scallions.  Bring temperature up to a simmer again, and cook covered for a few minutes until mussels open.  Mine took somewhere between 3 and 4 minutes – you don’t want to overcook.

Squeeze fresh lemon juice over mussels, transfer to a bowl, and sprinkle remaining cilantro on top.  Serve hot with big pieces of toasted, crusty bread.

*I think a key to making delicious mussels is thoroughly cleaning them.  I like to scrape around the outside of each mussel with a pairing knife, removing any debris and hairy parts (beard).  Prepare an ice- cold bowl of water and add sea salt until the water tastes pretty salty.  Rinse off mussels, place in salt water, and refrigerate for a minimum of a half hour.  The mussels will release a lot of their sand and grit this way.  Remember to rinse again before cooking and discard any open mussels.

tags: mussels, seafood recipes, spicy mussels, kokum
categories: all-5, recipes, main dishes-1
Monday 11.29.10
Posted by Aliya LeeKong
 

Saffron & Roasted Garlic Spaghetti Squash Gratin

View fullsize squash-pic1-500x333.jpg
View fullsize squash-pic2-500x333.jpg
View fullsize squash-pic3-500x166.jpg
View fullsize squash-pic4-500x333.jpg

Saffron & Roasted Garlic Spaghetti Squash Gratin

Saffron, without a doubt, is an expensive spice to work with.  I’m a bit of a deal hunter when it comes to it and always search around when I’m traveling to see if I can get it on the cheap.  I remember spotting it in the medina in Marrakech for a ridiculously low price and basically carting home a bushel full.  It wasn’t incredibly fragrant (and quite frankly the color was off) but eh, it was saffron!  It’s been sitting in my spice cabinet ever since – the lousiest, tasteless saffron I’ve ever met…and somehow I still won’t part with it.

The saffron for this dish I picked up during my visit to Mercat de la Boqueria a few months back.  I still trekked around to each stall that sold it to make sure I got the cheapest one!  Got it right this time.  This stuff has an incredible perfume and was beautiful in this dish.

When I dug deep into why I thought spaghetti squash and saffron would pair well together, I realized the mental origin of this dish might seem a bit strange.  There’s a South Asian pudding that can be made with either rice or vermicelli called kheer; it’s often scented with saffron.  This, to me, was like a savoury version of it.

The saffron, of course, compliments the flavor of the spaghetti squash, which I boost a bit with a touch of brown sugar.  The sweet, roasted garlic adds a lovely nuttiness and works incredibly well with the freshly grated parm.  I love this dish.  It’s a bit sinful, but healthier as far as gratins go since we’re using squash.  Cheesy, creamy, nutty with the perfume of saffron – Enjoy!

Ingredients

Yields 1 2-quart casserole dish

2 medium-sized spaghetti squash

5 garlic cloves

olive oil

salt and freshly ground pepper

½ stick butter

¼ cup all-purpose flour

2 cups milk

¼ cup crème fraiche

generous pinch of saffron

pinch of cayenne

a few dashes of hot sauce

1 ½ tsps light brown sugar

½ cup freshly grated parmesan

Procedure

Preheat oven to 375° F.

Poke holes with a knife into the spaghetti squash on all sides and place on a foil-lined baking sheet.  Season garlic cloves with a little olive oil, salt and pepper and wrap separately in foil.

Bake the squash for 1 hour turning every 15 to 20 minutes.  Cooking time may vary depending on the size of the squash.  Let it cool.  Split the squash lengthwise (should easily cut) and remove the seeds.  The flesh should be easy to pull out – if not, place it cut side up back on the baking sheet and cook for a bit longer.  I like to use a fork around the edges to pull out the squash flesh.  You want all of it to be separate, like spaghetti.  Reserve in a bowl.

Remove the garlic after another 15 minutes or so.  It should be soft, caramelized, and smell nutty and fragrant.

Reduce oven to 350° F.

In a saucepan over medium-low heat, melt butter.  Add flour and cook 2 to 3 minutes, whisking continuously.  Add milk, crème fraiche, saffron, cayenne, hot sauce and sugar.  At this point, you can purée the roasted garlic and add it.  I actually just added the cloves right in and used my whisk and the heat to break it up.  Continue to whisk and simmer for 5 to 6 minutes.  It should be at a slow bubble.

Combine béchamel mixture with squash and transfer to a greased 2-quart baking dish.  Sprinkle the freshly grated parmesan all over the top, and bake for 45 to 50 minutes until brown and bubbly.

tags: spaghetti squash gratin, squash recipes, spaghetti squash recipes, gratin recipes, saffron
categories: all-5, vegetarian, recipes, side dishes, main dishes-1
Monday 11.22.10
Posted by Aliya LeeKong
 

Lucknow Fennel

View fullsize fennel-pic2-500x333.jpg
View fullsize fennel-pic1-500x333.jpg

Lucknow Fennel

Roaming around various markets and farms in Goa, I was overwhelmed by the abundance of fresh spices.  I brought back the most beautiful cinnamon from a farm I visited, incredible white poppy seeds from a popular indoor market, and all sorts of nonsense from the famed, outdoor Mapusa Friday market the day before I left.  I smuggled in the lot  (smuggled as in declared them, carried them in my hand, and chatted away with the customs officer about cooking after…) and am now happily sitting on some prized spices.  They are incredibly fresh, distinct, aromatic – it’s sad how much of their potency is lost by the time they get to the supermarket shelves.

One of the spices I brought back is Lucknow Fennel, which is believed to be one of the highest quality fennel seeds out there.  These seeds are primarily grown in Lucknow, the capital of Uttar Pradesh in India.  They are smaller, greener, and definitively sweeter and more aromatic than traditional fennel seeds.  In South Asia, they are often used as a digestive or breath freshener.

I’ve seen this spice used in desserts and am debating baking them into a shortbread cookie myself.  They also would be fantastic in a riz au lait or kheer or even with yogurt, honey, and fruit.  I usually prefer traditional fennel seeds for more savoury applications (LOVE it in sausage and pork dishes), but love the sweeter crunch these provide for breads.

This type of fennel seed is easily found at ethnic grocers and online spice providers.

tags: fennel, Lucknow fennel, Goa
categories: all-5, spices-2
Thursday 11.18.10
Posted by Aliya LeeKong
 

Pear-Anise Cake

View fullsize pear-cake-pic1-500x333.jpg
View fullsize pear-cake-pic2-500x333.jpg
View fullsize pear-cake-pic3-500x333.jpg

Pear-Anise Cake

Whenever I head down to visit my parents in Florida, my mom bakes this incredible apple loaf cake.  Moist, cinnamon-ey, bursting with soft, baked chunks of apple.  Warmed up with a scoop of vanilla ice cream (um, on the couch in some sweats…) – it is pure, luxurious comfort.

I thought I’d recreate a version of this loaf cake using delicious, seasonal winter pears instead of apples.  Returning from Goa, I brought back a ton of spices – turmeric, massive cinnamon sticks, woodsy black cardamom, and some beautiful anise seed.  The anise struck me as an ideal compliment to sweet, ripened pears, AND I’ve been looking for an excuse to use that Pernod liqueur that’s been sitting on the shelf for who knows how long.

I used Bosc pears here because they hold up really well to cooking and don’t turn to complete mush.  I always ripen my pears in a bag on the counter before using them to get the peak flavor because most of the ones at the farmers’ market are unripe when you get them.  Also, I macerated the diced pears with Pernod and sugar before adding to the cake batter – the liquid that’s released develops beautiful flavor in the cake and adds moisture.  Theoretically, you could leave out the Pernod as long as you still macerate the pears with sugar and enough liquid is released – but I’m disclaiming that I haven’t tried it that way so you’re on your own!  The result is a fine crumb loaf cake that is moist, full of pear flavor, scented with licorice-anise.  Enjoy!

Ingredients

Yields 1 8½” x 4¼” x 2¾” loaf pan

3 cups peeled, cored and diced bosc pears

3 tbsps Pernod liqueur

1 ¼ cups light brown sugar

1 ½ cups all-purpose flour

½ tsp salt

½ tsp cinnamon

¾ tsp anise seed, crushed (with a mortar and pestle)

½ tsp baking soda

2 tsps baking powder

½ stick butter, room temperature

1 tsp vanilla

2 eggs, room temperature

Procedure

Preheat oven to 375° F.

Place diced pears in a bowl and add Pernod along with 2 tablespoons of the sugar.   Stir to combine and let stand to macerate for 15 minutes.

In another bowl, sift together flour with salt, spices, baking soda and baking powder.

In a stand mixer, cream together remaining sugar and butter.  With mixer on medium-low, add vanilla and then the eggs one at a time.  Turn mixer down to low, and add in the dry ingredients, stopping to scrape down the sides.  Mix until almost combined.  Add in the pears with any liquid that’s accumulated and mix until thoroughly combined.

Pour batter into a greased loaf pan, and bake for 45 minutes or until a toothpick inserted into the center comes out clean.

tags: pear cake, anise recipes, pear desserts, pear-anise recipes
categories: all-5, breads & cakes, recipes, desserts-1
Wednesday 11.17.10
Posted by Aliya LeeKong
 

Ritz Classic

Ritz Classic

I’m back from Goa and reflecting on all of the amazing food experiences I had while I was there.  I’m incredibly thankful I stayed with family – it allowed me to get a completely non-tourist perspective on everything from what restaurants locals really go to, typical foods that are cooked at home, and even what the best markets are for food shopping.  I packed in a serious culinary schedule over the last two weeks (and have the extra lbs to show for it…).

Ritz Classic was just one of these restaurants located in Panjim and I went there for lunch during the first few days of my trip.  Now, don’t let the décor fool you.  The yellow crown molding, palm trees painted on the walls, waiters in bow ties – it’s all part of the charm.  And, besides me of course, I did not see a single tourist in there.  The food there is a trifecta – authentic, delicious, and cheap.

Since this was one of my first few days, I went all-in and ordered the pork vindaloo.  For those that don’t know, vindaloo is one of the hottest curries in India and is actually a Portuguese tradition – tangy, serious heat, and a touch of sweetness.  The waiter brought out some sort of rookie vindaloo, which I didn’t find hot at all, and I had to level with him.  I told him I can take the heat, and he should give me what he serves the locals.  So he came with the thunder and brought out the real vindaloo.  I seriously sweated through the rest of the meal – it was, if I’m being honest, almost too hot for me, but I couldn’t fold after all the fuss I had made.

My aunt goes there for their crab, which she claims is the best in Goa, and given my crab obsession, I had to try it.  I made the HUGE mistake of going into this feast wearing silk.  Why?  The flimsy little paper napkins were no match for the flying, masala-coated crab, and I finished the meal satisfied though grease-stained.

Shrimp-stuffed papads were first out and were flavorful and perfectly crisp.  Fried, “rawa” fish, a Goan specialty using semolina in lieu of breadcrumbs, was ridiculously fresh with the perfect amount of crunch.   Of course, the pork vindaloo was rich and spicy and painful…and the crab was perfect.  Particularly since I’ve never eaten that much crab for something that converts to around $3!

In fact, the whole meal for the four of us came out to something like $14.  It was insane.  This is definitely a first stop for anyone visiting to get a true taste of Goa…

tags: Goa
categories: all-5, travel
Tuesday 11.16.10
Posted by Aliya LeeKong
 

Scones with Sorrel Flower Jelly

View fullsize sorrel-pic1-500x333.jpg
View fullsize sorrel-pic2-500x333.jpg
View fullsize sorrel-pic3-500x333.jpg

Scones with Sorrel Flower Jelly

When someone says “sorrel” these days, what typically springs to mind is the green leafy vegetable, or herb to some, that has trendily showed up on menus in the past few years.  Though it might be delicious in jelly form, that is definitely not the sorrel in this recipe…I’m actually referring to the sorrel flower I mentioned in a previous post that’s used to make a popular West Indian drink.

The first time I tried sorrel was with my husband at the Trinidadian-Chinese spot in Brooklyn I wrote about a few months back.  It’s a blood-red drink – tart, sweet, floral with an underlying taste of cloves.  Unusually delicious.  The sorrel flower is actually hibiscus, so it’s not a far stretch from your basic hibiscus tea.  And similar to tea, sorrel is made from steeping the flower with sugar and spices.  A similar drink is also widely consumed in parts of Africa where it’s known as roselle orbissap rouge in Senegal or even karkadeh in Egypt.  Jamaicans use ginger to flavor the sorrel, but you know I had to stay true to the Trinidadians, so I stuck with their tradition of cinnamon and clove.

I actually trekked over to the (deep) BK to a small West Indian market to find dried sorrel petals for this recipe, which was totally unnecessary I found out during my last trip to some of my favorite ethnic grocers in the city.  You can typically find the dried form in health food stores and in various ethnic markets.

In any case, a jelly is a mildly unusual but interesting use of sorrel and, it turns out, delicious.  How cool is that – to make your own homemade and seasonal jellies and jams.  This one, I like to layer with a little mascarpone or Devonshire cream on the scone to balance out the sweetness.  The scone is buttery and delectable but plain Jane as far as scones go, a great basic scone recipe to which you can add any variation of ingredients.  That was purposeful – I really wanted the flavor of sorrel to shine though.  Enjoy.

Ingredients

Yields 6 ½ cups jelly and approximately a dozen scones (depending on size)

Sorrel Jelly:

4 ½ cups water

1 ½ cups dried sorrel flower

1 cinnamon stick

6 whole cloves

6 cups granulated sugar

1 3 oz pouch liquid pectin (I used Certo brand)

Basic Scone:

2 cups all-purpose flour

1 tbsp baking powder

1/3 cup granulated sugar

1 tsp salt

1 stick butter, cold, cut into cubes

2 eggs, cold

½ cup heavy cream, cold

Procedure

For the jelly, bring water to a boil with the cinnamon stick and cloves.  Add sorrel and boil for 2 minutes.  Remove from the heat and let sit overnight.  In certain places, sorrel may even be allowed to sit for several days to achieve the desired flavor.

Strain sorrel mixture into a saucepan and bring to a boil.  Add sugar, stir to dissolve, and bring back up to a boil.  Add liquid pectin and boil for 1 minute .  Be very careful at this point – it easily boils over.  Remove from the heat and immediately pour into sterilized jars.   Jars, prior to being filled, should be heated in a pot in simmering water and kept hot until filled with the jelly.

Although the sugar helps preserve the jelly, processing the jars in a boiling water bath after filling with jelly will help seal the jars for longer preservation.  Place jars back into the water pot and make sure that the water covers the jars by 1 to 2 inches.  Boil for 5 minutes, remove, and cool.  Unopened, the jellies will be good for about 1 year.  Once opened, the shelf life is about 3 weeks.

For the scones, preheat the oven to 375? F.   Combine all-purpose flour, baking powder, sugar and salt in a stand mixer.  Add diced, cold butter and mix on low until the texture resembles sandy peas.  It’s important that the ingredients stay cold as this creates a flakier texture for the resulting scone.  Combine eggs and cold, heavy cream and pour into the mixer bowl slowly with the mixer on low.   Be careful not to overmix – you just want the dough to come together.   Overmixing will also result in a tougher, less flakier scone.

Roll out dough on a floured surface with a floured rolling pin until about ½ “ thick and cut out with whatever cutter shape/size you like.  I say approximately a dozen scones because it varies with how you choose to size your scones.  You can also brush with an egg wash at this point if you like to make the tops deeper brown and shiny.  Bake for about 15-18 minutes until the scones are uniformly golden brown.  Cool on a rack for another 20 minutes or so.

Serve scones warm with a bit of the jelly and some cream.

tags: scones, sorrel flower jelly, sorrel, brunch recipes
categories: breads & cakes, breakfast, recipes, all-5
Monday 11.15.10
Posted by Aliya LeeKong
 

Nigella Seeds

View fullsize nigella-pic1-500x333.jpg
View fullsize nigella-pic2-500x333.jpg

Nigella Seeds

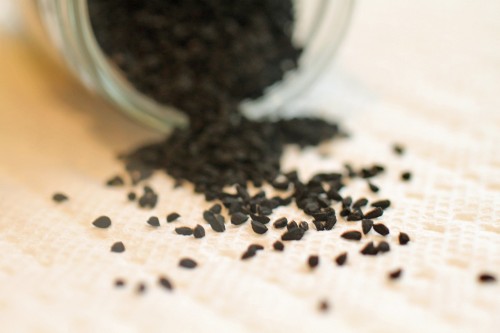
Nigella seeds are one of those nebulous spices.  If you bite into these little tear-shaped, matte, coal-black seeds raw, you get a little bitterness but otherwise very little flavor.  When cooked, though, there develops a smokiness of sorts, a peppery, almost oregano-like flavor that is absolutely delicious.  I love these in baked goods like in a biscuit or in my quickbread from a few months back.

Nigella seeds are found throughout Middle Eastern, South Asian, and even some African cooking.  In Ethiopia, the seed may be crushed up in stews or may even be added to their spiced clarified butter. The quatre épices or Chinese five spice equivalent in South Asia is called paanch phoron, and it includes nigella along with fenugreek, cumin, fennel, and black mustard seeds.   The seeds are also baked into Middle Eastern and South Asian flatbreads and added to pickles and chutneys.

tags: Nigella, Ethiopian spices
categories: all-5, spices-2
Thursday 11.11.10
Posted by Aliya LeeKong
 

Pumpkin Soup with Garam Masala & Crème Fraiche

View fullsize pumpkin-soup-pic1-500x333.jpg
View fullsize pumpkin-soup-pic2-500x166.jpg
View fullsize pumpkin-soup-pic3a-500x333.jpg
View fullsize pumpkin-soup-pic3-500x333.jpg

Pumpkin Soup with Garam Masala & Crème Fraiche

A few years back I discovered the beautiful combination of pumpkin and garam masala.  I think I was making a pumpkin polenta and, like the Swedish Chef on the Muppets, kind of just threw it in.  I’ve been in love with the combo ever since.

Garam masala is a traditional South Asian spice blend.  It’s spicy and full-flavored but has no real heat to it.  The blend differs from region to region but usually includes peppercorns, cardamom, cloves, cumin, cinnamon, coriander and bay leaves but can also include nutmeg, star anise, and even saffron.  I usually make my own at home because sometimes it’s added whole and sometimes ground.  But you can find the spice blend in powdered form at most supermarkets these days.  It can completely overwhelm a dish, so the key is to use it sparingly.

I debated a lot of different forms for the spice / vegetable combo – everything from waffles to pumpkin pie.  I settled on soup because it’s the perfect fall food – warm, comforting, and aromatic.  There’s sweetness from the pumpkin, the garam masala spice in the background, a little kick from the cayenne and a fantastic tanginess and mouth-feel from the crème fraiche…really delicious.   I used smaller sugar pumpkins because they are sweeter and have a more developed flavor than the larger ones, but even butternut squash would be beautiful here if you have it on hand.  Enjoy!

Ingredients

Serves 4 to 6

2 small sugar pumpkins (3 to 4 lbs each), halved and seeded

olive oil

salt and freshly ground pepper

4 tbsps unsalted butter

2 medium onions, diced

1 tsp salt

1 tsp ground garam masala

½ tsp freshly ground black pepper

¼ tsp ground cayenne pepper

2 cloves garlic, minced

2 tsp brown sugar

few sprigs thyme

1 bay leaf

½ cup white wine

3 cups stock

1/3  cup crème fraiche

chives, for garnish

Procedure

Preheat oven to 400° F.  Drizzle the inside of the pumpkin halves with olive oil, and season with salt and pepper.  Place halves flesh side down on a foil-lined baking sheet, and roast for 45 to 50 minutes until very tender.  Let cool slightly, and then scoop out the flesh into a bowl and reserve.

In a soup pot, melt butter over medium-low heat.   Add onions, salt, garam masala, black pepper, and cayenne and cook for 3 to 4 minutes until translucent.  Add the garlic and the brown sugar and cook for another minute.

Now, add back in the pumpkin along with the thyme, bay leaf and white wine and cook for 2 to 3 minutes until the wine has mostly absorbed.  Add the stock and bring up to a simmer.  Simmer for 35 minutes partially covered to finish cooking and let all of the flavors combine.

Remove the thyme sprigs and the bay leaf.  Add the crème fraiche and either transfer to a blender or use a hand blender to puree to your desired consistency.  I like mine with a bit of texture.

Serve sprinkled with chives and a nice piece of crusty bread!

tags: pumpkin, soups, garam masala, soups for winter
categories: recipes, soups & salads, all-5, vegetarian-1
Wednesday 11.10.10
Posted by Aliya LeeKong
 

Bacon, Cheddar & Cassava Stuffing

View fullsize stuffing-pic1-500x333.jpg
View fullsize stuffing-pic2-500x333.jpg
View fullsize stuffing-pic3-500x333.jpg

Bacon, Cheddar & Cassava Stuffing

A lovely food memory of mine growing up was baked cassava with a little lime, salt and chili pepper.  It’s an incredibly versatile vegetable whether deep-fried, ground into flour, puréed or even baked into a sweet dessert – my favorite being West Indian cassava pone, a thick, moist, gelatinous cake with coconut and spices like cinnamon and nutmeg.  Yum!  I craved it just thinking about it – will definitely be making soon…

Cassava, which is also called yucca, is a staple starch in many tropical areas.  It’s found throughout South America and the Caribbean and is also a large part of sub-Saharan African cuisines.  Again, building on the Thanksgiving-preparation concept, I decided to make a stuffing.  I used the cassava here much like I would a potato – for it’s starchy binding effect, gentle flavor and texture.

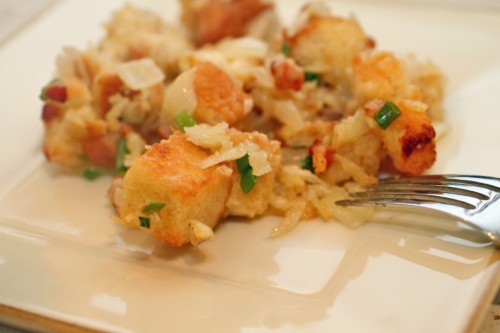
The flavors that really pop in this dish are the salty, smoky bacon, tangy cheddar and green onion.  It’s like a biscuit-turned-stuffing!   Totally yummy and pairs well with just about anything.    I’m not sure why stuffing has been relegated to holiday status – I would so eat this on any given day as my carb side.  Enjoy!

Ingredients

Yields 1 9” x 13” x 2” baking dish

2 to 3 slices bacon, diced

5 tbsps butter

2 cups diced onions

1 ½ cups grated cassava

3 cloves garlic, minced

1/3 cup sliced green onions, green and light green parts only

1 ¼ cups shredded cheddar cheese

10 cups day-old white or sourdough bread, cut into 3/4 “ cubes*

1 1/4 cup chicken stock

2 eggs, beaten

Procedure

Preheat oven to 350°F.

Heat a medium skillet over medium heat.  Add diced bacon and cook for 5 to 7 minutes until crispy.  Transfer bacon using a slotted spoon to a paper towel-lined plate.  Pour out most of the rendered bacon fat save about 2 teaspoons.

Turn heat down to medium-low and add butter.  Add onions and cook 3 to 5 minutes until translucent.  Add cassava and garlic and cook for another minute.  Transfer to a bowl.

Add green onions, cheese, bread, eggs, and chicken stock to onion mixture and combine thoroughly.  Pour stuffing mixture into a greased baking dish and bake for 30 to 40 minutes until the outside is lightly browned and the stuffing is warmed through.  Serve warm.

*You want the bread to be a little crusty.  If the bread is soft, lay the cubes out on baking sheets, and bake in a 350°F oven until lightly toasted (7 to 10 minutes).

tags: bacon recipes, stuffing recipes, Cassava recipes, bacon-cheddar
categories: all-5, side dishes, recipes
Monday 11.08.10
Posted by Aliya LeeKong
 

Pork Chops with Red Onion & Apple Chutney

View fullsize pork-chop-pic1-500x333.jpg
View fullsize pork-chops-pic2-500x333.jpg
View fullsize pork-chops-pic3-500x166.jpg

Pork Chops with Red Onion & Apple Chutney

I worked at a restaurant where we used to make “marmalades”, one of which was a tomato based one.  The process called for red onions to be cooked down first, and it always amazed me what a subtle flavor it provided against the sweet backdrop.  I had to try the combination with apples just to see and what better way for the season than to prepare them as a chutney with golden, crusty pork chops.

I’m big on brining, particularly when it comes to pork chops and chicken.  I’m trying to figure out the mechanics of brining the massive turkey we’re going to prepare for Thanksgiving, but I haven’t – how we’re going to fit it all in the fridge is beyond me.  But anyway, here, the brine imparts incredible moisture to the chops.  It’s important to dry them fully before searing to achieve that beautiful caramelized exterior, the most flavorful part!

This apple chutney is a delicious addition to any pork dish really.  The sweet red onions melt into the background.  The fennel and cumin work perfectly with the pork, and the warm, mellow apples bring it all together.  I used fuji apples here because they hold their shape, but feel free to use whatever you have on hand.  This dish is incredibly versatile – it goes from simple weeknight supper to deserving holiday meal.  Enjoy!

Ingredients

Serves 4

4 pork loin or rib chops, 1” thick

olive oil

butter

Brine:

8 cups water

½ cup sea salt

¼ cup + 2 tbsps sugar

1 tsp dried thyme

½ tsp coriander seeds, crushed

½ tsp whole black peppercorns, crushed

1 bay leaf

Red Onion & Apple Chutney:

2 tbsps olive oil

1 tbsp unsalted butter

1 tsp fennel seed

½ tsp cumin seed

¼ cup red onion, finely minced

3 ½ cups apples, peeled, cored, and cut into a ½“ dice

½ tsp salt

2 tsps sugar

¼ to ½ tsp crushed red pepper

3 tbsps rice vinegar

Procedure

Brining really helps the pork chops stay juicy during the cooking process.  In a medium saucepan, heat 2 cups of water.   Add salt, sugar and brining spices and stir until all of the salt and sugar has dissolved.  Add this mixture to the remaining 6 cups of cold water.  In a baking dish, lay pork chops flat and pour brine over them.  Cover with plastic wrap and refrigerate for anywhere from 3 to 24 hours, turning chops regularly.  When ready to cook, take out from brine removing any whole spices that are stuck to the chops and dry thoroughly.  If you don’t have time to brine, feel free to skip this step altogether.  Results will still be delicious.  Make sure that chops are room temperature before cooking.

For the chutney, heat a skillet over medium heat.  Add oil and butter.  When foam subsides, add fennel seed and cumin seed.  Cook for about 1 minute until the spices are fragrant.  Add the red onion and cook for another 2 to 3 minutes until translucent.  Add apples, salt, sugar, and crushed red pepper and cook for another 3 to 4 minutes.  Add vinegar, reduce heat to low and let simmer 15 minutes, stirring frequently.  Remove from heat and adjust seasoning if necessary.

For the pork chops, preheat oven to 350° F.  Season chops lightly with salt and pepper if brined, more generously if not.  Heat a large skillet over medium-high heat.  Add oil to just coat the bottom of the skillet and a pat of butter, if desired.  When oil shimmers, add chops and cook for 2 to 3 minutes on each side.  Finish for 7 to 10 minutes in the oven depending on how well done you like your chops.  I did 2 minutes per side plus 7 in the oven for medium temperature.

Serve chops topped with chutney.

tags: pork chops, red onion & apple chutney, apple chutney, recipes for fall, holiday recipes, brined pork
categories: all-5, recipes, main dishes-1
Wednesday 11.03.10
Posted by Aliya LeeKong
 

Champurrado

View fullsize champurrado-pic1-500x333.jpg
View fullsize Champurrado-pic2-500x333.jpg

Champurrado

Seriously, I feel like I’ve been missing something.  Mexican chocolate.  I mean I’ve had a Mexican hot chocolate before but have never experienced the pure form of it.  The deliciously sugary, cinnamony thick tablets of sweet dark chocolate.  It’s a serious love affair, and I’m going to find more and more reasons to sneak these into desserts…or my morning coffee.  You’ve been warned – forgoing the recipe in favor of just eating the chocolate did not seem like an outlandish option after the first bite.

Atoles are a group of masa-based Mexican and Central American hot drinks with champurrado a specifically chocolate one.  The drink consists of water or milk with masa, spices like cinnamon and/or anise, and chocolate in the case of champurrado.  The masa acts as a thickening agent to create a drink that can range in thickness from a pudding-like consistency to a thinner liquid.

As the weather continues to cool, the thought of a warm, spicy chocolate drink crept into my mind, and I thought I would explore this version over the traditional Mexican hot chocolate.  Champurrado is actually a Christmas drink, though it’s also had for breakfast, often with churros.  That’s the breakfast of champions if I ever knew one….would not mind it myself.

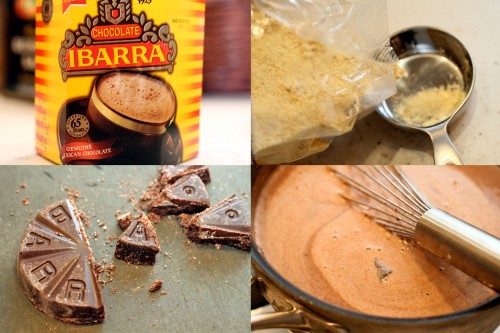
I happened to find this luscious Ibarra Mexican chocolate at Whole Foods along with the masa harina I used to thicken it.  Although the chocolate is sweetened and has cinnamon, I added a touch more of both along with some vanilla bean for good measure.  The result is thick, rich, warmly spiced deep hot chocolate with a hint of that sweet corn flavor.  Totally addictive.  Enjoy!

Ingredients

Serves 4

4 cups milk

2 tablets Mexican chocolate, chopped into little pieces

1/3 cup masa harina

¼ cup light brown sugar

½ tsp salt

1 cinnamon stick (optional)

½ vanilla bean, split and scraped or ¼ tsp vanilla powder (optional)

Procedure

In a saucepan, warm 1 cup of milk on low (want it warm enough to melt the chocolate).  Pour into blender and add chocolate pieces and masa harina.  Blend on high for 30 seconds, and strain back into the saucepan.

Add remaining milk and ingredients and heat on medium-low.  You want to slowly bring the mixture up.   Once the mixture begins to bubble, reduce heat to low and let simmer 10 minutes until it thickens and the cinnamon and vanilla have infused.

Serve immediately!

FYI – It’s natural for a skin to form as you’re cooking.  Feel free to remove before pouring.

tags: Mexican chocolate, hot chocolate, chocolate recipes, holiday recipes
categories: drinks & cocktails, breakfast, recipes, all-6
Tuesday 11.02.10
Posted by Aliya LeeKong
 

The Ravenous Pig

The Ravenous Pig

I went down to Florida a few weekends ago to visit my parents, and it was a complete eating fest.  Whenever I visit, our days literally centralize around food – what, where, when – and between my mom and I in the kitchen and different restaurants we visit, I always leave beyond stuffed.  This time they took me to a pretty cool gastropub that has opened up in a part of town called Winter Park.  The Ravenous Pig was such a unique departure from the usual big chains (though please…I do NOT hate on Cheesecake Factory…) that I had to write about it.

This restaurant literally felt like I was in some market-driven, casual pub in the West Village.  The restaurant was founded by a couple who trained at the CIA, worked in a number of restaurants on the East Coast, and returned to their hometown to open a quality resto.  They do all of their charcuterie themselves, and the list is diverse – everything from porchetta to lardo to vindaloo curry salumi.    All of their pastas are house-made as well, and the menu changes daily.

We started off with the house-made gruyère biscuits with smoked sea salt…buttery, fluffy with puff pastry-like layers of doughy goodness.  Then, we moved on to a kobe steak tartare with shallots, pickled green tomatoes, and a curry aioli.  Again, flavorful and delicious.  We wiped the plate clean.  For the entrees, there was a lamb loin with farro-risotto and a carrot puree, a Niman Ranch flat-iron steak with truffle fries (can you go wrong?), and a crispy skate with braised veal cheeks, charred radicchio, and parsnip puree.  All of them were amazing.

Dessert was s’mores pie!  A gooey marshmallow topping over dense, fudge-thick chocolate ganache served with the most amazing chocolate sorbet I have ever had.  They must have cheated – it was too good to be sorbet!  If you happen to find yourself in this area, you must try this place.  It’s too good to be missed and is head and shoulders above most other restaurants in the area…

tags: Winter Park
categories: all-6, travel
Monday 11.01.10
Posted by Aliya LeeKong
 

Kokum

View fullsize kokum-pic1-500x333.jpg
View fullsize kokum-pic2-500x333.jpg

Kokum

I thought it would be apropos to write about a spice I’m sure I’ll be cooking with a lot over the next few weeks!  I’m headed to Goa for serious culinary immersion and cannot wait to absorb the cuisines of the area.  The food of that region is deliciously complex and inflected by the climate, people, religions, coastal location, Portuguese colonialism, and local produce.

The kokum tree is a tropical tree that grows in this region and that produces a small, dark purple, plum-like fruit.  The rind of the fruit is preserved in the sun and is what is called kokum for cooking purposes.  In Goan and Malvani cuisine, kokum is used as a souring agent, a lot like tamarind is in other areas.

Most often, kokum is added whole to a braise or a curry to infuse it with its sweet, salty and sour flavor. The dried fruit also can be soaked in warm water and strained to provide a sour liquid.  It compliments coconut extremely well and the combination is popular during the summer months in the form of a sherbet. Kokum is also a common ingredient in chutneys and pickles, and I personally have been debating a jam of sorts.

When buying, kokum should be soft and pliable, not hard and brittle.  The color should be a deep purple.  I like to store mine in an airtight container – it keeps for months that way.

categories: spices-2, all-6
Thursday 10.28.10
Posted by Aliya LeeKong
 

North African-Inspired Chicken Terrine

View fullsize pastilla-pic1-500x333.jpg
View fullsize pastilla-pic2-500x333.jpg
View fullsize pastilla-pic4-500x166.jpg

North African-Inspired Chicken Terrine

So this friend of mine gave me this incredible book on terrines from the Phaidon bookstore in Soho which has a stunning array of recipes for different ways to make terrines.  The book was truly inspirational, and, for some reason, my mind immediately went to this tasty, Moroccan pie I had a few years ago in Marrakech.  It’s called bastilla or even pastilla, I’ve seen, and it’s traditionally a layered pie of pigeon with egg curd and sugary, cinnamon almonds all wrapped in a phyllo dough-like pastry.  A sweet and savoury pie of sorts that I thought would be fantastic as a terrine.

I spend so much time cooking for my husband – it causes me to trend towards manly food.  I.e. generally meaty, possibly in casserole form (he will take down with zeal anything layered in a casserole dish..) with some heavily starchy side.  I envisioned this dish for a girls’ brunch alongside a lightly dressed salad, and, true to form, every woman that’s eaten this has raved.   As a woman, sometimes (a lot of times…) I walk out of the house in an outfit that specifically women will appreciate.  This is my culinary version of that.

And I believe this incarnation of pastilla is an elegant one.  The pillowy puff pastry gives way to sweet, cinnamon-y crunchy almonds and then gently spiced, buttery minced chicken.  This is a great do ahead dish – I’ve actually travelled with the terrine as is (which also happens to be great cold) and when I get to a friends house, I wrap it up in puff pastry, throw it in the oven, and voilá!  20 minutes later the perfect compliment to a great bottle of wine and some cheese or even an elegant main dish.  Subtle, complex, surprising, textural, sweet and savoury all at the same time.  Enjoy!

Ingredients

Yields (1) 12” x 4” Terrine

¾ cups marcona almonds

¼ cup granulated sugar

¼ tsp ground cinnamon

3 tbsps unsalted butter

2 shallots, finely chopped

1 medium-sized leek, white and light green only, thinly sliced

¼ fennel bulb, finely chopped

¼ tsp grated ginger

½ tsp ground cinnamon

pinch ground allspice

¼ tsp turmeric

½ tsp ground coriander

½ tsp ground black pepper

1 dry bay leaf, crushed

1 pinch saffron

¼ tsp lemon zest

3 cloves garlic, minced

4 boneless, skinless chicken thighs, cut into ½” cubes

4 eggs

½ cup heavy cream

salt and pepper

1 sheet of puff pastry, thawed per package insructions

1 egg beaten with a little water or heavy cream (egg wash)

Confectioners sugar (for dusting)

Procedure

Preheat oven to 250° F.  Place almonds on a sheet pan and let toast in the oven for 50 minutes.  Cooking at a lower temperature for a longer period of time allows the nuts to toast all of the way through, not just on the outside.  Remove and cool.   Pulse in a food processor with sugar and cinnamon.  Set aside.

Turn oven temperature up to 350° F.  In a medium-sized skillet, melt butter over medium-low heat. Add shallots, leek, fennel and ginger and cook until softened (3 to 5 minutes).  Add all of the ground spices, the crushed bay leaf, the saffron and the lemon zest and continue to cook for another 2 to 3 minutes.  Add garlic and let cook for 30 seconds until fragrant.  Set aside mixture to cool.

In a food processor, add cubed chicken thighs and eggs and process until just a little chunky and transfer to a bowl.  I prefer a slightly chunky texture – feel free to process to a paste if you want a smoother consistency.  Add cream and the cooled shallot/leek mixture.

Line a terrine mold with plastic wrap so that the longer pieces of plastic wrap hang over the shorter sides of the mold.  Create a layer on the bottom with half of the almond mixture.  Add the entire chicken mixture and top with the other half of the almond mixture.

Overlap the plastic wrap across the top to cover the terrine completely.  Cover with a lid and place in a roasting pan or other baking dish.  Add boiling water until it comes halfway up the sides of the terrine mold and bake for 1 hour.  Remove from water bath and roasting pan and refrigerate.  Cool completely to unmold.  You can stop at this point in the recipe and serve the terrine either warm or cold – it’s delicious eiher way.

For those who want the extra decadence of the pastry, preheat the oven to 400° F.  Roll out the puff pastry on a lightly floured surface.  Place the cooled terrine top side down on the puff pastry.  Fold over to make a package of sorts and seal with a little water.  Flip over and transfer to a sheet pan.

Brush the egg wash over the exposed pastry and bake for 15 to 25 minutes to brown.  Dust with a little powdered sugar – slice, serve, and enjoy.

tags: chicken terrine recipe, North African cooking, bastilla, pastilla
categories: appetizers, recipes, main dishes-1, all-6
Wednesday 10.27.10
Posted by Aliya LeeKong
 

Lemon-Fennel Israeli Couscous Risotto

View fullsize risotto4-500x333.jpg
View fullsize risotto-pic2-500x333.jpg
View fullsize risotto-pic3-500x333.jpg

Lemon-Fennel Israeli Couscous Risotto

Risotto is one of my favorite things in the world to make.  It’s one of those dishes that has endless permutations.  It can take on any flavors you desire, can be simplified as a side dish, beefed up for a main, and is always creamy and satisfying.  I can get a bit heavy-handed with my risottos (a jumbo lump crab and smoked mozzarella iteration comes to mind…), so I wanted to create a slightly lighter dish here.

Israeli couscous is a tiny, pearl-shaped pasta that was created during a period in Israel when rice was scarce.  It has a slightly toothsome texture when cooked and a nutty flavor.  Because of its small size, it cooks up a lot quicker than most pastas.  That’s why I decided to use it here – instead of 30 plus minutes of constant stirring, you get a similarly delicious dish in about 15 minutes from start to finish.  You definitely still want to stir to develop the creamy texture, but it requires a lot less maintenance and time than traditional risotto.

When thinking about this dish, my mind immediately went to fennel since it’s in season.  Paired with bright lemon zest and a bit of juice, the result is a much lighter and fresher risotto than I typically make.  I cooked up a simply seared piece of fish, and it worked perfectly with the light and creamy, lemon-y couscous “risotto”.  Enjoy!

Ingredients

4 tbsps unsalted butter

2 small shallots, medium dice (2/3 cup)

½ medium fennel bulb, medium dice (2/3 cup)

3 or 4 garlic cloves, minced

2 cups toasted Israeli Couscous

1/3 cup white wine

3 cups vegetable or chicken stock

juice of half a lemon

1 tbsp lemon zest

finely chopped parsley, chives, and/or cilantro to finish

salt and freshly ground black pepper

Procedure

Heat a nonstick sauté pan over medium heat and bring the stock in a separate saucepan up to a boil.  Add 3 tablespoons of butter, and when foam subsides, add diced shallots and fennel and a pinch of salt to draw out the moisture.  Cook for 5 to 7 minutes stirring often until vegetables have softened.  Add garlic cloves and cook for 30 seconds to a minute until fragrant.

Add couscous and cook for a minute stirring to coat with the fat.  Add white wine and reduce completely.  Reduce heat to medium-low.  Add boiling stock in increments of one cup or so, stirring often.  Repeat until all stock has been incorporated and couscous has cooked for about 10 minutes.

Remove from the heat.  Stir in lemon juice and lemon zest.  Taste couscous and add salt and pepper as needed.  Add remaining tablespoon of butter and chopped herbs.  Serve immediately.

tags: israeli couscous recipes, couscous risotto, lemon risotto, risotto recipes, fennel
categories: recipes, side dishes, vegetarian, all-6
Monday 10.25.10
Posted by Aliya LeeKong
 
Newer / Older