X

Sign up to receive exclusive recipes, tips, updates and other goodies from Aliya!

  • Home
  • Blog
    • All
    • Recipes
    • Spices + Ingredients
    • Lifestyle, etc.
    • Travel
  • The Cookbook
  • The App
  • Media
    • All Media
    • Video
  • About
  • Passions
Aliya LeeKong
  • Home
  • Blog
    • All
    • Recipes
    • Spices + Ingredients
    • Lifestyle, etc.
    • Travel
  • The Cookbook
  • The App
  • Media
    • All Media
    • Video
  • About
  • Passions

Himalayan Red Rice

View fullsize red-rice-pic1-500x333.jpg
View fullsize red-rice-pic2-150x99.jpg

Himalayan Red Rice

Recently, on Facebook, I was asked about colors of salt and rice.  What are the differences between pink, red and black salt and what about black or red rice?  Great questions because it can all get pretty confusing.  I will definitely talk about salts at another time (though I have a bit on black salt here), but I thought I would highlight Himalayan red rice, which is a tasty and healthy alternative to white rice that is truly worth exploring.

First, can I just say how beautiful this rice looks!  It has a rosy hue that is stunning up against bright green veggies and even combined with white rice for a bespeckled dish.  Himalayan red rice is, as its name suggests, grown in and around the Himalayas and is often referred to as Bhutanese red rice (although France and other parts of Asia do grow a variety in smaller quantities).  It’s a short grain, heirloom rice that is grown at an altitude and thought to be fed by glacier water – making it particularly mineral-rich.

Himalayan red rice is semi-milled, and the residual red bran makes it compelling in terms of fiber content (way higher than white).  It has trace minerals, vitamins, and antioxidants and is often compared to brown rice, but has, what I think, is a far better flavor.  It’s nutty, a bit toothsome, sweet even, and has a gorgeous perfume to it…

With a higher level of bran, it takes a bit longer to cook than white rice, but the wait is worth it.  It’s the perfect salad rice – great with a vinegar base for a summer picnic with fresh tomatoes and corn.  The nuttiness holds up well to spices and blends seamlessly with mushrooms.  It also cooks up like risotto (a personal obsession of mine), so I’ve been meaning to do a mushroom red rice risotto soon.

It’s definitely available at Whole Foods and health food stores carry it.  Have you tried it?  How do you cook with Himalayan red rice?

tags: rice, red rice, Himalayan red rice, ingredients
categories: all-3, spices-1
Thursday 07.14.11
Posted by Aliya LeeKong
 

Pão de Queijo (Brazilian Cheese Bread)

View fullsize pao-pic1-500x333.jpg
View fullsize pao-pic2-500x333.jpg
View fullsize pao-pic3-500x166.jpg
View fullsize pao-pic4-500x167.jpg

Pão de Queijo (Brazilian Cheese Bread)

One of my favorite Brazilian restaurants in the city is Casa.  Tucked away on a quiet block in the West Village, this cozy spot gets it right – spot on flavors, perfect portions, delicious wines, an intimate setting.  The feijoada and moqueca are killer, but I can never make it through a dinner there without ordering their little basket of farm cheese bread, or pão de queijo. These little cheesy, chewy, buttery balls are perfection, so I decided to dig further to satisfy my cheese bread cravings at home.

Brazilian cuisine is completely amazing to me because of the number and span of cultures that have contributed to it – Portuguese, African, Native American, Japanese, Syrian, Lebanese.  Cassava or yucca is a staple ingredient in Brazilian cooking, and the resulting flour is used, in its coarse form, for farofa, and its finely ground form to make these lovely rolls.

We are familiar with one form of cassava or manioc starch, which is tapioca, but Brazilians have a sour fermented version, polvilho azedo, and a sweet one, polvilho doce.  Traditionally, both are used to make this bread, but, on the fly, I only found plain manioc starch and went with it.  If you can find both kinds, I suggest using them in 2/3rd sour / 1/3rd sweet ratio.

The great thing about these is, if you have a stand mixer, they are really easy to make.  Otherwise, it’s a bit of a work out and requires some sweat to knead!  The procedure and form is not unlike those lovely, French gougères, but the result here is a lot more dense and toothsome than that.  They are the perfect dinner roll – buttery and cheesy with a delicately crunchy exterior.  I added a touch of black pepper and nutmeg, not traditional but I think gives it a balanced flavor.  Be forewarned, they are addictive…Enjoy!

Ingredients

Yields 20 golf ball-sized pieces

1 ½ cup manioc or tapioca starch

½ cup all-purpose flour*

2 tsps kosher salt

1 tsp sugar

½ tsp black pepper

pinch of ground nutmeg

1 cup milk

6 tbsps stick butter

3 eggs

1 ½ cups finely grated parmesan

Procedure**

Preheat oven to 350° F.

Fit a stand mixer with a paddle attachment.  In the bowl of the stand mixer, sift together starch, flour, salt, sugar, and spices.  In a small saucepan, heat milk and butter over medium-high heat until mixture comes up to a full boil (make sure it doesn’t boil over!).  Add milk mixture to dry ingredients and mix on low for 2 minutes.

In a small bowl, beat together 1 egg and 1 egg yolk.  With the mixer still running, add eggs to the dough. When eggs are incorporated, add grated parmesan and mix/knead for another 5 minutes, scraping down at intervals.  Refrigerate for a minimum of 1 hour.

Using a small ice cream scoop or your hands, portion out dough into even-sized pieces.  Heavily (and repeatedly) flour hands and roll portioned pieces into balls.  Place on a parchment-lined baking sheet.  In a small bowl, beat the other egg.  Brush dough balls with egg wash and bake for 25 to 30 minutes until browned and the outside is crisp and a bit cracked.  Serve immediately.

*If you want these to be gluten-free, just use manioc starch in lieu of all-purpose flour here.

**A few points on procedure.  The dough can be kneaded traditionally – that is, by hand – if desired.  It just takes a bit of upper body strength.  The resulting dough should be soft and very sticky.  If not baking immediately (or that day), the dough can be frozen when formed into balls and popped in the oven at a later time.  This bread is best served warm and straight from the oven as it turns a bit gummy when cold (though, of course, if can be reheated).

tags: Pão de Queijo, Brazilian cheese bread, Brazilian cuisine, farofa
categories: all-3, breads & cakes, vegetarian, recipes, appetizers, side dishes
Monday 07.11.11
Posted by Aliya LeeKong
 

Aleppo Chilies

View fullsize aleppo-pic1-500x351.jpg
View fullsize aleppo-pic2-500x333.jpg

Aleppo Chilies

A few weeks back, I was working on a chutney recipe that married dried apricots with a luscious, sweet dessert wine.  I threw in some of these chili flakes, and the flavor became complex – at once, sweet, fruity, those peach-lychee notes from the wine and a tart bite with a touch of heat from the Aleppo chilies.  Although I’ve used it in cooking before, in that moment it dawned on me that I would no longer be reaching for typical crushed red pepper for my weekly (yes…once a week) pizza binge.

Aleppo chilies come from Syria and are named after the northern city of Aleppo.  A pinch of Aleppo is called for in various Middle Eastern dishes and in foods throughout parts of the Mediterranean.  This chili flake has often been compared to ancho and is fruity, moderately hot, with smoky undertones that come from being sundried.  It has an acidic tartness to it (think sundried tomatoes with a kick!) and is actually a little salty; the heat hits fast and then subtly lingers.

What I realized during that last time I was cooking with it was that it’s just a really balanced chili flake, and it doesn’t require a ton of cooking or toasting to bring out flavor (thus using it to sprinkle on hot, cheesy pizza).  It works as well with sweeter dishes, like a chutney, as with savoury, and is the perfect finale to a bolognese, in a kebab marinade, or, simply, to dress up a salad.  The focus is a lot more on flavor here than heat.

Like the Urfa chili I mentioned a few months ago, this flake has a ton of oil, and I find that it keeps longer in the freezer.  Middle Eastern grocers will have some of this in stock, but I’ve also seen it in some higher-end, gourmet shops and even William Sonoma.

tags: Chilies, Aleppo, Aleppo chilies, ingredients
categories: all-3, spices-1
Thursday 07.07.11
Posted by Aliya LeeKong
 

Sweet Chili Jam

View fullsize chili-jam-pic1-500x333.jpg
View fullsize chili-jam-pic2-500x333.jpg
View fullsize chili-jam-pic3-500x333.jpg

Sweet Chili Jam

Happy 4th of July!  I hope everyone is having a fantastic day, and enjoying a nice bbq with friends and family (I know I am!).  I have gone waay too far with my menu today – lamb burgers with pickled cukes, some shrimp cakes, grilled corn, roasted potato salad, spiced grilled shitakes, a big green salad with cherry tomatoes and asparagus, pineapples soaked in orange liqueur, and a great pitcher of rum punch…

As promised, here’s the chili jam I use (on basically everything…) on my lamb burgers.  Sweet, spicy, tart, and jammy…a beautifully versatile condiment that is soooo easy to make.  Enjoy!

Ingredients

Yields approximately 3 cups

2-3 tbsp oil

3 medium white onions, thinly sliced (~2 lbs)

3 plum tomatoes, seeded and chopped

10 red fresno chilies or combination red fresno / red finger chilies, finely chopped

1 cinnamon stick

1 dried bay leaf

¾ cup apple cider vinegar

1/3  cup brown sugar

1 cup water

Salt to taste

Procedure

In a medium-sized pot, heat oil over medium heat.  Add onions and a bit of salt and cook slowly to caramelize, about 25 to 30 minutes.  You don’t want the onions to brown quickly but rather develop a caramel color as they soften and sweeten, so keep the heat at about medium-low and stir at intervals.

Add the rest of the ingredients and bring up to a boil for 5 minutes, covered.  Lower to a simmer for another 25 minutes, removing the lid and stirring for the last 5 to 10 minutes of cooking.

Remove bay leaf and cinnamon stick and process in a food processor to a jam-like texture.

tags: jam, sweet chili jam, condiments
categories: all-3, condiments, sweet & savoury, appetizers, recipes
Monday 07.04.11
Posted by Aliya LeeKong
 

Dill Seed

View fullsize dill-pic1-500x333.jpg
View fullsize dill-pic2-500x394.jpg

Dill Seed

I did a little informal poll amongst friends that cook and some chefs I work with and dill seed is one of those spices that is truly under the radar.  I wasn’t so surprised – heck, it’s not like I use it on a daily basis, but the reality is that this spice spans everything from our everyday dill pickle to Swedish breads to Ras El Hanout, a popular North African spice blend.

Interestingly enough, these flat, tear-shaped seeds aren’t seeds at all.  They are actually the fruits of the dill plant (that gives us that beautiful, feathery herb).  The flavor of the seed is definitely stronger than the weed or the herb; it has a sharper bite and none of the leafy sweetness.  For me, caraway is the closest taste comparison, and there are also notes of chervil, parsley, and anise, which isn’t surprising since the plants are all in the same family.

I was shocked to find out how many different cultures actually use this spice!  It’s hard to pinpoint the origin, but dill is thought to have started off in Eastern Europe, spreading later to the Mediterranean, North Africa, and Asia.  Scandinavian cuisines, Russian, Ukrainian (it’s in borscht!) and German all use the spice.  In the Middle East and North Africa, the spice is found in pickles, spice blends and salads.  Even parts of Asia, Indonesia, and Malaysia, incorporate the spice in everything from meat curries to condiments.  In South Asia, dill seeds are added to curries or even cooked like lentils; it’s also part of the spice blend that goes into biryani.

It’s truly a versatile spice and works beautifully in potato salads, vinaigrettes, rice dishes and all types of breads.  I’m thinking about working it into a lobster salad along with the herb and a touch of coriander, but it’s also gorgeous in soups and stews (where it softens and becomes toothsome). The seed definitely gets a boost from dry-roasting, but it should be ground to order as the flavor dissipates quickly after being ground.   The dill seed from India has a milder flavor than that from other areas, so taste-experiment-repeat where necessary!

tags: Dill seed, spices, ingredients
categories: all-3, spices-1
Thursday 06.30.11
Posted by Aliya LeeKong
 

Smoky Lamb Burgers w/ Mint-Chili Pickled Cucumbers

View fullsize lamb-burger-pic1-500x333(1).jpg
View fullsize lamb-burger-pic2-500x333(1).jpg
View fullsize lamb-burgers-pic3-500x333.jpg

Smoky Lamb Burgers with Mint-Chili Pickled Cucumbers

Does anyone else have summer fever?  I seriously have been dreaming about barbecues for months, and now that it’s upon us I’m living for summer Sundays, hanging with friends and family and eating simple, flavorful meals that can be done on the grill.  The recipe for these smoky lamb burgers came out of wanting to create a kicked-up burger that was no-fuss and would taste delicious with an ice-cold beer…

I have two (not one, but TWO) secret ingredients in this burger that give it that smoky, peppery edge.  The first is black cardamom, which you may remember me writing about a few months back.  The flavor is a bit lighter than green cardamom – earthier and with a woodsy smokiness.  Black cardamom is used throughout North and East African cooking, in South Asian and Middle Eastern cuisine, and even in Sichuan cooking.

But, don’t worry if you only have the green kind.  It works beautifully here as well because there is still the second secret ingredient: pimentón de la Vera.  If you’ve never used it before, this dish is a great intro – it’s smoked paprika and is a key ingredient in Spanish cooking.  Both of these spices meld together here and bring out what’s best about lamb.

Now, I’m a burger-with-pickles kind of gal, so I had to do a super quick pickle (ready in an hour!) to go with these.  Thinly sliced cucumbers get quick-pickled with Thai green chilies, some fresh mint, garlic and thinly sliced shallots.  The shallots pickle too, so I use both along with some fresh chopped mint and a nice piece of butter lettuce to top this burger.  And these burgers are not for the faint of heart – they are big and bold!  Feel free to turn this recipe into sliders or more modestly-sized patties if you so desire.  Smoky, earthy, juicy lamb burgers with mint- and chili-pickled cucumbers on a gorgeously toasted bun is the perfect summer bbq food (and I WILL be serving these this weekend…) Enjoy!

Ingredients

Serves 4

Lamb Burgers:

6 tbsps butter

2 shallots, finely chopped

4-5 garlic cloves, minced

2 tsps ground black cardamom*

1 ½ tsps black pepper

2 tsps cayenne**

2 ½ tsps pimentón / smoked paprika

1 tbsp kosher salt

2 lbs ground lamb

vegetable oil

Mint-Chili Pickled Cucumbers:

¾ cup rice vinegar

¾ tsp kosher salt

1 ¼ tsps sugar

2 Thai chilies, halved

1 shallot, thinly sliced

2 garlic cloves thinly sliced

2 mini seedless cucumbers, sliced thin

handful of mint, roughly torn

Procedure

For the lamb, in a medium skillet, heat butter over medium heat.  Swirl the pan as the foam subsides and continue to heat until butter starts to brown.  Don’t let it burn!  Immediately, throw in the shallots, garlic and spices and cook stirring continuously to prevent sticking for 2 to 3 minutes until shallots are translucent and cooked through.  Remove and let cool briefly.

Place lamb in a bowl and make a well in the center.  Add cooled shallot and spice mixture and mix thoroughly.  Do not overmix or the meat will get tough.  Form mixture into 4 equal patties, keeping the center a bit thinner than the edges.  Conversely, you can make this mixture up to a day ahead of time and the flavors will come together even more beautifully.

Heat a grill pan or skillet over medium-high heat and coat with a thin layer of oil or grill on the outdoor grill.  Cook for about 4 minutes per side to get to a medium rare and longer for more well-cooked burgers.

For the cucumbers, in a bowl, whisk together vinegar, salt and sugar until dissolved.  Add remaining ingredients and toss to coat.  I like to put the cucumbers in a wider, shallow container to increase the surface area as they are pickling.  Let sit at least an hour before serving, but it can also be refrigerated and will keep for a few days.

Serve burgers on a toasted bun topped with the pickled cucumbers and a few of the pickled shallots.

*I use my spice grinder to grind the whole pods of black cardamom, and then I pass it through a fine mesh sieve to get rid of the coarse bits.  If you only have green cardamom on hand, that works; it’s still delicious.

**Go easier if you like less heat.


tags: lamb, lamb burgers, recipes for summer, mint-chili pickled cucumbers, pickles
categories: main dishes, recipes, all-3
Monday 06.27.11
Posted by Aliya LeeKong
 

Mini Gumbo Pot Pies (Take 2)

View fullsize gumbo-pot-pie-pic1-500x264.jpg
View fullsize gumbo-pot-pic-pic2-500x138.jpg
View fullsize gumbo-pot-pie-pic3-500x188.jpg

Mini Gumbo Pot Pies (Take 2)

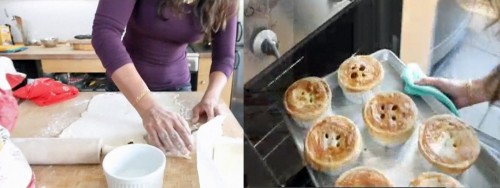
A few months back, I put up a recipe for mini seafood gumbo pot pies, spicy little pescatarian pots of joy that were topped with puff pastry crust.  After visiting New Orleans, I decided to revisit this recipe and tweak it here and there.  I learned so much on my trip and got a serious lesson in NOLA cooking from my friend, Gwendolyn Scott, who owns her own catering company out there.  We caught the whole thing on film and wrapped it into my first webisode of Exotic Table, which I’ll post a little later this week! (All of the pics here are from the video.)

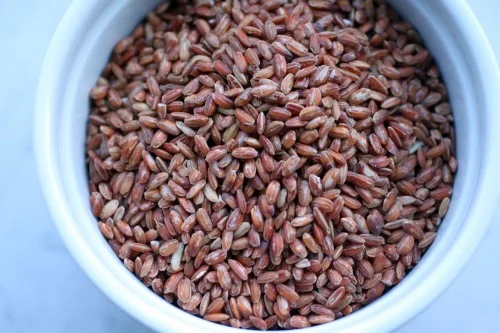
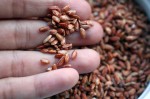
That NOLA smoked sausage is just irresistible, so you know I had to throw a little andouille in…I also made some changes to my “holy Trinity” ratio (holy Trinity is Louisiana’s catch phrase for onions, celery and peppers, which are key to their cooking) and added in a lot more okra to help thicken up my gumbo.

Thick, rich, spicy and hearty, but elegant enough to serve to dinner guests – little mini gumbo pot pies are a fun twist on an old favorite.  Enjoy!

Ingredients

Yields 8 10-ounce ramekins

1 stick unsalted butter

¾ cup all-purpose flour

2 tbsps butter

1 large onion, finely chopped

1 green pepper, finely chopped

1 celery, finely chopped

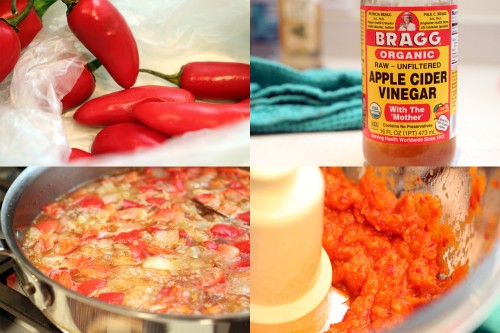
1 fresno, finely chopped

1 (1/2  lb) andouille sausage, diced

4 or 5 garlic cloves, minced

Creole seasoning (recipe follows, a little over 4 tbsps)*

4 cups chicken stock

2  cups sliced okra

1/3 cup peas

½ cup heavy cream

2 dried bay leaves

½ cup sliced green onion

small handful of cilantro, finely chopped

small handful of parsley, finely chopped

1 lb mixed seafood (lump crab, rock or small shrimp, bay or small scallops, shelled lobster)**

salt and freshly ground black pepper to taste

lemon juice to taste

1 egg (beaten with a bit of cream or water)

2 sheets of puff pastry, thawed according to package directions

Procedure

Preheat oven to 400° F.

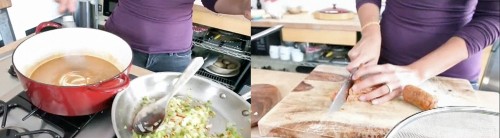
I like to start by making the roux since it takes some time to develop color.   That is, melt butter in a heavy bottomed cast-iron pan (large enough) or dutch oven over medium heat.   Add the flour and whisk.  Continue to whisk at very frequent intervals (semi-constantly) for 15 to 20 minutes until the mixture has turned a deep chocolate brown.  Be careful not to burn.

In a separate skillet, melt butter over medium-low heat and add onions and a bit of salt (to draw out the moisture).  Cook for about 2 minutes and add peppers, celery.  Cook for another 5 minutes, and push to veggies one side.  Crank up the  heat, and brown the sausage in that side of the pan.  When browned, add minced garlic and creoled seasoning, mix in the veggies, and let cook for about 30 seconds to a minute until fragrant.  Remove from heat, and, if the roux is ready (good timing!), add directly to the roux.

To the cooked roux, add the chicken stock and whisk to fully incorporate.  Add the onion mixture as discussed, okra, peas, heavy cream, and bay leaves.  Make sure none of the roux is stuck to the bottom or in the crevices of the pot.  Bring mixture up to a boil and lower to a simmer for 20 minutes.  You want it to thicken up, so leave it partially covered.

On a floured surface, roll out the puff pastry to about 1/8th of an inch thick.  Using pastry cutters or a glass that’s larger than the diameter of your ramekins, cut out 8 circles.  Make sure they are large enough to fit over top the ramekins.

To the gumbo, add the green onions, chopped herbs, and seafood.  Adjust seasonings at this point, adding salt, pepper and a shot or two of lemon juice, if needed.  Ladle gumbo evenly into ramekins.

Brush the tops of the ramekins on the outside with the egg wash.  Place puff pastry circles on top, crimp to your desired effect, and brush entirely with the egg wash.  Use a knife to make slits into the top to let the steam escape.  Place ramekins on baking sheets and bake for 20 to 25 minutes until the top is brown and crusty.

*Creole Seasoning:

1 tsps onion powder

2  tsps garlic powder

1  tsps dried oregano leaves

3/4 tsp dried sweet basil

1  tsps dried thyme leaves

½ tsp black pepper

½ tsp white pepper

¼  tsp cayenne pepper (whatever you can stand!)

½ tsp celery seed

2 tsps sweet paprika

½ tsp ground mustard

**For the seafood, I like to use small pieces for a few reasons.  (1) The seafood has to fit into the ramekins with room for all of the other great stuff, and (2) I only put the seafood in right before it goes into the oven – small pieces will cook perfectly (without overcooking) and pre-cooked items, like crab, don’t turn to mush.   If you are using larger shrimp or decide to do this in a casserole dish rather than individual ramekins, adjust your cooking time accordingly.

tags: pot pie, mini pot pie, gumbo, New Orleans, Creole seasoning, andouille, NOLA cooking, seafood recipes
categories: all-3, recipes, man-friendly, main dishes-1
Monday 06.20.11
Posted by Aliya LeeKong
 

Grape Molasses

View fullsize grape-pic1-500x396.jpg
View fullsize grape-pic2-500x166.jpg

Grape Molasses

Here, in the States, the term molasses conjures up images of gingerbread cookies and shoofly pie, that thick, dark syrup that’s the result of refining cane sugar.  But, in Mediterranean and Middle Eastern regions, molasses is something else entirely – still a syrup, but from sources like pomegranates, dates, grapes, figs, carob, or even mulberries.  The process and the flavor are completely different…and delicious.

In the old days, sugar was extraordinarily expensive in regions outside of India, and honey was, let’s say, tricky to procure. During the summer months when sweet fruits were plenty, the fresh juice of these fruits were boiled and reduced down to create intensely flavorful and perfectly sweet syrups, or molasses.  These syrups were the ideal sweeteners, capitalizing on peak season fruit, and kept for months.  I’m leaving out a great part of all this – they are way healthier than other sweeteners, given that they are fruit-based, and actually contain antioxidants, vitamins and minerals.

Grape molasses is one that I happen to love because it’s not overly sweet and has that amazing grape flavor.  When I was in Turkey, this lovely syrup, which is also called pekmez, was served at breakfast in lieu of honey.  I loved the traditional combo of grape molasses and tahini on flatbread – it was my PB&J for the trip!

There are so many ways to use this stuff.  Many simply mix it with water or milk for a great drink, and I’ll be using it to sweeten my flavored lemonades this summer.  I do love it on toast with peanut butter or tahini, and it’s incredible with cream cheese on currant scones or drizzled on cinnamon waffles.  Beyond all of the sweet dishes, the syrup can be added to stews to add a sweet thickness to them.  I used pomegranate molasses, which has a real sweet and sour feel to it, to make some lovely baby back ribs.  Think of it like you would honey or molasses.

I pick mine up at an ethnic food store, but I’ve seen this beautiful syrup at Chelsea Market and even a Whole Foods.   Have you ever tried any of these fruit-based molasses and how do you use it?

tags: pekmez, Turkish cuisine, ingredients, molasses, grape molasses
categories: all-3, spices-1
Friday 06.17.11
Posted by Aliya LeeKong
 

Patois

Patois

Whenever I travel, I do a slightly obsessive nerdy cross-referencing of sorts to make sure I have the ultimate eating experiences on my trip.  Between friends’ suggestions, write-ups, locals’ thoughts and general meandering, there’s nothing more joyful than finding a little place that embodies the spirit of a geographical location or a part of the culture.  Before heading to New Orleans, a friend mentioned Patois, where the food is “classic French cuisine with a patois, or local accent.”  I was so sold…

Like the other resto I visited on this trip, Patois has had a James Beard nod with the chef earning a semifinalist spot for Best Chef: South for the past three years.  The place is so unassuming and homey, a seamless building in a residential Uptown neighborhood, that the fact that chef Aaron Burgau is turning out deliciously modern-NOLA-Southern-French-Mediterranean food may just sneak up on you until you are stuffed and happy and think “wow, that was good.”

And it really was. All of the ingredients are, of course, locally sourced, and the menu changes often, seasonally driven.  I visited Patois on the last day of my trip, the Sunday I was leaving, for a delicious lunch-brunch.  Ponchatoula strawberries with creole cream cheese, beautiful potato gnocchi with crawfish, ramps, edamame and a dollop of mascarpone, and the crumbly house-made muffins were just the start of it.  I’m still dreaming about the gnocchi’s buttery sauce…

We moved on to the almond crusted gulf fish, succulent grilled lamb ribs with green tomato relish and finally (my favorite!) the fried Mississippi rabbit with a biscuit, eggs, and sausage gravy…eating light in NOLA is an impossibility.  I also HAD to sample the grits (as I did everywhere I ate), and these were the best of the bunch – creamy, buttery, peppery, and gorgeous corn flavor.

I did go light on dessert with a beautiful strawberry sorbet, but, seriously, there was no room after the previous feast and my diligent grits taste-testing.  This is definitely the type of place I’d go back to if I’m lucky enough to travel again to New Orleans…

tags: NOLA cuisine, New Orleans
categories: all-3, travel
Wednesday 06.15.11
Posted by Aliya LeeKong
 

Crispy Asparagus with Fenugreek Aioli

View fullsize asparagus-pic1-500x333.jpg
View fullsize asparagus-pic2-500x333.jpg
View fullsize asparagus-pic3-500x333.jpg

Crispy Asparagus with Fenugreek Aioli

Asparagus can be polarizing, lovers and haters – I happen to be a lover.  I’m a huge fan of throwing asparagus in an oven with some olive oil, salt and pepper (and maybe a pat or two of butter…) and letting it roast to perfection while I’m making the rest of my meal.  With the abundance of beautiful, thick and luscious asparagus in the greenmarket, I’ve found myself going beyond simple roasting and grilling techniques to figure out ways to single it out and highlight its taste at this time of year.  This recipe is one lovely variation.

I know.  The old adage that frying makes everything taste better is a bit overused, but, in this case, it is so true!  This requires basic breading, but I like to spice up the flour for dredging a bit and use panko to form the crispy crust.  The asparagus are then shallow-fried until they just yield under the bite.

Homemade aioli is the perfect accompaniment.  It’s cheaper and easier to make your own mayo, and this one is scented with a bit of fenugreek powder.  Fenugreek is one of the key spices in curry.  I actually love it on its own, without the rest of the spices that comprise curry.  It definitely has a bitter edge to it though, so a little goes a long way.  Some garlic, a touch of mustard, and you have a deliciously creamy sauce.  The crisp asparagus dipped into the garlicky aioli with hints of curry are the perfect summer side.  Enjoy!

Ingredients

Serves 4 to 6

For the asparagus:

¼ cup all purpose flour

½ tsp salt

1 tsp garlic powder

½ tsp onion powder

black pepper to taste

2 eggs, beaten

1 ¼ cups panko breadcrumbs

1 bunch of asparagus (approximately 1 lb)

oil for frying

For the fenugreek aioli:

2 or 3 garlic cloves

large pinch salt

1 egg yolk, room temperature

2 ½ teaspoons fresh lemon juice

½ tsp Dijon mustard

¼ tsp + a small pinch finely ground fenugreek

½ cup oil*

Procedure

For the asparagus, using three trays or bowls, set up a breading station.  Whisk together the flour, salt, garlic powder, onion powder, and black pepper into one.  Set up another with the beaten eggs, and a third with the panko.  If you like, pulse the panko in the food processor to make it a bit finer before using.

Dredge the asparagus in the flour mixture, tapping off any excess.  Dip into the beaten eggs, and, finally, coat with the panko.  Transfer to a rack over a baking sheet and work in batches to bread all of the asparagus.

Heat ¼” to a ½” of oil in a large skillet to medium heat.  You don’t want the oil to be too hot or the breading will brown (and burn) before the asparagus cooks through.  I like to shallow-fry about 2 to 3 minutes per side on a medium heat to get that golden brown crust and perfectly-cooked asparagus.

Transfer back to the rack over the baking sheet and sprinkle with additional salt if you like.  If you aren’t serving immediately, keep warm in a 200° F oven.

For the aioli, place the garlic and salt in a food processor and pulse until chopped as finely as possible.  Conversely, you can do this by hand and chop the garlic finely and make a paste with the salt.  Add the egg yolk, lemon juice, mustard and fenugreek and pulse or whisk until blended and uniform.  Start the processor or continue whisking and add in the oil in a thin stream until all is completely incorporated.

Serve the asparagus warm with a side of the aioli.

*To save a bit, I like to use a combination of regular olive oil (extra virgin can turn bitter) and canola or other vegetable oil.

tags: asparagus, crispy asparagus, fried vegetables, fenugreek aioli, aioli, recipes for spring
categories: all-3, appetizers, recipes, side dishes, vegetarian-1
Monday 06.13.11
Posted by Aliya LeeKong
 

Epazote

View fullsize epazote-pic1-500x333.jpg
View fullsize epazote-pic2-500x333.jpg

Epazote

Modern day foraging in urban areas is not necessarily a new idea.  With amazing restaurants like Noma, whose philosophy of foraging the local countryside has defined a new tradition, I’m happy to see how much this trend has been embraced and am looking around for a cool class to take some time this summer.  This is only relevant because epazote, an herb that’s popular in Mexican cooking, actually grows wild in Central Park!  I need to know what other exotic herbs I can grab from the NYC parks…

Epazote otherwise grows wild throughout Mexico, Central and South America, and Caribbean.  Also called American wormseed, I’ve read the Aztec translation of the word actually means “skunk sweat” (which seems like one of the last things I’d like to add to food…).  The fresh leaves have a strong, petrol-like smell, but the dried form, here, captures some of the flavor of this herb and works well as a tea to aid in digestion.

In Mexican cooking, epazote is a key ingredient in (amongst others) black bean dishes, Oaxacan mole verde, and mole de epazote, a goat casserole.  It’s flavor is distinctive and may require some getting used to.  Some describe it as soapy (like cilantro), camphorous, and definitely minty.  It’s not something you want to add to raw dishes because it’s so pungent, but it doesn’t require long cooking time either; it does the trick in cooked salsas.

To be completely honest, I have not done a ton of cooking with this herb, but it does add beautiful flavor to my (seriously) beefy chili.  I’m also working on a roasted tomatillo salsa recipe into which I slip in a bit.  Share with me please!  What are your favorite ways to use epazote?

tags: epazote, spices, American wormseed
categories: spices-1, all-3
Friday 06.10.11
Posted by Aliya LeeKong
 

“Morir Soñando” Semifreddo

View fullsize semifreddo-pic11-500x345.jpg
View fullsize semifreddo-pic2-500x333.jpg
View fullsize semifreddo-pic3-again-500x167.jpg

“Morir Soñando” Semifreddo

Food phases.  I don’t know if any of you have them, but I go through periods of craving where I want the same thing over and over again.  In college, I had this extended phase with Dominican food.  For dinner, I would trek out to an area of town where there was a big Latin American community.  The Dominican spots were amazing!  And for like $5, you would get a heaping plate of stewed chicken, saffron rice and fried plaintains with garlic.  I was a bit obsessed (and had the resulting 15 lbs to show for it…), and would always order a morir soñando, an orange creamsicle-like drink, to go with my meal.

Morir soñando translates to “to die dreaming.”  How romantic is that?  That pretty much sums up the deliciousness of this drink – orange juice blended with evaporated milk, sugar and ice and sometimes vanilla and cinnamon.  I was thinking about a dessert that captures these flavors best and decided on a semifreddo.

For those of you that don’t have an ice cream maker / attachment (or do but no desire to deal with it…), a semifreddo, Italian for “half cold”, is the perfect, delicate, frozen, ice cream-like treat and requires no extra equipment.  The custard requires a bit of finesse, but once you’ve mastered it, it’s like riding a bike.

Here, I spike the custard with concentrated blood orange juice (you can use any orange you like) and cinnamon and then fold in a vanilla-bean whipped cream.  A few hours in the freezer and you have an elegant dessert.  It’s a great do-ahead item; I plan to freeze it in popsicle forms this summer to grab as a treat out of the freezer.  Enjoy!

Ingredients

Yields 12 servings (using a standard muffin tin)

10 small blood oranges or any orange you like, juiced (approximately 1 ½ cups of juice)

1 cinnamon stick

8 egg yolks

1/2 cup sugar

pinch of salt

½ tsp orange zest

1 ¾ cup heavy cream, cold

1 vanilla bean, split and scraped

Procedure

In a small saucepan, bring orange juice with the cinnamon stick up to a simmer and let reduce 2/3rdsuntil you have about a ½ cup of concentrated juice.  Set aside to cool.

Prepare an ice bath and set aside.  Bring a saucepan with a few inches of water up to a simmer over medium heat.  In a medium bowl, whisk together yolks, sugar, salt, zest and cooled, concentrated orange juice.  Set bowl over the simmering saucepan of water to form a double boiler. Make sure the bottom of the bowl doesn’t touch the water but sits comfortably on top. Whisk continuously until the mixture becomes frothy, thick and creamy.  This could take anywhere from 4 to 6 minutes.  An instant-read thermometer should register 160 F, but you can also eyeball it and see that the mixture will more than double in size when it’s ready.  Set bowl over ice bath to cool completely.

Using a stand or hand mixer, beat heavy cream with vanilla until the peaks are firm.  Carefully, fold whipped cream into the cooled egg yolk custard.  Incorporate completely but try not to deflate the mixture.

Line a standard muffin tin with cupcake liners.  Carefully, scoop semifreddo mixture into cupcake liners and level off the tops.  Wrap tin in saran wrap and freeze for a minimum of 6 hours.  An alternative would be to freeze in ramekins in which you plan to serve the semifreddo.

Serve soon after removing from the freezer (because it begins to melt quickly) and garnish with a little cinnamon and orange supremes/pieces.

* Remember to refrigerate whipped cream if not using immediately.  The custard must be completely cooled before folding in the cream.

tags: “Morir Soñando” Semifreddo, Semifreddo, custard, recipes for summer, citrus, blood orange
categories: all-3, recipes, desserts-1
Monday 06.06.11
Posted by Aliya LeeKong
 

Pippali (Long) Pepper

View fullsize Pippali-pic1-500x333.jpg
View fullsize pippali-pic2-500x363.jpg

Pippali (Long) Pepper

I am on a pepper kick these days – first pink, now these.  Pippali is the Sanskrit word for the long pepper and is actually the same root word from which the English term pepper is derived.  Again, this is one of those overlooked spices that can seamlessly transition into regular use once you’ve tested it out.

In fact, the long pepper was used over black pepper for quite some time throughout history by the Romans, Greeks and other parts of Europe.  There was a trade advantage because the spice was grown in the northwestern region of India and was, therefore, more accessible than black peppercorns further south.  Once chiles arrived from the New World and trade to the Malabar Coast increased making black pepper cheaper and more widely used, the long pepper declined in popularity.

Pippali pepper is grown in India, but another version also comes from Java.   The spice is used today in South Asian cooking as well as in North African, Indonesian and Malay cuisine.  It’s popular in Ayurvedic medicine and has a host of uses – longevity, aphrodisiac qualities, analgesic, and digestion aid to name a few.

The flavor of long pepper is hard to capture.  Each cattail-like comb contains dark red seeds, and its smell is reminiscent of good incense.  That muskiness combines with a sweet quality, a bit like cardamom or cinnamon, and a touch of floral.  It still has heat like the black pepper but is way more complex – a bit more pungent and it lingers on the tongue.

Honestly, I crush up these guys and throw them into my pepper grinder.  Although they are popular in South Asian pickles and vegetarian stews, I love the flavor with beef and pork.  It’s awesome as part of a dry rub for barbecue because it totally jives with smoky flavors.  But it works well in place of black pepper too for everything from salads and vinaigrettes to your morning eggs.

Would love to hear if you have tried cooking with it and favorite uses!

tags: Pippali Pepper, long pepper, ingredients
categories: all-3, spices-1
Friday 06.03.11
Posted by Aliya LeeKong
 

St. Lucian Rum Punch

View fullsize punch-pic1-500x333.jpg
View fullsize punch-pic2-500x333.jpg
View fullsize punch-pic3-500x166.jpg
View fullsize punch-pic4-500x333.jpg

St. Lucian Rum Punch

Hope everyone had a fun Memorial Day!  I was in St. Lucia this past weekend for a wedding and was awed by the beauty (and cuisine) of the island.  Now, I usually post recipes that I create, but I made a special request to learn how to make this delicious cocktail and just can’t keep it to myself.  This rum punch will be the signature drink this summer for all of my bbq’s and cookouts.

Now, it’s my understanding that each island lays claim to the original rum punch, and I am not taking any sides!  But this version is fruity, a bit strong, but goes down easy (it may have supplied a significant percentage of my vitamins this weekend…).  I also wasn’t completely exact with my measurements here (i’ll let you guess why!), but it’s easy enough to do to your personal tastes.

As with all rum punches, it’s best to make this a day or two in advance to let the flavor intensifies.  Juices, bitters, rum, and a few key spices make this a gorgeous warm weather cocktail.

Enjoy!  and thank you Diane for the tutorial!

Ingredients

Serves 10 to 12

3 cups orange juice

3 cups pineapple juice

1 cup lime juice

a healthy pinch of cinnamon

a healthy pinch of nutmeg

6 generous shakes of angostura bitters

2 1/2 cups dark or light rum

grenadine syrup (will give amount in the procedure)

1 1/4 cups simple syrup

Procedure

In a large bowl or pitcher, mix together juices, spices, bitters and rum.  Add grenadine syrup until the punch reaches the color of a flaming sunset.  Grenadine syrups differ in sweetness, so I like to add the simple syrup after this point and taste along the way to make sure it’s not too sweet.

Again, it’s great to refrigerate it for a few hours or overnight to let the flavors combine, but it’s also delicious served immediately.  Serve over ice.

tags: rum punch, St. Lucia, recipes for summer, cocktails
categories: all-3, drinks & cocktails, recipes
Tuesday 05.31.11
Posted by Aliya LeeKong
 

Pink Peppercorns

View fullsize pink-peppercorn-pic1-500x333.jpg

Pink Peppercorns

Pink peppercorns are an incredible and, I think, a bit underused spice.  True, they aren’t the easiest to find, but these little guys have a different complexity from black, white, or green peppercorns that is worth exploring.  What’s lovely about this spice is how seamlessly it can blend into different cuisines – Mediterranean, latin, south asian to name a few.  It adds its own distinct flavor without disrupting the overall character of a dish.

So the rub is that pink peppercorns aren’t really true peppercorns after all and are unrelated to the black sort we use in everyday cooking.  They are actually berries that are found on a specific tree, not vine grown as most other peppercorns are.  On the tree, they start out green, turn yellow, and ripen into the beautiful pinky-red you see here.

What do they taste like?  I’d say they are closer to a super mild chili pepper.  They have a very thin skin, little heat (nothing that lingers), and have a pine-like quality, sweet fruitiness, and a bit of floral all at the same time.  Don’t be afraid to sample them on their own – they actually taste interesting on their own and would be great sprinkled on a salad.

In South America, they are used to flavor alcoholic beverages and are also a popular ingredient in French cuisine.  They work extremely well with poultry and fish, but I think they make a great substitute for green peppercorns in a steak sauce. I recently used them to create a chutney with rhubarb and strawberries that was also scented with star anise.

Do not grind them in a peppermill.  The skin is thin, as I mentioned, and they’ll get stuck in there.  Pink peppercorns are delicate (and not cheap) and break apart easily.  I like to rub them between my palms to activate their oils and crush them up.

Would love to hear how you might have used these in the past!

tags: pink peppercorns, peppercorns, ingredients
categories: all-3, spices-1
Friday 05.27.11
Posted by Aliya LeeKong
 

Cochon

Cochon

So if you happen to be on my Facebook or follow me on Twitter, you know all about the trip I took a few weeks back to the Big Easy.  New Orleans was hands down incredible – food, culture, fun.  I planned the trip well in advance and luckily made a reservation at Cochon before it was nominated and won (!) the James Beard Award for Best Chef : South 2011! I can say after my painfully delicious meal there, that award was so well deserved…

Donald Link, who also helms Herbsaint, and Calcasieu, and Stephen Stryjewski, who officially won the JB Award, conceived Cochon and wanted to highlight Cajun-style, regional cuisine using local ingredients.  The restaurant is in the warehouse district in New Orleans, and they followed it up with Cochon Butcher (also fab) next door, which has more of a sandwich / charcuterie / bar food / butcher menu with a lovely wine selection as well.  Yes, a butcher that serves wine.

Cochon has an open kitchen layout with simple banquettes and tables.  The focus is all food – which is homey, rich, and flavorful.  The menu is an all day one, so I went for lunch my first day in New Orleans (and it was packed!).

We started with the amazing wood-fired oyster roast, drizzled with this spicy, soppable garlic butter.  The fried gator with chili garlic aioli, spicy grilled pork ribs with watermelon pickle, and fried boudin with pickled peppers were also really killer.  Boudin is originally a French, pork sausage.  The NOLA version eschews casing the sausage in favor of rolling it into a ball and crisp, batter-frying it.  I never said this was a light lunch.

For the mains (I know. can you imagine we ate this much?), we had the oven-roasted gulf fish “fisherman’s style”, smoked beef brisket with horseradish potato salad, mac and cheese, and the most buttery, black peppered grits I’ve tasted.  Smoked brisket, by the way, like gumbo or etouffee, is a rite of passage down there.  We were sufficiently comatosed from just how filling, perfectly seasoned, well-cooked, and all around delectable the meal was.  Oh, and the fresh-baked bread hot out of the oven?  Out.  Of.  This.  World.

We obviously couldn’t leave without dessert, and the black bottomed brown butter banana cream pie was the best version of banana cream pie I’ve ever had.   Hands down.

This place is a NOLA must and WILL be a stop the next time I head down there!

tags: NOLA cuisine, New Orleans
categories: all-3, travel
Wednesday 05.25.11
Posted by Aliya LeeKong
 

Mandazi (East African Donuts)

View fullsize mandazi-pic4-500x333.jpg
View fullsize mandazi-pic2-500x333.jpg
View fullsize mandazi-pic3-500x333.jpg
View fullsize mandazi-pic1-500x333.jpg

Mandazi (East African Donuts)

One of my earliest cooking memories was when I asked my aunt to teach me how to make mandazis.  I think I was about 8 or 9 years old, and I was very serious about learning how to do these.  For some reason, we wouldn’t make these delectable little donuts at home.  I got to eat them when I traveled to see my family, and only the old school grandmas and aunties knew the secret.  Of course, East African restaurants were pretty much nonexistent in Florida where I grew up (not that I can find any now that serve these in NYC…I’m just saying).  So I felt I had to carry on the tradition!

Of course, the dish was a bit ambitious for an 8 year old (in one ear…and out the other!), and I was more focused on enjoying the fruits of my aunt’s and my labor than on getting the technique down.  As an adult, however, I decided I wanted to perfect my own using the tad more culinary knowledge I now have.

I should be clear: mandazis are savoury.  They shouldn’t be too sweet or too salty.  One of my most treasured food memories is sitting, facing the Indian Ocean, in Dar-Es-Salaam, Tanzania, using the (hollow) mandazis to scoop up a tender stew of pigeon peas in coconut milk with fresh chilies and cilantro (called barazi).  But, of course, you can eat them however you like; I’m partial now to having them for breakfast.

These are very easy to make.  A little yeast leavens the dough, and I use a combination of all-purpose and rice flour to make them even lighter.  A touch of sweetness, lightly coconut-scented, and that signature cardamom flavor.  Heavenly…Enjoy!

Ingredients

Yields 2 dozen donuts

¼ cup sugar

1 ½ tsp yeast

2/3 cup warm water

½ cup coconut milk

1 ¾ cup all purpose flour

¾ cup rice flour

¾ tsp salt

3 tbsp dried grated coconut (preferably unsweetened, adjust sugar if not)

¾ – 1 ¼ tsps ground cardamom*

oil for frying

salt & powdered sugar

Procedure

This can easily be made in a stand mixer or by hand.

In the bowl of a stand mixer fitted with a dough hook, dissolve sugar and yeast in warm water and let bloom 5-10 minutes.  It should become foamy and frothy.  Turn the mixer on low and add coconut milk.

In a separate bowl, sift flours together and mix in salt, grated coconut and cardamom.  Add contents to liquids in the mixer and knead on low for 5 to 10 minutes.  Conversely, you can also knead by hand – the dough should get pretty smooth (except for the grated coconut) and relatively sticky.

Transfer dough to a greased bowl, cover, and let rise for a minimum of 2 hours.

On a floured work surface, divide dough into 4 even pieces.  Form each piece into a ball and flatten to a disc.  Roll each circle out to about ¼” thick and cut like a pie into six triangular pieces.  Transfer to a parchment lined baking sheet while working on each piece.

In a dutch oven or pot, heat 3 to 4 inches of oil to 360 F.  Working in batches, carefully drop a few triangles into the oil.  Don’t overcrowd or the oil temperature will drop.  As soon as the triangles puff, quickly flip them over.  This will ensure that both sides cook – if they become lopsided, it will be hard to keep them on the less inflated side to brown.  Cook for a few minutes, flipping at intervals until golden brown.  Remove to a paper towel-lined plate or baking sheet and lighltly salt.

Before serving, sprinkle with powdered sugar.

They are best served warm as they can get a touch chewy once they’ve cooled.  If you need to reheat, do so in a very low oven or on a low power in the microwave.

*Traditionally, cardamom is roughly ground and added to the mandazi batter.  This results in biting into delightful pieces of cardamom while eating the donuts.  I add about 1 ¼ teaspoons when I’m using roughly ground cardamom and more like ¾ teaspoon when I use the powdered / ground form.


tags: Mandazi, East African donuts, donuts
categories: all-3, breads & cakes, desserts, recipes, side dishes, breakfast
Monday 05.23.11
Posted by Aliya LeeKong
 

Browning (aka Burnt Sugar “Sauce”)

View fullsize browning-pic1-500x333.jpg
View fullsize browning-pic2-500x333.jpg

Browning (aka Burnt Sugar “Sauce”)

I mentioned browning a few weeks back when I was creating my spicy creole ketchup, where I used it as a base. I thought I would talk a bit more about this “sauce” and how it’s used in a lot of West Indian cooking.  This is one of those down-home, secret ingredients that can make or break just how good a dish turns out and also help you flex knowledge when talking to someone who knows about West Indian food (don’t you just love that inside information)?

So what exactly is browning?  Quite simply, it is burnt sugar.  Sugar is heated either by itself or with a little oil or water until it’s taken to a stage of caramelization where it’s smoking and almost black.  At that point, more water is added or ingredients are tossed in to stop the cooking process.  Browning is often bottled and can be bought at most West Indian grocers, but, as you can tell from my description, it’s fairly easy to do at home (just don’t even THINK about touching it when it’s cooking unless you want the burn of your lifetime…).

If you’ve ever had Jamaican oxtail stew or Trini peas and rice, browning was probably the foundation of it.  It’s additive to both color and taste and coats a dish’s ingredients with sweet goodness.  Once the sugar is cooked to that stage, it develops a really rich flavor, molasses-like with smokiness and depth.  It’s used a lot in savoury dishes, but it’s also a key ingredient in West Indianblack cake, a boozy, wine-soaked fruit cake that’s super dark and served around the holidays.

As I mentioned, I used it to form the foundation of a ketchup (why not?) because I love the flavor.  But that’s a pretty unusual way to use it.  Next time you are talking to someone who says they know West Indian food, see if they know as much as you do!

tags: Browning, Burnt Sugar Sauce, West Indian ingredients
categories: all-3, spices-1
Friday 05.20.11
Posted by Aliya LeeKong
 

Fava Purée Topped with Sumac Onions

View fullsize fava-pic1-500x333.jpg
View fullsize fava-pic2-500x333.jpg
View fullsize fava-pic3-500x166.jpg

Fava Purée Topped with Sumac Onions

The terms spring and vegetables really go hand-in-hand – earthy artichokes, thick, luscious asparagus, comical fiddleheads and, one of my personal favorites, fava beans.  Yes, they are a bit labor-intensive as they have to be shelled from their pods and then each individual fava has to be peeled…but the taste, the creamy butteriness, makes all of that work worthwhile.

Fava beans, or broad beans as they are sometimes called, are actually very popular in the Middle East, North Africa and Mediterranean regions.  In fact, ful medames, a dish consisted of slow-cooked favas with garlic, lemon and spices, is a typical breakfast dish in Egypt often served with eggs and pita.  Seasonally, fresh favas may be available, but year-round, dried favas are a staple in the Egyptian diet.

Fava purée is a great way to enjoy the seasonally abundant, fresh favas at the greenmarkets.  I like to add similar ingredients to the Egyptian dish – garlic, lemon, spices, but I also add potato to give the purée a bit of body.  For a silky mouthfeel, I gently stir in extra virgin olive oil at the end; blending too vigorously with the rest of the ingredients can make the oil bitter.  To top this puree, I soften sweet onions in a pan with tart spice sumac.  The result is a beautiful side dish or starter that’s creamy, luscious, and bright.  Enjoy!

Ingredients

Yields approximately 1 ½ cups of puree

Fava Puree:

2 cups shelled fresh favas (from about 2 lbs unshelled)

3 tbsp butter (1 tbsp is optional, melted)

1 tbsp olive oil

1 small yellow onion, finely chopped

1 yukon gold potato, peeled and shredded

¾ tsp ground cumin

pinch of chili powder

5 garlic cloves, minced

juice of half a lemon

½ cup chicken or vegetable stock

3 tbsp extra virgin olive oil

salt and black pepper to taste

Sumac Onions:

3 tbsps butter or olive oil

1 medium yellow onion, thinly sliced

1 tbsp ground sumac

Procedure

For the fava purée, bring a medium pot of salted water up to a boil over high heat.  Add favas and cook for 90 seconds to 2 minutes (they should be bright green).  Drain and shock in an ice bath or run under cold water to stop cooking.  Peel outer layer of skin from favas – they should slip out pretty easily.  Discard skins and set peeled favas aside.

Heat 2 tablespoons of butter and olive oil over medium heat.  Add onion, potato, cumin, chili and favas (and a pinch or two of salt) and cook for 4 to 5 minutes until potatoes and favas are softened.  Add garlic and cook for another 30 seconds until fragrant.  Add lemon juice and chicken stock and bring up to a simmer.

Transfer fava mixture to a blender and purée to desired texture.  Add a bit more stock if necessary to achieve a smoother texture.  Remove to a bowl and stir in extra virgin olive oil and 1 tablespoon of melted butter to get a creamy, mouthfeel.  I like to stir in the oil, rather than blend, so that it doesn’t get bitter from overprocessing.  Season with salt and pepper to taste.

For the sumac onions, heat butter or oil over medium heat.  Add onion and sumac and cook until softened.

Serve fava purée warm, topped with sumac onions and a side of pita or toast points.

tags: fava beans, sumac, recipes for spring
categories: all-3, appetizers, side dishes, recipes, vegetarian-1
Monday 05.16.11
Posted by Aliya LeeKong
 

Filé Powder

View fullsize file-pic1-500x333.jpg

Filé Powder

I am headed to New Orleans this weekend to do some serious Creole cooking, so I thought it would be appropriate to end this week with an ingredient that is key to NOLA cuisine – filé powder.  This spice is made from the dried, young leaves of the American sassafras tree (NOT the root bark, where root beer flavor comes from).

Filé powder is a key ingredient in that most beloved of dishes, gumbo.  The flavor is distinctive and to me tastes earthy or green.  Some describe it as a combo between thyme and savory, but I find it really hard to pin down.

There seems to be an argument out there – when to include the spice, when not.  Gumbo has long been a debatable food, with each cook having his or her own secrets.  Many believe that when okra is included, filé shouldn’t.  And vice versa.  Both actually go beyond adding flavor to thicken gumbo and give it that signature texture.

A few things about filé powder…(1) It should be added to gumbo at the end and not to the entire pot!  If filé is boiled, it becomes super stringy, so just stir it in off the heat or to individual bowls.  (2) Filé loses flavor when stored for long periods of time, so buy in small quantities…

tags: Filé Powder, Filé, New Orleans, NOLA cuisine
categories: spices-1, all-4
Friday 05.13.11
Posted by Aliya LeeKong
 
Newer / Older