X

Sign up to receive exclusive recipes, tips, updates and other goodies from Aliya!

  • Home
  • Blog
    • All
    • Recipes
    • Spices + Ingredients
    • Lifestyle, etc.
    • Travel
  • The Cookbook
  • The App
  • Media
    • All Media
    • Video
  • About
  • Passions
Aliya LeeKong
  • Home
  • Blog
    • All
    • Recipes
    • Spices + Ingredients
    • Lifestyle, etc.
    • Travel
  • The Cookbook
  • The App
  • Media
    • All Media
    • Video
  • About
  • Passions

Espresso-Chocolate Brigadeiros

View fullsize brig-pic1-500x333.jpg
View fullsize brig-pic2-500x333.jpg
View fullsize brig-pic3-500x166.jpg

Espresso-Chocolate Brigadeiros

I love when I discover a food or dish that is completely a blank slate – a truly adaptable item that you can tailor to your own taste preferences with a few key ingredients.  Brigadeiros, another one of my Brazilian discoveries, are precisely that, a docinho or sweet that is enjoyed all over the country.  These are effectively little balls of luscious, milk fudge that are ridiculously easy to make and that can be layered with any flavor combo you like.

Now, when I say easy, even that might be an overstatement.  It can be as simple as 3 ingredients – sweetened condensed milk, unsalted butter, and whatever you are flavoring are garnishing these little guys with.  I found my favorite sweet shop in Rio and kept sneaking a new flavor (or two, who are we kidding) back to my hotel room each day, but my heart really settled on chocolate, which is one of the most popular versions.

So, I will admit, I made the recipe more complicated than the original BUT only in number of ingredients.  And, of course, I think using real chocolate in lieu of just cocoa (the tradition) gives it a much richer taste.  It’s seldom I go all in on just chocolate in a dessert, so the espresso powder, I think, brings out what’s best about the semisweet chocolate.  I would say that the addition of heavy cream,  vanilla, salt and corn syrup make this somewhere between a truffle and a brigadeiro – but the result is simply heavenly: rich, thick fudgy bites with that signature mocha flavor.  Next time, I plan to use Mexican chocolate, one of my favorite ingredients out there, and see what happens.  Enjoy!

Ingredient

Makes approximately 2 dozen brigadeiros

3 tbsps unsalted butter

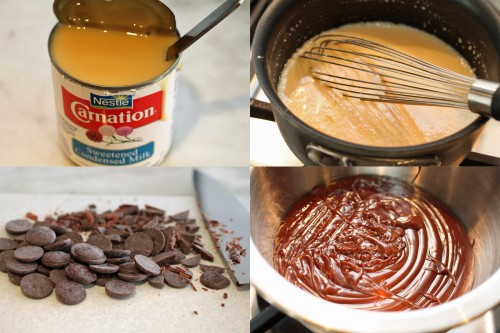
1 (14 oz) can sweetened condensed milk

¼ tsp kosher salt

3 tbsps heavy cream

1 tsp light corn syrup

½ tsp vanilla extract

1 ¼ tsp instant espresso powder

1 tsp unsweetened cocoa powder

3.5 oz semisweet or bittersweet chocolate, chopped (approx ¾ cup)

Garnish: cocoa powder, chocolate sprinkles or vermicelli, and/or chocolate-covered espresso bean

Procedure

In a small, preferably nonstick, pot, melt the butter over medium-low heat.  Add the sweetened condensed milk, salt, heavy cream, corn syrup and vanilla extract and whisk to combine.  When the mixture starts to bubble, add the espresso powder, cocoa powder and chopped chocolate and whisk to melt chocolate.  Cook on medium-low for 10-15 minutes whisking constantly.  The mixture should just lightly bubble around the edges so reduce the heat if it’s cooking too quickly.

When it’s ready, you should see that the mixture will pull away from the sides and slide around the bottom.  Transfer to a metal bowl and don’t scrape the bottom of the pot.  Let cool for 30 to 45 minutes at room temperature.  Cover with plastic wrap and transfer to the fridge.

You want to cool the mixture completely before rolling the brigadeiros.  This will take likely between 3 and 4 hours.  I actually took the bowl out after 2 hours and used a small, greased ice cream scoop to scoop out 24 equal mounds of the mixture onto a parchment-lined baking sheet.  Then, I put it back into the fridge to firm up for another 20 minutes.  The increased surface area makes it cool faster.

Make sure your hands are greased and roll the mixture into even-sized balls.  Then, it is up to your imagination how to garnish.  You can simply roll in cocoa powder or sprinkles.  I garnished mine with chocolate vermicelli and a chocolate-covered espresso bean.  I think the little paper baking cups make it look adorable.  These are best enjoyed at room temperature.

These will keep for 2 days at room temperature if you keep them in an airtight container.  In the fridge, they’ll keep for closer to a month.  If refrigerating, bring to room temperature before serving.

tags: brigadeiros, espresso, chocolate, chocolate desserts
categories: all -1, desserts, recipes
Monday 01.30.12
Posted by Aliya LeeKong
 

Sal Rosada from Maras

View fullsize salt-pic1-500x333.jpg
View fullsize salt-pic2-500x364.jpg
View fullsize salt-pic3-500x333.jpg
View fullsize salt-pic4-500x333.jpg

Sal Rosada from Maras

When someone mentions pink salt, I tend to always think about the curing sort, with sodium nitrite.  But finishing salts do come in all colors – black, pink, red, grey – and this pink salt I happened to pick up while I was exploring Peru.  A lot of times during my spice stories I talk about unique ingredients and their extraordinary flavor.  This salt I wanted to share with you more for the story and the experience it represented for me, less for its individual influence on cooking.

To me pink salt is pink salt and perhaps my palate is just not developed enough.  My understanding is that the reason for (any) color in salt is due to the lack of a refining process, and so salts mainly differ in mineral content, size and shape of crystals, intensity and the way they disperse in foods.   One exception I know to that is kala namak or black salt from India – this type has a distinct, sulphurous taste that makes it easily identifiable.

In the Sacred Valley, near a town called Maras, I visited these salt-evaporation ponds that the locals all referred to as salt mines. Here’s a photo – and it can’t quite do it justice. I was blown away by the site (it’s massive and intense) and particularly the fact that these have been in use from the Inca times, a way of capturing salt from a nearby, super-salty spring.  I literally put my hand in the stream and minutes later my hand had dried with a thorough dusting of salt on it.  The pans need only natural evaporation for the gorgeous salt crystals to form.

What I loved was how the ponds help support the locals according to people I spoke with from the area.  Some of the pools have been passed on for generations; each family owns and harvests its own salt though it’s usually sold through the coop that manages the ponds.  One thing is for sure – labor cost isn’t figured in…Carrying those heavy bags of salt at that altitude and that distance would be no joke!

tags: sal rosada, pink salt, Maras, Peru, Sacred Valley
categories: all -1, spices, travel
Thursday 01.26.12
Posted by Aliya LeeKong
 

Quinoa Crusted Shrimp with Chipotle Mayo

View fullsize shrimp-pic11-500x333.jpg
View fullsize shrimp-pic2-500x333.jpg
View fullsize srhimp-pic3-500x333.jpg

Quinoa Crusted Shrimp with Chipotle Mayo

It feels like over the last few years, Americans have gotten really smart about the health benefits and cooking of quinoa (and, in reality, about a lot of the ancient grains / foods that are showing up in supermarkets).  Quinoa, in particular, has gotten a lot of attention because it’s a complete protein source, high in fiber and minerals and is gluten-free.  The “pseudograin” is actually native to the Andes and a big part of the diet out there, so while I was in Peru a few weeks back, I was a bit obsessed with learning traditional quinoa recipes.

I had the opportunity to cook with a few chefs in the Sacred Valley, and they gave me their creative interpretations of the grain – using it in surprisingly delicious, brothy soups, cooking it like a risotto in a dish called “quinotto”, and even sweet, in a dessert that’s not unlike a frozen rice pudding.  I too wanted to put my spin on it, so I thought replacing traditional breading for fried shrimp with quinoa would create a healthier (but still super flavorful) option.

And this recipe is almost gluten-free.  You can easily replace the all-purpose flour in this recipe with rice flour, and you are good to go.  One of the chilies used in Peruvian cooking (the “ajis” as they call it) is aji panca, a dried, smoky chili which I think has a similar flavor profile to the chipotle.  I thought a creamy, homemade mayo spiked with chipotle pepper would be the perfect accompaniment to this shrimp.  The quinoa crust is nutty, crunchy and satisfying and tastes heavenly with a bit of smoky, spicy mayo….Enjoy!

Ingredients

Serves 4 to 6

For the shrimp:

½ cup flour

1 tsp salt

¼ tsp freshly ground black pepper

½ tsp ground cumin

½ tsp paprika

¾ tsp garlic powder

½ tsp onion powder

2 eggs, beaten

1 cup raw quinoa*

1 lb medium shrimp, peeled and deveined

Olive or vegetable oil, for frying

For the chipotle mayo:

Yields ¾ cup

1 egg yolk

1 garlic clove

½ tsp mustard

1 tbsp lemon juice

150 mL olive oil

generous pinch of salt

1 chipotle in adobo sauce

Procedure

Let’s start by quinoa-crusting the shrimp.  Set up 3 bowls and a baking sheet with a rack on top.  In the first bowl, thoroughly mix together the flour with the salt and all of the ground spices.  The second bowl will have the beaten eggs, and the third bowl, the quinoa.  For each shrimp, holding by the tail dip them in the flour mixture, eggs, and then quinoa – shaking off excess at each stage.  Place on the rack on the baking sheet and set in the fridge while heating the oil.

In a heavy-bottomed pot, heat 2 to 3 inches of oil to 375° – 380° F.  The key here is that the oil has to be hot enough or the quinoa won’t cook through.  It should be crisp but not taste raw.  You want to work in batches so the oil temperature doesn’t drop too much – the overall goal is to keep the temperature above 360° F for the duration of cooking.  Fry shrimp for 3 minutes and transfer to another rack on a baking sheet.  Immediately, season with a bit of salt while it’s hot out of the oil.

For the mayo, in a food processor or a blender, blend together the egg yolk with the garlic clove, mustard, and lemon juice.  With the machine on, slowly drizzle in the olive oil until fully incorporated.  Add the chipotle and blend until uniform.

Serve shrimp hot with a side of the chipotle mayo.

*I used a combination of red and white quinoa here (and would have used black as well had I found it).  You can use whatever variety you have on hand.

tags: quinoa, shrimp, chipotle mayo, Peruvian cooking
categories: all -1, appetizers, recipes
Monday 01.23.12
Posted by Aliya LeeKong
 

Kodampuli or Malabar Tamarind

View fullsize kodampuli-pic1-500x333.jpg
View fullsize kodampuli-pic2-500x333.jpg

Kodampuli or Malabar Tamarind

This week, I came across an ingredient that has quickly become one of my favorite new foods – a smoky, heady dried fruit that had my mind racing for different ways to use it!  Although I tend to work on more of the modern dishes for Junoon, I decided to take a step back and focus on researching and developing a recipe for a traditional curry from the south of India, a Kerala shrimp curry.  From my experience in Goa and in cooking Indian cuisine, I knew about kokum and tamarind as souring agents but had never heard about kodampuli, a smoked, dried fruit that’s used almost exclusively in the Kerala region.

Kodampuli is also called kudampuli, Malabar tamarind, gambooge or fish tamarind and is not actually tamarind at all as I first thought.  The fruit is small, pumpkin-shaped and ripens from green to yellow.  It’s grown in the south of India, other areas of southeast Asia and in part of Africa.  Once the fruit ripens, it’s deseeded and dried in the sun after which it’s smoked.  They have a really long shelf life, so if you happen to get your hands on this hard-to-find ingredient, you can keep it for literally years.

I was super excited to use this in the curry because I’m a bit obsessed with smokiness in foods (and cocktails), and I certainly had never tasted a smoky curry.  To get the best out of the fruit, you have to rinse it and soak it in boiling water for about 10 to 15 minutes.  Both the fruit and the liquid are used in cooking and impart a sour but not acidic (I finished it with grilled lime juice) quality to a dish.  The flavor is not wholly unlike kokum or tamarind but there is a subtle, smoky finish; I think it added a delicious complexity.

You can be sure that I will be throwing these little guys in winter soups this season.  Their flavor is best when simmered in a liquid for 10 to 15 minutes, so any braises I make (braising is one of my favorite cooking activities) may get a sour kick.  I’d love to explore using these in sauces and meat marinades for searing or grilling – perhaps simmer it in wine or water with garlic and spices to do an overnight marinade or brine.  Quite frankly, I’m just not sure how I’ll go back to regular tamarind again…


tags: kodampuli, Malabar Tamarind
categories: spices, all-2
Thursday 01.19.12
Posted by Aliya LeeKong
 

Arroz Con Pato

View fullsize arroz-pic1-500x333.jpg
View fullsize arroz-pic2-500x333.jpg
View fullsize arroz-pic3-500x166.jpg

Arroz Con Pato

A classic dish in Spanish and Latin culture is Arroz con Pollo or chicken with rice.  It’s a family-style, one-pot dish, chicken cooked with onions, peppers, garlic, tomatoes (sofrito) and rice – some families add achiote, others saffron, cilantro, or culantro…whatever is that family’s tradition.  One of the best dishes I tried in Peru was Arroz con Pato, where succulent duck replaces the chicken in the traditional dish.  It was such a rich and elegant dish that I had to try my hand at it now that I’m back home in NYC.  I’m so happy I did….

Two of the differences between arroz con pollo and arroz con pato (aside from the whole chicken v. duck thing) is that chicha, Peruvian corn beer, is used to cook the rice and duck in arroz con pato.  Also, cilantro is blended with water and added to the braising liquid, so the color of the dish takes on a gorgeous, green hue.  Beer, cilantro, and duck?  A winning combination in my book!

I learned a number of dishes from a fantastic friend in Lima, Naguib Ciurlizza, a colorful and multi-talented gentleman who boasts poetry and painting as skills alongside his vast knowledge of Peruvian cuisine.  He detailed to me how the original dish was made.  I had to make a few twists and turns to accommodate what’s locally available here in the States (aji amarillo can be so difficult to find!) and to accommodate my own taste.  So I use jalapenos in lieu of Peruvian peppers.  I also substitute a good stout beer instead of corn beer and chicken stock instead of water.  Traditionally, a long grain rice is used, but I went with a shorter grain rice that’s more of a paella tradition because I just love the texture.  I also throw in some olives at the end for a salty bite.

I will be blunt – this is not something to be whipped up in 30 minutes.  It’s a long, slow, loving cooking process, but I promise you the results are incredible and rewarding.   Fall-off-the-bone duck meat in a flavorful rice infused with beer and cilantro, studded with peas, bell pepper, and olives.  It’s a meal your family will love you for or that works for a great, casual dinner party (when you want to flex your Peruvian-inspired skills).  I’m a cook, so I shouldn’t say this but…I was literally shocked by how delicious this version of the dish is!  Enjoy!

Ingredients

Serves 4 to 6

Vegetable oil to coat pot

Duck, preferably 2 legs, bone-in with thigh meat and 1 breast, boneless split (approximately 3 lbs)

3 shallots, finely chopped

1 jalapeno, minced

2 tsps ground cumin

5 cloves garlic, minced

¾ cup stout beer

¼ cup Pisco liqueur (optional)

4 cups chicken stock

1 very large handful cilantro (no tough stems but soft stems are fine)

Bay leaf, dried or fresh

2 ½ cups Valencia, bomba or calasparra rice (paella rice)

¾ cup fresh or frozen peas

1 cup bell pepper, small dice (mixed yellow, red and orange)

Black olives (garnish)

Salt and freshly ground black pepper

Procedure

Preheat oven to 350° F.

Start by prepping the duck.  Dry the legs and breast and trim of excess fat.  I like to reserve this fat to melt down and keep for cooking in the future.  Prick the legs all over with a fork (this will help the legs render the fat easier) and season all over with salt and freshly ground pepper.  Score the skin on the breast in a criss-cross pattern (again for fat-rendering purposes) and set aside.

Heat a large pot or dutch oven over medium-low heat.  Add vegetable oil to coat the bottom of the pot and prevent the duck from sticking.  Add the legs skin-side down.  You want the fat to render out and the skin to crisp and brown.  This should take 3 to 4 minutes.  Turn pieces over and cook for another 3 minutes.  Remove legs to a plate and set aside.  Pour off (and keep!) any excess fat, reserving a few tablespoons in the pot for cooking the vegetables.

Add shallots, minced jalapeno and cumin and cook for 3 to 5 minutes until the shallots are softened and translucent.  Add the minced garlic and cook for another minute.  Pour in the beer and pisco, if using, and increase the heat.  Scrape the bottom of the pan with your spoon to dislodge any brown bits and bring up to boil.

While the duck or vegetables are cooking, blend 2 cups of the chicken stock in a blender with a large handful of the cilantro, reserving a small handful to chop for garnish later.  You want to blend on high for several minutes until the cilantro is totally pulverized.

Nestle the duck legs back into the pot, skin-side up.  Add the chicken stock blended with the cilantro and a bay leaf, cover and bring up to a boil.  As soon as it boils, place covered pot into the oven and cook for 1½ hours.

Take pot out of the oven, place on the stovetop and temporarily (and carefully) remove the duck legs.  Add the rice, peas, and chopped peppers and season very well with salt now to avoid stirring once it’s cooked.  Add the remaining 2 cups of chicken stock, stir and nestle the duck thighs back in.  Cover and bring back up to a boil.  Place in the oven for another 30 to 40 minutes until the rice is cooked through.

In the last 10 minutes of cooking, heat a skillet over medium-low heat.  Season scored duck breast all over with salt and freshly ground pepper.  Add a touch of oil to prevent the duck breast from sticking and place breast pieces skin-side down.  You want to render all of the fat out, so as the fat accumulates in the pan, carefully pour it off (and keep!).  Cook for 8 to 10 minutes until the skin has become crisp and there is no layer of fat underneath it.  Turn breast pieces over, increase heat to medium-high and cook for another 2 minutes.  This will yield a medium-rare breast – cook for longer if you like your meat more well done.

Remove the duck breast to a cutting board, cover loosely with foil and let rest for 5 minutes.  Thinly slice the duck breast.

Serve the rice garnished with black olives, some fresh cilantro and sliced duck breast.

tags: duck, Peru, Peruvian cooking
categories: recipes, travel, all-2, main dishes-1
Monday 01.16.12
Posted by Aliya LeeKong
 

Catupiry

View fullsize catupiry-pic1-500x333.jpg

Catupiry

Because I live in NYC, when I travel, I tend to shy away from big cities and focus on countrysides and off-the-beaten-path destinations.  I like to experience the physical beauty of a place while taking in the culture, and the rush of a city is the last thing I crave.  But, literally, as soon as the plane landed in Rio de Janeiro, I felt an indescribable energy – a laid back beach culture combined with effortless sexiness and an urban edge.  This is one big city I looove.  Of course, cooking and food exploration was high on my list here, and I wanted to share with you one of the most delicious finds, a rich, creamy, spreadable cheese called Catupiry.

Catupiry is completely Brazilian, and the way it’s made is apparently a well-guarded secret of one family who created it in the state of Minas Gerais early in the 20th century.  It’s a popular brand of requeijão cheese, a type of cream cheese that dates back to times of slavery in the country.  The flavor is really mild, luscious, with a bit of tang, and I think it resembles a cross between mascarpone and fromager d’affinois.  Because it’s local to Brazil, it is certainly not the easiest thing to find in the States.  If you are in the NYC area, I know Rio Bonito in Queens carries it as does Seabra Supermarkets in Jersey.

Requeijão cheese is part of Brazilian food culture and is incorporated in family’s dishes on the day to day.  It may be used in the country’s famous cheese bread, pão de queijo, as a breakfast spread, baked with shredded chicken in a pastry crust (that just made me hungry! might try that soon), simply enjoyed with guava paste (would be delicious in these guava cheese crepes), or, and this might be my favorite, as a pizza topping.  I will certainly be making recipes with Catupiry soon and will make sure mascarpone works for them too for those who can’t find it!

tags: Catupiry, Brazil, cheese, requeijão cheese
categories: travel, spices, all-2
Thursday 01.12.12
Posted by Aliya LeeKong
 

A Twist on the Classic Pisco Sour

View fullsize pisco-pic1-500x333.jpg
View fullsize pisco-pic2-500x333.jpg

A Twist on the Classic Pisco Sour

Happy New Year!  As many of you know, I spent the past few weeks doing some serious culinary exploration of Peru and Brazil (so expect me to go a bit South American-crazy with my recipes in the coming weeks).  I was blown away in Peru by the incredible produce – fruits, vegetables and herbs I had never seen or heard of.  The cooking was super fresh, with Lima highlighting a lot of the country’s famous seafood dishes and Cusco showing me more of the homey, Andean classics.  I thought I’d start this year with a cheers to 2012, a twist on a classic Peruvian cocktail (which I drank like water…).

Pisco is a clear grape brandy produced in the winemaking regions of Peru and Chile and is the national spirit of both countries.  Both also lay claim to the pisco sour, but I’ve only experienced the Peruvian version, which I was taught has 3 parts pisco to 1 part lime juice.  Throw in some simple syrup for sweetness, an egg white for a bit of foamy, creaminess and a dash of bitters and you have one of the most refreshing cocktails out there.

I saw a ton of different versions while I was there, everything from passionfruit to mint.  But I thought I would make something a bit more seasonally appropriate, since this mid-20’s temperature makes “refreshing” the last thing you want to think about.  This is sort of a cross, a pisco sour-apple really.  I used a combination of fresh fuji apple juice and lime juice and infused the simple syrup with some mulling spices – cinnamon, clove, allspice, and a star anise for good measure.  The result is a cold drink with warm spices that’s totally in the winter spirit…

A few things: For pisco sours, Peruvians use the juice of a local, small lime that’s extremely aromatic.  I suggest using key lime juice to get as close to that flavor as possible.  Also, if you are making these for a party, I suggest making them in batches to prevent the drink getting a bit bitter or the egg white from completely separating out.  Enjoy!

Ingredients

Serves 4 to 6

Spice-Infused Simple Syrup*:

Yields about ¾ cup

½  cup white sugar

½  cup water

2 cinnamon stick

3 whole cloves

3 whole dried allspice berries

2 star anise

2 bay leaf

pinch of ground nutmeg

1 inch piece of meyer lemon rind

Pisco Sour Apple:

1 ¾ cups pisco

¼ cup lime juice (preferably key lime)

1/3 cup fresh apple juice

¾ cup spice-infused simple syrup

2 egg whites

ice

angostura bitters (garnish)

Procedure

For the simple syrup, bring all ingredients in a small saucepan up to a boil, stirring so the sugar dissolves.  Remove from the heat, cover and let steep for 15 minutes.  Strain and cool before using.

For the pisco sour apple, pour pisco, both juices, and the simple syrup into a blender.  Blend briefly.  Add egg whites and blend for another 10 seconds.  Pour into glasses over ice and add a few dashes of angostura bitters to each.  Serve immediately.

*Feel free to use your favorite mulling spices here and make this your own.  I used meyer lemon rind because I had some sitting around and felt it would work well with the lime juice.  Orange rind is great too.


tags: Pisco Sour, Peru, cocktails
categories: all-2, drinks & cocktails, recipes, travel
Monday 01.09.12
Posted by Aliya LeeKong
 

Persian Saffron

View fullsize saffron-pic1-500x333.jpg
View fullsize saffron-pic2-500x333.jpg

Persian Saffron

If you have been reading this blog, it is no secret I’m a huge fan of what I think is one of the more alluring spices out there….saffron.  A tiny pinch of these little stigmas from the Crocus flower can completely transform a dish, infusing savoury and sweet foods alike with its intoxicating perfume.  For me, saffron represents a childhood  memory – the unforgettable taste of seviyan, a sweet pudding made with vermicelli flecked with cardamom and sultanas that was a treat (or special request!) my Mom would make.  .

When people think of saffron, there is usually a close association with the Spanish sort.  The reality is Kashmiri and certain Italian saffrons, though not marketed as much as Spanish saffron, are the highest quality and the most potent in terms of aroma and color.  Persian or Iranian saffron (my saffron of choice) falls in right after these and is as good as (if not better) than the best saffron from Spain.

Anyway you slice it, if you want good saffron, you’re going to have to shell out!  Each strand is plucked by hand for goodness sake.  But the last thing you want is to spend on a spice and then have it lose its flavor, so I always think about longevity and rationing when buying a spice….The thing that distinguishes Persian saffron is that it has a lower moisture content, which means it keeps for a longer period of time and also crushes easily into a powder (so you can use less).  It easily infuses a dish with its color as the small particles disperse more easily.

Although my childhood memory was a sweet saffron dish, here in my recipes, I’ve done nothing but add it to savoury dishes – fried chicken, saffron & roasted garlic spaghetti squash gratin, and shakshuka to name a few (I’m sure there are more).  Saffron is often “bloomed” first, soaked in a liquid before being added to a dish.  It blooms easily in a warm liquid like milk, cream, or stock as well as alcohol and not as easily in fats like oil or butter.   I would love to hear how you incorporate saffron into your dishes so please share!

tags: saffron, Persian saffron, seviyan
categories: all-2, spices
Thursday 12.15.11
Posted by Aliya LeeKong
 

Shiro Powder

View fullsize shiro-pic1-500x333.jpg
View fullsize shiro-pic2-500x333.jpg

Shiro Powder

A few years back I spent some time in a kitchen in Brooklyn learning Ethiopian cooking, at a small, authentic restaurant called Bati in Fort Greene (I highly recommend it!).  The chef there “mama” (which is exactly what I called her…) showed me dish after dish, albeit speaking in Amharic, and I followed along as best as I could – watching, tasting, smelling, feeling (and googling where otherwise stumped!).  It was quite an education, and I felt incredibly fortunate to be grounded in the true tradition of this cuisine – from the fermentation of their bread, injera, to learning how to perfect kitfo, a luscious, warm steak tartare, to savouring the gorgeous vegetarian stews, shiro being my favorite.

Shiro is a staple, Ethiopian stew that’s made from peas, lentils, and chickpeas that are dried and ground into a fine powder, shiro powder.  The flavor is rich, spiced and nutty, and the shiro powder comes blended with a ton of spices and herbs – fenugreek, cardamom, and sacred basil to name a few – as well as dried garlic and ginger.  The stew consists of sautéed red onions, garlic, water, shiro powder and some green peppers, and occasionally is finished with a spiced, clarified butter, which is one of my favorite ingredients in the world.  Easy to make and imparts everything you cook in it with rich flavor….

This is the time of year where the cold weather makes you just want to curl up with a nice soup or stew over rice, and I love this ingredient because it’s low maintenance, already has a ton of spices in it, and can easily thicken up and flavor most soups you have out there.  This is such a great ingredient for vegans to incorporate because of its protein levels and makes a quick meal because all of the lentils are powdered.  I like to do a nice, creamy cauliflower soup and throw this in; it’s used to thicken up beef stews in Ethiopia as well so I have added it to a basic bowl of chili.  Feel free to use your imagination!

tags: shiro powder, Ethiopian cooking, .
categories: all-2, spices
Thursday 12.08.11
Posted by Aliya LeeKong
 

Frittata with Caramelized Garlic, Squash & Aleppo

View fullsize frittata-pic1-500x333.jpg
View fullsize frittata-pic2-500x333.jpg
View fullsize frittata-pic3-500x166.jpg

Frittata with Caramelized Garlic, Butternut Squash & Aleppo

One thing I get asked about all the time is how to incorporate spices into your every day foods.  I write here a lot about “exotic” spices or ingredients, and the reality is I do cook with them all of the time.  It doesn’t have to be a special occasion.  It doesn’t even have to be an overtly ethnic dish.  I like the foods everyone else does, but I tend to add a little something extra to them.

This frittata with caramelized garlic (like savoury candy!) and butternut squash is the perfect example.  Wait, I need to reiterate how ridiculously delicious caramelized garlic is.  This recipe is exact, but I encourage you to double the garlic portion and save half for other dishes later in the week – it’s like balsamic-y, glazed, nutty goodness and the cloves are fantastic on a salad, as part of a cheese plate, or worked into a pork or lamb chop sauce.

In any case, back to spices…here I use Aleppo chili flakes for heat.  These are my go-to-on-top-of-pizza chili flake and just have a really sweet, mild flavor.  Pairing this with a bit of smoked Spanish paprika brings a real richness to the dish; the scent as it’s cooking is maddening (particularly if you are starving like I was when I made this).

I love the idea of working a fall squash into breakfast, and this is a fantastic dish to entertain with for a brunch.  I used grana padano cheese here because it’s delicate, and there are so many outspoken flavors here: the caramelized garlic adds that savoury / sweet quality as does the butternut squash, the chilis and paprika a bit of smokiness and heat and the scallions that bright finish.  This is definitely one of my Sunday morning fall faves…Enjoy!

Ingredients

Serves 6 to 8

Caramelized garlic:

15 – 20 whole garlic cloves

¾ cup milk

1 tbsp unsalted butter

2 tsps olive oil

2 tsps balsamic vinegar

½ cup water

2 tsps sugar

pinch salt

pinch Aleppo chili flakes

Frittata:

2 cups butternut squash, peeled, seeded and cut into a ½” dice

olive oil

salt

freshly ground black pepper

10 eggs

½ cup crème fraiche

2 tsps pimentón de la Vera (smoked Spanish paprika)

1 tbsp Aleppo chili flakes

1 cup grana padano cheese, grated*

½ cup mozzarella, shredded

2 tbsps scallions or chives, green parts only, finely chopped

1 ¼ tsp salt

Procedure

Preheat oven to 375° F.

In a small saucepan, add whole garlic cloves and milk.  Bring up to a simmer and simmer for 5 minutes.  Be careful it doesn’t boil over!

Strain and rinse garlic cloves.  Wipe out saucepan and place back over medium heat.  Add butter and oil.  When hot, add garlic and sauté for 5 minutes.  Add remaining caramelized garlic ingredients and simmer until almost all of the liquid is reduced and the cloves are dry.  Swirl the garlic in the pan from time to time during this process to keep from sticking and to make sure the cloves cook evenly.  Strain off any excess liquid and set aside.

In an ovenproof skillet, toss together the squash cubes with a little olive oil, salt and pepper.  Roast in the oven for 15 to 20 minutes until squash is fork tender.

In a large bowl, whisk together the remaining ingredients, reserving ¼ cup of the grated cheese.  Add to the hot skillet with the squash.  Top with the remaining cheese and a sprinkle of salt and place back in the oven.  Cook at this temperature for 15 minutes and increase the temperature to 425° F for another 5 minutes.  Serve warm.

*You can substitute in Parmigiano Reggiano or any other grated hard cheese you like.


tags: Frittata, butternut squash recipes, aleppo, brunch recipes
categories: breakfast, recipes, all-2, vegetarian-1
Monday 12.05.11
Posted by Aliya LeeKong
 

Fennel Pollen

View fullsize fennel-pollen-pic2-500x333.jpg
View fullsize fennel-pollen-pic1-500x333.jpg

Fennel Pollen

I was recently dusting some of this gorgeous, fragrant pollen over scallops to finish off a dish when I thought about the fact that this (slightly sexy) ingredient isn’t as popular as it used to be.  For a time, you couldn’t open up a menu in NYC without seeing a sprinkle of fennel pollen somewhere, and now….not so much.  Whether it’s trendy or not, fennel pollen creates a luxurious and fragrant layer to a dish, with that signature anise-like aroma and a delicacy that is as beautiful to look at as it is to eat.

Many people are pretty familiar with fennel seeds and their culinary use, and I’ve actually touched on Lucknow fennel here, my favorite and what I think is the most intense of the bunch.  But the pollen is another thing altogether.  It is just that, harvested from the yellow flowers of wild fennel, which grows mainly in Italy (thus its use in Tuscan cooking) as well as in California, where it was apparently planted by Italian immigrants.

Some claim that the flavor of the pollen is way more powerful than the seeds, and, if you’re lucky enough to live in Cali and harvest it fresh, that could be true.  What I pick up at the spice store, however, has a gentler flavor, more reminiscent of the Lucknowi fennel seeds in its sweetness but with less of a sharp bite.

Now, this isn’t the cheapest spice out there, but a little of it makes a big impact.  A sweet, tiny bowl of it stays perennially on my cheese board for entertaining – it complements soft cow and goat milk cheeses beautifully.  I am guilty of sprinkling a bit on top of buttered popcorn, throwing it into my scrambled eggs, and mixing it with olive oil for a bread dip.  Although it works really well with pork in a spice rub, I prefer its delicacy paired with fish and seafood where it can really stand out.  But what I’m really itching to do now is bake with it.  I may throw these into some shortbread or, better, madeleines this weekend….

tags: Fennel Pollen, Lucknow fennel
categories: all-2, spices
Thursday 12.01.11
Posted by Aliya LeeKong
 

My Classic Braised Short Ribs

View fullsize short-rib-pic1-500x333.jpg
View fullsize short-rib-pic2-500x333.jpg
View fullsize short-rib-pic3-500x168.jpg

My Classic Braised Short Ribs

Inevitably, there are certain dishes in a cook’s culinary arsenal that get whipped out from time to time and become their signature.  It’s usually something that’s a big crowd pleaser, that they can basically do in their sleep, and that fools others into thinking they slaved for hours making it.  The dish often becomes something close friends (close enough to get repeat dishes) associate that cook with, and other friends (who may not get the repeat) leave asking for a detailed recipe.  For me, and you can ask any of my friends, it’s my classic braised short ribs (I know, not exactly exotic, but damn good).

I happened to serve these at Thanksgiving this year, and, like any cook who is cooking from muscle memory and not a recipe, I decided to tweak my method a bit based on timing, what’s on hand.  I thought my short ribs were already delicious but this version outdid all the previous ones!  SO the time has come for me to actually write this recipe down, and I’m now sharing it with you.

When you look at any classic short rib recipe, there are some basic truths – sear the ribs, cook vegetables down, add wine and stock, simmer for hours.  Most of the recipes start with the ribs, salt and freshly ground pepper and go from there – and they are fantastic.  But what I did differently this year was simple – I marinated the ribs in some onions and garlic and a few spices the night before I cooked them…and it just took this dish to the next level!  This has now become my classic braised short ribs – rich, red wine-infused, flavorful, fall completely and utterly off the bone….Enjoy!

Ingredients

Serves 4 to 6

For the marinade:

1 onion, quartered

8 garlic cloves

1 small red chili pepper

1 ½ tsps whole black peppercorns

2 tsps Spanish paprika

¾ tsp onion powder

1 tsp garlic powder

¾ cup of vegetable oil

5 lbs short ribs, bone-in (5 to 6 ribs)

For the braise:

2 medium onions, cut into a medium dice

1 leek, thickly sliced

1 stalk celery, cut into a medium dice

5 – 6 garlic cloves, minced

1 small plum tomato, roughly chopped

1 cup red wine

small bunch thyme

1-2 fresh bay leaves

3 ½ cups chicken stock

2-4 tbsps heavy cream (optional)

vegetable oil

Kosher salt and freshly ground black pepper

Procedure

In the bowl of a food processor, add the onion, garlic, chili pepper, black peppercorns and ground spices.  Pulse until finely chopped, scraping down the sides.  With the food processor on, stream in the vegetable oil until a uniform paste forms.  Place short ribs in a resealable plastic bag and toss in the marinade.  Try to remove as much air as possible before resealing.  Move ribs around until all are coated with the marinade.  Refrigerate for a minimum of 6 hours.

Preheat oven to 325° F.

Remove ribs from the marinade, wiping off all excess (should be dry).  Let ribs come to room temperature.  Season all sides generously with salt and freshly ground pepper.

Heat a Dutch oven or heavy-bottomed pot over high heat.  Sear ribs in the pan for about 2 minutes per side to develop a nice brown.  You don’t want to overcrowd the pan, so it’s best to work in batches of 2 to 3 ribs at a time.  Set ribs aside and drain pan of any excess oil.

Turn heat down to medium-low and add onions, leeks, and celery with a bit of salt to draw out the moisture.  You want to cook the vegetables until they have softened and the onions are translucent, about 7 to 9 minutes.  Add the garlic and cook for about 30 seconds and then throw in the chopped tomato.  Cook for another 2 minutes.

Add red wine and use your wooden spoon or spatula to scrape the bottom of the pan.  You want to dislodge all of the brown bits from the bottom of the pan so they really flavor the cooking liquid.  Let the red wine simmer and reduce until the vegetables are almost dry.

Nestle the browned ribs back in the pot amongst the vegetables.  Don’t forget to throw in any accumulated juices from the plate where you were resting the ribs as well.  Add in the thyme, bay leaves, and chicken stock and increase the heat to bring it all up to a boil.

Immediately, cover tightly with a lid or foil-line and then place a lid on top.  Place pot in the oven and cook for 3 to 3 ½ hours until the meat is fork tender (or basically falling off the bone…).  Season to taste.

Now, these are absolutely delicious like this.  You have a number of choices depending on what kind of time you have:

(1) You can serve as is with a bit of the cooking liquid (thin).  Completely delicious.

(2) You can remove the ribs and skim off as much fat from the top of the cooking liquid using a ladle.  Then, reduce the liquid by half over a medium flame, strain through a mesh strainer into another pan, and add heavy cream to thicken.  The ribs can be simmered in this if you want to heat them up a bit.

(3) This is what I like to do.  I like to make the night before and cool the ribs in the cooking liquid.  The fat solidifies in the fridge, so it’s really easy to spoon off.  Then, I just follow #2.  I love to just throw the ribs back into the strained sauce and reheat.

tags: short ribs, braised short ribs, signature dishes
categories: all-2, main dishes, man-friendly, holiday, recipes
Monday 11.28.11
Posted by Aliya LeeKong
 

Thanksgiving Ideas

View fullsize Thanksgiving-pic1-500x333.jpg
View fullsize thanksgiving-pic2-500x168.jpg
View fullsize thankgiving-pic3-500x166.jpg
View fullsize thanksgiving-pic4-500x166.jpg

Thanksgiving Ideas

Thanksgiving has to be my favorite holiday!  I love the gathering of friends and family, that crisp fall weather, and, of course, the serious spread of food…I admit I get a little insane for the few days leading up to it with a master recipe list and plan of attack for prepping for the 3 days before (last year it was 14 pages long.  I know, crazy.).  And although I go a bit traditional for the turkey, I like to use the sides, apps and desserts to be creative and incorporate all of the delicious exotic flavors you guys have been reading about here.  SO I thought I’d give everyone some ideas today on how to spice up your Thanksgiving…

Let’s start with appetizers.  I love a big, beautiful cheese plate dressed with some membrillo, a great variety of honey, a rich balsamic vinegar to accompany the blue cheese, and perhaps some concord grapes.  I’m doing that this year along with a bit of Indian street food called pani puri that I’ll have to post soon!  Pani puri are little crispy puffs stuffed with a mixture of chickpeas, red onion, tamarind, yoghurt and cilantro-mint chutney.  I wanted to keep the apps light this year because of how much food I’m making for the main meal, but if you’re going for hot apps, pao de quiejo is always a winner; you really can’t go wrong with Brazilian cheese bread, chewy cheesy goodness.  I also love these harissa cheese-stuffed fried olives, this mushroom pissaladière and lamb meatballs with quince and black olives.

This year I’m doing red wine-braised short ribs to accompany my heritage turkey.  For the sides, I love love macaroni pie, a West Indian version of mac ‘n cheese that has onions, garlic, and habanero and is baked in the oven– you can stick to the traditional one or try the porcini version (which is what I’m making…).  My brain goes straight to casseroles when I think Thanksgiving sides, so smoky spicy corn pudding is always on my list as is South African shepherd’s pie or bobotie as it’s called there, a layered dish with spicy-sweet ground beef or lamb cooked down and topped with a velvety egg custard.  The recipe I have shows how to make individual ones, but you can easily transfer it all to a gratin or casserole dish and just adjust baking time.  I’m also planning for simple roasted, market vegetables and a rice dish.  This pilau makes a beautiful accompaniment.

Ah, and now for dessert.  Definitely, apple pie with star anise brown butter that I’m going to serve with vanilla ice cream and some homemade dulce de leche and some of the Greek-inspired madeleines. This recipe for cape malva pudding, another South African treasure that features a moist cake drenched in a bit of brandy cream works really well and is something I’ve served at previous Thanksgivings OR, if you’re going a bit more elegant, these Arabic coffee panna cottas are also silky and gorgeous.  The easiest by far though would be these amarena cherry and dark chocolate clafoutis – yum…

Whatever you choose to do, I hope everyone has a warm, fun-food-family-friends-filled Thanksgiving!

tags: Thanksgiving ideas, Thanksgiving recipes, spicing up Thanksgiving, entertaining a crowd, holiday recipes
categories: all-2, holiday, lifestyle
Monday 11.21.11
Posted by Aliya LeeKong
 

White Peppercorn from Penja

View fullsize penja-pepper-500x333.jpg

White Peppercorn from Penja

It’s interesting, the whole concept of terroir. It’s traditionally used when describing wines (and sometimes coffee and tea) to paint just how the land, the environment, and the climate all affect its flavor and characteristics.  But, to me, terroir works for so much more than that and can be applied to many different parts of the culinary world – produce, mushrooms, dairy and cheeses, meats and even, like in the case of this pepper, spices.

While most peppercorns are grown in South Asia (India, Sri Lanka), Malaysia, Sumatra, Indonesia or even Vietnam, this white pepper comes from Africa, a small, populated area in Cameroon called Penja actually.  Penja has a monsoon climate, warm and humid, and its soil is high in volcanic material.  Peppercorns are grown in this region, and the Penja white peppercorn specifically has become a standout in the culinary world for its incredibly distinct flavor, which is largely attributed to its unique terroir…

Now, Sarawak peppercorns from Malaysia are thought to be the best white peppercorns out there – hot, woody and pine-like.  But white peppercorns from Penja are milder, with a floral bite, musky and not a ton of heat.  After picking these up on my latest spice hunt (in the city…), I envisioned coarse grinding these over oysters, to flavor a béchamel or a simple piece of fish.  I think it complements mild, creamy textures where the spice can really do its thing.

The downside to these guys is that there is very limited production in this region, so it’s not so easy to find…the usual online purveyors do carry it though!

tags: White peppercorn, Penja
categories: all-2, spices
Thursday 11.10.11
Posted by Aliya LeeKong
 

Kourabiedes-Inspired Madeleines

View fullsize madeleine-pic1-500x333.jpg
View fullsize madeleine-pic2-500x333.jpg
View fullsize madeleine-pic3-500x166.jpg

Kourabiedes-Inspired Madeleines

Madeleines to me have always been a bit untouchable – you know, one of those things you look at and say that is better left to someone else to make (because I couldn’t possibly produce that sort of perfection!).  I loved conquering that fear here.  Yes, they take a bit of finesse to make the genoise batter (the base of them) but can easily be mastered in one or two try’s, and THEN become a serious piece in your culinary arsenal.  I plan to show these off, in fact, at my Thanksgiving table…

Kourabiedes are a Greek, shortbread cookie that are served at holidays, particularly Christmas.  As opposed to a traditional shortbread, these cookies have almonds ground up in the batter, rosewater to scent them, and are crescent-shaped and dusted with powdered sugar.

Kourabiedes were absolutely the inspiration for me to create these fluffy, buttery madeleines.  As opposed to grinding up the almonds, I used almond extract here to keep the integrity of the madeleine – that signature spongy texture.  I also went ahead and browned the butter before adding it to the batter; brown butter is simply butter that has been cooked until the milk solids turn a golden color and it smells like hazelnuts.  It adds a beautiful, nutty undertone to complement the almond flavor.  The key to this batter is beating the eggs until they have tripled in volume, not deflating it when adding in the flour and browned butter, and resting it a bit before cooking.  The result: light as air, addictive and buttery madeleines that are nutty and perfumed with rosewater.  Enjoy!

Ingredients

Yields 1 dozen

5 tbsps unsalted butter

2 large eggs

1/3 cups sugar

½ tsp vanilla extract

1 tsp almond extract

1 ½ tbsps rose water

1/2 cup + 2 tbsps all-purpose flour

½ tsp baking powder

½ tsp kosher salt

extra butter and flour for greasing

powdered sugar

Procedure

In a small pan, heat butter over medium-low heat until it browns and gives off a hazelnut aroma.  Be careful not to burn.  Strain butter through a cheesecloth or paper towel-lined mesh strainer and set aside to cool completely.

Using a stand mixer or hand mixer, beat eggs with sugar until they have tripled in volume and the mixture is extremely foamy.  When the beater is lifted, a ribbon should form.  Add the vanilla extract, almond extract and rosewater and beat for a few seconds to incorporate.

Sift together the all-purpose flour, baking powder and salt.  If you are using a stand mixer, remove the bowl from the stand.  Otherwise, carefully fold in the flour mixture using a spatula.  You don’t want to work it too much or the mixture will deflate.  Add a little of the mixture to the cooled brown butter and fold it all back in carefully.  Cover and refrigerate the batter for at least an hour.

Preheat oven to 375º F.  Generously grease a madeleine pan (I used non-stick) with softened or melted butter and then dust with flour, shaking off any excess.  Divide the dough amongst the 12 molds, letting a tablespoon or so just heap in the center.

Bake for 11 to 13 minutes on the center rack of the oven until the edges look golden brown and the centers feel a bit spongy.  Serve the same day sprinkled with powdered sugar.

tags: Madeleines, cookies, Kourabiedes
categories: all-2, desserts, recipes, breads & cakes
Monday 11.07.11
Posted by Aliya LeeKong
 

Japanese Black Sugar or Kuro Sato

View fullsize black-sugar-pic1-500x333.jpg
View fullsize black-sugar-pic2-500x333 (1).jpg

Japanese Black Sugar or Kuro Sato

I recently came across this stuff when I was perusing my favorite local Asian market – yes, the same one where I bought the Umeboshi Paste and lost my mind getting ingredients for my Homemade Furikake Popcorn.  And the interesting thing is, though it’s commonly referred to as “black” sugar (and sure looks pretty dark to me), Kuro Sato, the official name, is actually more in the brown sugar family and bears a similar resemblance and taste to jaggery or piloncillo.

Like those other forms of sugar, Japanese black sugar is unrefined, cane sugar, and this sort comes from Okinawa.   It too contains vitamins and minerals not found in traditional white sugar; the fact that it isn’t processed as heavily leaves behind the trace minerals that naturally occur in sugarcane – potassium, iron and calcium to name a few.

The flavor…is beautiful! It has a smoky, malt-like taste with a bit of saltiness.  It’s not as sweet as white sugar and definitely takes on a caramel / molasses quality to it.  In fact, I’m thinking about making some black sugar caramel sauce for a vanilla sundae or even going all in and making candies myself (the Japanese, of course, already have black sugar candies…).  It’s such a rich flavor, and I can only imagine working this into a chocolate dessert.  Where I’d pair jaggery with fruit, the malti-ness of this to me is meant for chocolate.

You can find black sugar at your local Asian market or online through Amazon or Kalustyan’s…

tags: black sugar, Kuro Sato
categories: all-2, spices-1
Thursday 11.03.11
Posted by Aliya LeeKong
 

Tempura Wings with Sriracha-Honey

View fullsize wings-pic1-500x333.jpg
View fullsize wings-pic2-500x333.jpg
View fullsize wings-pic3-500x166.jpg

Tempura Wings with Sriracha-Honey

So when I dream up a recipe, I usually come home and google to see what else is out there.  Is it truly a unique idea or am I late to the game?!?  The once in a while that I see something similar, I am really happy that people are inspired to experiment with exotic spices and flavors.  I was making this tempura batter the other day when the idea of frying wings in it and drizzling them with a sweetened sauce of sriracha popped into my head.  And, when I googled, I found out I’m not the only one that appreciates this combo!

That said, this is a bit of a departure from any of the other recipes out there.  First of all, I use a traditional tempura batter as a base, which gives quite a different texture than a typical wing batter.  Second, I like to remove the skin from the wings – it’s not necessary to achieve the crisp texture, and it’s much healthier.  Third, I don’t completely coat the wings in the sauce because they can get a bit soggy, so I use this sauce more for dipping or to drizzle on top.

The light as air, crispy (and NOT greasy) texture of the resulting wings goes without saying.  But the sauce made from sriracha, honey, lime, and a bit of fish sauce for that umami flavor is divine!  It’s such a salty-sweet satisfaction and pairs beautifully with the crunchy wings.  Enjoy!

Ingredients

Yields 4 servings as an appetizer

For the wings:

Oil for deep-frying (I use peanut)

½ cup all-purpose flour

½ cup rice flour

½ tsp hot paprika

1 tsp finely ground black pepper

½ tsp salt

1 egg yolk

½ tsp baking powder

2/3 cup seltzer water / club soda, very cold

1.5 lbs chicken wings (approximately 12), trimmed, skinned and at room temperature

flour for dredging

For the sauce:

2 tbsps unsalted butter

2 tbsps sriracha*

1 tbsp honey

1 tsp lime juice

½ tsp fish sauce

pinch of salt

toasted sesame seeds (optional , for garnish)

chopped chives (optional , for garnish)

Procedure

Heat 2 to 3 inches of oil in a Dutch oven to 360° F.

In a bowl, mix together flours, paprika, black pepper and salt.  In a separate bowl, beat together the egg yolk with baking powder and the cold seltzer water.  Whisk the wet mixture into the flour mixture until uniform and lump free.

Make sure chicken wings are room temperature.  Dredge chicken wings in flour, shaking off any excess.  Dip into the batter and let excess drip off.  Fry for 6 to 8 minutes until golden brown and cooked through.  If the wings are particularly large, you can place them on a rack on a baking sheet and bake for another 5 to 10 minutes in a 350° F oven.  Otherwise, they can be kept warm in a 200° F oven.

In a small saucepan, melt the butter.  Add remaining ingredient and simmer for a few minutes to let the flavors combine.

Serve wings hot, drizzled with the sauce and garnished with sesame seeds and chopped chives.

*Sriracha is a Southeast Asian hot sauce that you can find now at most grocery stores in the ethnic foods isle. It’s tangy, sweet, and spicy and is my table hot sauce of choice…

tags: wings, sriracha honey, tempura wings
categories: all-2, appetizers, recipes
Monday 10.31.11
Posted by Aliya LeeKong
 

Sawtooth or Culantro

View fullsize sawtooth-pic1-500x333.jpg

Sawtooth or Culantro

Ok, so this picture is a bit of a rustic departure from my norm, but it was actually taken a while back when I visited a spice farm in Goa.  At the time, this leaf was described to me as a version of cilantro that the locals cook with and that’s used for all sorts of medicinal purposes.  I’ve since found out that this herb is called sawtooth and does indeed make a beautiful substitution for cilantro.

Sawtooth is actually native to South America and Mexico where it’s referred to as culantro or recao; it really has too many names to keep track of.  It’s used in a lot of Thai, Cambodian and Vietnamese cooking where it’s called pak chi farang and even in West Indian cuisine as shado beni. For a long time, I used to wonder when I‘d read through West Indian and Trini recipes what the heck shado beni was – I always assumed it was cilantro, but now I know better!

And this herb shouldn’t be confused with cilantro though the taste is similar – sawtooth has a lot more punch. It’s brighter, more pungent and a bit peppery; the leaves’ oils have a more potent, volatile quality than cilantro. It’s fantastic in chutneys, curry pastes, to garnish soups or noodle dishes (pho is a great example), anywhere you’d typically use parsley or cilantro or another bright herb.

From my remedial understanding of gardening, sawtooth is apparently a lot easier to cultivate than cilantro.  And what makes it particularly interesting is its long shelf-life.  The herb keeps for a while, maintains its flavor and can even be frozen or stored in oil without losing its oomph.

I’ve found sawtooth in Chinatown in downtown NYC and at West Indian markets in Brooklyn.  I’m assuming there are also Latin specialty stores that keep it as well.  Not such an easy herb to find, but definitely worth seeking out and trying…

tags: sawtooth, culantro, recao, pak chi farang
categories: all-2, spices-1
Thursday 10.27.11
Posted by Aliya LeeKong
 

Guava & Sweet Cheese Crèpes

View fullsize crepe-pic1-500x367.jpg
View fullsize crepe-pic2-500x333.jpg
View fullsize crepe-pic3-500x333.jpg
View fullsize crepe-pic4-500x333.jpg

Guava & Sweet Cheese Crèpes

That was fast!  I mentioned a few days ago in my post about guava paste and the popular pairing of it with soft, creamy cheese in various Latin American dishes like empanadas, turnovers and tarts.  As I was writing that post, I was dreaming of just how to marry the two, and this weekend gave me the perfect opportunity to test out that savoury combo. I thought a paper-thin crèpe would be the perfect vehicle, and so it was…

I used here what has become one of my favorite cheeses of all time – fromager d’affinois.  It’s a cow’s milk cheese that resembles Brie, with about 65% butterfat and an edible rind – it’s buttery, supple, creamy and goes incredibly well with fruit, jams and jellies.  That creaminess makes for the perfect crèpe filling alongside the sweet guava paste.

Now, the process of making crèpes can seem really intimidating, but it’s seriously like riding a bike. And, no matter how long you’ve been doing it, just forget about that first one (and possibly the second), pour and whirl with confidence, and the rest will come out like magic once you get that wrist work down.

This crepe batter is a great neutral one that would work for both sweet or salty fillings (with or without the cinnamon).  So to enhance the sweetness a bit for this dish, I drizzle a touch of honey on top and throw in some toasted almonds for a bit of texture and a nutty crunch.  This is a satisfying treat, perfect for breakfast, dessert, or an elegant afternoon tea.  What’s great is that this dish can be prepped ahead of time and thrown in the oven right before serving – makes it great for entertaining.  Enjoy!

Ingredients

Serves 8 to 10

For the crèpes (yields 8 to 10 crèpes):

3/4 cup whole milk

¼ cup water

2 large eggs

1 cup all-purpose flour

¼ tsp kosher salt

1 tsp sugar

½ tsp cinnamon

½ tsp vanilla extract

3 tablespoons unsalted butter, melted

melted butter for cooking

For the filling and garnish:

Guava paste

Soft cheese like fromager d’affinois, brie or your favorite triple-crème

Honey

Toasted almond slices

Procedure

Preheat oven to 375° F.

In a blender, mix all of the crèpe ingredients and pulse until fully blended and foamy.  Rest batter in the refrigerator at least an hour.  Strain batter.

Heat a non-stick pan over medium heat.  Brush pan with melted butter.  Pour crèpe batter, a little less than ¼ cup, into the pan while turning the pan to coat the bottom.  Cook for one minute or until the edges become crispy and start to brown.  Carefully, flip and cook for a little less than a minute.  Keep crèpes stacked together on a plate or cutting board until all of the batter has been used.

Place a crèpe on a cutting board.  Place a thin sliver of cheese in the center and a sliver of the guava paste on top of it.  Fold crepe and place seam-side down on a greased baking sheet.  Bake for 8 to 10 minutes until cheese is melted and guava paste is soft.

Serve warm, drizzled with honey and sprinkled with toasted almond slices.

tags: Crèpes, guava, guava paste, sweet cheese
categories: all-2, breakfast, recipes, desserts-1
Monday 10.24.11
Posted by Aliya LeeKong
 

Guava Paste or Goiabada

View fullsize guava-pic1-500x333.jpg
View fullsize guava-pic2-500x333.jpg

Guava Paste or Goiabada

This stuff is a no-brainer.  Whenever I hit up a Latin market (though I’ve also seen it in the ethnic isle of larger grocery stores), I pick up a pack of this paste, pasta de guayaba or goiabada.  It’s guava purée that’s been cooked down with sugar and a bit of pectin.  It sets into a semi-solid, gelatinous state – think membrillo or quince paste – and inflects everything it touches with that sweet, floral flavor, excellent with both savoury and sweet dishes.

Guava paste is used throughout Latin American cooking; from the Domican Republic to Colombia to Cuba to Mexico, guavas and guava paste are featured heavily, particularly paired with fresh cheese.  This pair is often found together in its most simplest form, as cheese with slices of guava paste (which makes it extremely handy to keep on hand for a spur of the moment cheese plate), but I recently saw a recipe with guava paste, a beautiful white cheese, and dulce de leche all baked together in one happy puff pastry…umm, yum.  how divine does that sound??  I’m definitely going to have to create my own incarnation.

Cookies, tarts, jelly rolls, cakes, soufflés, and turnovers – guava paste is used to enhance desserts throughout Latina cultura.  And, believe me, a little guava thumbprint cookie or cheesecake doesn’t hurt anybody, but I do want to explore, beyond that, how to incorporate this gorgeous ingredient into other savoury dishes.  A beautiful vinaigrette, for example, or an amazing barbecue sauce or glaze.  I use quince paste in lamb meatballs, why not this?  It has a flavor that just melds harmoniously, particularly with pork or chicken.

I would love to hear your family’s recipe for goiabada or how you may have uniquely incorporated this surprising ingredient into a dish!

tags: guava paste, goiabada, Latin American cooking
categories: all-2, spices-1
Thursday 10.20.11
Posted by Aliya LeeKong
 
Newer / Older