X

Sign up to receive exclusive recipes, tips, updates and other goodies from Aliya!

  • Home
  • Blog
    • All
    • Recipes
    • Spices + Ingredients
    • Lifestyle, etc.
    • Travel
  • The Cookbook
  • The App
  • Media
    • All Media
    • Video
  • About
  • Passions
Aliya LeeKong
  • Home
  • Blog
    • All
    • Recipes
    • Spices + Ingredients
    • Lifestyle, etc.
    • Travel
  • The Cookbook
  • The App
  • Media
    • All Media
    • Video
  • About
  • Passions

Popcorn + Homemade Furikake

View fullsize popcorn-pic11-500x333.jpg
View fullsize popcorn-pic2-500x333.jpg
View fullsize popcorn-pic31-500x165.jpg

Popcorn + Homemade Furikake

Popcorn (with, ahem, a goblet of red wine) is my signature comfort food; it’s what I crave after a hard day or if I’m settling down on the couch for a night of t.v. or to watch a movie.  A number of years back, I went through this Hawaiian Hurricane popcorn faze where I must have consumed this concoction of buttery popcorn with Japanese furikake and rice crackers on a daily basis for weeks on end.  As expected, I made myself sick and had to swear off the stuff, but a recent conversation with a friend (who is a homemade popcorn snob!) made me think revisiting the idea, on a healthier, homemade basis, might not be such a bad idea…

Furikake is a Japanese seasoning that is typically sprinkled on top of cooked rice but is truly an all-purpose condiment.  There are different versions with the core of roasted seaweed, sesame seeds, salt and sugar mixed in with other ingredients like bonito flakes, ground shiso leaf, dried egg, miso, salmon flakes, and powdered soy sauce.  It’s a truly umami experience, and once you try it, you start thinking of other ways to incorporate furikake into your cooking.

And, on top of popcorn, drizzled with butter – it’s perfect!  You get that crunch of the popcorn along with lovely butteriness, saltiness, a touch of sweet, nuttiness from the sesame and rice crackers, a (very pleasant) touch of fishiness from the bonito flakes, and that umami of the seaweed.  Consume this in moderation lest you fall into an addictive phase like I did.  This is an elevated version of popcorn worthy of being served at parties or simply as a special treat for the family.  Enjoy!

Ingredients

Yields approximately 14 cups (one big bowl)

4 tbsps vegetable or blended oil

½ cup popcorn kernels

4 tbsps unsalted butter

½ tsp soy sauce

4 tbsps furikake (see recipe below)

1 ¼ cups Japanese rice crackers (optional)

Procedure

In a medium-sized pot or large saucepan with a cover, add the oil so that it coats the bottom of the pan.  Add the popcorn, cover, and place over medium-high heat.  When the kernels start to pop, shake the pan until the popping slows to a few seconds between each pop.  Shaking the pan will help to prevent the popcorn from burning.

In a small saucepan, melt the butter and add the soy sauce and furikake.  If using, add the rice crackers to the popped popcorn, and pour the butter-soy-furikake mixture all over, tossing to coat.  Tranfer to a large bowl and serve warm.

Homemade Furikake Ingredients

Yields approximately 4 tbsps

3 tbsps roasted shredded seaweed*, torn into smaller pieces

¾ tsp bonito flakes**

1 ½ tsps black and/or white sesame seeds, toasted

1 tsp salt

1 tsp light brown sugar

Procedure

Mix all the ingredients together and store in an airtight container.

*If you can’t find this, you can roast nori or seaweed sheets in a skillet over medium heat until they turn crisp.  They can then easily be torn or crumbled into small pieces.

** Look for the smallest flakes to use here.  Bonito flakes are from a type of tuna that is cooked, smoked and dried.

tags: popcorn, homemade furikake, snacks, comfort food
categories: man-friendly, recipes, snacks, all-2, vegetarian-1
Monday 09.19.11
Posted by Aliya LeeKong
 

Peruvian-Style Roast Chicken

View fullsize chick-pic1-500x333.jpg
View fullsize chick-pic2-500x333.jpg
View fullsize chick-pic3-500x333.jpg

Peruvian-Style Roast Chicken

A few weeks back on Facebook, I asked people to share their favorite family dishes – authentic, traditional food they love to eat at home.  As you know, I love to take old world flavors and traditions and reinvent them in ways that we can use in our every day cooking.  One dish that came up was aji de gallina, a typical Peruvian dish.  Chicken is cooked and topped with a rich creamy sauce that includes walnuts, garlic, breadcrumbs, and parmesan and is spiced with the yellow aji amarillo pepper.  The sauce is incredibly addictive and the aji lends such distinctive flavor and just the right amount of heat.

I had a craving the other night for roast chicken, which I think is the ULTIMATE in winter, comfort food.  Roast chicken is also a complete blank canvas, and, like everyone else, I’m constantly searching for ways to take it to the next level.  When I looked at the components of the Peruvian sauce, the ingredients called to mind a tasty stuffing, so I decided to convert aji de gallina into a roast chicken spiced with aji amarillo and filled with a beautiful, nutty, cheesy stuffing.

If you can get past the whole trussing part, roast chicken is extraordinarily easy and satisfying to make.  This recipe creates a gorgeous result – golden brown, tender and juicy, and snap-crispy skin.  The aji and cumin butter rub is what gives the skin that great texture.  The stuffing – bacon, onion, garlic, spices, walnuts, parm – creates the moisture inside the chicken.  I always make a little more stuffing than what fits in the bird and throw it into some ramekins because stuffing always goes quickly!  Enjoy!

Ingredients

Stuffing:*

2 slices thick-cut bacon, cut into small dice

1 medium onion, diced

1 ½ tsps ground aji amarillo

½ tsp ground cumin

3 or 4 garlic cloves, minced

½ cup white wine

¼ cup chicken stock

¼ cup heavy cream

5 slices white Pullman bread, cubed

½ cup raw walnut halves, toasted and crushed

1/3 cup ground parmesan

1 egg, beaten

Chicken:

5 tbsp unsalted butter, room temperature

1 ½ tsps ground aji amarillo

½ tsp ground cumin

1 4 – 5 lb roasting chicken

salt and freshly ground black pepper

Procedure

Before I start, there are a few keys to a crispy, succulent roast chicken.  First, the chicken must be completely dry.  After removing the covering and rinsing and drying the inside of the chicken, I like to place it, uncovered, on a rack on a baking sheet on a low shelf in the fridge (not touching anything!).  I leave it there for a couple of hours or even up to a day.  The air circulates and dries out the chicken from all sides.  Second, the chicken has to be at room temperature before putting it in the oven.  Take it out of the fridge at least an hour before you plan to cook.  The next things are a hot starting temperature and lots of salt!  Which we’ll get to…

Preheat the oven to 475° F.

For the stuffing, in a medium skillet on medium heat, add the diced bacon.  Cook for a few minutes until browned and crispy, remove using a slotted spoon to a paper towel-lined plate, and set aside.  Add the diced onion, aji, and cumin back into the pan with the bacon fat (should be enough but add a little oil or butter if not).  Cook for 3 to 5 minutes until the onions are translucent, add the minced garlic and cook for another minute.  Add the white wine and let reduce, stirring, until it’s almost all evaporated.  Add in the chicken stock and cream and reduce the heat, simmering for another 2 to 3 minutes until thickened.  Remove from heat and let mixture cool.

In a large bowl, add the bread cubes, crushed walnuts, parmesan, egg, bacon and onion mixture.  Stir to evenly distribute.  (Don’t do this until you are ready to stuff the chicken, so the stuffing doesn’t get soggy.)

For the chicken, combine softened butter with aji and cumin.  Massage butter all over the outside and inside of the bird.  Season generously with salt and freshly ground black pepper, and stuff with the stuffing.

At this point, you want to truss the bird for even cooking.  Here’s a great video (http://ruhlman.com/2010/07/how-to-truss-a-chicken.html) .

Place the stuffed, trussed chicken on a rack in a roasting pan, breast-side up, and into the oven.  Cook for 25 minutes and reduce the heat to 375° F.  Cook for another 45 minutes or so.  The safe internal temperature of cooked chicken is 165° F.  I check the temperature with a thermometer inserted into the thigh joint and actually take mine out of the oven around 155° F.   I then rest it on a cutting board for 15 minutes to finish cooking.

Slice (the juices should run clear) and serve!

*For this dish I create more stuffing than I can fit in the bird because I don’t think what can fit inside is enough for a side dish!  I like to take the leftover stuffing and throw it into buttered ramekins or a small, greased baking dish.  For the last 25 minutes of cooking, I throw the excess stuffing into the oven and let it get browned and crispy.

tags: roast chicken, Peruvian cooking, comfort food, recipes for winter
categories: all-4, recipes, main dishes-1
Monday 03.07.11
Posted by Aliya LeeKong
 

Sumptuous Beef & Rice Casserole w/ Raw Mango Salad

View fullsize pilau-pic1-500x333.jpg
View fullsize pilau-pic2-500x333.jpg
View fullsize pilau-pic3-500x333.jpg
View fullsize pilau-pic4-500x333.jpg
View fullsize pilau-pic5-500x333.jpg

Sumptuous Beef & Rice Casserole w/ Raw Mango Salad

The first time my mom made my husband pilau we were having a party at my place in NYC.  There were around 25 people over, celebrating, drinking wine and eating standing up because I didn’t have enough chairs for everyone.  The layout of my apartment is pretty open with the kitchen, dining, and living rooms all visible.  No joke, at the end of his 4th helping of the dish, my husband stood up abruptly, pronounced my mom had purposefully “roofied” him…and promptly went to sleep on the couch in front of the other 20-some-odd people!

In the spirit of dishes that work well for the holidays, I thought I would put this recipe out since it’s a delicious communal or even potluck dish.  Hanging with my parents this weekend meant my mom and I were seriously throwing down in the kitchen, and pilau was definitely on the menu.  Typically, there’s so much “a little of this, a little of that” that it’s pretty close to impossible to get a solid recipe out of the whole affair.   But I managed to pry this one out.  And even with this dish, it takes a bit of intuition and a little praying to get the beef and the rice to be cooked perfectly at the same time.  But it is so worth it.  For me, it’s old school comfort food, a taste memory that dates back to my early childhood.

I did a little research, and pilau = pilaf which is actually Turkish!  And this is extraordinarily exciting for me because I am planning a trip to Turkey later this year.  Cannot wait to cook their version…Much like another rice casserole I’ve mentioned, biryani, this dish originated in Persia and can be found throughout the world, taking its individual form in different cultures.   Afghani palau has carrots, raisins, and nuts; in parts of East Africa, coconut milk is included.  And West Indian pelau is closer to their peas and rice with the inclusion of chicken or another protein.

This version is a true combination of my mom and I.  The ingredients are largely hers, but I changed the technique to try to create the best textures and flavors possible.  I made a raw mango salad to go along with it, which provides the perfect cool and acidic balance to the warmly spiced rice and beef that melts in your mouth.  Enjoy!

Ingredients

Yields 6 to 8 servings

Pilau:

2 lbs beef chuck, cut into 1 ½ inch cubes

5 tbsps canola oil

1 stick of cinnamon

3 whole cloves

3 whole black peppercorns

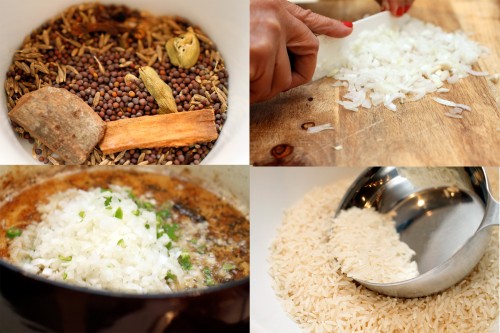
3 whole cardamom pods, cracked open

1 ½ tsps cumin seeds

2 tsps black mustard seeds

1 large yellow onion, finely chopped

1-3 green chilies, finely chopped

½ tsp grated ginger

½ tsp of ground cumin

¼ tsp of ground coriander

4 cloves of garlic, minced

1 ½ bunches of fresh cilantro, chopped (including stems)

1 marrow bone (totally optional, I added it for extra flavor)

4 ½ cups light beef stock or beef stock + water

3 ½ cups of basmati rice

Salt and pepper to taste

Raw Mango Salad:

juice of 1 lime

2 ½ tsps rice wine vinegar

½ tsp salt

¼ tsp cayenne

1 raw mango, peeled, seeded and diced

1 cucumber, peeled, seeded and diced

1 apple, peeled, seeded and diced

½ red onion, minced

2 small sweet red peppers, minced

4 to 6 mint leaves, chiffonade

small handful of cilantro, finely chopped

Procedure

For the Pilau:

Preheat the oven to 325° F.

Thoroughly wash the basmati rice until the water runs clear.  You want to remove as much starch as possible.  Set aside.

Heat a large Dutch oven over high heat.  Liberally season the cubed beef.  Add oil to the pot and sauté beef for 2 to 3 minutes in batches.  You don’t want to overcrowd the pot or the meat won’t brown.  Also, you don’t want to cook the beef all the way through – just enough to brown the outside.  Using a slotted spoon, spoon beef onto an unlined plate and set aside.

Turn the heat down slightly to a medium heat and add all of the whole spices.  When they start to pop, add onions, chilies, ginger, ground cumin and ground coriander and cook for 6 to 8 minutes.  Lower the heat if necessary – you want the onions to turn translucent but not brown.   Add the garlic and ½ of the chopped cilantro and cook for another minute.  Add beef back to the pot along with any juices that have accumulated on the plate and the marrow bone if using.

This is where it gets slightly tricky.  Pre-measure the 4 ½ cups of liquid – you can use a light stock, water or some combination of the two.  You want to keep track of how much liquid you’ve added because the rice will become sticky if you end up adding too much and will be dry if not enough is used.  Add liquid to the pot to just cover the meat.  Place the lid on the pot, and turn the heat up.  When the temperature comes up and it’s about to boil, place covered pot in the oven and cook for about 1 ½ hours or until the meat is fork tender.

Once meat is cooked, add rice and the remaining liquid to get to 4 ½ cups.  Re-season if necessary and place back in the oven for another 30 to 35 minutes until rice is cooked and fluffy.  Rice may take a little less or more time depending on the type of rice you are using, type of pot in which you are cooking, etc., so I would advise checking it at intervals.

When serving, use the other half of the chopped cilantro to garnish the top.

For the Raw Mango Salad:

Combine lime juice, rice wine vinegar, cayenne and salt in a small bowl to create a dressing.

In a separate bowl, toss together raw mango, cucumber, apple, red onion, sweet red pepper, mint and cilantro.  Add dressing and adjust seasoning if necessary.

tags: casserole, pilau, beef and rice casserole, comfort food, holiday recipes
categories: recipes, all-6, soups & salads, main dishes-1, man-friendly
Monday 10.18.10
Posted by Aliya LeeKong
 

Trini-style Macaroni Pie

View fullsize mac-pie-pic1-500x333.jpg
View fullsize mac-pie-pic2-500x333.jpg
View fullsize mac-pie-pic3-500x333.jpg
View fullsize mac-pie-pic4-500x166.jpg

Trini-style Macaroni Pie

Thanksgiving is by far my favorite holiday of the year.  My family always does it big down in Florida, and I love the coming together of friends and family of all ages, the hustle in the kitchen with my mom and me and other intruders…I mean, helpers..., the beautiful cool, fall weather (yes, even in Florida).  Ours is a whole day affair with people stopping by at different points in the meal, card games at the kitchen table later followed by a second session of eating in the evening.

Our table is a complete mash-up!  A humungous turkey filled with my mom’s famous stuffing that my dad carves to perfection, a plethora of South Asian, African and other international dishes to complement, one definite chocolate dessert as well as everything else under the sun.  Thanksgiving isn’t too far away, and I’m inspired by my table to bring dishes to you that you might want to try for your own Thanksgiving.  This gives you ample time to do a trial run and see what you like.

My husband’s family always does the most delicious macaroni pie, a staple dish from Trinidad.  It’s a delectably spicy mac and cheese that is baked and served casserole-style.  It’s great because it can be assembled ahead of time if you are going over to someone else’s house.

Macaroni pie is like a blank slate that you can totally personalize.  Traditionally, this pie uses full-on spaghetti, but I personally prefer penne because it’s easy to eat, and I love when the center fills with the creamy sauce.  I also use a half of a habanero pepper here, but feel free to use as much or as little as your heat tolerance permits – other peppers would work well here too.  I’ve seen macaroni pie made with a bunch of different cheeses; I’m partial to gruyere because it’s nutty and works really well with the spices.  Again, you can use whatever grated cheese is your preference.  The herbs really boost the flavor, and I love the crunchy breadcrumb topping.  This is the perfect side dish, truly.  Creamy, cheesy, crunchy with a bit of a kick.  Enjoy!

Ingredients

Serves 6 to 8 (yields 1 3 quart baking dish)

olive oil or butter

1 yellow onion, finely diced

½ habanero pepper, seeded and ribbed, minced

3 garlic cloves, minced

1 stick unsalted butter

½ cup all-purpose flour

1 quart milk

½ tsp powdered mustard

1 tsp paprika

½ tsp white pepper

½ tsp black pepper

2 tsps salt

2 ½ cups grated gruyère

2 eggs

1 lb pasta (I used penne but anything you like)

1 tbsp + 1 tsp fresh chives, finely chopped

1 ½ tsps fresh thyme, finely chopped

¾ cup breadcrumbs

Procedure

Preheat oven to 350° F.

Heat a medium skillet over medium-low heat.  Add olive oil, and, when hot, add onion and pepper.  You want the onions to be pretty finely diced, so they will spread easily throughout the dish and cook quickly.  Cook for 3 to 5 minutes until the onions are translucent.  Add garlic and cook for 30 seconds or so until fragrant.  Remove from heat and cool in a bowl.

In a sauté pan over medium heat, melt butter.  Add flour all at once and whisk vigorously to avoid lumps.  Cook for 2 to 3 minutes.  You just want to remove the raw taste.  Add milk and spices and continue to whisk to prevent lumps (remember to get the corners!).  Once the mixture starts to bubble, reduce heat to low and cook for 8 to 10 minutes whisking often.  You want this to simmer gently while it’s thickening.  Remove from heat.

To the onion mixture in the bowl, add 2 cups of the grated cheese as well as the eggs.  Add a ladle full of the béchamel (milk mixture) and stir.  Continue to add ladlefuls until the egg mixture is up to temperature with the béchamel.  Add everything back to the béchamel in the sauté pan and stir to combine thoroughly and insure cheese is completely melted.

Add pasta to boiling, heavily salted water and cook until it’s a bit underdone.  It depends on what type of pasta you are using.  I used penne and cooked it for about 9 or 10 minutes.  It’s going to continue cooking in the oven.  Drain pasta and add to the béchamel/cheese mixture.  Add 1 tablespoon of the chopped chives and 1 teaspoon of the chopped thyme and combine thoroughly.  Pour into a heavily greased 3 quart baking dish.

In a bowl, combine remaining herbs, ½ cup of cheese, and breadcrumbs.  Sprinkle on top of macaroni and either dot with butter or drizzle with olive oil.  Bake for 35 minutes until top is browned and bubbly.

tags: macaroni pie, trini-style cooking, comfort food
categories: side dishes, recipes, all-6, vegetarian-1
Wednesday 10.13.10
Posted by Aliya LeeKong
 

Smoky Spicy Corn Pudding

View fullsize corn-pudding-pic1-500x268.jpg
View fullsize corn-pudding-pic2-500x333.jpg
View fullsize corn-pudding-pic3-500x171.jpg

Smoky Spicy Corn Pudding

Seriously.  I had a somewhat interesting story for how I came up with this recipe, but I keep going to the fridge and sticking a fresh spoon into this now cold, smoky, spicy corn pudding and taking a bite.  Then, tossing the spoon into the sink to prevent a second bite.  I’m hedging because I don’t want to admittedly portion a piece out, heat it up and eat it (after the three helpings I had last night), but I seriously can’t help myself.  It is that tasty…even cold and semi-solid in the fridge.

Growing up in Florida (yes, it’s still the South!), I developed such a weakness for southern food, and corn pudding, itself, is classic, southern comfort food at its best.  And I know I did some corn fritters not too long ago and repeating corn might be a sin, but it’s such a seasonal staple in my house.  and this is just too good not to share.

There are tons of variations and no real right way to make corn pudding, but I prefer this method because it stays creamy, sweet, with a caramelized top, and it still cuts easily without being bread-like.  I mention the combo of mustard seeds and curry leaves in a previous post, and this marries incredibly well with the spiciness from the peppers, the sweet tang of the sundried tomatoes, and the deep, lovely smokiness from the mozzarella.  I wanted smokiness without bacon-y flavor (for once), and the result here is divine.  I’m likely making this for Thanksgiving this year, which is always a cultural trip!  Enjoy!

Ingredients

Yields 1 2-quart baking dish

4 to 6 medium ears of corn (you want 3 ½ cups of the kernels), husks and silk removed

olive oil

salt & pepper

1 tbsp canola or vegetable oil

2 tbsps butter

1 ½ tbsps brown mustard seeds

10 curry leaves

2 shallots, finely chopped

1 red cherry, fresno or jalapeno pepper, minced (seeded and ribbed only if you can’t take the heat!)

3 garlic cloves, minced

1 tbsp finely chopped sundried tomatoes (either packed in oil or rehydrated)

¼ cup all-purpose flour

3 eggs

2 cups heavy cream

a couple dashes of Tabasco

1 ¼ tsp salt

½ tsp black pepper

1 ¼ cups grated smoked mozzarella

¼ cup sliced green onions, dark and light green parts only

Procedure

The first step of this dish is roasting or grilling the corn.  Brush the corn with olive oil and season with salt and pepper.  Place cobs on a hot grill or a grill pan and cook for 20 minutes, rotating every few minutes to cook all sides.  If you don’t have a grill, you can place the seasoned corn on a baking sheet under the broiler for the same amount of time (still rotating).  Let cool slightly, cut the kernels from the cobs, and reserve kernels in a separate bowl.

Preheat the oven to 350° F.

In a medium skillet, heat oil and butter on medium-high heat.  Once foam subsides, add mustard seeds and curry leaves.  Once the seeds start to sputter and pop, lower the heat to medium-low and add shallots, peppers and a pinch of salt.  Cook for a few minutes until shallots are translucent.  Add garlic and cook 30 seconds until fragrant.  Add sundried tomatoes, corn kernels, and flour and stir to coat.  Cook for another 30 seconds, stirring.  Remove from heat and transfer to a large bowl.

In a separate bowl, beat together eggs, cream, Tabasco, salt, and pepper.  Add this along with the grated smoked mozzarella and the green onions to the corn mixture and combine thoroughly.  Transfer to a greased 2-quart baking dish and bake for 50 minutes or until an inserted knife comes out clean.

Let cool slightly before serving.

tags: corn pudding, southern food, comfort food, southern comfort food, spicy corn pudding
categories: side dishes, recipes, all-6, vegetarian-1
Tuesday 09.07.10
Posted by Aliya LeeKong