X

Sign up to receive exclusive recipes, tips, updates and other goodies from Aliya!

  • Home
  • Blog
    • All
    • Recipes
    • Spices + Ingredients
    • Lifestyle, etc.
    • Travel
  • The Cookbook
  • The App
  • Media
    • All Media
    • Video
  • About
  • Passions
Aliya LeeKong
  • Home
  • Blog
    • All
    • Recipes
    • Spices + Ingredients
    • Lifestyle, etc.
    • Travel
  • The Cookbook
  • The App
  • Media
    • All Media
    • Video
  • About
  • Passions

An Easy Thanksgiving Side: Cranberry Salsa

View fullsize cranberry-pic1-500x333.jpg

An Easy Thanksgiving Side: Cranberry Salsa

Thanksgiving is my favorite of favorites, and I’ve already gone on and on about how my sides turn into a total global mash up.  I love the day and although I go a little prep crazy, I do try to sneak in at least a few, no-brainer, quick dishes to make my life (and any voluntary sous-chefs!) a little easier.

This is a fast, Mexican-inspired side using seasonal fresh cranberries – don’t worry you can use frozen if that’s what you got.  I like to mix this up the night before and let all the flavors mingle (and the cranberries break down a bit).  It’s really tasty and adds a bit of heat and piquant flavor to the meal….enjoy!

Ingredients

Serves 6 to 8

3 cups fresh or frozen cranberries, halved

½ red onion, finely chopped

1 jalapeno, seeded and ribbed, finely chopped

2 – 4 tbsps sugar

pinch of salt

½ tsp lime zest

juice of half a lime

small handful of cilantro, finely chopped

Procedure

In a large bowl, mix all ingredients together.  Since different batches of cranberries can be sweeter than others, adjust the amount of sugar to your personal taste.

Refrigerate covered for at least a half hour to let the flavors marry.  Serve chilled.

tags: Thanksgiving ideas, cranberry salsa
categories: recipes, side dishes, all, soups & salads, vegetarian-1
Thursday 11.15.12
Posted by Aliya LeeKong
 

Roasted Garlic, Cheese & Herb Baked Rice

View fullsize rice-pic1-500x333.jpg
View fullsize rice-pic2-500x333.jpg
View fullsize rice-pic3-500x166.jpg

Roasted Garlic, Cheese & Herb Baked Rice

This is not your every day, throw-in-the-oven-rather-than-on-the-stovetop rice.  My inspiration for this dish is Tah Chin, a Persian rice pilaf that layers saffron rice with chicken and bakes it to perfection.  The rice is bound with yoghurt and egg yolks and during its slow-baking process forms this beautiful crust where it hits the baking dish, not wholly unlike soccarat (which is the crusty layer found at the bottom or paella).  Suffice it to say, I veered a bit off of tradition with this version….

Many of the items are similar to the original – the long grain rice (though trying this with Valencia or Bomba rice sounds pretty alluring), saffron, yoghurt and egg yolks.  But that is where it ends!  I leave out the chicken and created this to be an easy (and slightly more elegant…) substitute for mac n’ cheese, a lovely casserole side.  Thus, I included some butter and crème fraiche for richness and tang, some cheeses for good measure, roasted garlic and herbs for depth of flavor.

It was truly an experiment, and I love the result…First of all, it’s beautiful! I plan to just leave the cutting board and knife out for people to help themselves at my next dinner party.   I warn you, however, to do this as close to serving time as possible.  It was all I could do to snap a few pics before my husband hacked off a third of it and ran off!  The smell of it drove him mad…the roasted garlic and cheese, creaminess and that crusty layer of rice – amazing.  Enjoy!

Ingredient

Yields (1) 9”x13” baking dish

3 cups long grain rice

3 tbsps kosher salt

½ stick unsalted butter

½ cup yoghurt

½ cup crème fraiche

pinch saffron

4 egg yolks

1 cup grated mozzarella cheese

¾ cup grated grana padano or parmigiano reggiano cheese

12-13 roasted garlic cloves

¾ cup chopped herbs

freshly ground black pepper

Procedure

Preheat oven to 350° F.

Rinse the rice in changes of hot water until the water runs clear.  In a medium pot, bring 6 cups of water up to a boil.  Add 1 ½ tablespoons of the salt and the washed rice.  Let cook 6 to 8 minutes (rice should start to soften but still be raw at the center), drain and rinse lightly.  Transfer to a large bowl.

In a small saucepan, melt butter with yoghurt and crème fraiche over medium heat.  When it starts to bubble, shut off the heat and add the saffron.  Let it bloom for 5 minutes.  Place the egg yolks in a medium bowl.  Add spoonfuls of the saffron mixture to the egg yolks stirring constantly – you want to bring the egg yolks up to temperature slowly.

To the drained rice, now add the saffron-egg yolk mixture, the cheeses, roasted garlic cloves, chopped herbs, the other 1 ½ tablespoons of salt and freshly ground black pepper to taste.  Combine thoroughly.

Grease a 9” x 13” baking pan and line the bottom with parchment paper.  Transfer the rice mixture to the baking pan, cover with foil and bake for 1 hour and 35 minutes.  Let cool slightly and then loosen the side of the rice from the dish.  Turn out onto a cutting board and serve hot in slices or squares as you choose.

tags: baked rice, saffron, vegetarian sides, roasted garlic, cheese
categories: all -1, side dishes, recipes, vegetarian-1
Monday 05.21.12
Posted by Aliya LeeKong
 

Rhubarb, Cucumber & Mint Salsa

View fullsize salsa-pic1-500x333.jpg
View fullsize rhubarb-pic2-500x333 (1).jpg
View fullsize salsa-pic3-500x333.jpg

Rhubarb, Cucumber & Mint Salsa

Increasingly, I’m realizing that every culture has its form of “salsa.”  When I was down in St. Lucia a few weeks back, I found out they have their version called souscaille.  In South Asian cuisines, it’s called kachumber, and in African cuisines, kachumbari.  At all points, it’s a fresh salad, often with onions or shallots, with acidity in the form of the juice or segments of citrus or vinegar.  I wanted to inject a little seasonality into my salsa this week, and spring’s tart rhubarb was the perfect add.

Rhubarb, contrary to popular belief, is a vegetable, and it has a crisp, fresh texture that’s somewhere between jicama and celery with a sourness that’s reminiscent of green apples.  I’ve played with it before in a dessert, a granita, but here I wanted to see what it could do from a savoury point of view.

The cucumber and rhubarb meld together beautifully.  You have the cooling, soothing, watery cucumber contrasted with the tart bite of the rhubarb.  The shallots add mellow onion flavor and the fresh mint a bright finish.  It would be perfect on fish or shrimp tacos or a simply grilled chicken breast.  Enjoy!

Ingredients

Yields approximately 2 ½ cups

2 mini seedless cucumbers, cut into a small dice

1 stalk rhubarb, cut into small dice

1 shallot, finely chopped

juice of half a lime

½ tsp kosher salt

pinch cayenne pepper

pinch white sugar

small handful fresh mint, finely chopped

Procedure

In a small bowl, toss together the cucumbers, rhubarb and shallot.  Add the lime juice, salt, cayenne, sugar and mint mix thoroughly.

tags: rhubarb, salsa, recipes for spring
categories: all -1, condiments, recipes, side dishes, salads, soups & salads, vegetarian-1
Monday 04.30.12
Posted by Aliya LeeKong
 

Parsnip Cakes with Spring Garlic & Chile

View fullsize parsnip-pic1-500x333.jpg
View fullsize parsnip-pic2-500x333.jpg
View fullsize parsnip-pic3-500x222.jpg

Parsnip Cakes with Spring Garlic & Chile

Walking through the Union Square Greenmarket the other day (as the weather shifted from the low 40’s to the low 60’s), it felt to me that the season is being a bit ambivalent, unsure of whether it’s winter or spring.  Piled high were the hearty root vegetables of the winter – rutabagas, salsify and parsnips – next to the burgeoning spring crop with lovely spring garlic and rhubarb making an appearance.  I nabbed some of the spring garlic and for breakfast this Sunday created these little cakes, as an ode to this in-between season.

Parsnip is an incredibly flavorful and versatile vegetable.  The flavor is somewhere between a potato and a carrot, and it’s signature sweetness works beautifully with butter, spices, and heat. Spring garlic, on the other hand, is like a two-for-one sale – garlic and green onion flavor in one!  If you can’t find any, using a bit of garlic with leek or green onion works really well here too.

This recipe couldn’t be simpler or more forgiving – cook the parsnips til tender, add other ingredients, fry until golden.  You could easily use potatoes instead of parsnips here if you have them on hand.  I love these for breakfast with some scrambled eggs and a touch of sriracha to dip.  But these could also be a great dinner side to accompany roast chicken or a nice piece of fish.  A crisp bite with that sweet, creamy parsnip flavor, garlic, onion and the heat from the chilies…Enjoy!

Ingredients

Serves 4 to 6

2 lbs parsnips, peeled and cut into a medium dice

1-2 red and/or green chilies, finely chopped (red jalapeno, jalapeno, Thai)

2 spring garlic shoots, finely chopped (approximately 1/3 cup)

½ cup all-purpose flour

¾ tsp kosher salt

½ tsp sugar

handful of fresh herbs (chives, cilantro, parsley), roughly chopped

unsalted butter for frying

kosher salt to taste

Procedure

Put diced parsnips in a pot and cover with cold water.  Place over medium-high heat, cover and bring to a boil.  Lower to a strong simmer and simmer until fork tender (approximately 10-15 minutes depending on the size of your dice).  Drain in a colander and let air dry for a few minutes.

In a large bowl, mash parsnips with a potato masher or use a ricer to break them up.  Add the chilies, spring garlic, flour, salt, sugar and herbs and mix until a uniform texture (don’t overmix though or they’ll get a tad gummy).

Heat a sauté or cast iron pan over medium heat and add butter.  For the parsnip cakes, I like to use an ice cream scoop so I can be sure I get even amounts.  I love to use my hands here, making a flat patty out of the parsnip mixture and then just sliding them into the pan.  They don’t have to be perfectly shaped.

Fry for 3 to 4 minutes per side just to develop that nice golden crust, and work in batches if necessary to finish off the mixture.  Let drain on a paper towel-lined baking sheet.  Sprinkle with a bit of salt while it’s hot for extra flavor.

Serve immediately.  I like mine with a bit of sriracha on the side to dip.

tags: parsnip, spring garlic, vegetarian sides
categories: all -1, appetizers, breakfast, side dishes, vegetarian-1
Monday 03.19.12
Posted by Aliya LeeKong
 

Quick Use-Your-Veggies Quinoa Soup

View fullsize soup-pic1-500x333.jpg
View fullsize soup-pic2-500x166.jpg
View fullsize soup-pic3-500x166.jpg

Quick Use-Your-Veggies Quinoa Soup

I know what you’re thinking.  This chick went to Peru and came back plumb-quinoa-crazy since she just posted a quinoa recipe 2 weeks ago.  I feel you guys deserve an explanation, so I’m going to level with you.  I was actually working on an exciting recipe for some black sesame Arabic donuts with date molasses (sounds pretty delicious, no?), but I had a yeast malfunction issue. TWICE.  And after 2 trips to the store in the cold and a bit of heartache (I’m not a yeast novice.  I blame the yeast!), I decided to warm myself up with this soup and share it with you guys.  Donuts tbd…

I did, in fact, learn a version of quinoa soup in the Sacred Valley in Peru.  And I’ve made this soup a few times.  What I LOVE about it is that it gives you a chance to use up all of the random vegetables you might have sitting in your fridge.  I like to save onion scraps, carrot halves, any little bits of a vegetable – and all of that works well in the soup.  Not overcooking the veggies also adds a beautiful, textural crunch.

The soup I had in Peru was super rich, cooked with evaporated milk, egg, and luscious cubes of cheese.  I omit the egg, leave the cheese optional here and opt for a bit of heavy cream to thicken instead, but I have to admit the cheese is an amaaaazing part of the soup.  It’s so warm and comforting and really pops with flavor (while you get your protein punch from the quinoa).  If you keep cooked quinoa in your fridge like I do, this takes no time to make – 15 minutes (half an hour if you have to make the quinoa).  Either way, this is a perfect winter weeknight meal – enjoy!

Ingredients

Serves 4 to 6

2-3 tbsps olive oil

1 red onion, finely chopped

1 jalapeno, finely chopped

2 scallions, thinly sliced

1 ½ cups finely chopped mixed vegetables (carrot, celery, zucchini, etc.)

4 to 6 garlic cloves, minced

4 cups cooked quinoa*

2 quarts vegetable or chicken stock

1 cup cubed Monterey jack cheese (optional)

½ cup heavy cream

Handful of fresh cilantro, roughly chopped

salt and freshly ground black pepper

Procedure

Heat a medium-sized pot over medium heat.  Add olive oil and throw in the red onion and jalapeno as well as a bit of salt to draw out the moisture.  Cook for a few minutes until the red onions start to turn translucent.  Add in the scallions and mixed vegetables.  You want to cook for another few minutes but you want the vegetables to retain some crunch (so don’t overcook).

Add the garlic and sauté another 30 seconds and then throw in the quinoa and stock.  Bring the mixture up to a boil and then lower to a simmer.  Add in the cheese, if using, and the heavy cream and simmer for another 2 minutes so the flavors come together.  Add the cilantro and season to taste.

*As a rule of thumb, I assume quinoa triples in size.  So I made 1 1/3 cups of quinoa (in 2 2/3 cups water) for this recipe.

tags: soups for winter, quinoa, vegetarian meals, leftover veggies, quick soups, easy soups, weeknight meals
categories: main dishes, recipes, soups & salads, all -1, vegetarian-1
Monday 02.06.12
Posted by Aliya LeeKong
 

Frittata with Caramelized Garlic, Squash & Aleppo

View fullsize frittata-pic1-500x333.jpg
View fullsize frittata-pic2-500x333.jpg
View fullsize frittata-pic3-500x166.jpg

Frittata with Caramelized Garlic, Butternut Squash & Aleppo

One thing I get asked about all the time is how to incorporate spices into your every day foods.  I write here a lot about “exotic” spices or ingredients, and the reality is I do cook with them all of the time.  It doesn’t have to be a special occasion.  It doesn’t even have to be an overtly ethnic dish.  I like the foods everyone else does, but I tend to add a little something extra to them.

This frittata with caramelized garlic (like savoury candy!) and butternut squash is the perfect example.  Wait, I need to reiterate how ridiculously delicious caramelized garlic is.  This recipe is exact, but I encourage you to double the garlic portion and save half for other dishes later in the week – it’s like balsamic-y, glazed, nutty goodness and the cloves are fantastic on a salad, as part of a cheese plate, or worked into a pork or lamb chop sauce.

In any case, back to spices…here I use Aleppo chili flakes for heat.  These are my go-to-on-top-of-pizza chili flake and just have a really sweet, mild flavor.  Pairing this with a bit of smoked Spanish paprika brings a real richness to the dish; the scent as it’s cooking is maddening (particularly if you are starving like I was when I made this).

I love the idea of working a fall squash into breakfast, and this is a fantastic dish to entertain with for a brunch.  I used grana padano cheese here because it’s delicate, and there are so many outspoken flavors here: the caramelized garlic adds that savoury / sweet quality as does the butternut squash, the chilis and paprika a bit of smokiness and heat and the scallions that bright finish.  This is definitely one of my Sunday morning fall faves…Enjoy!

Ingredients

Serves 6 to 8

Caramelized garlic:

15 – 20 whole garlic cloves

¾ cup milk

1 tbsp unsalted butter

2 tsps olive oil

2 tsps balsamic vinegar

½ cup water

2 tsps sugar

pinch salt

pinch Aleppo chili flakes

Frittata:

2 cups butternut squash, peeled, seeded and cut into a ½” dice

olive oil

salt

freshly ground black pepper

10 eggs

½ cup crème fraiche

2 tsps pimentón de la Vera (smoked Spanish paprika)

1 tbsp Aleppo chili flakes

1 cup grana padano cheese, grated*

½ cup mozzarella, shredded

2 tbsps scallions or chives, green parts only, finely chopped

1 ¼ tsp salt

Procedure

Preheat oven to 375° F.

In a small saucepan, add whole garlic cloves and milk.  Bring up to a simmer and simmer for 5 minutes.  Be careful it doesn’t boil over!

Strain and rinse garlic cloves.  Wipe out saucepan and place back over medium heat.  Add butter and oil.  When hot, add garlic and sauté for 5 minutes.  Add remaining caramelized garlic ingredients and simmer until almost all of the liquid is reduced and the cloves are dry.  Swirl the garlic in the pan from time to time during this process to keep from sticking and to make sure the cloves cook evenly.  Strain off any excess liquid and set aside.

In an ovenproof skillet, toss together the squash cubes with a little olive oil, salt and pepper.  Roast in the oven for 15 to 20 minutes until squash is fork tender.

In a large bowl, whisk together the remaining ingredients, reserving ¼ cup of the grated cheese.  Add to the hot skillet with the squash.  Top with the remaining cheese and a sprinkle of salt and place back in the oven.  Cook at this temperature for 15 minutes and increase the temperature to 425° F for another 5 minutes.  Serve warm.

*You can substitute in Parmigiano Reggiano or any other grated hard cheese you like.


tags: Frittata, butternut squash recipes, aleppo, brunch recipes
categories: breakfast, recipes, all-2, vegetarian-1
Monday 12.05.11
Posted by Aliya LeeKong
 

Buttermilk Gruyère Biscuits with Ajwain

View fullsize biscuit-pic1-500x333.jpg
View fullsize biscuit-pic2-500x333.jpg
View fullsize biscuit-pic3-500x166.jpg

Buttermilk Gruyère Biscuits with Ajwain

Let’s face it.  Those biscuits in the refrigerated section of the grocery are easy (and tasty!), and we’ve all used them in a pinch to deliver some buttery goodness to the breakfast or dinner table.  BUT.  It’s just not the same as the homemade kind (see: nothing artificial), and this recipe, with or without the fancy cheese and spices, is so easy and quick, you may swear off the metal tube-sort for good…

I have always loved cheddar-thyme biscuits, and those were precisely the inspiration for this spice-flecked version.  I wrote about ajwain some months ago and used it in a gorgeous pissaladière with mushrooms and onions, and what I think is fantastic about this spice is its resemblance to thyme, albeit with a slightly more pungent, menthol quality to it.  It’s used a lot in South Asian cooking and is often added to flatbread or samosa dough.

The base of this recipe is self-rising flour.  I used it because it has a slightly lower protein content than all-purpose, which translates into super tender, flaky biscuits.  White Lily brand is supposedly the go-to flour for Southern biscuits because it has a significantly lower protein content than some of the other national brands out there, but if you can’t find it, any self-rising flour works well here.  You whir the flour with cold butter, pour in some buttermilk and voilá! Biscuit dough in about 2 minutes flat.  I add in some grated gruyere or cheddar, typically, along with a bit of ajwain for that signature flavor.  Enjoy!

Ingredients

Yields 1 dozen biscuits

2 cups self-rising flour

¼ tsp black pepper

½ stick cold, unsalted butter, cut into small cubes + 1 tbsp for brushing

1 cup grated gruyère or cheddar cheese

½ tsp ajwain seeds

¾ cups cold buttermilk

kosher or maldon salt

Procedure

The key to making tender, flaky biscuits is to not over-develop the glutens in the dough.  One way to do this is to keep all of the ingredients cold, and another is to not work the dough too much.

Preheat the oven to 425° F.

In a food processor or stand mixer, sift the flour and the black pepper together.  Add the cold, cubed butter and pulse or mix just until a sandy texture forms, and there are no visible clumps of butter.  Add the cheese and ajwain seeds and pulse to combine.  Pour the buttermilk in all at once and pulse until the dough sticks together.

Turn the dough out onto a floured surface.  Gently knead the dough a few times so that it comes together and form into a flat, 1-inch thick disc.  Use a 2-inch cutter to cut out a dozen biscuits.

Melt 1 tablespoon of butter over low heat in a small saucepan.  Place the biscuits so they are touching on a greased or parchment-lined baking sheet.  Paint the tops of the biscuits with the melted butter and sprinkle with a little salt.

Bake for 15 – 20 minutes until golden brown.  Serve warm…

tags: buttermilk biscuits, buttermilk cheese biscuits, Gruyère, Buttermilk Gruyère Biscuits, Ajwain, homemade biscuits
categories: all-2, breads & cakes, side dishes, recipes, vegetarian-1, breakfast
Monday 09.26.11
Posted by Aliya LeeKong
 

Popcorn + Homemade Furikake

View fullsize popcorn-pic11-500x333.jpg
View fullsize popcorn-pic2-500x333.jpg
View fullsize popcorn-pic31-500x165.jpg

Popcorn + Homemade Furikake

Popcorn (with, ahem, a goblet of red wine) is my signature comfort food; it’s what I crave after a hard day or if I’m settling down on the couch for a night of t.v. or to watch a movie.  A number of years back, I went through this Hawaiian Hurricane popcorn faze where I must have consumed this concoction of buttery popcorn with Japanese furikake and rice crackers on a daily basis for weeks on end.  As expected, I made myself sick and had to swear off the stuff, but a recent conversation with a friend (who is a homemade popcorn snob!) made me think revisiting the idea, on a healthier, homemade basis, might not be such a bad idea…

Furikake is a Japanese seasoning that is typically sprinkled on top of cooked rice but is truly an all-purpose condiment.  There are different versions with the core of roasted seaweed, sesame seeds, salt and sugar mixed in with other ingredients like bonito flakes, ground shiso leaf, dried egg, miso, salmon flakes, and powdered soy sauce.  It’s a truly umami experience, and once you try it, you start thinking of other ways to incorporate furikake into your cooking.

And, on top of popcorn, drizzled with butter – it’s perfect!  You get that crunch of the popcorn along with lovely butteriness, saltiness, a touch of sweet, nuttiness from the sesame and rice crackers, a (very pleasant) touch of fishiness from the bonito flakes, and that umami of the seaweed.  Consume this in moderation lest you fall into an addictive phase like I did.  This is an elevated version of popcorn worthy of being served at parties or simply as a special treat for the family.  Enjoy!

Ingredients

Yields approximately 14 cups (one big bowl)

4 tbsps vegetable or blended oil

½ cup popcorn kernels

4 tbsps unsalted butter

½ tsp soy sauce

4 tbsps furikake (see recipe below)

1 ¼ cups Japanese rice crackers (optional)

Procedure

In a medium-sized pot or large saucepan with a cover, add the oil so that it coats the bottom of the pan.  Add the popcorn, cover, and place over medium-high heat.  When the kernels start to pop, shake the pan until the popping slows to a few seconds between each pop.  Shaking the pan will help to prevent the popcorn from burning.

In a small saucepan, melt the butter and add the soy sauce and furikake.  If using, add the rice crackers to the popped popcorn, and pour the butter-soy-furikake mixture all over, tossing to coat.  Tranfer to a large bowl and serve warm.

Homemade Furikake Ingredients

Yields approximately 4 tbsps

3 tbsps roasted shredded seaweed*, torn into smaller pieces

¾ tsp bonito flakes**

1 ½ tsps black and/or white sesame seeds, toasted

1 tsp salt

1 tsp light brown sugar

Procedure

Mix all the ingredients together and store in an airtight container.

*If you can’t find this, you can roast nori or seaweed sheets in a skillet over medium heat until they turn crisp.  They can then easily be torn or crumbled into small pieces.

** Look for the smallest flakes to use here.  Bonito flakes are from a type of tuna that is cooked, smoked and dried.

tags: popcorn, homemade furikake, snacks, comfort food
categories: man-friendly, recipes, snacks, all-2, vegetarian-1
Monday 09.19.11
Posted by Aliya LeeKong
 

Farm Stand Corn & Mushroom Tortilla Salad

View fullsize corn-tortilla-pic2-500x333.jpg

Farm Stand Corn & Mushroom Tortilla Salad

I walked into a coffee shop the other day, Nina Simone playing in the background, an unidentifiable buzz and warmth in the room and the scent of hot beverages brewing, and it totally transported me; I feel ready for the cooler months ahead to be filled with days of apple picking, Fall dinners with friends in Fort Greene, weekend drives to go leaf peeping, the build to the holidays and rum toddies.  I’m finally facing the fact that it’s the end of summer and am filled with this mixture of wistful nostalgia and excited anticipation of the fall to come. That said, it’s my last hurrah! And I couldn’t help but take one last shot at summer with this beautiful salad inspired by the farm stands I visited out in the South Fork this past week and a Mexican tortilleria in Queens where I spent the day cooking.

In thinking about Mexican food and traditions, I wanted to visit Tortilleria Nixtamal because they make incredible corn tortillas in keeping with true Mexican tradition, a not-so-straightforward process that hinges on corn quality, cal, humidity, and timing (they happen to supply to many of the best of the best Mexican restos in town).  The restaurant also turns out gorgeous authentic food to boot, so I headed out to Queens to learn a few dishes from the Chef there, Santiago, and see just how this tortilla process works.  My time at Nixtamal and this dish is the basis for my next webisode of Exotic Table, so stay tuned!

One dish Chef Santiago taught me was a quesadilla with Oaxaca cheese, corn, and huitlacoche, a fungus that actually grows on the corn and is a Mexican delicacy.  Here, I decided to use that as inspiration for a salad, substituting some farm stand shitakes to add the earthy kick from otherwise hard-to-find huitlacoche and threw in some gorgeous grape tomatoes.  Bright and filled with end of summer flavors, this is a super easy dish to make at home, tortilla bowls included.  Enjoy!

Ingredients

Yields 4 servings

4 corn tortillas (the thinnest you can find)

Butter and olive oil

¾ cup shitake mushrooms, thinly sliced

1 shallot, finely chopped

1 jalapeno, seeded and finely chopped

1 ¼ cups fresh corn kernels (about 2 ears)

6 – 8 grape tomatoes, halved

handful of cilantro, chopped

farmer’s cheese or queso fresco

salt and freshly ground black pepper

Procedure

The first step is to make the tortilla “bowls.”  Rather than deep-frying to achieve pliability and moldability, I like to go a bit healthier and just use a skillet with a touch of butter and/or olive oil to get similar results. While doing this, you’re going to use small bowls that fit inside each other to mold the tortillas.  They will not turn out as crisp (and using thinner tortillas will help), but this method makes me feel better about calling this a salad.

Simply heat a medium-sized skillet over medium-high heat.  When hot, add the tortilla and flip at intervals until it puffs and browns a bit.  You’ll feel the edges start to get crispy.  At this point, add a ½ tablespoon of butter or olive oil and let coat the tortilla.   Place a small bowl upside down on a cookie sheet.  Remove tortilla carefully and place on top of the overturned bowl.  Take another bowl, overturned, and put it on top.  It should mold the tortilla to the shape of the bowl and hold it in place as it cools.   Repeat for remaining tortillas, and let cool while preparing the rest of the ingredients.

Heat the same skillet over medium-high heat, and add another tablespoon of butter with 1 to 2 tablespoons of oil.  When the foam subsides, add the mushrooms and let sit undisturbed in a single layer for about 2 minutes.  You want to develop a nice, golden brown on the mushrooms and bring out the flavor.   Stir the mushrooms and sauté for another minute or two to cook through.  Add salt at the end to taste and, using a slotted spoon, transfer to a bowl.

Add another tablespoon or two of butter or olive oil to the pan.  Add shallots and jalapeno and a bit of salt to draw out the moisture.  When shallots are translucent (about 3 to 4 minutes), add corn kernels and tomatoes and toss to mix thoroughly.  I like to crank the heat up a bit here to develop a more roasted flavor to the corn, but be careful because the corn can start to pop a bit.  Cook for 5 to 7 minutes until corn is cooked through and tomatoes have puckered a bit.

Remove from the heat, toss back in the mushrooms, season with salt and freshly ground pepper to taste and add some chopped cilantro, reserving some of the cilantro for garnish.  Spoon mixture into tortilla bowls and dollop farmer’s cheese or queso fresco to your heart’s content.  Garnish with remaining cilantro and serve warm or room temperature.

tags: corn, mushrooms, recipes for summer, Mexican recipes, Tortilleria Nixtamal
categories: recipes, soups & salads, all-2, vegetarian-1, main dishes-1
Monday 09.12.11
Posted by Aliya LeeKong
 

Porcini Macaroni Pie

View fullsize porcini-pic3-500x333.jpg
View fullsize porcini-pic2-500x139.jpg

Porcini Macaroni Pie

So I’m working on my second episode of Exotic Table, and this one is inspired by a nonna I met at Enoteca Maria, an Italian spot in Staten Island that has grandmas from all over Italy as chefs making specialties from their individual regions.  How inviting is that?  I found the concept so powerful – I had to dig deeper, and a nonna by the name of Rosa Turano showed me her simple and elegant porcini dish. 

Of course, I can never leave well enough alone, so I did a bit of a double twist here drawing from my incredible day in the kitchen with Rosa and one of my favorites, Trinidadian Macaroni Pie.  The result is this beautiful baked mac ‘n cheese threaded with porcinis.  Cheesy, buttery, with a crust and that gorgeous porcini flavor…Enjoy and look out for the Exotic Table episode in a few weeks!

Ingredients

Serves 6 to 8 (yields (1) 3-quart baking dish)

olive oil or butter

1 cup fresh or rehydrated porcini mushrooms, thinly sliced*

1 yellow onion, finely diced

3 garlic cloves, minced

1 stick unsalted butter

½ cup all-purpose flour

1 quart milk

½ tsp white pepper

½ tsp black pepper

2 tsps salt

2 ½ cups grated gruyère

2 eggs

1 lb pasta (I used pappardelle here)

1 tbsp + 1 tsp fresh chives, finely chopped

1 ½ tsps fresh thyme, finely chopped

Procedure

Preheat oven to 350º F.

Heat a medium skillet over medium-high heat.  Add olive oil, and, when hot, add mushrooms.  Leave them alone and let them brown for a minute or two and then throw in a pat of butter to help with the browning.  Stir and add salt – browning the mushrooms will really bring out their earthy flavor and adding salt at the end will prevent moisture from ruining the browning process.  Lower the heat to medium-low and throw in the onions.  Cook for 3 to 5 minutes until the onions are translucent.  Add garlic and cook for 30 seconds or so until fragrant.  Remove from heat and cool in a bowl.

In a large sauté pan or pot over medium heat, melt butter.  Add flour all at once and whisk vigorously to avoid lumps.  Cook for 2 to 3 minutes.  You just want to remove the raw taste.  Add milk and spices and continue to whisk to prevent lumps (remember to get the corners!).  Once the mixture starts to bubble, reduce heat to low and cook for 8 to 10 minutes whisking often.  You want this to simmer gently while it’s thickening.  Remove from heat.

To the onion mixture in the bowl, add 2 cups of the grated cheese as well as the eggs.  Add a ladle full of the béchamel (milk mixture) and stir.  Continue to add ladlefuls until the egg mixture is up to temperature with the béchamel.  Add everything back to the béchamel in the sauté pan and stir to combine thoroughly and make sure cheese is completely melted.

Add pasta to boiling, heavily salted water and cook until it’s a bit underdone.  It depends on what type of pasta you are using.  I used fresh pappardelle, and it cooked in 2 to 3 minutes.  It’s going to continue cooking in the oven, so leave it al dente.  Drain pasta and add to the béchamel/cheese mixture.  Add 1 tablespoon of the chopped chives and 1 teaspoon of the chopped thyme and combine thoroughly.  Pour into a heavily greased, 3-quart baking dish.

In a bowl, combine remaining herbs, ½ cup of cheese, and breadcrumbs.  Sprinkle on top of macaroni and either dot with butter or drizzle with olive oil.  Bake for 35 minutes until top is browned and bubbly.

tags: Porcini Mushroom Pie, Enoteca Maria, vegetarian meals, macaroni pie
categories: all-3, recipes, side dishes, vegetarian-1, main dishes-1
Monday 08.01.11
Posted by Aliya LeeKong
 

Crispy Asparagus with Fenugreek Aioli

View fullsize asparagus-pic1-500x333.jpg
View fullsize asparagus-pic2-500x333.jpg
View fullsize asparagus-pic3-500x333.jpg

Crispy Asparagus with Fenugreek Aioli

Asparagus can be polarizing, lovers and haters – I happen to be a lover.  I’m a huge fan of throwing asparagus in an oven with some olive oil, salt and pepper (and maybe a pat or two of butter…) and letting it roast to perfection while I’m making the rest of my meal.  With the abundance of beautiful, thick and luscious asparagus in the greenmarket, I’ve found myself going beyond simple roasting and grilling techniques to figure out ways to single it out and highlight its taste at this time of year.  This recipe is one lovely variation.

I know.  The old adage that frying makes everything taste better is a bit overused, but, in this case, it is so true!  This requires basic breading, but I like to spice up the flour for dredging a bit and use panko to form the crispy crust.  The asparagus are then shallow-fried until they just yield under the bite.

Homemade aioli is the perfect accompaniment.  It’s cheaper and easier to make your own mayo, and this one is scented with a bit of fenugreek powder.  Fenugreek is one of the key spices in curry.  I actually love it on its own, without the rest of the spices that comprise curry.  It definitely has a bitter edge to it though, so a little goes a long way.  Some garlic, a touch of mustard, and you have a deliciously creamy sauce.  The crisp asparagus dipped into the garlicky aioli with hints of curry are the perfect summer side.  Enjoy!

Ingredients

Serves 4 to 6

For the asparagus:

¼ cup all purpose flour

½ tsp salt

1 tsp garlic powder

½ tsp onion powder

black pepper to taste

2 eggs, beaten

1 ¼ cups panko breadcrumbs

1 bunch of asparagus (approximately 1 lb)

oil for frying

For the fenugreek aioli:

2 or 3 garlic cloves

large pinch salt

1 egg yolk, room temperature

2 ½ teaspoons fresh lemon juice

½ tsp Dijon mustard

¼ tsp + a small pinch finely ground fenugreek

½ cup oil*

Procedure

For the asparagus, using three trays or bowls, set up a breading station.  Whisk together the flour, salt, garlic powder, onion powder, and black pepper into one.  Set up another with the beaten eggs, and a third with the panko.  If you like, pulse the panko in the food processor to make it a bit finer before using.

Dredge the asparagus in the flour mixture, tapping off any excess.  Dip into the beaten eggs, and, finally, coat with the panko.  Transfer to a rack over a baking sheet and work in batches to bread all of the asparagus.

Heat ¼” to a ½” of oil in a large skillet to medium heat.  You don’t want the oil to be too hot or the breading will brown (and burn) before the asparagus cooks through.  I like to shallow-fry about 2 to 3 minutes per side on a medium heat to get that golden brown crust and perfectly-cooked asparagus.

Transfer back to the rack over the baking sheet and sprinkle with additional salt if you like.  If you aren’t serving immediately, keep warm in a 200° F oven.

For the aioli, place the garlic and salt in a food processor and pulse until chopped as finely as possible.  Conversely, you can do this by hand and chop the garlic finely and make a paste with the salt.  Add the egg yolk, lemon juice, mustard and fenugreek and pulse or whisk until blended and uniform.  Start the processor or continue whisking and add in the oil in a thin stream until all is completely incorporated.

Serve the asparagus warm with a side of the aioli.

*To save a bit, I like to use a combination of regular olive oil (extra virgin can turn bitter) and canola or other vegetable oil.

tags: asparagus, crispy asparagus, fried vegetables, fenugreek aioli, aioli, recipes for spring
categories: all-3, appetizers, recipes, side dishes, vegetarian-1
Monday 06.13.11
Posted by Aliya LeeKong
 

Fava Purée Topped with Sumac Onions

View fullsize fava-pic1-500x333.jpg
View fullsize fava-pic2-500x333.jpg
View fullsize fava-pic3-500x166.jpg

Fava Purée Topped with Sumac Onions

The terms spring and vegetables really go hand-in-hand – earthy artichokes, thick, luscious asparagus, comical fiddleheads and, one of my personal favorites, fava beans.  Yes, they are a bit labor-intensive as they have to be shelled from their pods and then each individual fava has to be peeled…but the taste, the creamy butteriness, makes all of that work worthwhile.

Fava beans, or broad beans as they are sometimes called, are actually very popular in the Middle East, North Africa and Mediterranean regions.  In fact, ful medames, a dish consisted of slow-cooked favas with garlic, lemon and spices, is a typical breakfast dish in Egypt often served with eggs and pita.  Seasonally, fresh favas may be available, but year-round, dried favas are a staple in the Egyptian diet.

Fava purée is a great way to enjoy the seasonally abundant, fresh favas at the greenmarkets.  I like to add similar ingredients to the Egyptian dish – garlic, lemon, spices, but I also add potato to give the purée a bit of body.  For a silky mouthfeel, I gently stir in extra virgin olive oil at the end; blending too vigorously with the rest of the ingredients can make the oil bitter.  To top this puree, I soften sweet onions in a pan with tart spice sumac.  The result is a beautiful side dish or starter that’s creamy, luscious, and bright.  Enjoy!

Ingredients

Yields approximately 1 ½ cups of puree

Fava Puree:

2 cups shelled fresh favas (from about 2 lbs unshelled)

3 tbsp butter (1 tbsp is optional, melted)

1 tbsp olive oil

1 small yellow onion, finely chopped

1 yukon gold potato, peeled and shredded

¾ tsp ground cumin

pinch of chili powder

5 garlic cloves, minced

juice of half a lemon

½ cup chicken or vegetable stock

3 tbsp extra virgin olive oil

salt and black pepper to taste

Sumac Onions:

3 tbsps butter or olive oil

1 medium yellow onion, thinly sliced

1 tbsp ground sumac

Procedure

For the fava purée, bring a medium pot of salted water up to a boil over high heat.  Add favas and cook for 90 seconds to 2 minutes (they should be bright green).  Drain and shock in an ice bath or run under cold water to stop cooking.  Peel outer layer of skin from favas – they should slip out pretty easily.  Discard skins and set peeled favas aside.

Heat 2 tablespoons of butter and olive oil over medium heat.  Add onion, potato, cumin, chili and favas (and a pinch or two of salt) and cook for 4 to 5 minutes until potatoes and favas are softened.  Add garlic and cook for another 30 seconds until fragrant.  Add lemon juice and chicken stock and bring up to a simmer.

Transfer fava mixture to a blender and purée to desired texture.  Add a bit more stock if necessary to achieve a smoother texture.  Remove to a bowl and stir in extra virgin olive oil and 1 tablespoon of melted butter to get a creamy, mouthfeel.  I like to stir in the oil, rather than blend, so that it doesn’t get bitter from overprocessing.  Season with salt and pepper to taste.

For the sumac onions, heat butter or oil over medium heat.  Add onion and sumac and cook until softened.

Serve fava purée warm, topped with sumac onions and a side of pita or toast points.

tags: fava beans, sumac, recipes for spring
categories: all-3, appetizers, side dishes, recipes, vegetarian-1
Monday 05.16.11
Posted by Aliya LeeKong
 

Crab & Callaloo Quiche

View fullsize quiche-pic1-500x333.jpg
View fullsize quiche-pic2-500x333.jpg
View fullsize quiche-pic3-500x333.jpg
View fullsize quiche-pic4-500x166.jpg

Crab & Callaloo Quiche

So I’ve been flushing out dishes for an event for April.  The event is for Heifer International and honors their Pass on the Gift tradition, specifically for their Haiti projects.  It’s an incredible organization that promotes sustainable solutions for impoverished families worldwide, and I’m really excited to be involved with them.

I’m designing some Haitian-inspired dishes for the event, and this one comes from a popular West Indian side called callaloo, made from the eponymous greens.  The greens are the leaves of the dasheen bush or taro plant and are also used in Pacific Island and Asian cooking.  They can be found at West Indian markets but swiss chard, spinach and even collards make a great substitute here.

Callaloo, the side, is thick and stew-like with roots tracing back to West Africa.  The greens are flavored with salt pork, shallots or onions, garlic, ginger, habanero pepper and bouillon.  The mixture is roughly blended and coconut milk is used to thin it out.  Oftentimes, crab is added, and it’s such a rich, distinctive dish.  I was eating a spinach and bacon quiche one day, and the callaloo just mentally translated. I had to see what would happen if I changed its form.

My husband went a bit nuts for this, I have to admit.  He grew up eating callaloo and couldn’t get over how the flavor of the dish could transplant into a quiche.  The greens, the crab, a salty porkiness, garlicky and heat from the chilies – it’s an exciting combination.  Oh, and this crust recipe, though involved as most tart shells are, is pretty easy and foolproof as far as crusts go – crunchy, buttery and neutral (could definitely work for sweet applications).  It’s my go-to crust.  Enjoy!

Ingredients

Crust:

1 ½ cups all-purpose flour

¾ tsp salt

¼ tsp sugar

1 stick unsalted butter, cold and cut into small cubes

1 egg

1 tsp water

Filling:

1 slice thick-cut bacon, cut into small dice

½ habanero pepper, seeded and ribs removed, minced

1 small shallot, cut into a small dice

¼  tsp minced ginger

2 or 3 cloves garlic, minced

1 bunch callaloo, spinach, or swiss chard, roughly chopped, blanched and squeezed of excess water* (equivalent to 1/3rd cup cooked)

¼ lb peekytoe, lump, or jumbo lump crabmeat

1 scallion, finely chopped

1 tsp fresh thyme, finely chopped

1 tbsp cilantro, finely chopped

1 egg

2 egg yolks

3/4 cups coconut milk

Salt and freshly ground pepper to taste

Procedure

Preheat oven to 375° F.

For the crust, in a food processor, pulse together flour, salt and sugar.  Scatter the cold cubes of butter over the dry ingredients and pulse until the butter is cut in and the texture looks like sandy peas or a coarse meal.  In a small bowl, lightly beat together the egg and water.   Add in increments, pulsing, until the dough sticks together.  There will still be a lot of crumbly bits that haven’t incorporated – that’s okay.

Turn the dough out onto a work surface or a piece of parchment paper.  LIGHTLY, knead the dough to make sure everything is incorporated.  I literally just press it together a bit.  Place into plastic wrap and create a flattened disk.   Refrigerate for a minimum of 2 to 3 hours (and up to a day).

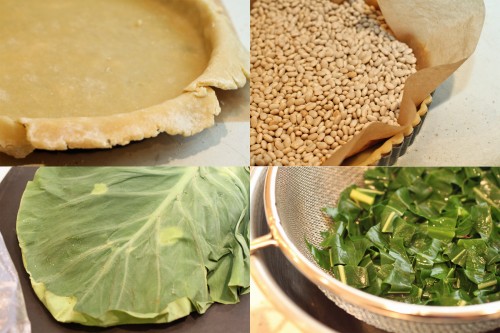
On a floured work surface or in between pieces of parchment paper (with flour), carefully roll out the dough with a rolling pin until uniform thickness and large enough for a 9 or 9 ½ inch tart shell.  Carefully transfer to the greased tart shell and press carefully into the sides.  Try not to stretch the dough at all.  Trim any excess edges and dock or prick holes all over the surface of the dough with a fork.  Wrap shell in plastic wrap and freeze for a minimum of a half hour.

Remove tart shell from freezer and plastic wrap and place on a baking sheet.  Fit a piece of parchment paper on the surface of the dough and weight down with dried beans or baking weights.  Bake for 20 minutes.  Remove baking weights or beans and parchment paper and bake for another 10 minutes to brown.  Let cool slightly.

Turn oven temperature down to 350° F.

For the filling, heat a medium skillet over medium-high heat.  Add bacon and brown.  Remove bacon with a slotted spoon and transfer to a paper towel-lined plate.  Turn heat down to medium-low, and add pepper, shallot and ginger.  Add a touch of salt to draw out the moisture.   Cook for 2 to 3 minutes until shallots are translucent.  Add garlic and cook for another minute until fragrant.  Remove to a bowl and let cool.

Add to the shallot mixture, the browned bacon, blanched callaloo, crab, scallion, thyme and cilantro.  Mix thoroughly and season to taste.

In a separate bowl, beat together egg, egg yolks and coconut milk and lightly season.

Spread crab and callaloo mixture evenly over the bottom of the tart shell.  Pour egg / coconut milk mixture evenly on top.  Bake for 25 minutes.   The edges should be firm and the middle slightly jiggly.

*Callaloo should NOT be eaten raw.  It contains a toxin, calcium oxalate, that can cause itching and constriction of the throat. Always cook callaloo thoroughly before consuming.  To blanch the callaloo or other greens, bring water in a medium-sized pot up to a boil.  Add a great deal of salt.  Also, prepare an ice bath (a bowl with ice and cold water).  Add callaloo to pot.  Cook for 2 to 3 minutes.  Strain and plunge into the ice bath to stop cooking.  Remember to wring out any excess water from the greens.

tags: crab, callaloo, quiche, brunch recipes
categories: all-4, breakfast, main dishes, recipes, vegetarian-1
Monday 03.14.11
Posted by Aliya LeeKong
 

Pumpkin Soup with Garam Masala & Crème Fraiche

View fullsize pumpkin-soup-pic1-500x333.jpg
View fullsize pumpkin-soup-pic2-500x166.jpg
View fullsize pumpkin-soup-pic3a-500x333.jpg
View fullsize pumpkin-soup-pic3-500x333.jpg

Pumpkin Soup with Garam Masala & Crème Fraiche

A few years back I discovered the beautiful combination of pumpkin and garam masala.  I think I was making a pumpkin polenta and, like the Swedish Chef on the Muppets, kind of just threw it in.  I’ve been in love with the combo ever since.

Garam masala is a traditional South Asian spice blend.  It’s spicy and full-flavored but has no real heat to it.  The blend differs from region to region but usually includes peppercorns, cardamom, cloves, cumin, cinnamon, coriander and bay leaves but can also include nutmeg, star anise, and even saffron.  I usually make my own at home because sometimes it’s added whole and sometimes ground.  But you can find the spice blend in powdered form at most supermarkets these days.  It can completely overwhelm a dish, so the key is to use it sparingly.

I debated a lot of different forms for the spice / vegetable combo – everything from waffles to pumpkin pie.  I settled on soup because it’s the perfect fall food – warm, comforting, and aromatic.  There’s sweetness from the pumpkin, the garam masala spice in the background, a little kick from the cayenne and a fantastic tanginess and mouth-feel from the crème fraiche…really delicious.   I used smaller sugar pumpkins because they are sweeter and have a more developed flavor than the larger ones, but even butternut squash would be beautiful here if you have it on hand.  Enjoy!

Ingredients

Serves 4 to 6

2 small sugar pumpkins (3 to 4 lbs each), halved and seeded

olive oil

salt and freshly ground pepper

4 tbsps unsalted butter

2 medium onions, diced

1 tsp salt

1 tsp ground garam masala

½ tsp freshly ground black pepper

¼ tsp ground cayenne pepper

2 cloves garlic, minced

2 tsp brown sugar

few sprigs thyme

1 bay leaf

½ cup white wine

3 cups stock

1/3  cup crème fraiche

chives, for garnish

Procedure

Preheat oven to 400° F.  Drizzle the inside of the pumpkin halves with olive oil, and season with salt and pepper.  Place halves flesh side down on a foil-lined baking sheet, and roast for 45 to 50 minutes until very tender.  Let cool slightly, and then scoop out the flesh into a bowl and reserve.

In a soup pot, melt butter over medium-low heat.   Add onions, salt, garam masala, black pepper, and cayenne and cook for 3 to 4 minutes until translucent.  Add the garlic and the brown sugar and cook for another minute.

Now, add back in the pumpkin along with the thyme, bay leaf and white wine and cook for 2 to 3 minutes until the wine has mostly absorbed.  Add the stock and bring up to a simmer.  Simmer for 35 minutes partially covered to finish cooking and let all of the flavors combine.

Remove the thyme sprigs and the bay leaf.  Add the crème fraiche and either transfer to a blender or use a hand blender to puree to your desired consistency.  I like mine with a bit of texture.

Serve sprinkled with chives and a nice piece of crusty bread!

tags: pumpkin, soups, garam masala, soups for winter
categories: recipes, soups & salads, all-5, vegetarian-1
Wednesday 11.10.10
Posted by Aliya LeeKong
 

Celery Root Hummus

View fullsize hummus-pic1-500x333.jpg
View fullsize hummus-pic2-500x333.jpg
View fullsize hummus-pic3-500x333.jpg

Celery Root Hummus

It’s amazing to me how ubiquitous hummus has become in the last 10 years.  I remember making it from scratch as a child to be served to guests when they’d come over (alongside this delicious, buttery, puff pastry-encased, baked brie…), and then all of a sudden it was in every super market…everywhere.  A cultural explosion of sorts with every variation you could ask for: roasted garlic, salsa-infused, greek olive, or roasted red pepper…Now, it’s been further gourmet-ified, and I’ve seen chickpeas substituted with everything from avocado to squash.

If you’ve been reading my posts over the past few months, I am always inspired by different cultures’ foods, but also by seasonality.  I love the freshness and flavor that comes from the farmers’ market – thus my version of hummus uses seasonal celery root, a fantastic Fall, root vegetable.  It looks pretty scary but, once you get passed peeling it, it cooks up quickly and easily to delicious results.

I adore basic hummus, but sometimes it just sits like a weight in my stomach.  It can be really heavy at times, so I decided to forgo chickpeas altogether, which actually resulted in the lightest, fluffiest hummus I’ve ever eaten!  The celery root provides a gently sweet, tangy, celery-like flavor that blends seamlessly with the sesame tahini, garlic, and lemon juice.  The cumin and cayenne give it smokiness and kick, and the result is a beautiful incarnation of hummus that was incredible slathered on a bit of pita.  Enjoy!

Ingredients

Yields approximately 2 ½ cups

2 baseball sized celery roots, peeled and cut into a 3/4” dice (approximately 3 ½ cups)

1 tbsp butter

3 garlic cloves

1 ½ tbsps tahini

½ tsp cumin

¼ tsp cayenne

½ tsp salt

juice of half a lemon

extra virgin olive oil

paprika

Procedure

Place celery root dice in a stock pot and cover with cold water.  Bring up to a boil uncovered and boil 13-15 minutes until the celery root is very tender.

Using a slotted spoon, transfer celery root into a blender, reserving the cooking liquid.  Add butter and let melt.  Add garlic cloves, tahini, cumin, cayenne, salt, and lemon juice.

Ladle in a bit of the cooking liquid and blend.  Continue adding cooking liquid a little bit at a time until desired texture is achieved.  It took about 2 full ladles (of a 4 oz. ladle) to get to the puree I desired.

Transfer to a bowl and make a well in the center.  Pour a little extra virgin olive oil in the well and sprinkle hummus with paprika.  I love to eat this warm or cold, so serve as you like!

tags: hummus, celery root, recipes for fall
categories: all-6, appetizers, recipes, vegetarian-1
Wednesday 10.20.10
Posted by Aliya LeeKong
 

Trini-style Macaroni Pie

View fullsize mac-pie-pic1-500x333.jpg
View fullsize mac-pie-pic2-500x333.jpg
View fullsize mac-pie-pic3-500x333.jpg
View fullsize mac-pie-pic4-500x166.jpg

Trini-style Macaroni Pie

Thanksgiving is by far my favorite holiday of the year.  My family always does it big down in Florida, and I love the coming together of friends and family of all ages, the hustle in the kitchen with my mom and me and other intruders…I mean, helpers..., the beautiful cool, fall weather (yes, even in Florida).  Ours is a whole day affair with people stopping by at different points in the meal, card games at the kitchen table later followed by a second session of eating in the evening.

Our table is a complete mash-up!  A humungous turkey filled with my mom’s famous stuffing that my dad carves to perfection, a plethora of South Asian, African and other international dishes to complement, one definite chocolate dessert as well as everything else under the sun.  Thanksgiving isn’t too far away, and I’m inspired by my table to bring dishes to you that you might want to try for your own Thanksgiving.  This gives you ample time to do a trial run and see what you like.

My husband’s family always does the most delicious macaroni pie, a staple dish from Trinidad.  It’s a delectably spicy mac and cheese that is baked and served casserole-style.  It’s great because it can be assembled ahead of time if you are going over to someone else’s house.

Macaroni pie is like a blank slate that you can totally personalize.  Traditionally, this pie uses full-on spaghetti, but I personally prefer penne because it’s easy to eat, and I love when the center fills with the creamy sauce.  I also use a half of a habanero pepper here, but feel free to use as much or as little as your heat tolerance permits – other peppers would work well here too.  I’ve seen macaroni pie made with a bunch of different cheeses; I’m partial to gruyere because it’s nutty and works really well with the spices.  Again, you can use whatever grated cheese is your preference.  The herbs really boost the flavor, and I love the crunchy breadcrumb topping.  This is the perfect side dish, truly.  Creamy, cheesy, crunchy with a bit of a kick.  Enjoy!

Ingredients

Serves 6 to 8 (yields 1 3 quart baking dish)

olive oil or butter

1 yellow onion, finely diced

½ habanero pepper, seeded and ribbed, minced

3 garlic cloves, minced

1 stick unsalted butter

½ cup all-purpose flour

1 quart milk

½ tsp powdered mustard

1 tsp paprika

½ tsp white pepper

½ tsp black pepper

2 tsps salt

2 ½ cups grated gruyère

2 eggs

1 lb pasta (I used penne but anything you like)

1 tbsp + 1 tsp fresh chives, finely chopped

1 ½ tsps fresh thyme, finely chopped

¾ cup breadcrumbs

Procedure

Preheat oven to 350° F.

Heat a medium skillet over medium-low heat.  Add olive oil, and, when hot, add onion and pepper.  You want the onions to be pretty finely diced, so they will spread easily throughout the dish and cook quickly.  Cook for 3 to 5 minutes until the onions are translucent.  Add garlic and cook for 30 seconds or so until fragrant.  Remove from heat and cool in a bowl.

In a sauté pan over medium heat, melt butter.  Add flour all at once and whisk vigorously to avoid lumps.  Cook for 2 to 3 minutes.  You just want to remove the raw taste.  Add milk and spices and continue to whisk to prevent lumps (remember to get the corners!).  Once the mixture starts to bubble, reduce heat to low and cook for 8 to 10 minutes whisking often.  You want this to simmer gently while it’s thickening.  Remove from heat.

To the onion mixture in the bowl, add 2 cups of the grated cheese as well as the eggs.  Add a ladle full of the béchamel (milk mixture) and stir.  Continue to add ladlefuls until the egg mixture is up to temperature with the béchamel.  Add everything back to the béchamel in the sauté pan and stir to combine thoroughly and insure cheese is completely melted.

Add pasta to boiling, heavily salted water and cook until it’s a bit underdone.  It depends on what type of pasta you are using.  I used penne and cooked it for about 9 or 10 minutes.  It’s going to continue cooking in the oven.  Drain pasta and add to the béchamel/cheese mixture.  Add 1 tablespoon of the chopped chives and 1 teaspoon of the chopped thyme and combine thoroughly.  Pour into a heavily greased 3 quart baking dish.

In a bowl, combine remaining herbs, ½ cup of cheese, and breadcrumbs.  Sprinkle on top of macaroni and either dot with butter or drizzle with olive oil.  Bake for 35 minutes until top is browned and bubbly.

tags: macaroni pie, trini-style cooking, comfort food
categories: side dishes, recipes, all-6, vegetarian-1
Wednesday 10.13.10
Posted by Aliya LeeKong
 

Mushroom and Ajwain Pissaladière

View fullsize mushroom-pic1-500x333.jpg
View fullsize pissaladiere-pic2-500x333.jpg
View fullsize mushroom-pic3-500x333.jpg
View fullsize mushroom-pic5-500x333.jpg

Mushroom and Ajwain Pissaladière

A few weeks ago, I was flipping through a food magazine and came across a recipe for a traditional pissaladière.  Of course, now I can’t find the article amongst the heaping piles of magazines I accumulate!  Probably need a better reference system around here…Anyway, the dish is a Provençal pizza-like tart, a yeast-based dough typically topped with onions, anchovies and French oil-cured olives.  No cheese, but for a pizza addict like myself (once a week!), this dish completely hits the spot.

I decided, of course, that a blank canvas like this needs – is basically crying for – an exotic twist.  Wild mushrooms are in season, and I picked up these beautiful, feathery oyster mushrooms from the farmers’ market.  In a previous post, I mention a spice, ajwain seeds, and how they pair gorgeously with mushrooms.  Therein, lies the inspiration for this pissaladière.

Instead of making pizza dough from scratch, I like to use puff pastry because I’m a bit obsessed, but also because it saves time and forms the most perfectly thin, buttery, crunchy layer.  And not to stray too far from the original, caramelized onions still form the base layer and work incredibly well with the spices and the sautéed mushrooms.  The ajwain and cumin give a smoky, thyme-like kick, and the dish just pops with flavor.

I use this recipe all the time for entertaining because you can pre-cook the topping, assemble, pop it in the oven, and have the most delicious and elegant tart in 15 minutes.   I sometimes pre-cut the pastry into little squares before cooking to make it easier.  Put this out next to a cheese plate, and you are all set.  Or whip it up for an easy weeknight app.  Enjoy!

Ingredients

Serves 6 as an appetizer / Makes about 8 squares for hors d’oeuvres

1 sheet frozen puff pastry, thawed according to package directions

olive or canola oil

3 tbsps unsalted butter

2 ½ cups sliced mixed mushrooms (I used a mixture of cremini, shiitake and oysters)

¼ tsp ajwain seeds

¼ tsp cumin seeds

2-3 medium-sized Spanish onions, thinly sliced

¼ tsp crushed red pepper

scant ½ tsp black pepper

scant ½ tsp chili powder

scant ½ tsp ground cumin

1 egg + 1 tbsp heavy cream

fresh thyme leaves

Salt to taste

Procedure

Preheat oven to 400° F.

Heat a medium-sized skillet over medium-high heat.  Cover bottom of pan with oil and add 1 tablespoon of butter.  Once foam has subsided, add mushrooms and toss to coat.  Cook for about 2 to 3 minutes until well-browned, season lightly with salt and place in a colander over a bowl to drain excess liquid and oil.

Wipe off skillet and set back over medium heat.  Add oil again to coat the bottom of the pan and, when oil begins to shimmer, add ajwain and cumin seeds.  Fry spices for about a minute being careful not to burn.  Turn heat down to medium-low, add 2 tablespoons of butter, onions, crushed red pepper, black pepper, chili powder, and a generous pinch of salt.  Cook on low for 15 to 20 minutes, stirring frequently until onions soften and caramelize. Taste and adjust seasoning.  Set aside to cool for about 10 minutes.

On a floured surface, roll out the puff pastry to fit the baking sheet; it will shrink a bit as it cooks.  Place on a parchment-lined baking sheet, and prick all over with a fork to prevent it from puffing too much.  In a bowl, beat together the egg and heavy cream and brush puff pastry with egg wash.  Bake for 10 minutes, and remove from the oven.  Let sit for 2 minutes to deflate.

Using tongs, spread onion mixture onto pastry being sure to leave an uncovered edge around the outside.  Try not to get any excess oil or butter on the pastry.  Spread browned mushrooms on top, sprinkle with thyme leaves and bake for another 10-15 minutes until crust is golden brown.

Let cool slightly before cutting.  I like to sprinkle a little fresh fleur de sel on top before serving.


tags: mushrooms, ajwain, pissaladiere
categories: appetizers, recipes, all-6, vegetarian-1
Monday 10.11.10
Posted by Aliya LeeKong
 

Crispy Salt and Pepper French Toast

View fullsize toast-pic1-500x333.jpg
View fullsize toast-pic2-500x333.jpg
View fullsize toast-pic3-500x166.jpg

Crispy Salt and Pepper French Toast

Savoury, crispy French toast. Salty, with a heavy hit of black pepper.  This was one of my favorite Sunday breakfasts growing up, the smell of the toasts frying up a scent memory that still takes me back.

This fried bread I grew up eating, called khara pao (khara means “spicy”), is South Asia’s answer to French toast, typically served with a kicked-up tomato ketchup.  My family was partial to black pepper, but I’ve seen turmeric, chili powder, cayenne and even cumin added.  And South Asia’s not the only one that goes the savoury route.  In other cultures, they do similar-style “eggy toasts” – Italy’s has mozzarella and tomato sauce, Russia’s is simple salt, egg and milk, and Hungary serves theirs with onions, tomatoes, ketchup and even mayonnaise…

This version is so ridiculously easy to make, and requires ingredients we all usually have on hand.  I’m a savoury brunch person myself, and this is such a delicious alternative to sweet French toast.  The crispy, salty, pepper-heavy toast dipped in a cool, spicy, slightly sweet, tomato-ey ketchup is a truly heavenly combination that will quickly move into your go-to, I-have-leftover-bread-and-don’t-know-what-to-do-with-it rotation.  Breakfast or even as a mid-afternoon snack – enjoy!

Ingredients

Serves 4 to 6

French Toast:

5 eggs

3 tbsps half-and-half

1 tsp salt

2 tsps black pepper

1 ½ tbsps green onions, finely chopped (optional)

1 ½ tbsps cilantro, finely chopped (optional)

vegetable oil

butter

8 (½”) slices day-old bread*, cut on the diagonal

Sauce:

Ketchup

Sriracha or your favorite hot sauce

Procedure

In a bowl or baking dish, beat together eggs with half-and-half, salt, pepper, green onions, and cilantro.

Heat a medium or large skillet over medium-high heat.  Cover the bottom of the skillet with vegetable oil and add a tablespoon or two of butter for taste.

Dip the bread triangles into the egg batter, drain off any excess, and place straight into the hot pan.  Fry for 2 to 3 minutes on each side – you want to develop a golden-brown color and the texture should be crispier than traditional French toast.  Place cooked toasts on a paper towel-lined plate or rack to drain.

In a small bowl, mix together ketchup and hot sauce to your desired heat tolerance.

Serve toasts warm with a side of the spicy ketchup.

*I like to use a country or pullman loaf for this.  You want it to stand up to the egg batter and not get mushy, so I always go for a day-old loaf.

tags: french toast, savoury french toast, khara pao, South Asian french toast
categories: all-6, breakfast, recipes, vegetarian-1
Monday 10.04.10
Posted by Aliya LeeKong
 

Tunisian Bread Salad

View fullsize bread-salad-pic1-500x333.jpg
View fullsize Bread-salad-pic2-500x333.jpg
View fullsize bread-salad-pic3-500x333.jpg

Tunisian Bread Salad

I am completely in love with the concept of “bread salad”.  It feels like cheating.  Like you have this healthy bunch of vegetables and you just make them so much tastier by adding chunks of rustic bread that soak up all the lovely dressing.  But you still feel healthy doing it because you call it a salad.  I am famous for taking leftover cornbread and making a cornbread-bread salad with honey balsamic dressing.  And sometimes I even throw in a few vegetables too.

Most people know about panzanella or Tuscan bread salad, which is made from crusty Italian bread mixed with tomatoes, red onions, cucumbers and basil.  Delicious.  But Tunisian bread salad or even Mediterranean bread salad (similar) is less well known and equally (if not slightly more…) tasty.  You take beautiful seasonal vegetables – eggplant, peppers, tomatoes – and roast them off with some aromatics.  Mix those in with olives, herbs, capers, fresh cheese, and chunks of stale bread and toss with a delicious, harissa dressing and you have a beautiful, alternative, light and flavorful, bread salad.

This is a fantastic way to use up old bread (or so we all tell ourselves…).  But I’ve actually seen this as a roasted vegetable salad on its own, so if no bread is at hand or you want to be even healthier, you can leave it out and still have a delectable salad.  Store-bought harissa is fine, but I would suggest making your own like I do in my homemade harissa recipe; it’s cheaper, fresher, and healthier without the preservatives.

I love harissa in a salad dressing, and my dressing here has honey and harissa which, by the way, is a fantastic combination – I like to just slather the two on bread as a crostini or as an hors d’oeuvre to spruce up a weeknight dinner.  In any case, this salad is bright, flavorful and beautiful – great for entertaining.  Enjoy!

Ingredients

Yields 4 to 6 servings

Salad:

1 eggplant, cut into a medium (bite-sized) dice

1 red bell pepper, cut into a medium (bite-sized) dice

1 yellow bell pepper, cut into a medium (bite-sized) dice

8 oz mini sweet or cherry tomatoes

3 small shallots, quartered

3 or 4 whole garlic cloves

Olive oil

Salt & freshly ground black pepper

¼ cup niçoise olives, pitted

A generous handful of fresh mint, roughly chopped

A generous handful of fresh cilantro, roughly chopped

1 day-old round loaf of bread or whatever rustic bread you have on hand, cut into medium-sized cubes*

Garnish:

Fresh cheese (feta, goat or bocconcini will do), torn or crumbled into small pieces

2 tsps capers, rinsed and drained

1 or 2 hard-boiled eggs, quartered

Dressing:

¼ cup rice vinegar

1 tbsp harissa**

1 ½ tbsps honey

¼ cup extra virgin olive oil

Procedure

Preheat oven to 400° F.

In a bowl, toss together eggplant, bell peppers, tomatoes, shallots and garlic with olive oil, salt and pepper to coat.  On a baking sheet, arrange vegetables in a single layer.  Roast for 25 minutes until lightly browned.

For the dressing, whisk together the rice vinegar, harissa and honey in a bowl.  Drizzle in extra virgin olive oil, whisking to incorporate.

Using a slotted spoon, transfer roasted vegetables to a large bowl.  Add olives, herbs, and bread and toss with dressing.  Garnish with cheese, capers, and hard-boiled eggs.

*If you have fresh bread, just put the cubes of bread on a baking sheet, drizzle with olive oil, and bake at 350° F until lightly browned.  You just want it to be crisp enough to stand up to the salad dressing and not turn to mush.

**For harissa you can use my version here or use the store-bought kind.

tags: bread salad, Tunisian cooking, harissa, vegetarian sides, recipes for entertaining
categories: all-6, side dishes, recipes, salads, vegetarian-1, soups & salads
Monday 09.20.10
Posted by Aliya LeeKong
 

Exotic Fried Green Tomatoes

View fullsize tomato-pic1-500x333.jpg
View fullsize tomato-pic2-500x333.jpg
View fullsize tomato-pic3-500x166.jpg

Exotic Fried Green Tomatoes

A friend of mine has a farm in upstate New York, and he generously dropped off a CSA-like box of his vegetables – tomatoes, green peppers, cucumbers, celery, and parsley (more pics on my FB page).   There were a ton of tomatoes, and he suggested ripening them by placing them on a sunny windowsill.  I thought I would reserve a few of the green ones to recreate classic, Southern fried green tomatoes.

So, interestingly enough, although green tomatoes are known as a Southern specialty, they do pop up in other cultures.  They can be found throughout the Mediterranean; Italy, Greece, Turkey – all have their versions.  I’ve seen green tomato pickles, green tomato sauces for pasta, delicious cold soups, and beautiful casserole dishes with green and red tomatoes.

For my fried green tomatoes, I like to crush up some pistachios with panko bread crumbs for the crust in place of traditional cornmeal.  It gives a nutty bite and a hint of sweetness that works well with the acidity of the green tomatoes.  You can stop right there after frying in the recipe if you like – they taste lovely just like that.  But I took it a step further and chopped up a bunch of herbs, mixed them up with shredded mozzarella, and baked them to bubbly, cheesy perfection.  You can, of course, use whatever herbs you like – any combination of chives, parsley, mint, thyme, and even oregano would be fantastic.  Enjoy!

Ingredients

Yields 4 to 6 servings

4 medium, firm green tomatoes

½ cup shelled pistachios

1 ½ cups panko bread crumbs

2 tsps garlic powder

1 tsp onion powder

½ tsp cayenne

½ tsp black pepper

½ tsp salt

¾ cup buttermilk

Canola or olive oil

1 tbsp butter

2 tbsps chopped herbs (I used chives, parsley & mint)

1 cup low-moisture shredded mozzarella*

Preheat the oven to 400° F.

Trim the ends off of the tomatoes, and cut into 1/4 “ slices.  In the food processor, pulse pistachios, until they are almost a coarse meal.  Add bread crumbs, garlic powder, onion powder, cayenne, black pepper, and salt and pulse until the mixture looks like a fine crumb.  Pour breading mixture into a bowl or baking dish.

Pour buttermilk into a separate bowl.  Dip tomato slices in the buttermilk and then dredge in the breading mixture.  Pat the breading mixture on to create an even coat that sticks.  Place on a rack on a baking sheet.

Heat a ½“ of oil with butter over medium-high heat in a Dutch oven or cast iron skillet.  Fry tomatoes in batches for 1 to 2 minutes on each side.  Place back on the rack over the baking sheet.

In a bowl, combine chopped herbs and mozzarella.  Sprinkle over fried tomato slices and bake in the oven for 5 to 7 minutes until the cheese is melted and bubbly.  Serve immediately.

*I used low-moisture, shredded mozzarella in place of slices of buffalo mozzarella here in order to keep the tomatoes crispy.


tags: fried green tomatoes, recipes for summer, recipes for fall
categories: all-6, appetizers, recipes, vegetarian-1, side dishes
Wednesday 09.15.10
Posted by Aliya LeeKong
 
Newer / Older