X

Sign up to receive exclusive recipes, tips, updates and other goodies from Aliya!

  • Home
  • Blog
    • All
    • Recipes
    • Spices + Ingredients
    • Lifestyle, etc.
    • Travel
  • The Cookbook
  • The App
  • Media
    • All Media
    • Video
  • About
  • Passions
Aliya LeeKong
  • Home
  • Blog
    • All
    • Recipes
    • Spices + Ingredients
    • Lifestyle, etc.
    • Travel
  • The Cookbook
  • The App
  • Media
    • All Media
    • Video
  • About
  • Passions

Swiss Chard "Leaves"

View fullsize dolma-pic1-500x333.jpg
View fullsize dolma-pic2-500x166.jpg

Swiss Chard "Leaves"

Grape leaves have to be one of my all-time, favorite Middle Eastern snacks (and something I deemed impossible to make at home for many years).  When I visited Turkey a few years back, I learned a nifty trick for how to make them using a more common green to the West, swiss chard.  This would actually work with a number of different greens, but I do have to say the flavor of swiss chard works great – it’s mild and verdant and lets the flavor of the stuffing pop.

Grape leaves are often stuffed with ground meat and/or rice and flavored with mint and lemon.  They are part of a group of stuffed vegetables made throughout the Middle East, Greece and Turkey called dolmas.

I kept these guys vegetarian – I feel like they are a bit more delicate that way.  A few other things: in lieu of long-grain rice, I used a short-grain one, Egyptian rice, which is one of my favorites!  It’s fluffy, rounder, has a great toothsome texture and absorbs flavor beautifully.  Also, in lieu of steaming them the traditional way – I lay the leaves on top of stacked lemon slices and let the juice from the lemons steam and infuse them with even more flavor.  These are not the most speedy hors d’oeuvres to make, but they are well worth it!  And I guarantee by your 48th folding, you’ll be a lot faster…Enjoy!

Ingredients

24 Swiss chard leaves, washed and stems removed (approximately 3 bunches)

2 tbsps unsalted butter

1 small shallot, finely chopped

1 garlic clove, minced

½ tsp dried mint

¼ tsp ground allspice

¼ tsp ground cinnamon

¼ tsp ground black pepper

pinch chili flakes

pinch ground cloves

¾ cup Egyptian rice

1 cup vegetable stock or water

2 tbsps pine nuts, toasted

1 tbsp lemon juice

½ tsp lemon zest

2 tbsps chives and parley, finely chopped

3 or 4 lemons, cut into ½ inch rounds

olive oil

salt

Procedure

Preheat oven to 350° F.

Bring a large pot of water up to a boil and prepare a large bowl with ice and water.  Add enough salt to make the boiling water taste like the sea.  Place the chard leaves in the boiling water for 60 seconds and then shock them in the ice bath.  Let dry on paper towels.

In a medium saucepan, melt butter over medium heat.  Add shallot and garlic and sauté for 3-4 minutes until shallots are translucent.  Add spices and then the Egyptian rice and toast for about 1 minute.  Add stock or water and bring up to a boil.  Lower to a simmer and cook partially covered for 15 minutes.  Let cool slightly and add pine nuts, lemon juice, lemon zest and herbs.  Season to taste, though note that the rice will not yet be fully cooked.

Cut chard leaves down the middle on either side of the seam.  Place one leaf rib-side up, vertically in front of you.  Add about 2 teaspoons of the rice mixture about an inch up the leaf.  Start by rolling the end closest to you away from you to cover the rice.  Tuck each side of the chard leaf in and roll the entire parcel.  If the leaf is too long, you can cut the other end a bit short.  Repeat until you’ve finished the chard leaves and rice mixture.

Layer lemons in a dutch oven or pot with ¼ cup of water.  Layer the dolmas on top and drizzle them with a little olive oil.  Cover and bake for 30-40 minutes until the rice is fully cooked.

Serve warm or cold.

tags: swiss chard recipes, dolmas, middle eastern recipes
categories: side dishes, appetizers, snacks, vegetarian, all, spices
Monday 07.30.12
Posted by Aliya LeeKong
 

Cherry-Pinot Paletas

View fullsize cherry-pic1-500x333.jpg
View fullsize cherry-pic2-500x333.jpg
View fullsize cherry-pic3-500x333.jpg

Cherry-Pinot Paletas

When cherry season rolls around each year, I get oddly giddy.  Maybe it’s a remnant of childhood – the feeling that these little fruits are the nectar of the gods (and thus you only get one of them on top of a sundae), that they are a privilege to eat (I remember fighting for the last one…), or that they were hands-down the best hard candy (Blow-pop, Ring Pop, Lifesaver, Jolly Rancher) flavor out there.  Whatever the case, as an adult, I definitely go a bit dessert crazy around this time of year, working cherries in wherever I can, and here is one with a decidedly un-childlike spin….

The weather here in New York City has been absurdly hot, so naturally my thoughts turn to ways to cool off.  Paletas are basically Latin American popsicles, and THE way to do it.  They are usually made with fresh fruit juice, sometimes with bits of fruit, or can be milk-based.  I thought cherries would be the perfect ingredient until I became overwhelmed by the thought of having to pit and stem them…And then it struck me, why do I have to?!?

The adult spin here is that I use a bit of red wine.  I had a popsicle phase last summer where I was freezing everything from fresh juices to my St. Lucian rum punch (which didn’t freeze by the way because of the alcohol!), and I love serving these as dessert at a summer bbq.  It’s a light treat after serious grubbing and happens to keep the party going… These pops not only have cherries and red wine, a heavenly combo, but also a host of spices – black peppercorns, cloves, cinnamon and vanilla bean – that create gorgeous flavor.  You may end up just wanting to reduce the liquid to a syrup and pour it all over ice cream!  Enjoy!

Ingredients

Yields 3¾ cups juice or 10-12 popsicles

2 lbs fresh, sweet cherries, washed*

2 cups water

¾ cup sugar

½ cup red wine (Pinot Noir or whatever red wine you like)**

3 black peppercorns

2-3 whole cloves

1 cinnamon stick

1 vanilla bean, split and scraped

Procedure

The best part about this recipe is that you just throw in the whole cherries here, stems, seeds and all.  The whole bits get strained out at the end.

In a medium-sized pot, bring all ingredients up to a boil.  Lower to a simmer  and simmer half-covered for 10 minutes.  Let cool to room temperature.

Using a potato masher, mash up the mixture until the cherries are completely broken down.  Strain liquid through a mesh sieve extracting as much of the juice as possible.  I like to use the back of the spoon to push on the pulp.

Pour into popsicle molds and let freeze until solid (about 7 to 8 hours).

*I used bing cherries here but feel free to use whatever is in season nearest you.  Pitted, frozen cherries would also work wonderfully here – without the pits or stems, you could blend up the whole mixture to get bits of the cherry in there and change up the texture.  Just remember you’ll likely have more than 10 to 12 popsicles at the end!

**Of course, if you are making these for the little ones, you can replace the red wine here with some juice or water.


tags: recipes for summer, popsicles, paletas, cherries
categories: desserts, recipes, snacks, all
Monday 06.25.12
Posted by Aliya LeeKong
 

My Homemade Nutella

View fullsize nutella-pic3-500x333.jpg
View fullsize nutella-pic2-500x333.jpg
View fullsize nutella-pic1-500x330.jpg

My Homemade Nutella

So, admittedly, I’ve been on a bit of a healthy kick lately – toting around awful looking bottles of green juice, trying to eat more raw foods and roughage, and avoiding alcohol (gasp!). A bit of a spring cleanse, if you will.  It’s been about two weeks (14 days, 11 hours and 33 minutes but who’s counting?), and I’m feeling pretty good.  For some reason, over the last few days, my sweet tooth has gone a bit haywire, so I decided to make something I crave pretty often…nutella!

Now, nutella is one of those items with which I avoid eye contact in the grocery store.  God forbid I bring a jar of it home, and it sits there longingly, just asking for me to take a spoon to it each time I go into the kitchen.  I grew up eating it on special breakfast occasions, a lusciously chocolate-y and nutty filling for crèpes, a tradition I’ve carried on to adulthood.  It’s popular for breakfast in Europe, where it’s touted as healthy!  Can you actually believe it??

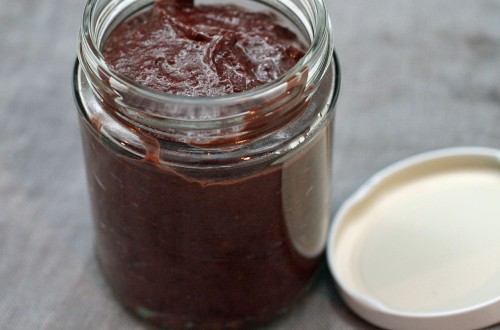
On closer inspection, it really isn’t that bad for you!  Nuts, skim milk, a bit of cocoa powder – I thought a homemade version could only be better.  I used a slightly healthier oil, hazelnut oil, in lieu of the palm oil used in the original version.  I also used a local honey instead of sugar.  I did add some real dark chocolate to mine, but I rationalized that 3.5 ounces spread out over a whole jar can’t be that bad for you, and isn’t dark chocolate an antioxidant anyway? This nutella is creamy, rich, and delicious and tastes just like the ingredients it’s made from (so use good ones!).  Enjoy!

Ingredients

¾ cup chopped hazelnuts, toasted*

¼ cup raw almonds, toasted*

2 tbsps hazelnut oil

1-3 tbsps local honey**

½ tsp vanilla extract

1 tbsp unsweetened cocoa powder

½ tsp kosher salt

½ cup skim milk

3.5 ounces semisweet or dark chocolate, chopped

Procedure

To the bowl of a food processor, add the toasted hazelnuts and almonds and process until a fine crumb.  Add the oil, honey, vanilla extract, cocoa powder and salt and process until a paste.

In a small saucepan, heat the milk and chocolate together until the chocolate is completely melted.  Add to the food processor and process until the nutella’s texture is smooth and creamy.  Cool and refrigerate.  This can be stored in the refrigerator for about a week.

*I chopped up the hazelnuts here to increase their surface area, so they toast up quicker.  You can easily toast the chopped hazelnuts and almonds together in a 350° F oven for 5 to 10 minutes.

**The variation in the amount of honey really depends on 2 things: (1) what type of chocolate you are using and (2) your personal preference for how sweet you want this.  I used a 70% dark chocolate and about 2 tablespoons, but if you are using a semisweet or even a milk chocolate, you may need less.  This is something that you can add at the end to taste if you like.

tags: dessert, healthy, raw, breakfast, nutella, almonds, chocolate, hazelnut
categories: breakfast, desserts, recipes, snacks, all -1
Monday 05.07.12
Posted by Aliya LeeKong
 

Popcorn + Homemade Furikake

View fullsize popcorn-pic11-500x333.jpg
View fullsize popcorn-pic2-500x333.jpg
View fullsize popcorn-pic31-500x165.jpg

Popcorn + Homemade Furikake

Popcorn (with, ahem, a goblet of red wine) is my signature comfort food; it’s what I crave after a hard day or if I’m settling down on the couch for a night of t.v. or to watch a movie.  A number of years back, I went through this Hawaiian Hurricane popcorn faze where I must have consumed this concoction of buttery popcorn with Japanese furikake and rice crackers on a daily basis for weeks on end.  As expected, I made myself sick and had to swear off the stuff, but a recent conversation with a friend (who is a homemade popcorn snob!) made me think revisiting the idea, on a healthier, homemade basis, might not be such a bad idea…

Furikake is a Japanese seasoning that is typically sprinkled on top of cooked rice but is truly an all-purpose condiment.  There are different versions with the core of roasted seaweed, sesame seeds, salt and sugar mixed in with other ingredients like bonito flakes, ground shiso leaf, dried egg, miso, salmon flakes, and powdered soy sauce.  It’s a truly umami experience, and once you try it, you start thinking of other ways to incorporate furikake into your cooking.

And, on top of popcorn, drizzled with butter – it’s perfect!  You get that crunch of the popcorn along with lovely butteriness, saltiness, a touch of sweet, nuttiness from the sesame and rice crackers, a (very pleasant) touch of fishiness from the bonito flakes, and that umami of the seaweed.  Consume this in moderation lest you fall into an addictive phase like I did.  This is an elevated version of popcorn worthy of being served at parties or simply as a special treat for the family.  Enjoy!

Ingredients

Yields approximately 14 cups (one big bowl)

4 tbsps vegetable or blended oil

½ cup popcorn kernels

4 tbsps unsalted butter

½ tsp soy sauce

4 tbsps furikake (see recipe below)

1 ¼ cups Japanese rice crackers (optional)

Procedure

In a medium-sized pot or large saucepan with a cover, add the oil so that it coats the bottom of the pan.  Add the popcorn, cover, and place over medium-high heat.  When the kernels start to pop, shake the pan until the popping slows to a few seconds between each pop.  Shaking the pan will help to prevent the popcorn from burning.

In a small saucepan, melt the butter and add the soy sauce and furikake.  If using, add the rice crackers to the popped popcorn, and pour the butter-soy-furikake mixture all over, tossing to coat.  Tranfer to a large bowl and serve warm.

Homemade Furikake Ingredients

Yields approximately 4 tbsps

3 tbsps roasted shredded seaweed*, torn into smaller pieces

¾ tsp bonito flakes**

1 ½ tsps black and/or white sesame seeds, toasted

1 tsp salt

1 tsp light brown sugar

Procedure

Mix all the ingredients together and store in an airtight container.

*If you can’t find this, you can roast nori or seaweed sheets in a skillet over medium heat until they turn crisp.  They can then easily be torn or crumbled into small pieces.

** Look for the smallest flakes to use here.  Bonito flakes are from a type of tuna that is cooked, smoked and dried.

tags: popcorn, homemade furikake, snacks, comfort food
categories: man-friendly, recipes, snacks, all-2, vegetarian-1
Monday 09.19.11
Posted by Aliya LeeKong
 

Smoked Peach Chutney

View fullsize smoked-peach-pic1-500x333.jpg
View fullsize smoked-peach-pic2-500x166.jpg
View fullsize smoked-peach-pic3-500x333.jpg

Smoked Peach Chutney

Biting through velvet skin into the honeyed-sweet juiciness of a peach is such a summer pleasure.  I’ve been on a quest, from farm stand to farm stand, to find the best of the bunch and have tasted this summer the stuff poets write about.  Of course, a few weekends back, I got a bit carried away at a local stand, and I ended up with more peaches than I knew what to do with.  What better way to use up this peak season fruit than to turn it into a chutney…Interestingly enough, it was a cocktail that inspired the flavor combo for the chutney; the drink had bourbon, crème de peche and cumin.  Genius!  The smokiness of the bourbon played beautifully off of the sweet tanginess of the peach intermingling with the warm earthiness of the cumin.  I wanted to figure out how to capture that in this chutney.

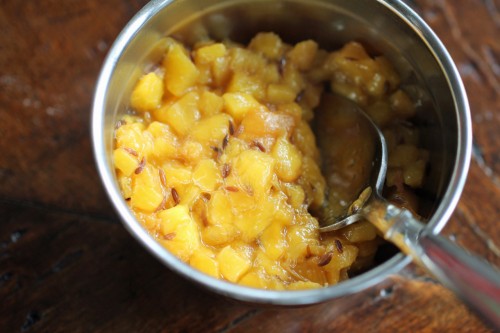
Smoking was the answer, and you can use either a stovetop smoker (my lifesaver in a NYC kitchen…) or the grill.  The smoked peaches by themselves are distinctive but a bit overwhelming until cooked down a bit more with some sugar, honey and the roasted cumin seeds.  The resulting chutney has a gorgeous flavor!  Smoky, sweet, tangy, with the bite of the cumin seed…it’s perfect on pork chops, fish or even with creamy brie on crackers. Enjoy!

Ingredients

Yields approximately 1 quart

6 large, lusciously-ripe peaches, halved with pit removed (skin on)

1 ¼ tbsps cumin seeds

2-3 tbsps water

¼ cup sugar

¼ cup honey

pinch of salt

Procedure

The first step of this chutney is smoking the peaches. I used a stovetop smoker and cherry wood.  Placing the peaches cut side down on the grate, I smoked the peaches for 6 minutes and achieved the perfect level of smokiness.  If you choose to do this on the grill, I would keep the temperature low (200° F to 225° F).  Once the chips start to smoke, place the peaches cut side down on the side with no flame (indirect heat), cover, and smoke for about 10-15 minutes.

Peel the peaches, the skin should slip off relatively easily, and cut into a fine dice.  Set aside.

Heat a medium-sized pot over medium heat.  Add the cumin seeds, and toast, stirring, until fragrant and slightly darker in color.  Reduce the heat slightly, add the diced peaches and remaining ingredients and simmer for 8 to 10 minutes, stirring at intervals, until the peaches are soft.  You want this chutney to have form, so overcooking will turn the peaches to mush.

You can serve this warm, cold, or at room temperature.

tags: recipes for summer, peaches, chutney, condiments
categories: breakfast, recipes, snacks, side dishes, vegetarian, all-3
Monday 08.22.11
Posted by Aliya LeeKong
 

Chili Cheese Toast

View fullsize cheese-toast-pic1-500x333.jpg
View fullsize cheese-toast-pic2-500x333.jpg
View fullsize cheese-toast-pic31-500x333.jpg

Chili Cheese Toast

I absolutely love when you are feeding someone who has no idea what cooking requires, and you serve them something sinfully easy to prepare, and they take a bite and look at you as if you performed a miracle of sorts.  That’s what happened the first time I gave my husband these cheese toasts…for breakfast no less.  You would have thought I had prepared foie from scratch.

Although these might look like a kicked-up pizza of sorts, chili cheese toasts are actually a very popular South Asian snack.  Every cook has her or his own version – perhaps a dash of chili powder, a touch of turmeric , some curry leaves.  My grandmother used to make a delicious version and bound all of the ingredients together with egg.  She then fried it on the stove top for ultimate crispiness.

I kept this version relatively simple, so feel free to modify to your heart’s content.  I didn’t feel like frying as I wanted this to be a tad healthier, so these are baked.  I also used sundried tomatoes instead of fresh ones to minimize the moisture, but feel free to use fresh tomatoes  – just try to remove as much liquid as possible before adding to the cheese mixture.

You get heat from the chilies, delicious green onion flavor, a bit of sweet and tart from the tomato, of course, lovely, tangy, bubbly cheese, and a nice satisfying crunch from the toast.   These make an amazing afternoon snack, but I love them for breakfast.  If you’ve got knife skills, you can make this in 10 minutes with the cooking time!  Enjoy!

Ingredients

Serves 2 to 4

1 jalapeno or Serrano pepper, finely chopped (any chili of your choice)

2 sundried tomatoes, finely chopped

1 scallion, green and light green part only, thinly sliced

1 cup mozzarella, shredded (preferably low-moisture)

3 tbsps cream cheese, room temperature

¼ tsp salt

freshly ground black pepper

4 slices white bread, toasted

chopped cilantro or parsley

Procedure

Preheat the broiler.

In a bowl, mix together chopped chilies, sundried tomatoes, scallions, mozzarella, cream cheese, salt and pepper.  Spoon equal amounts of mixture onto 4 slices of toasted white bread.  Spread to create an even layer on each piece of toast.

Place cheese toasts on a baking sheet and place under the broiler.  Broil for anywhere from 3 to 5 minutes until cheese has melted – keep it under a bit longer if you like your cheese to brown (like I do!).  Sprinkle with a bit of fresh cilantro or parsley before serving.

tags: South Asian snacks, Chili cheese toast, cheese toast recipe, South Asian cheese toast
categories: all-5, breakfast, recipes, snacks, vegetarian
Wednesday 12.01.10
Posted by Aliya LeeKong