X

Sign up to receive exclusive recipes, tips, updates and other goodies from Aliya!

  • Home
  • Blog
    • All
    • Recipes
    • Spices + Ingredients
    • Lifestyle, etc.
    • Travel
  • The Cookbook
  • The App
  • Media
    • All Media
    • Video
  • About
  • Passions
Aliya LeeKong
  • Home
  • Blog
    • All
    • Recipes
    • Spices + Ingredients
    • Lifestyle, etc.
    • Travel
  • The Cookbook
  • The App
  • Media
    • All Media
    • Video
  • About
  • Passions

Cherry-Pinot Paletas

View fullsize cherry-pic1-500x333.jpg
View fullsize cherry-pic2-500x333.jpg
View fullsize cherry-pic3-500x333.jpg

Cherry-Pinot Paletas

When cherry season rolls around each year, I get oddly giddy.  Maybe it’s a remnant of childhood – the feeling that these little fruits are the nectar of the gods (and thus you only get one of them on top of a sundae), that they are a privilege to eat (I remember fighting for the last one…), or that they were hands-down the best hard candy (Blow-pop, Ring Pop, Lifesaver, Jolly Rancher) flavor out there.  Whatever the case, as an adult, I definitely go a bit dessert crazy around this time of year, working cherries in wherever I can, and here is one with a decidedly un-childlike spin….

The weather here in New York City has been absurdly hot, so naturally my thoughts turn to ways to cool off.  Paletas are basically Latin American popsicles, and THE way to do it.  They are usually made with fresh fruit juice, sometimes with bits of fruit, or can be milk-based.  I thought cherries would be the perfect ingredient until I became overwhelmed by the thought of having to pit and stem them…And then it struck me, why do I have to?!?

The adult spin here is that I use a bit of red wine.  I had a popsicle phase last summer where I was freezing everything from fresh juices to my St. Lucian rum punch (which didn’t freeze by the way because of the alcohol!), and I love serving these as dessert at a summer bbq.  It’s a light treat after serious grubbing and happens to keep the party going… These pops not only have cherries and red wine, a heavenly combo, but also a host of spices – black peppercorns, cloves, cinnamon and vanilla bean – that create gorgeous flavor.  You may end up just wanting to reduce the liquid to a syrup and pour it all over ice cream!  Enjoy!

Ingredients

Yields 3¾ cups juice or 10-12 popsicles

2 lbs fresh, sweet cherries, washed*

2 cups water

¾ cup sugar

½ cup red wine (Pinot Noir or whatever red wine you like)**

3 black peppercorns

2-3 whole cloves

1 cinnamon stick

1 vanilla bean, split and scraped

Procedure

The best part about this recipe is that you just throw in the whole cherries here, stems, seeds and all.  The whole bits get strained out at the end.

In a medium-sized pot, bring all ingredients up to a boil.  Lower to a simmer  and simmer half-covered for 10 minutes.  Let cool to room temperature.

Using a potato masher, mash up the mixture until the cherries are completely broken down.  Strain liquid through a mesh sieve extracting as much of the juice as possible.  I like to use the back of the spoon to push on the pulp.

Pour into popsicle molds and let freeze until solid (about 7 to 8 hours).

*I used bing cherries here but feel free to use whatever is in season nearest you.  Pitted, frozen cherries would also work wonderfully here – without the pits or stems, you could blend up the whole mixture to get bits of the cherry in there and change up the texture.  Just remember you’ll likely have more than 10 to 12 popsicles at the end!

**Of course, if you are making these for the little ones, you can replace the red wine here with some juice or water.


tags: recipes for summer, popsicles, paletas, cherries
categories: desserts, recipes, snacks, all
Monday 06.25.12
Posted by Aliya LeeKong
 

Happy Memorial Day + Strawberry-Chia Aqua Fresca

View fullsize aqua-pic1-500x333.jpg
View fullsize aqua-pic2-500x333.jpg

Happy Memorial Day + Strawberry-Chia Aqua Fresca

First off, Happy Memorial Day to everyone!  It’s the unofficial start of summer, and I am hanging out with friends and enjoying it – I hope you are too.  I wanted to start off the summer with something very simple, something you could even make today if you wanted.  It’s refreshing and is all about easy summer cooking and entertaining. – an aqua fresca.

I love when something in another language makes it sound so much more interesting or complex!  The reality is aqua fresca, or “fresh waters”, are traditional Latin American beverages that blend seasonal fruits and sometimes even grains or seeds with water and a touch of sugar or natural sweetener.  The succulent strawberries that have been staring at me in the market seemed a natural base for a refreshing drink, and I decided to include another popular aqua fresca ingredient: chia.

If you didn’t read my diatribe last week on chia seeds, you should if you are interested in all of the amazing health benefits of this superfood.  If not, they add a nice gelatinous texture to the drink and at the very least increase hydration on a hot day.  Enjoy!

Ingredients

Yields approximately 4 cups / Serves 4 to 6

1 lb fresh strawberries, washed and hulled

1-2 tbsps honey

2 cups cold water

Juice of 1 lime

4-6 tsps chia seeds

Procedure

In a blender, puree the strawberries with honey, water and lime juice.  Pass through a strainer.  Chill further if desired or pour into glasses.

I like to add the chia seeds, 1 teaspoon per serving, directly to the glasses and let sit in the aqua fresca for about 10 minutes to bloom.  The chia seeds will absorb some of the liquid and become gelatinous.   Serve with or without ice.

tags: chia, recipes for summer, aqua fresca, strawberries, drinks
categories: drinks & cocktails, recipes, all -1
Monday 05.28.12
Posted by Aliya LeeKong
 

Farm Stand Corn & Mushroom Tortilla Salad

View fullsize corn-tortilla-pic2-500x333.jpg

Farm Stand Corn & Mushroom Tortilla Salad

I walked into a coffee shop the other day, Nina Simone playing in the background, an unidentifiable buzz and warmth in the room and the scent of hot beverages brewing, and it totally transported me; I feel ready for the cooler months ahead to be filled with days of apple picking, Fall dinners with friends in Fort Greene, weekend drives to go leaf peeping, the build to the holidays and rum toddies.  I’m finally facing the fact that it’s the end of summer and am filled with this mixture of wistful nostalgia and excited anticipation of the fall to come. That said, it’s my last hurrah! And I couldn’t help but take one last shot at summer with this beautiful salad inspired by the farm stands I visited out in the South Fork this past week and a Mexican tortilleria in Queens where I spent the day cooking.

In thinking about Mexican food and traditions, I wanted to visit Tortilleria Nixtamal because they make incredible corn tortillas in keeping with true Mexican tradition, a not-so-straightforward process that hinges on corn quality, cal, humidity, and timing (they happen to supply to many of the best of the best Mexican restos in town).  The restaurant also turns out gorgeous authentic food to boot, so I headed out to Queens to learn a few dishes from the Chef there, Santiago, and see just how this tortilla process works.  My time at Nixtamal and this dish is the basis for my next webisode of Exotic Table, so stay tuned!

One dish Chef Santiago taught me was a quesadilla with Oaxaca cheese, corn, and huitlacoche, a fungus that actually grows on the corn and is a Mexican delicacy.  Here, I decided to use that as inspiration for a salad, substituting some farm stand shitakes to add the earthy kick from otherwise hard-to-find huitlacoche and threw in some gorgeous grape tomatoes.  Bright and filled with end of summer flavors, this is a super easy dish to make at home, tortilla bowls included.  Enjoy!

Ingredients

Yields 4 servings

4 corn tortillas (the thinnest you can find)

Butter and olive oil

¾ cup shitake mushrooms, thinly sliced

1 shallot, finely chopped

1 jalapeno, seeded and finely chopped

1 ¼ cups fresh corn kernels (about 2 ears)

6 – 8 grape tomatoes, halved

handful of cilantro, chopped

farmer’s cheese or queso fresco

salt and freshly ground black pepper

Procedure

The first step is to make the tortilla “bowls.”  Rather than deep-frying to achieve pliability and moldability, I like to go a bit healthier and just use a skillet with a touch of butter and/or olive oil to get similar results. While doing this, you’re going to use small bowls that fit inside each other to mold the tortillas.  They will not turn out as crisp (and using thinner tortillas will help), but this method makes me feel better about calling this a salad.

Simply heat a medium-sized skillet over medium-high heat.  When hot, add the tortilla and flip at intervals until it puffs and browns a bit.  You’ll feel the edges start to get crispy.  At this point, add a ½ tablespoon of butter or olive oil and let coat the tortilla.   Place a small bowl upside down on a cookie sheet.  Remove tortilla carefully and place on top of the overturned bowl.  Take another bowl, overturned, and put it on top.  It should mold the tortilla to the shape of the bowl and hold it in place as it cools.   Repeat for remaining tortillas, and let cool while preparing the rest of the ingredients.

Heat the same skillet over medium-high heat, and add another tablespoon of butter with 1 to 2 tablespoons of oil.  When the foam subsides, add the mushrooms and let sit undisturbed in a single layer for about 2 minutes.  You want to develop a nice, golden brown on the mushrooms and bring out the flavor.   Stir the mushrooms and sauté for another minute or two to cook through.  Add salt at the end to taste and, using a slotted spoon, transfer to a bowl.

Add another tablespoon or two of butter or olive oil to the pan.  Add shallots and jalapeno and a bit of salt to draw out the moisture.  When shallots are translucent (about 3 to 4 minutes), add corn kernels and tomatoes and toss to mix thoroughly.  I like to crank the heat up a bit here to develop a more roasted flavor to the corn, but be careful because the corn can start to pop a bit.  Cook for 5 to 7 minutes until corn is cooked through and tomatoes have puckered a bit.

Remove from the heat, toss back in the mushrooms, season with salt and freshly ground pepper to taste and add some chopped cilantro, reserving some of the cilantro for garnish.  Spoon mixture into tortilla bowls and dollop farmer’s cheese or queso fresco to your heart’s content.  Garnish with remaining cilantro and serve warm or room temperature.

tags: corn, mushrooms, recipes for summer, Mexican recipes, Tortilleria Nixtamal
categories: recipes, soups & salads, all-2, vegetarian-1, main dishes-1
Monday 09.12.11
Posted by Aliya LeeKong
 

Heirloom Tomato Shakshuka

View fullsize shakshuka-pic1-500x396.jpg
View fullsize shakshuka-pic2-500x333.jpg
View fullsize shakshuka-pic3-500x333.jpg
View fullsize shakshuka-pic4-500x166.jpg

Heirloom Tomato Shakshuka

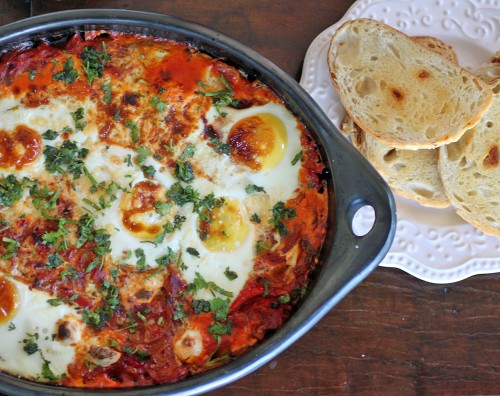
Summer’s tomatoes have been a constant source of inspiration – from different salads to bruschetta toppings to side dishes and even simply roasted and sprinkled with sea salt.  The late summer varieties and, particularly, the heirlooms were speaking to me last weekend. I wanted to create a dish that, typically calling for canned whole tomatoes, would benefit from the intense flavor and sweetness these tomatoes offer.  I went with a Maghreb dish called shakshuka.

My inspiration started with a local farm stand’s crazy number of heirloom varieties.  I went with the heirloom plum tomatoes, which are excellent for a sauce like this.

The Maghreb region incorporates the northwest portion of Africa – Tunisia, Morocco, Libya, Algeria and Mauritania.  Shakshuka is a mainstay there – baked eggs over an onion and tomato sauce that’s eaten for breakfast or supper – and even made its way to Israel where it’s an extremely popular dish.  The main ingredients for the dish are tomatoes, onions, garlic and eggs, and it differs from country to country, city to city, family to family.  It can be as simple or extravagant as you like – I tailored this version to my tastes, but feel free to make it your own!

First, please excuse the overcooked eggs in these pictures.  My husband likes everything well done and I didn’t take the dish out early enough for the final picture…ha!  It was still delicious and the cheese melted down and got all brown and bubbly.  The sweet onions, the intensity of those tomatoes, a bit of heat from the chilies and the fragrant spices – cumin, saffron, smoked paprika….it was all a bit heady.  I got a fresh-baked, roasted garlic loaf, sliced that baby up and toasted with a bit of butter.  The combination was heavenly!  I could put that sauce on anything (grilled fish, some nicely seared scallops, that bread alone…) and be incredibly happy.  This is my brunch staple…enjoy!

Ingredients

Serves 4 – 5

¾ tsp whole cumin seeds

2-3 tbsps olive oil

2 yellow onions, thinly sliced

3 – 4 red peppers, mix of hot and sweet*

pinch of saffron

1 tsp smoked paprika

3 cloves garlic, thinly sliced

4 sprigs thyme

2 bay leaves

2 lbs heirloom plum tomatoes, roughly chopped

handful of cilantro, chopped

salt and freshly ground black pepper to taste

1/3 cup fresh cheese (cream cheese, farmer’s cheese or queso fresco all work well)

6 whole eggs

Procedure

I like to cook this in a skillet and then transfer to a clay baking dish to finish in the oven.  You can just as easily make this in a cast-iron pan for double-duty or simply cover and finish this dish on the stove.  If you are finishing in the oven, preheat the broiler.

Heat a large skillet over medium heat.  Add cumin seeds and dry toast until fragrant.  Add olive oil, sliced onions, peppers, saffron, and paprika and cook for 6 to 8 minutes until onions are translucent.  Add garlic, thyme and bay leaf and sauté another minute or two until the garlic is fragrant.  I add in the thyme whole, let the leaves fall off, and pull off the stems later.  If you want to remove the leaves from the stems before adding, feel free.

Now, add in the rough-chopped tomatoes (seeds and all!) and cook for another 12 to 15 minutes until tomatoes have softened, much of the liquid has evaporated, and the dish has taken on a thick, sauce-like consistency.

Remove the thyme stems, if left in, and bay leaves.  Add the chopped cilantro, reserving a few tablespoons for garnish, and adjust seasoning.

If you are transferring to a baking dish, do this now.  Divide the cheese into small bite-sized pieces with your hands, and dot the surface of the sauce with it.  Carefully, crack the eggs over the sauce so that the eggs are distributed evenly across the surface.  Sprinkle the tops of the eggs with a bit of salt.  Either cover dish with a lid or foil and cook for another 6 to 8 minutes or place under the broiler for 3 to 4 minutes until the whites of the eggs have set and the cheese is melted.

Garnish with remaining chopped cilantro and serve hot with thick-cut pieces of toast.

* I used (2) hot red chilies and (2) medium-sized sweet peppers, but feel free to adapt to your own tastes.

tags: recipes for summer, eggs, brunch, heirloom tomato, shakshuka
categories: breakfast, recipes, vegetarian, all-2
Monday 08.29.11
Posted by Aliya LeeKong
 

Smoked Peach Chutney

View fullsize smoked-peach-pic1-500x333.jpg
View fullsize smoked-peach-pic2-500x166.jpg
View fullsize smoked-peach-pic3-500x333.jpg

Smoked Peach Chutney

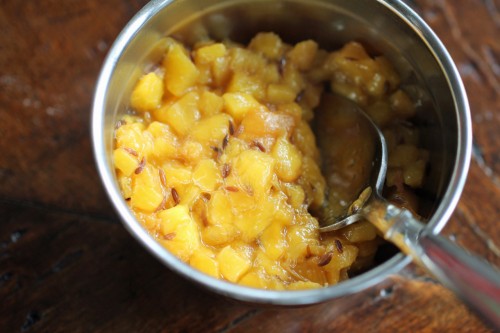
Biting through velvet skin into the honeyed-sweet juiciness of a peach is such a summer pleasure.  I’ve been on a quest, from farm stand to farm stand, to find the best of the bunch and have tasted this summer the stuff poets write about.  Of course, a few weekends back, I got a bit carried away at a local stand, and I ended up with more peaches than I knew what to do with.  What better way to use up this peak season fruit than to turn it into a chutney…Interestingly enough, it was a cocktail that inspired the flavor combo for the chutney; the drink had bourbon, crème de peche and cumin.  Genius!  The smokiness of the bourbon played beautifully off of the sweet tanginess of the peach intermingling with the warm earthiness of the cumin.  I wanted to figure out how to capture that in this chutney.

Smoking was the answer, and you can use either a stovetop smoker (my lifesaver in a NYC kitchen…) or the grill.  The smoked peaches by themselves are distinctive but a bit overwhelming until cooked down a bit more with some sugar, honey and the roasted cumin seeds.  The resulting chutney has a gorgeous flavor!  Smoky, sweet, tangy, with the bite of the cumin seed…it’s perfect on pork chops, fish or even with creamy brie on crackers. Enjoy!

Ingredients

Yields approximately 1 quart

6 large, lusciously-ripe peaches, halved with pit removed (skin on)

1 ¼ tbsps cumin seeds

2-3 tbsps water

¼ cup sugar

¼ cup honey

pinch of salt

Procedure

The first step of this chutney is smoking the peaches. I used a stovetop smoker and cherry wood.  Placing the peaches cut side down on the grate, I smoked the peaches for 6 minutes and achieved the perfect level of smokiness.  If you choose to do this on the grill, I would keep the temperature low (200° F to 225° F).  Once the chips start to smoke, place the peaches cut side down on the side with no flame (indirect heat), cover, and smoke for about 10-15 minutes.

Peel the peaches, the skin should slip off relatively easily, and cut into a fine dice.  Set aside.

Heat a medium-sized pot over medium heat.  Add the cumin seeds, and toast, stirring, until fragrant and slightly darker in color.  Reduce the heat slightly, add the diced peaches and remaining ingredients and simmer for 8 to 10 minutes, stirring at intervals, until the peaches are soft.  You want this chutney to have form, so overcooking will turn the peaches to mush.

You can serve this warm, cold, or at room temperature.

tags: recipes for summer, peaches, chutney, condiments
categories: breakfast, recipes, snacks, side dishes, vegetarian, all-3
Monday 08.22.11
Posted by Aliya LeeKong
 

Yuzu-Basil Rickey

View fullsize yuzu-pic1-500x333.jpg
View fullsize yuzu-pic2-500x333.jpg
View fullsize yuzu-pic3-500x333.jpg

Yuzu-Basil Rickey

The art of the summer cocktail…something light, refreshing, icy cool, perfect for a summer bbq or a breezy night out on the porch (or stoop as the case may be), and preferably in a pitcher so friends can help themselves!  I personally love something that has a tart-sweetness to it like a mojito, caipirinha, or a spiked lime rickey, which was the inspiration for this drink.

I’ve talked a bit about yuzu in the past, but, basically, it’s a Japanese citrus that has an interesting flavor mix of lime, grapefruit and mandarin with a musky and slightly salty quality to it.  It’s rarely found fresh here, but a bottle of yuzu juice from the Asian market will last forever (a few dashes go a long way).  I love it in salad dressings, anywhere I might use lemon, and particularly in cocktails like this one.

A lime rickey is pretty simple – usually it’s made from fresh lime juice, carbonated water, and sometimes simple syrup to sweeten.  My take here replaces lime juice with lemon and yuzu juices, includes club soda, and is spiked with vodka.  The very simple syrup gets infused with fresh basil leaves, which complements the yuzu incredibly.  This drink goes down a bit too easy if you know what I mean (what vodka?), but truly it’s my perfect summer drink – flavorful and totally refreshing.  Enjoy!

Ingredients

Serves 8 to 10

1 ¼ cups water

1 ¼ cups sugar

10 to 12 leaves of basil

¾ cup lemon juice

1 ½ tbsp yuzu juice

2 ¾ cups club soda

1 ¼ cup vodka

Procedure

First, make the basil-infused simple syrup.  In a saucepan, heat the water, sugar and basil stirring until water comes up to a boil.  Remove from the heat, cover, and let steep for 15 minutes.  Strain and cool.

In a large pitcher, mix together the remaining ingredients with the cooled simple syrup.  It’s best to let it chill for a few hours for the flavors to come together, but it’s still great right away.

Serve the yuzu-basil rickey over ice.


tags: recipes for summer, cocktails, yuzu, basil, drinks, citrus
categories: drinks & cocktails, recipes, all-3
Monday 08.08.11
Posted by Aliya LeeKong
 

Cinnamon-Passion Fruit Fool

View fullsize fool-pic1-500x333.jpg
View fullsize fool-pic2-500x333.jpg
View fullsize fool-pic3-500x166.jpg

Cinnamon-Passion Fruit Fool

When the weather is hot and beautiful fresh fruits abound, I always turn to a fruit fool as dessert.  A classic British dessert, a fool is quite simply puréed fruit and a bit of sugar folded in with fluffy whipped cream. They are light, no fuss, and always highlight the flavors of the season.

There are umpteen variations and shortcuts for this dish – from the type of fruit (gooseberries, strawberries, peaches) to using a frozen purée or pre-fab whipped cream.  You really can’t go wrong with this one.  With the fragrant passion fruits in season right now, this latest incarnation of a fool became doubly inspired by a staple Brazilian dessert, mousse de maracujá.  Maracujá is Portuguese for passion fruit, and the Brazilian version uses thick cream, sweetened condensed milk, and sometimes gelatin.

This dessert literally could not be easier.  Passion fruits are basically already puréed, so you simply have to split and remove the pulp; you can, of course, use a frozen purée if you can’t find fresh.  I sweeten the passion fruit pulp with a bit of sugar, add a squeeze of lime juice for brightness and a bit of cinnamon because I think it really brings out the signature flavor of the fruit.  Fold all of that into whipped cream, and that’s it!  It’s shockingly delicious.  My fussy I-only-eat-meat-and-no-dessert husband went to town on a few bowls after initially, begrudgingly taste-testing.  Light, fluffy, tart, sweet – this might be my favorite, easy summer dessert.  Enjoy!

Ingredients

4 passion fruits, seeds and pulp removed to a bowl*

squeeze of lime juice

1 tsp cinnamon

½ cup sugar

2 cups heavy cream, cold

Procedure

In a bowl, mix together thoroughly all except a few tablespoons of the passion fruit seeds and pulp, the squeeze of lime juice, cinnamon and ¼ cup of the sugar.

In another bowl using a stand or hand mixer, beat the heavy cream with the other ¼ cup of sugar until stiff peaks form.  Fold the passion fruit mixture carefully into the sweetened whipped cream.  I like to add a third at a time and not overmix to avoid collapsing the fluffy cream.

Spoon mixture into dessert glasses and top with a few of the reserved passion fruit seeds and a bit of juice / pulp.  I like to refrigerate for a bit before serving, but it can be eaten straight away.

*Slice the top off of a passion fruit, and use a spoon to remove all of the seeds and pulp to be used.  You could also substitute about one cup of thawed, frozen passion fruit purée.


tags: cinnamon, passion fruit, fool, desserts, recipes for summer
categories: recipes, all-3, desserts-1
Monday 07.25.11
Posted by Aliya LeeKong
 

Smoky Lamb Burgers w/ Mint-Chili Pickled Cucumbers

View fullsize lamb-burger-pic1-500x333(1).jpg
View fullsize lamb-burger-pic2-500x333(1).jpg
View fullsize lamb-burgers-pic3-500x333.jpg

Smoky Lamb Burgers with Mint-Chili Pickled Cucumbers

Does anyone else have summer fever?  I seriously have been dreaming about barbecues for months, and now that it’s upon us I’m living for summer Sundays, hanging with friends and family and eating simple, flavorful meals that can be done on the grill.  The recipe for these smoky lamb burgers came out of wanting to create a kicked-up burger that was no-fuss and would taste delicious with an ice-cold beer…

I have two (not one, but TWO) secret ingredients in this burger that give it that smoky, peppery edge.  The first is black cardamom, which you may remember me writing about a few months back.  The flavor is a bit lighter than green cardamom – earthier and with a woodsy smokiness.  Black cardamom is used throughout North and East African cooking, in South Asian and Middle Eastern cuisine, and even in Sichuan cooking.

But, don’t worry if you only have the green kind.  It works beautifully here as well because there is still the second secret ingredient: pimentón de la Vera.  If you’ve never used it before, this dish is a great intro – it’s smoked paprika and is a key ingredient in Spanish cooking.  Both of these spices meld together here and bring out what’s best about lamb.

Now, I’m a burger-with-pickles kind of gal, so I had to do a super quick pickle (ready in an hour!) to go with these.  Thinly sliced cucumbers get quick-pickled with Thai green chilies, some fresh mint, garlic and thinly sliced shallots.  The shallots pickle too, so I use both along with some fresh chopped mint and a nice piece of butter lettuce to top this burger.  And these burgers are not for the faint of heart – they are big and bold!  Feel free to turn this recipe into sliders or more modestly-sized patties if you so desire.  Smoky, earthy, juicy lamb burgers with mint- and chili-pickled cucumbers on a gorgeously toasted bun is the perfect summer bbq food (and I WILL be serving these this weekend…) Enjoy!

Ingredients

Serves 4

Lamb Burgers:

6 tbsps butter

2 shallots, finely chopped

4-5 garlic cloves, minced

2 tsps ground black cardamom*

1 ½ tsps black pepper

2 tsps cayenne**

2 ½ tsps pimentón / smoked paprika

1 tbsp kosher salt

2 lbs ground lamb

vegetable oil

Mint-Chili Pickled Cucumbers:

¾ cup rice vinegar

¾ tsp kosher salt

1 ¼ tsps sugar

2 Thai chilies, halved

1 shallot, thinly sliced

2 garlic cloves thinly sliced

2 mini seedless cucumbers, sliced thin

handful of mint, roughly torn

Procedure

For the lamb, in a medium skillet, heat butter over medium heat.  Swirl the pan as the foam subsides and continue to heat until butter starts to brown.  Don’t let it burn!  Immediately, throw in the shallots, garlic and spices and cook stirring continuously to prevent sticking for 2 to 3 minutes until shallots are translucent and cooked through.  Remove and let cool briefly.

Place lamb in a bowl and make a well in the center.  Add cooled shallot and spice mixture and mix thoroughly.  Do not overmix or the meat will get tough.  Form mixture into 4 equal patties, keeping the center a bit thinner than the edges.  Conversely, you can make this mixture up to a day ahead of time and the flavors will come together even more beautifully.

Heat a grill pan or skillet over medium-high heat and coat with a thin layer of oil or grill on the outdoor grill.  Cook for about 4 minutes per side to get to a medium rare and longer for more well-cooked burgers.

For the cucumbers, in a bowl, whisk together vinegar, salt and sugar until dissolved.  Add remaining ingredients and toss to coat.  I like to put the cucumbers in a wider, shallow container to increase the surface area as they are pickling.  Let sit at least an hour before serving, but it can also be refrigerated and will keep for a few days.

Serve burgers on a toasted bun topped with the pickled cucumbers and a few of the pickled shallots.

*I use my spice grinder to grind the whole pods of black cardamom, and then I pass it through a fine mesh sieve to get rid of the coarse bits.  If you only have green cardamom on hand, that works; it’s still delicious.

**Go easier if you like less heat.


tags: lamb, lamb burgers, recipes for summer, mint-chili pickled cucumbers, pickles
categories: main dishes, recipes, all-3
Monday 06.27.11
Posted by Aliya LeeKong
 

“Morir Soñando” Semifreddo

View fullsize semifreddo-pic11-500x345.jpg
View fullsize semifreddo-pic2-500x333.jpg
View fullsize semifreddo-pic3-again-500x167.jpg

“Morir Soñando” Semifreddo

Food phases.  I don’t know if any of you have them, but I go through periods of craving where I want the same thing over and over again.  In college, I had this extended phase with Dominican food.  For dinner, I would trek out to an area of town where there was a big Latin American community.  The Dominican spots were amazing!  And for like $5, you would get a heaping plate of stewed chicken, saffron rice and fried plaintains with garlic.  I was a bit obsessed (and had the resulting 15 lbs to show for it…), and would always order a morir soñando, an orange creamsicle-like drink, to go with my meal.

Morir soñando translates to “to die dreaming.”  How romantic is that?  That pretty much sums up the deliciousness of this drink – orange juice blended with evaporated milk, sugar and ice and sometimes vanilla and cinnamon.  I was thinking about a dessert that captures these flavors best and decided on a semifreddo.

For those of you that don’t have an ice cream maker / attachment (or do but no desire to deal with it…), a semifreddo, Italian for “half cold”, is the perfect, delicate, frozen, ice cream-like treat and requires no extra equipment.  The custard requires a bit of finesse, but once you’ve mastered it, it’s like riding a bike.

Here, I spike the custard with concentrated blood orange juice (you can use any orange you like) and cinnamon and then fold in a vanilla-bean whipped cream.  A few hours in the freezer and you have an elegant dessert.  It’s a great do-ahead item; I plan to freeze it in popsicle forms this summer to grab as a treat out of the freezer.  Enjoy!

Ingredients

Yields 12 servings (using a standard muffin tin)

10 small blood oranges or any orange you like, juiced (approximately 1 ½ cups of juice)

1 cinnamon stick

8 egg yolks

1/2 cup sugar

pinch of salt

½ tsp orange zest

1 ¾ cup heavy cream, cold

1 vanilla bean, split and scraped

Procedure

In a small saucepan, bring orange juice with the cinnamon stick up to a simmer and let reduce 2/3rdsuntil you have about a ½ cup of concentrated juice.  Set aside to cool.

Prepare an ice bath and set aside.  Bring a saucepan with a few inches of water up to a simmer over medium heat.  In a medium bowl, whisk together yolks, sugar, salt, zest and cooled, concentrated orange juice.  Set bowl over the simmering saucepan of water to form a double boiler. Make sure the bottom of the bowl doesn’t touch the water but sits comfortably on top. Whisk continuously until the mixture becomes frothy, thick and creamy.  This could take anywhere from 4 to 6 minutes.  An instant-read thermometer should register 160 F, but you can also eyeball it and see that the mixture will more than double in size when it’s ready.  Set bowl over ice bath to cool completely.

Using a stand or hand mixer, beat heavy cream with vanilla until the peaks are firm.  Carefully, fold whipped cream into the cooled egg yolk custard.  Incorporate completely but try not to deflate the mixture.

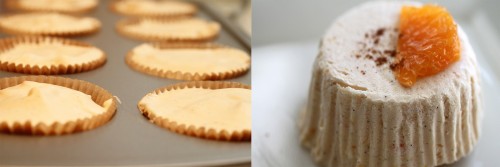
Line a standard muffin tin with cupcake liners.  Carefully, scoop semifreddo mixture into cupcake liners and level off the tops.  Wrap tin in saran wrap and freeze for a minimum of 6 hours.  An alternative would be to freeze in ramekins in which you plan to serve the semifreddo.

Serve soon after removing from the freezer (because it begins to melt quickly) and garnish with a little cinnamon and orange supremes/pieces.

* Remember to refrigerate whipped cream if not using immediately.  The custard must be completely cooled before folding in the cream.

tags: “Morir Soñando” Semifreddo, Semifreddo, custard, recipes for summer, citrus, blood orange
categories: all-3, recipes, desserts-1
Monday 06.06.11
Posted by Aliya LeeKong
 

St. Lucian Rum Punch

View fullsize punch-pic1-500x333.jpg
View fullsize punch-pic2-500x333.jpg
View fullsize punch-pic3-500x166.jpg
View fullsize punch-pic4-500x333.jpg

St. Lucian Rum Punch

Hope everyone had a fun Memorial Day!  I was in St. Lucia this past weekend for a wedding and was awed by the beauty (and cuisine) of the island.  Now, I usually post recipes that I create, but I made a special request to learn how to make this delicious cocktail and just can’t keep it to myself.  This rum punch will be the signature drink this summer for all of my bbq’s and cookouts.

Now, it’s my understanding that each island lays claim to the original rum punch, and I am not taking any sides!  But this version is fruity, a bit strong, but goes down easy (it may have supplied a significant percentage of my vitamins this weekend…).  I also wasn’t completely exact with my measurements here (i’ll let you guess why!), but it’s easy enough to do to your personal tastes.

As with all rum punches, it’s best to make this a day or two in advance to let the flavor intensifies.  Juices, bitters, rum, and a few key spices make this a gorgeous warm weather cocktail.

Enjoy!  and thank you Diane for the tutorial!

Ingredients

Serves 10 to 12

3 cups orange juice

3 cups pineapple juice

1 cup lime juice

a healthy pinch of cinnamon

a healthy pinch of nutmeg

6 generous shakes of angostura bitters

2 1/2 cups dark or light rum

grenadine syrup (will give amount in the procedure)

1 1/4 cups simple syrup

Procedure

In a large bowl or pitcher, mix together juices, spices, bitters and rum.  Add grenadine syrup until the punch reaches the color of a flaming sunset.  Grenadine syrups differ in sweetness, so I like to add the simple syrup after this point and taste along the way to make sure it’s not too sweet.

Again, it’s great to refrigerate it for a few hours or overnight to let the flavors combine, but it’s also delicious served immediately.  Serve over ice.

tags: rum punch, St. Lucia, recipes for summer, cocktails
categories: all-3, drinks & cocktails, recipes
Tuesday 05.31.11
Posted by Aliya LeeKong
 

Exotic Fried Green Tomatoes

View fullsize tomato-pic1-500x333.jpg
View fullsize tomato-pic2-500x333.jpg
View fullsize tomato-pic3-500x166.jpg

Exotic Fried Green Tomatoes

A friend of mine has a farm in upstate New York, and he generously dropped off a CSA-like box of his vegetables – tomatoes, green peppers, cucumbers, celery, and parsley (more pics on my FB page).   There were a ton of tomatoes, and he suggested ripening them by placing them on a sunny windowsill.  I thought I would reserve a few of the green ones to recreate classic, Southern fried green tomatoes.

So, interestingly enough, although green tomatoes are known as a Southern specialty, they do pop up in other cultures.  They can be found throughout the Mediterranean; Italy, Greece, Turkey – all have their versions.  I’ve seen green tomato pickles, green tomato sauces for pasta, delicious cold soups, and beautiful casserole dishes with green and red tomatoes.

For my fried green tomatoes, I like to crush up some pistachios with panko bread crumbs for the crust in place of traditional cornmeal.  It gives a nutty bite and a hint of sweetness that works well with the acidity of the green tomatoes.  You can stop right there after frying in the recipe if you like – they taste lovely just like that.  But I took it a step further and chopped up a bunch of herbs, mixed them up with shredded mozzarella, and baked them to bubbly, cheesy perfection.  You can, of course, use whatever herbs you like – any combination of chives, parsley, mint, thyme, and even oregano would be fantastic.  Enjoy!

Ingredients

Yields 4 to 6 servings

4 medium, firm green tomatoes

½ cup shelled pistachios

1 ½ cups panko bread crumbs

2 tsps garlic powder

1 tsp onion powder

½ tsp cayenne

½ tsp black pepper

½ tsp salt

¾ cup buttermilk

Canola or olive oil

1 tbsp butter

2 tbsps chopped herbs (I used chives, parsley & mint)

1 cup low-moisture shredded mozzarella*

Preheat the oven to 400° F.

Trim the ends off of the tomatoes, and cut into 1/4 “ slices.  In the food processor, pulse pistachios, until they are almost a coarse meal.  Add bread crumbs, garlic powder, onion powder, cayenne, black pepper, and salt and pulse until the mixture looks like a fine crumb.  Pour breading mixture into a bowl or baking dish.

Pour buttermilk into a separate bowl.  Dip tomato slices in the buttermilk and then dredge in the breading mixture.  Pat the breading mixture on to create an even coat that sticks.  Place on a rack on a baking sheet.

Heat a ½“ of oil with butter over medium-high heat in a Dutch oven or cast iron skillet.  Fry tomatoes in batches for 1 to 2 minutes on each side.  Place back on the rack over the baking sheet.

In a bowl, combine chopped herbs and mozzarella.  Sprinkle over fried tomato slices and bake in the oven for 5 to 7 minutes until the cheese is melted and bubbly.  Serve immediately.

*I used low-moisture, shredded mozzarella in place of slices of buffalo mozzarella here in order to keep the tomatoes crispy.


tags: fried green tomatoes, recipes for summer, recipes for fall
categories: all-6, appetizers, recipes, vegetarian-1, side dishes
Wednesday 09.15.10
Posted by Aliya LeeKong
 

Melon-Orange Blossom Gelato

View fullsize melon-gelato-pic1-500x333.jpg
View fullsize melon-gelato-pic2-500x333.jpg
View fullsize melon-gelato-pic3-500x333.jpg

Melon-Orange Blossom Gelato

Ice cream is somewhat of a problem for me.  You might find me on any given night at home, with a pint of mint chip or vanilla swiss almond on the couch circa 11 p.m.  Or walking in Soho, stopping at the Van Leeuwen truck for their earl grey.  Or at Cones grabbing some corn ice cream in the West Village.  Or inhaling mochi in single bites at Nobu.  Or…get the picture? In the winter, I crave the super creamy, bitter coffee flavors with chunks of chocolate, but the summer leads me to lighter, more subtle ones.  Therein lies the inspiration for a light-as-air, delicately-flavored, slightly floral melon-orange blossom gelato.

I’ve mentioned orange blossom water in a previous post, and it is a flavor that is found throughout Middle Eastern foods, particularly the desserts.  That said, it can be found in Mediterranean cuisine as well as French – it’s often used to flavor madeleines. The water is distilled from the blossoms of the sour orange tree, which is also known as the bitter orange or Seville orange tree.  Since it’s from the blossoms, the flavor is certainly more floral than fruity – quite exceptional, really.

Although I call this a gelato, it’s only because it’s lower in fat and lighter in texture than ice cream.  It’s truly a cross between a sorbet and a gelato because of the high water content of the melons.  It’s extraordinarily light – like a milky ice that melts when it hits your tongue spreading the soft melon flavor while the perfume of the orange blossom hits you at the end.  One thing I’d like to say about orange blossom water – each brand is very different.  The one I’m using now is a bit diluted, so, in this case (and, quite frankly, whenever a recipe calls for it), add a bit less and check for flavoring before adding more.  The flavor can be a bit cloying in excess.  Enjoy!

Ingredients

Yields approximately 2 quarts

1 ¾ cups heavy whipping cream

1 cup whole milk

½ tsp kosher salt

¼ cup sugar

¼ cup honey

2 tbsps orange blossom water

½ tsp orange zest

1 medium melon (approx. 1 ¼ lbs), seeded and cut into small cubes

1 squeeze of fresh lemon juice

Procedure

Place cream and milk in a saucepan.  Add salt, sugar, honey, orange blossom water, and orange zest.  Bring mixture up to a boil.  Once it starts boiling, turn off the heat, cover, and let steep for 10 to 15 minutes.

Place cut melon and a squeeze of lemon juice in a blender, and blend on high for a few minutes until completely pureed.  Strain cream mixture into a container, add melon puree, and refrigerate for at least 6 hours or even overnight.  You want the mixture to be the same temperature as the refrigerator or under 40° F.

Process ice cream in an ice cream maker per instructions.

If you don’t have an ice cream maker, place chilled mixture in a baking dish and place in the freezer.  After 40 minutes, take it out and stir it up with a whisk, or (best) a hand-mixture to incorporate air and until a uniform texture.  Place back in the freezer and repeat this every 30 minutes.  After about 2 ½ to 3 hours, the ice cream should be good to go.

tags: melon gelato, orange blossom gelato, orange blossom water, melon desserts, recipes for summer
categories: desserts-1, all-7
Monday 08.30.10
Posted by Aliya LeeKong
 

Squash Blossom Dolmas

View fullsize Squash-pic1-500x333.jpg
View fullsize Squash-pic2-500x333.jpg
View fullsize Squash-pic3-500x333.jpg
View fullsize Squash-pic4-500x169.jpg

Squash Blossom Dolmas

What is a “dolma” you might be asking?  A dolma is any number of stuffed vegetables – squash, onions, peppers, tomatoes, leafy greens or even eggplants.  It’s a tradition of the Ottoman Empire found throughout Greece, Turkey, the rest of the Mediterranean and the Middle East.  Think grape leaves, which are one of the more recognizable forms, found at the late-night gyro spot (is that just me??).  The stuffing is usually rice and/or lamb with nuts, dried fruits, spices and herbs.  When in a small form like a grape leaf or like these, they are pretty snackable.

I picked up some beautiful, delicate squash blossoms from the farmer’s market and was debating what to do with them.  They have a bit of that elusive, squash-like flavor and are visually captivating.  I’ve seen squash blossoms everywhere fried – tempura-fried, stuffed and fried, lightly batter fried.  And, yes, they do taste delicious fried.  That said, I wanted a bit of crunch but without the headache (and fattiness) of frying.  Making a squash blossom dolma, stuffed with a subtle, flavorful rice mixture and baked to lightly-crisped perfection, was the answer.

I must say the spices are pretty light here, which adds to the delicate nature of this dish.  For that reason, I like to be generous with the herbs because they lend such brightness to the dolmas.  These make a lovely (and conversation-provoking I can assure you) party appetizer, served alongside a dill-yogurt-dipping sauce.  They taste best warm though – once they cool, they lose a bit of their edge.  Also, this stuffing is pretty universal – if no squash blossoms are on hand, you could easily stuff peppers or blanched, swiss chard leaves with this.  Enjoy!

Ingredients

Yields 4 servings as a side or an appetizer

16 Squash blossoms, stems trimmed and stamens removed

2 tbsps butter

1 shallot, minced

¼ fennel bulb, minced

½ tsp ground coriander

¼ tsp ground cinnamon

pinch of ground cloves

2 garlic cloves, minced

½ cup white rice (jasmine or basmati are both fantastic)

¾ cup water or vegetable stock

1 ½ tbsps chopped, toasted pine nuts

½ tsp lemon zest

a generous handful of mint & dill, finely chopped

salt & freshly ground pepper

melted butter for greasing

Procedure

Preheat the oven to 400° F.

Rinse the squash blossoms gently and leave to dry fully in a colander or over paper towels while preparing the stuffing.

In a small saucepan, heat butter.  When foam subsides, add shallot, fennel, coriander, cinnamon and clove.  Sauté for a few minutes until shallots are translucent (will happen quickly because of how finely chopped they are).  Add garlic and sauté another 30 seconds or so until the garlic becomes fragrant.

Add rice and let toast with the butter and vegetables, stirring frequently.  Add water or vegetable stock and increase temperature.  Bring up to a boil, lower to a simmer, and cook covered for 20-25 minutes.   When rice is cooked, fluff with a fork, add pine nuts, lemon zest, chopped herbs, and salt and pepper to taste.

Carefully, stuff the squash blossoms with the rice mixture using a small spoon or even a melon baller.  Don’t overfill – allow the ends of the flowers to close.  Transfer to a greased baking sheet and drizzle with a little melted butter.  Season with a few pinches of salt, and bake for 15 minutes.  The outside should brown and be a bit crispy.  Serve warm!

tags: squash blossoms, dolmas, squash blossom recipes, recipes for summer
categories: appetizers, recipes, vegetarian-1, all-7
Thursday 08.26.10
Posted by Aliya LeeKong
 

Black Salt 'Slaw

View fullsize slaw-pic1-500x333.jpg
View fullsize slaw-pic-2-500x358.jpg
View fullsize Slaw-pic3-500x333.jpg
View fullsize slaw-pic4-500x333.jpg

Black Salt 'Slaw

I grew up in a suburb in Florida, and, although there was a pretty large Indo-Pakistani community, the resources were very spread out.  That is to say, there was no central area to find food (think Adam’s Morgan in D.C. or Curry Hill in NYC), and there were maybe one or two good Indian grocers selling everything from spices to Indian sweets to household goods.

I used to love visiting my family in Toronto, an incredibly ethnically diverse city.  There are West Indian neighborhoods, Indian areas, Chinese, Philipino, Latin American – all distinct areas.   Ambling down Gerard Street, one of those streets that literally transport you into a different country, you can find row after row of Indian restaurants and shops– clothing, groceries, dvd’s, jewelers…you name it.

One of my favorite parts about the trip (because I can assure you shopping for clothes with the women in my family is nothing short of arduous) was visiting the various chaat houses.  Chaat is a general term and includes any Indian snacks that have puris, puffed rice, fried noodles or dumplings with potatoes, lentils, chickpeas or even mung bean, all doused in spicy, tart, tangy sauces.  “Junk food”, we’d call it.  I would devour these chaats and wash it all down with falooda (which I mentioned in my sugar plum post and which I will have to make at some point); it’s really what got me through these shopping trips.

Tamarind, cilantro, chilies, onions, and yoghurt were all featured heavily in these dishes, but it was the spice mix, the chaat masala, that really made them distinct.  Chaat masala includes a staggering number of spices, but one flavor that stands out from them all is black salt.  Black salt, or Kala Namak, is a grayish rock salt, and it, quite frankly, has a smell similar to eggs.  It has a sulphurous quality, and, although that may not sound too appealing, I assure you once mixed in it is delicious!

I thought I would make a ‘slaw for the summer that focuses on black salt.  I served it here over a beautiful, simple, grilled swordfish, but it would also be delicious with yesterday’s ribs.  The chili powder gives it a little heat, the honey sweetness, and it definitely has the tart and tangy quality of the chaats I remember as a child.  Enjoy!

Ingredients

Yields 6 to 8 Servings

For the dressing:

½ cup red wine vinegar

2 garlic cloves, minced

3 tbsps honey

3 tsps black salt

½ tsp salt, kosher or sea

½ tsp Indian chili powder or hot Hungarian paprika

½ tsp finely ground black pepper

I roughly ground the toasted seeds)

For the slaw:

½ head green cabbage

½ head red cabbage

1 or 2 carrots, julienned or shredded

1 bulb fennel, thinly sliced

2 green onions, thinly sliced (white and green parts only)

Procedure

This is super simple as most coleslaws are.  I like to combine all of the dressing ingredients, and let them marinate while I’m prepping the vegetables.

For the cabbages, wash thoroughly and remove the core.  You can either slice manually or use the slicer in your food processor to achieve the right sized pieces.  Combine with the carrots, fennel and green onions in a non-reactive bowl.

Pour the dressing over the vegetables, and keep refrigerated for 2 hours or so.  I like to toss the coleslaw every half hour  to make sure any dressing that has sunk to the bottom gets fully mixed in.  The flavors are much brighter when you let them sink in for a few hours.

tags: Black Salt, 'slaw, recipes for summer
categories: side dishes, recipes, vegetarian-1, all-7, soups & salads
Wednesday 08.18.10
Posted by Aliya LeeKong
 

Crunchy Coconut Corn Fritters

View fullsize corn-fritters-pic1-500x333.jpg
View fullsize Corn-Fritter-Pic2-500x333.jpg
View fullsize Corn-Fritters-Pic3-500x166.jpg
View fullsize corn-fritters-pic4-500x333.jpg

Crunchy Coconut Corn Fritters

The combination of corn and coconut is something that will always remind me of childhood.  One of my favorite East African dishes growing up is called makai paka. It’s basically sweet corn on the cob simmered in a creamy, coconut-based broth with turmeric, garlic, green chilies, and cilantro.  The fun was in eating the corncobs; you could suck out the spicy coconut curry absorbed into the cobs, making ridiculous slurping noises.  Not something I can quite get away with these days…

Corn seems like a New World food, but it was brought to the African continent by the Portuguese in the sixteenth century.  Whether in South African mealies, West African maïs grille (basically grilled corn), or East Africa’s ugali, corn figures prominently.  In Ghana, the coconut/corn combo pops back up in a dish called abrow ne kokosi, where corn kernels are simmered in coconut milk with fresh pieces of coconut flesh.  Delicious.

I wanted to see the combo in a more familiar form, something easy to eat or serve as a snack to guests.  These fritters come out surprisingly light, not overpoweringly coconut-ey, and have a sweet and savoury quality to them.  With all of the beautiful summer corn, it’s also a great way to use up any leftovers you might have sitting around.  The fritters work really well with a cilantro aioli or even a spicy ketchup dipping sauce.  Enjoy!

Ingredients

Yields approximately 2 dozen fritters

1 cup all purpose flour

1 tsp baking powder

½ tsp salt

½ tsp sugar

½ tsp cayenne

1 egg

½ cup coconut milk

a few dashes of hot sauce

1 ½ tbsps butter, melted

1 ¼ cups fresh corn kernels (about 2 ears)

1 cup frozen, grated unsweetened coconut, thawed

¼ cup scallions, thinly sliced

1 tbsp green chilies, finely minced (optional)

salt

Procedure

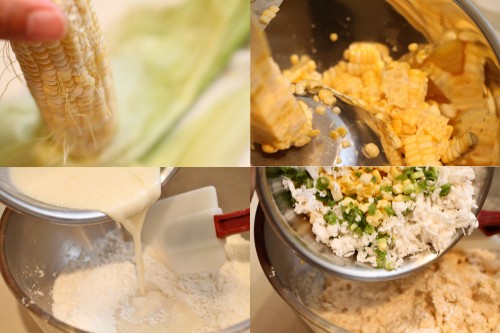
In a bowl, sift together flour, baking powder, salt, sugar, and cayenne.  In another bowl, beat together egg, coconut milk, hot sauce, and butter.  Add wet ingredients to dry ingredients and mix until it comes together.  Don’t overmix.  Fold in remaining ingredients.

In a large heavy saucepan, dutch oven, or deepfryer, heat about 4 inches of vegetable oil to 325° F.    Carefully, drop spoonfuls of the batter and cook until golden brown, working in batches.  Remove to a towel-lined plate and sprinkle with salt.

A few things: (1) don’t overcrowd because it will bring the oil temperature too far down, and (2) be careful – it splatters when cooking.

Serve warm with a dipping sauce of your choice…

tags: corn fritters, coconut fritters, recipes for summer, corn recipes, savoury fritters
categories: all-7, appetizers, recipes, vegetarian-1
Wednesday 08.11.10
Posted by Aliya LeeKong
 

Open-Faced Soft-Shell Crab Sandwich

View fullsize Soft-Shell-Crab-pic1-500x333.jpg
View fullsize Soft-Shell-Crab-Brioche-500x166.jpg
View fullsize Soft-Shell-Crab-Cooking-500x167.jpg

Open-Faced Soft-Shell Crab Sandwich

I have a mild obsession with crab, and I’m pretty sure it all started around the age of 5.

I went on a mini crabbing expedition of sorts with my family in the Arabian Sea.  It was a day trip really – out on the water on this creaky boat, where we caught these beautiful, huge blue crabs.  Thrilling.  They were cooked right there on the spot with a ton of spices and butter.  I remember breaking them apart, yanking out the soft, sweet flesh, and sopping up the buttery spices with naan.  It was a vivid taste memory I will never forget.

I felt like I was in heaven…until around 6 hours later when I became the sickest ever.  I literally thought I was going to die.  Who knows what was in that water.  But I must really love crab because, unlike tequila, the experience never deterred me from future consumption.

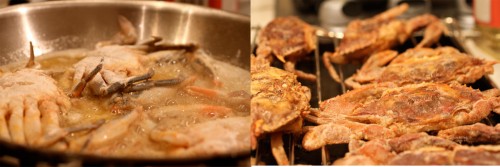
Right now, I’m loving soft-shell crab season, which goes from April to October/November.  Walking through Chelsea Market, I stopped by The Lobster Place, and they had live ones (frozen ones don’t compare).  So I nabbed them, and, though I obviously can clean them, my heart couldn’t take it.  I turned my head while they snipped off the eyes, gills, and aprons.  At one restaurant, I had to mercilessly rip the claws off of around 150 langoustines in one sitting while they tried to scurry away…it’s hypocritical, and I’m likely in karmic trouble, but I avoid the killing part wherever I can.

The inspiration for this dish is the infamous Singapore black pepper crab.  I wanted the peppery flavor without the soy and oyster sauces, so I lightened this with a little white wine and stock and mellowed with some cream to make a thin, sauce that gets spooned over (and absorbed into) thick brioche.  Rather than typically deep-frying the soft shells, I kept the crab a little lighter by dredging in a seasoned flour and shallow frying.  With the sweetly caramelized onions, the spicy chilies and black pepper, the creamy sauce over crunchy, buttery bread and, of course, the crispy crab on top, this is more meal than sandwich.  Enjoy!

Ingredients

Yields 6 open-faced sandwiches

Crabs:

½ dozen soft-shell crabs, cleaned, rinsed, and dried

2/3 cups rice flour

1/3 cup cornstarch

2 tsps salt

½ tsp black pepper

1 ½ tsps onion powder

2 ½ tsps garlic powder

1 tsp paprika

Oil

Butter

Topping:

3 to 4 tbsps of butter

6 to 8 curry leaves

4 small or 3 medium yellow onions, thinly sliced

1 green chili, minced (you choose based on your heat tolerance: poblano, jalapeno, Serrano, thai)

4 garlic cloves, minced

1 scallion, thinly sliced

1 ½ tsps black pepper

1/3 cup white wine

1/3 cup vegetable or seafood stock

¼ cup cream

Handful of cilantro, finely chopped

Salt and lemon juice to taste

6 pieces of thick-cut bread, preferably brioche, toasted and kept warm in 200° F oven

Procedure

Preheat oven to 200° F.

In a large bowl, sift together rice flour and cornstarch, and add salt, black pepper, onion powder, garlic powder and paprika.  Make sure the crabs are dry, and dredge in the seasoned flour, shaking off any excess.

Heat a ½“ of oil in a large skillet over medium-high heat.  Add a few tablespoons of butter for taste.  When the oil is hot and shimmering, place crabs in the skillet undersides up.  Cook for about 2 minutes until that side crisps, and then flip and cook for another 2 minutes.  Remove and place on a rack on a baking sheet.  Keep warm in the oven until ready to serve.

A few things: 1) There will still be some residual moisture in the crabs so be careful.  When they are wet, they pop and sputter. 2) Don’t overcrowd the pan – fry in batches if you must.  Steamed, crowded crab is yucky.

Turn the heat down to medium low, and pour off the excess oil from the skillet.  Add a few tablespoons of fresh butter.  Add in the curry leaves and onions, and cook on medium-low.  You want to caramelize the onions slowly to bring out their natural sweetness, not brown them.  Stir frequently to make sure cooking is even.

After 10 minutes, add in the chilies, garlic, scallions (reserving some for garnish), and black pepper.  Cook for another 5 minutes or so.  Deglaze the pan by adding the white wine and scraping up any bits from the bottom of the pan.  Cook until the wine is almost completely reduced.  Add in the stock and cream and reduce by half.  Add cilantro (again, reserving some for garnish) and salt and lemon juice to taste.

Serve by placing a piece of warm, toasted brioche on a plate or in a bowl.  Spoon onions with sauce over the bread, and place a crispy soft-shell crab on top.  Garnish with scallions and cilantro.

tags: soft-shell crab, crab sandwich, open-faced sandwich, seafood recipes, crab recipes, recipes for summer
categories: all-7, recipes, main dishes-1
Wednesday 08.04.10
Posted by Aliya LeeKong
 

Peaches w/ Cardamom Streusel & Honey-Vanilla Cream

View fullsize roasted-peaches-pic1-500x333.jpg
View fullsize Roasted-Peaches-Pic2-500x333.jpg
View fullsize Roasted-Peaches-Pic3-500x166.jpg

Peaches w/ Cardamom Streusel & Honey-Vanilla Cream

I headed up to Ellsworth Hill Orchard in Litchfield, Connecticut this last week to do some summer fruit picking and came across these beautiful, juicy Flaming Fury peaches.

The farm was scenic and serene and loaded with peaches, blueberries and several plum varieties.  I got completely carried away out in the orchard and was a bit obsessed with finding the perfect peach (to my husband’s dismay in the insanely sweaty heat).  All I could think about was pairing sweet peaches with cardamom for a super easy summer dessert.

Cardamom is a really aromatic spice from the ginger family with camphorous notes and the ability to translate equally well in both sweet and savoury dishes.  It’s used in everything from Danish pastries to Indian curries to Middle Eastern coffee.  Like ginger, it can be pretty overpowering, so I tend to use it sparingly in cooking.  My mom and I actually throw the bruised pods into our mugs of green tea to bump up the flavor.

There are green, white and brown varieties of the spice, and, here, I use the green ones.  I remove the seeds from the pods and manually grind them with a mortar and pestle.  But ground cardamom is fine to use as well.

Baking the peaches really brings out the sweetness, and cardamom, in place of traditional cinnamon, creates a delicious, crunchy streusel to layer on top.  It does not get any easier than mixing a few ingredients in a bowl, spooning the crumbly mixture on top of halved peaches, and throwing it all in the oven.   I serve this dish with whipped honey-vanilla cream, which balances out the residual tartness in the peaches.  A lovely way to indulge in summer’s fruit.  Enjoy!

Ingredients

Yields 4 to 6 servings

Baked Peaches:

½ cup packed light brown sugar

1/3 cup flour

3/4 tsp ground cardamom

½ tsp salt

3 tbsps butter, room temperature (but not completely soft) and cut into pieces

4 peaches

Cream:

1 cup heavy cream

3 tbsps honey

½ vanilla bean, scraped OR 1 ½ tsps of vanilla extract

Procedure

Preheat oven to 400° F.

In a bowl, mix together brown sugar, flour, cardamom and salt.  Cut in butter using your fingers or a pastry scraper until the mixture resembles coarse crumbs.

Halve peaches on the vertical, remove pits, and scrape off any rough bits.  I do this at the last second, so that the peaches don’t turn brown.  Also, I leave the skin on as a preference – you can remove the skin if you like.

Arrange peaches in a buttered baking dish.  Top with streusel topping and bake for 25 minutes.  Remove and let cool briefly.

Whip the heavy cream by hand or by using a hand or stand mixture.  Before it is fully whipped, add in the vanilla and honey, so that it becomes evenly distributed (but not over whipped!).

Serve peaches warm with a side of the honey-vanilla cream.

tags: peach desserts, streusel, cardamom streusel, recipes for summer, summer fruits, summer desserts
categories: all-7, desserts-1, recipes
Monday 08.02.10
Posted by Aliya LeeKong
 

Freekeh with Summer Squash and Brown Butter

View fullsize freekeh-pic1-500x333.jpg
View fullsize Freekeh-pic21-500x156.jpg
View fullsize freekeh-pic31-500x333.jpg
View fullsize freekeh-pic41-500x333.jpg

Freekeh with Summer Squash and Brown Butter

I was having lunch with a Lebanese girlfriend of mine recently when she pointed out freekeh on the menu.  I had never heard of it, so, of course, I had to order!  It was served like a pilaf to accompany a fish, tasted like a nuttier, slightly smoky brown rice, and had a toothsome texture.

After some research, I was really surprised that it’s not more well known.  Freekeh is a roasted green wheat and can be found throughout Lebanon, Syria, Egypt and Jordan.  It’s an incredibly healthy whole grain, comparable (if not superior) to quinoa, a rich source of nutrients with high fiber and protein.  It’s harvested young and then roasted in the fields over an open fire, giving it that smoky quality.

The mixed summer squash at the Union Square Greenmarket looked too shiny and beautiful to resist the other day, and I thought it would pair well with the freekeh.  I roast the squash off here with some sweet cherry tomatoes and prepare the freekeh similarly to rice.  The coriander and cinnamon work really well with the sweetness of the squash and the smokiness of the freekeh, and the pine nuts are great for texture.  This is so delicious I’ve given up my carnivorous ways for a few days, snacking on it at intervals.

And the pièce de résistance?  Nutty, glistening, warm brown butter.  I love to use brown butter in place of regular butter in a dish like this or even in breads and cakes; it really elevates and deepens the flavor.

Freekeh also goes by the name frik, farik or even roasted green wheat, so if you are shopping for it, I would ask by all names.  I picked up my freekeh at Sahadi’s on Atlantic Ave. in Brooklyn, but I know a number of the Middle Eastern specialty shops in the area carry it.   Kalustyan’s also carries it in store and online.

Enjoy!

Ingredients

Yields 4 to 6 servings

2 cups freekeh, whole (not cracked)

1 lb mixed summer squash, medium dice

¾ cup cherry tomatoes, whole

olive oil, salt, & pepper

2 ½ tbsps canola oil

1 onion

½ tsp ground coriander

½ tsp ground cinnamon

¼ tsp white pepper

1 scallion, thinly sliced

4 garlic cloves, minced

3 cups vegetable or chicken stock

¼ cup pine nuts, toasted

4 tbsps brown butter *

handful of parsley, chives, and/or cilantro, chopped

Procedure

Preheat oven to 400° F.

Pour freekeh in a bowl and pick through for any stones or off pieces.  Rinse freekeh with several changes of water until the water runs clean.  Cover the freekeh with fresh water and soak for a half hour.  Strain off all excess water.

Combine diced squash and tomatoes in a bowl.  Lightly coat in olive oil and season with salt and pepper.  Transfer to a baking sheet in a single layer and roast for 15-20 minutes until soft but still with a bit of firmness.

Heat a pot or a dutch oven over medium-low heat.  Add canola oil.  When hot, add onions and coat with the fat.  Add coriander, cinnamon, white pepper and a pinch of salt to draw out the moisture.  You just want to sweat out the onions until they are translucent, so be careful the heat isn’t too high or they will start to brown.

When the onions are translucent, add scallions and garlic.  Cook for one minute, and then add freekeh.  Toast the freekeh in the pot, stirring occasionally, for 5 minutes.  The freekeh should become aromatic.

Add the vegetable or chicken stock, and bring up to a boil.  Lower to a simmer and simmer covered for 45 minutes.  Turn off heat, remove cover, and let stand uncovered 5 minutes.

Toss in the summer squash, tomatoes, pine nuts, and brown butter.  Add chopped herbs and adjust seasoning as necessary.

* Brown butter is really easy to make, but it has to be watched.  Simply heat the butter in a pan over medium low.  Once the foam starts to subside, watch the color of the milk solids that sink to the bottom of the pan.  They should turn brown, and the butter should take on the smell of toasted hazelnuts.  At that point, remove immediately from the heat by pouring into another container.  The solids go from brown to black quickly, so it’s important to stop the cooking process as soon as the hazelnut stage is achieved.  Also, I like to scrape the solids off the pan into whatever I’m cooking – there’s a ton of flavor there.

tags: freekeh, recipes for summer, roasted green wheat, whole grain sides, vegetarian sides
categories: all-7, side dishes, vegetarian-1
Tuesday 07.27.10
Posted by Aliya LeeKong
 

A South Indian Gazpacho

View fullsize gazpacho-500x333.jpg
View fullsize spices-2-500x170.jpg
View fullsize tamarind-2-500x166.jpg

A South Indian Gazpacho

A friend of mine asked me for a gazpacho recipe and was looking for something a little different than the traditional.  She wanted it to be fresh and healthy but with a more robust flavor.  At first I considered making a white gazpacho, which is a delicious combination of almonds, grapes, garlic and bread.   But summer shorts are upon us, and carb-minimization is in full effect.

I, then, thought about this East African stew I grew up eating.  It’s called chana bateta and is made with chickpeas and potatoes in a thin, tart broth.  That broth, in turn, got me to thinking about a popular South Indian soup called rasam as they share a very similar flavor profile. Rasam is a thin, peppery, tart soup that is often served to warm up winter nights or to help remedy a cold.

While at Devi, I often saw it used in various ways.  My time there and the spices and ingredients at that restaurant will never cease to inspire me.  I truly enjoyed working with Chef Mathur, who was innovative in his own right (thus helping to earn the restaurant a Michelin star in both 2007 and 2008).

Rasams come in all different forms – tomato, lemon, pineapple, and even mint, and it’s one of those recipes that is different for each household.  Some have daal as an ingredient; some don’t.  This is a completely different expression in that it’s a cold gazpacho-like soup with the flavors and ingredients of a rasam.

Tamarind is a requisite ingredient in every rasam, and I usually use the brick form. This requires soaking a nob of it for a period of time in hot water followed by straining and pressing to extract flavor – it’s a longer process but has a more developed flavor when using it for curries, chutneys and the like.  For a quick cold soup like this, though, the jarred tamarind concentrate works really well (because, really, isn’t the ease the whole point of a cold soup like this?).

Although the soup is cold and refreshing, it has spice to it.  You can always modify the amount of jalapeno depending on its heat, sub in a bell pepper, and add or remove chili powder to your tolerance level.  I also cook the spices and the garlic because I’m not a fan of those raw.  For a hot summer day, I think it becomes even better, with an iced, fresh mint tea made from steeping actual mint leaves in hot water with sugar and then pouring over ice.  Or even serving it with a crisp, cold Sauvignon Blanc, because, after all, you did save on the carbs…Enjoy!

Ingredients

Yields 4 to 6 servings

1 cup water

1 tbsp tamarind concentrate

2 tsp palm sugar

3 tbsp canola or other neutral oil

2 tsp black mustard seeds

½ tsp fenugreek seeds

1 tsp cumin seeds

1 tsp coriander seeds

10 curry leaves

3 garlic cloves

¼ tsp turmeric

½ tsp chili powder

5 tomatoes on the vine, medium dice

1 shallot, medium dice

½ to 1 jalapeno (or some combination of jalapeno and a half bell pepper), medium dice

Handful of cilantro, thoroughly washed

Procedure

Bring water to a boil, and add tamarind and sugar making sure both are fully dissolved.

Heat oil over medium-low heat.  Add black mustard, fenugreek, cumin, coriander and curry leaves and listen for them to start popping.  At that point, add garlic, turmeric, and chili powder and cook for a few minutes, stirring often to prevent sticking or burning of the spices.  Quickly add a little water and remove from the heat if it looks like its about to burn.

Put tamarind mixture and cooked spices in the blender and blitz until the spices are thoroughly ground.  The blender makes a fantastic spice grinder.  Set aside in a bowl.

Using a food processor, process tomatoes, shallots, jalapenos and cilantro separately to achieve desired texture.  Combine with tamarind and spice mixture and season to taste with salt and black pepper.  I like to refrigerate for a few hours or even overnight to let all of the flavors combine.  It’s a great do-ahead dish.

tags: gazpacho, South Indian cooking, recipes for summer
categories: soups & salads, vegetarian-1, recipes, all-8
Wednesday 07.21.10
Posted by Aliya LeeKong