X

Sign up to receive exclusive recipes, tips, updates and other goodies from Aliya!

  • Home
  • Blog
    • All
    • Recipes
    • Spices + Ingredients
    • Lifestyle, etc.
    • Travel
  • The Cookbook
  • The App
  • Media
    • All Media
    • Video
  • About
  • Passions
Aliya LeeKong
  • Home
  • Blog
    • All
    • Recipes
    • Spices + Ingredients
    • Lifestyle, etc.
    • Travel
  • The Cookbook
  • The App
  • Media
    • All Media
    • Video
  • About
  • Passions

Apple Pie with Star Anise Brown Butter

View fullsize apple-pic-pic4-500x299.jpg
View fullsize apple-pic-pic2-500x333.jpg
View fullsize apple-pic-pic3-500x333.jpg
View fullsize apple-pic-pic11-500x333.jpg

Apple Pie with Star Anise Brown Butter

Fall may just be my favorite time of year.  I grew up in Florida, where seasons blend and highs in the 80’s are not unheard of in mid-December.  Now that I’ve been in NYC for so long, I can’t tell you how much I look forward to that first cool breeze, the leaf change and, of course, something I NEVER did before living up here…apple-picking!  Yes, a beautiful, clear Fall day driving out to a farm, apple-picking, rooting around a pumpkin patch (and, potentially, a hayride to my husband’s dismay) is for me perfection.

Now, the reality is once you get out amongst the orchards, apple-picking turns to sport.  And you can’t help but go a bit loony and bring back a quantity of apples that most normal people couldn’t consume in a year.  I end up making pies, apple butter and chutneys until I can’t look at another apple for a year, and this weekend was no exception.  I went in on some Red Delicious, Idareds, and Mushus, and this pie was the (necessary) result.

In fact, it was really my post from last week where I was dreaming up incorporating star anise into an apple pie that led me to create this recipe.  The star anise infuses the brown butter, and that fragrant nuttiness complements the light, licorice-like flavor of the spice.  In combination with cinnamon, nutmeg, and a rich vanilla bean, the pie has a complexity that still doesn’t take away from the simplicity of the apple pie itself – that traditional apple flavor and buttery, flaky crust.  I love to make the crust from scratch, but feel free to use your own recipe here or go ready-made.  The filling could not be more simple, and this is now my go-to apple pie…Enjoy!

Ingredients

Yields (1) 9-inch pie

Double crust:

2 ½ cups all-purpose flour

1 tsp salt

1 tbsp sugar

2 sticks butter, chilled and cut into cubes

8-9 tbsps ice water

For the pie filling:

6 apples, peeled, cored and sliced 1/8” thick*

a generous squeeze lemon juice

½ cup light brown sugar

1 tsp ground cinnamon

¼ tsp ground nutmeg

½ tsp ground star anise

3 tbsps all-purpose flour

4 tbsps butter

1 vanilla bean, split and scraped

1 star anise

heavy cream for brushing

sugar for sprinkling

Procedure

First, we’re going to make and chill the crust.  To the bowl of a food processor, add the flour, salt, sugar and butter and pulse until mixture resembles a coarse meal.  Turn mixture out into a bowl and add water, a tablespoon at a time, pressing dough using a pastry cutter or a fork until dough starts to come together.  Dough will have both sandier crumbs and more clumped wet pieces.  Divide dough in half and wrap each piece in plastic wrap forming each into flattened discs.  Refrigerate for at least an hour.

Preheat oven to 425° F.

In a large bowl, mix together the sliced apples with lemon juice, brown sugar, cinnamon, nutmeg, star anise, and flour.

In a small sauté pan over medium-low heat, melt butter with vanilla bean, the scraped vanilla seeds, and the star anise.  Swirl pan and watch carefully as the foam subsides and the milk solids take on a golden brown color.  The butter should look like the color of and smell like hazelnuts.  Remove from the heat immediately, take out the vanilla bean and star anise and add to the apple mixture, stirring to incorporate thoroughly.

On a floured surface or between parchment paper, roll out the first disc to a 12” diameter circle and place carefully in the pie dish.  Fill with apple mixture.  Roll out the second disc and cut strips using a knife or pastry cutter to desired width.  Place strips over pie and place remaining strips at a right angle, weaving if desired.  Brush top crust with heavy cream and sprinkle with sugar.

Bake for 15 minutes keeping the pie on the middle rack with a baking sheet on the rack just below it to catch anything that might bubble over.  Reduce heat to 350° F and bake for another 35 to 40 minutes until top is golden brown.

Let cool on a rack for 2 hours before serving.  Serve warm or at room temperature.

*I used a combination of Idareds and Mushus here.


tags: apple pie, star anise, Thanksgiving recipes, recipes for fall
categories: all-2, desserts, recipes
Monday 10.10.11
Posted by Aliya LeeKong
 

Pork Chops with Red Onion & Apple Chutney

View fullsize pork-chop-pic1-500x333.jpg
View fullsize pork-chops-pic2-500x333.jpg
View fullsize pork-chops-pic3-500x166.jpg

Pork Chops with Red Onion & Apple Chutney

I worked at a restaurant where we used to make “marmalades”, one of which was a tomato based one.  The process called for red onions to be cooked down first, and it always amazed me what a subtle flavor it provided against the sweet backdrop.  I had to try the combination with apples just to see and what better way for the season than to prepare them as a chutney with golden, crusty pork chops.

I’m big on brining, particularly when it comes to pork chops and chicken.  I’m trying to figure out the mechanics of brining the massive turkey we’re going to prepare for Thanksgiving, but I haven’t – how we’re going to fit it all in the fridge is beyond me.  But anyway, here, the brine imparts incredible moisture to the chops.  It’s important to dry them fully before searing to achieve that beautiful caramelized exterior, the most flavorful part!

This apple chutney is a delicious addition to any pork dish really.  The sweet red onions melt into the background.  The fennel and cumin work perfectly with the pork, and the warm, mellow apples bring it all together.  I used fuji apples here because they hold their shape, but feel free to use whatever you have on hand.  This dish is incredibly versatile – it goes from simple weeknight supper to deserving holiday meal.  Enjoy!

Ingredients

Serves 4

4 pork loin or rib chops, 1” thick

olive oil

butter

Brine:

8 cups water

½ cup sea salt

¼ cup + 2 tbsps sugar

1 tsp dried thyme

½ tsp coriander seeds, crushed

½ tsp whole black peppercorns, crushed

1 bay leaf

Red Onion & Apple Chutney:

2 tbsps olive oil

1 tbsp unsalted butter

1 tsp fennel seed

½ tsp cumin seed

¼ cup red onion, finely minced

3 ½ cups apples, peeled, cored, and cut into a ½“ dice

½ tsp salt

2 tsps sugar

¼ to ½ tsp crushed red pepper

3 tbsps rice vinegar

Procedure

Brining really helps the pork chops stay juicy during the cooking process.  In a medium saucepan, heat 2 cups of water.   Add salt, sugar and brining spices and stir until all of the salt and sugar has dissolved.  Add this mixture to the remaining 6 cups of cold water.  In a baking dish, lay pork chops flat and pour brine over them.  Cover with plastic wrap and refrigerate for anywhere from 3 to 24 hours, turning chops regularly.  When ready to cook, take out from brine removing any whole spices that are stuck to the chops and dry thoroughly.  If you don’t have time to brine, feel free to skip this step altogether.  Results will still be delicious.  Make sure that chops are room temperature before cooking.

For the chutney, heat a skillet over medium heat.  Add oil and butter.  When foam subsides, add fennel seed and cumin seed.  Cook for about 1 minute until the spices are fragrant.  Add the red onion and cook for another 2 to 3 minutes until translucent.  Add apples, salt, sugar, and crushed red pepper and cook for another 3 to 4 minutes.  Add vinegar, reduce heat to low and let simmer 15 minutes, stirring frequently.  Remove from heat and adjust seasoning if necessary.

For the pork chops, preheat oven to 350° F.  Season chops lightly with salt and pepper if brined, more generously if not.  Heat a large skillet over medium-high heat.  Add oil to just coat the bottom of the skillet and a pat of butter, if desired.  When oil shimmers, add chops and cook for 2 to 3 minutes on each side.  Finish for 7 to 10 minutes in the oven depending on how well done you like your chops.  I did 2 minutes per side plus 7 in the oven for medium temperature.

Serve chops topped with chutney.

tags: pork chops, red onion & apple chutney, apple chutney, recipes for fall, holiday recipes, brined pork
categories: all-5, recipes, main dishes-1
Wednesday 11.03.10
Posted by Aliya LeeKong
 

Celery Root Hummus

View fullsize hummus-pic1-500x333.jpg
View fullsize hummus-pic2-500x333.jpg
View fullsize hummus-pic3-500x333.jpg

Celery Root Hummus

It’s amazing to me how ubiquitous hummus has become in the last 10 years.  I remember making it from scratch as a child to be served to guests when they’d come over (alongside this delicious, buttery, puff pastry-encased, baked brie…), and then all of a sudden it was in every super market…everywhere.  A cultural explosion of sorts with every variation you could ask for: roasted garlic, salsa-infused, greek olive, or roasted red pepper…Now, it’s been further gourmet-ified, and I’ve seen chickpeas substituted with everything from avocado to squash.

If you’ve been reading my posts over the past few months, I am always inspired by different cultures’ foods, but also by seasonality.  I love the freshness and flavor that comes from the farmers’ market – thus my version of hummus uses seasonal celery root, a fantastic Fall, root vegetable.  It looks pretty scary but, once you get passed peeling it, it cooks up quickly and easily to delicious results.

I adore basic hummus, but sometimes it just sits like a weight in my stomach.  It can be really heavy at times, so I decided to forgo chickpeas altogether, which actually resulted in the lightest, fluffiest hummus I’ve ever eaten!  The celery root provides a gently sweet, tangy, celery-like flavor that blends seamlessly with the sesame tahini, garlic, and lemon juice.  The cumin and cayenne give it smokiness and kick, and the result is a beautiful incarnation of hummus that was incredible slathered on a bit of pita.  Enjoy!

Ingredients

Yields approximately 2 ½ cups

2 baseball sized celery roots, peeled and cut into a 3/4” dice (approximately 3 ½ cups)

1 tbsp butter

3 garlic cloves

1 ½ tbsps tahini

½ tsp cumin

¼ tsp cayenne

½ tsp salt

juice of half a lemon

extra virgin olive oil

paprika

Procedure

Place celery root dice in a stock pot and cover with cold water.  Bring up to a boil uncovered and boil 13-15 minutes until the celery root is very tender.

Using a slotted spoon, transfer celery root into a blender, reserving the cooking liquid.  Add butter and let melt.  Add garlic cloves, tahini, cumin, cayenne, salt, and lemon juice.

Ladle in a bit of the cooking liquid and blend.  Continue adding cooking liquid a little bit at a time until desired texture is achieved.  It took about 2 full ladles (of a 4 oz. ladle) to get to the puree I desired.

Transfer to a bowl and make a well in the center.  Pour a little extra virgin olive oil in the well and sprinkle hummus with paprika.  I love to eat this warm or cold, so serve as you like!

tags: hummus, celery root, recipes for fall
categories: all-6, appetizers, recipes, vegetarian-1
Wednesday 10.20.10
Posted by Aliya LeeKong
 

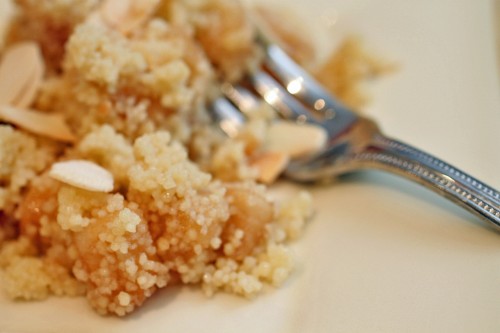
Sweet Apple Couscous

View fullsize couscous-pic1-500x333.jpg
View fullsize couscous-pic2-500x333.jpg
View fullsize couscous-pic3-500x333.jpg
View fullsize couscous-pic4-500x333.jpg

Sweet Apple Couscous

I sort of jumped the gun and went apple picking this past weekend.  I couldn’t help myself.  I’m a sucker for fall, the first cool change of temperature and all the apple picking, pumpkin patch wandering, and wine-tasting (I threw that in there…).  It’s a bit early in the season, so where I usually come back with several different varieties I ended up with who-knows-how-many pounds of Honeycrisps.  They are literally overflowing in my kitchen, so I’m pressed to find ways to use them up…Luckily, they are delicious, the perfect balance of sweet and tart, and hold up well to cooking.

Couscous, while a North African staple, has truly become popularized and is found throughout parts of France, Spain, Portugal, Italy, Eastern Europe, and across the Middle East.  Here, in the States, I’ve seen it creep onto dinner tables because of its incredible versatility and high nutritional content compared to rice and pasta.  North African cooking, particularly Moroccan, is full of sweet and savoury dishes – with spices like cardamom or cinnamon bridging the gap.  So couscous as a sweet side dish or a dessert does exist, though I surely haven’t seen any Berber recipes with apples…

For this dish, I was inspired by (obviously) the mass of apples in my kitchen, the sweet couscous recipes of North Africa involving dried fruits and nuts, and even the rice puddings of American and South Asian cultures (though this has no cream or milk).  This dish is extraordinarily simple, healthy and delicious.  It’s basically cooking a warm, buttery apple pie filling, folding it in to light, fluffy, sweetened couscous, and topping it with nutty, crunchy thin almond slices.  The textures are beautiful and who can resist the combination of apples and cinnamon.  A great fall dish… enjoy!

Ingredients

Serves 4 to 6

2-3 tbsps butter

5 cups apples, peeled, cored, and cut into a small/medium dice

½ cup brown sugar

¾ tsp cinnamon

¼ tsp nutmeg

¼ tsp salt

½ tsp vanilla extract

2 cups couscous*

2 cups water

3 tbsps butter

1/3 cup sugar

½ tsp salt

½ cup sliced almonds, toasted

Procedure

Place a skillet on the stove over medium heat and melt the butter.  When the foam subsides, add the diced apples and stir to coat.  Turn temperature slightly down and cook on medium-low heat for 10 minutes, stirring every few minutes to make sure the apples evenly cook.  Add brown sugar, cinnamon, nutmeg, salt, and vanilla to the apples and stir to coat.  Cook for another 5 minutes.  The apples should be soft but still hold their shape (not complete mush).

In a casserole dish, spread couscous out to an even layer.  Cooking it in this type of dish will increase surface area and keep the resulting texture light and fluffy.  In a saucepan, bring water, butter, sugar and salt to a boil.  Pour over couscous, stir briefly with a fork, cover tightly with plastic wrap, and let sit 5 minutes.  After the 5 minutes, remove the plastic wrap and fluff couscous with a fork – the butter should keep the grains separate and prevent any clumping.

In the same dish or another serving bowl, mix together the couscous with the apple mixture and top with the toasted sliced almonds.  Serve warm.

*I used the typical, plain, non-whole wheat, pre-steamed variety from the grocery store.  Be careful not to use the tri-color type, which has spinach and tomato flavoring, or Israeli couscous, which is larger and requires a longer cooking time.

tags: couscous, sweet couscous, apple couscous, recipes for fall, apple recipes
categories: all-6, desserts-1, side dishes, vegetarian, recipes, breakfast
Wednesday 09.22.10
Posted by Aliya LeeKong
 

Exotic Fried Green Tomatoes

View fullsize tomato-pic1-500x333.jpg
View fullsize tomato-pic2-500x333.jpg
View fullsize tomato-pic3-500x166.jpg

Exotic Fried Green Tomatoes

A friend of mine has a farm in upstate New York, and he generously dropped off a CSA-like box of his vegetables – tomatoes, green peppers, cucumbers, celery, and parsley (more pics on my FB page).   There were a ton of tomatoes, and he suggested ripening them by placing them on a sunny windowsill.  I thought I would reserve a few of the green ones to recreate classic, Southern fried green tomatoes.

So, interestingly enough, although green tomatoes are known as a Southern specialty, they do pop up in other cultures.  They can be found throughout the Mediterranean; Italy, Greece, Turkey – all have their versions.  I’ve seen green tomato pickles, green tomato sauces for pasta, delicious cold soups, and beautiful casserole dishes with green and red tomatoes.

For my fried green tomatoes, I like to crush up some pistachios with panko bread crumbs for the crust in place of traditional cornmeal.  It gives a nutty bite and a hint of sweetness that works well with the acidity of the green tomatoes.  You can stop right there after frying in the recipe if you like – they taste lovely just like that.  But I took it a step further and chopped up a bunch of herbs, mixed them up with shredded mozzarella, and baked them to bubbly, cheesy perfection.  You can, of course, use whatever herbs you like – any combination of chives, parsley, mint, thyme, and even oregano would be fantastic.  Enjoy!

Ingredients

Yields 4 to 6 servings

4 medium, firm green tomatoes

½ cup shelled pistachios

1 ½ cups panko bread crumbs

2 tsps garlic powder

1 tsp onion powder

½ tsp cayenne

½ tsp black pepper

½ tsp salt

¾ cup buttermilk

Canola or olive oil

1 tbsp butter

2 tbsps chopped herbs (I used chives, parsley & mint)

1 cup low-moisture shredded mozzarella*

Preheat the oven to 400° F.

Trim the ends off of the tomatoes, and cut into 1/4 “ slices.  In the food processor, pulse pistachios, until they are almost a coarse meal.  Add bread crumbs, garlic powder, onion powder, cayenne, black pepper, and salt and pulse until the mixture looks like a fine crumb.  Pour breading mixture into a bowl or baking dish.

Pour buttermilk into a separate bowl.  Dip tomato slices in the buttermilk and then dredge in the breading mixture.  Pat the breading mixture on to create an even coat that sticks.  Place on a rack on a baking sheet.

Heat a ½“ of oil with butter over medium-high heat in a Dutch oven or cast iron skillet.  Fry tomatoes in batches for 1 to 2 minutes on each side.  Place back on the rack over the baking sheet.

In a bowl, combine chopped herbs and mozzarella.  Sprinkle over fried tomato slices and bake in the oven for 5 to 7 minutes until the cheese is melted and bubbly.  Serve immediately.

*I used low-moisture, shredded mozzarella in place of slices of buffalo mozzarella here in order to keep the tomatoes crispy.


tags: fried green tomatoes, recipes for summer, recipes for fall
categories: all-6, appetizers, recipes, vegetarian-1, side dishes
Wednesday 09.15.10
Posted by Aliya LeeKong