X

Sign up to receive exclusive recipes, tips, updates and other goodies from Aliya!

  • Home
  • Blog
    • All
    • Recipes
    • Spices + Ingredients
    • Lifestyle, etc.
    • Travel
  • The Cookbook
  • The App
  • Media
    • All Media
    • Video
  • About
  • Passions
Aliya LeeKong
  • Home
  • Blog
    • All
    • Recipes
    • Spices + Ingredients
    • Lifestyle, etc.
    • Travel
  • The Cookbook
  • The App
  • Media
    • All Media
    • Video
  • About
  • Passions

Piment D’Espelette

View fullsize piment-pic1-500x337.jpg
View fullsize piment-pic2-500x333.jpg

Piment D’Espelette

I seriously have a spice addiction, and, when I recently spotted a jar of this stuff I couldn’t help but pick it up.  It’s not the cheapest of spices, so I’m rationing its use.

And, truthfully, I can understand why it isn’t.  This rare pepper only comes from the town of Espelette in French Basque country.  The cultivation and processing of the pepper is still done traditionally, that is by hand, and a little over 100,000 pounds of it is produced annually.  The French government has gone so far as to safeguard this pepper under the Appellation D’Origine Contrôlée (A.O.C.), a classification system that basically designates the quality producers in an approved growing area (with A.O.C. being the highest).

The pepper is red in color and has a truly complex flavor – sweet, mild, a bit fruity and smoky.  The peppers are harvested, sun-dried, and then smoked in wood-fired ovens before being ground into the flakes we use.  It has a really low Scoville rating which is to say it packs more flavor than heat, and the closest comparables would be hot paprika or even New Mexico red chili powder.

Piment d’Espelette is a key ingredient in Basque pipérade (see: Julia Child’s recipe), a stir-fry of peppers, tomatoes, onions, herbs and ham.  But I like to use it like a finishing salt.  The pepper is fantastic to top a soup, pep up a simple risotto, or speckle a potato or squash puree.  I love it on a simple pizza or garlic bread and add it to my caramelized onions to round out the flavor.

tags: piment d'espelette, pepper
categories: spices-2, all-5
Friday 01.28.11
Posted by Aliya LeeKong
 

Savoury Blue Cheese Kunefe

View fullsize kunefe-pic1-500x273.jpg
View fullsize kunefe-pic2-500x333.jpg
View fullsize kunefe-pic3-500x333.jpg

Savoury Blue Cheese Kunefe

This dessert I had in Turkey called kunefe has been haunting me.  Shredded phyllo (think shredded wheat texture) layered with soft cheese, melted in the center, soaked in a sugary-sweet syrup and topped with crushed pistachios.  It was insane – crunchy, creamy, sweet, nutty – and you could literally only have a small bite before immediately falling into a food coma of sorts.

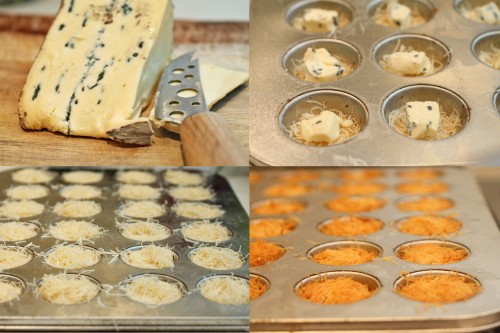
Kunefe is also called kanafeh or kunafah and is found in many different cultures including Egyptian and Israeli.  I couldn’t help thinking how incredible this tradition would be in a more savoury form, something small that could work as a fun hors d’oeuvres.  Replace the soft, sweet cheese for a lovely blue, leave out the sugar syrup and drizzle instead with a touch of balsamic and honey – bite-sized deliciousness!

The “dough” that’s used here is called kadaif, kadayif or shredded phyllo and resembles vermicelli.  Most Middle Eastern grocers carry it in the frozen section, near the regular phyllo.  It’s incredibly versatile and is lovely wrapped around jumbo shrimp or even layered on top of a casserole for crunch.   Here, I combine it with a bit of butter and cream, press it into a mini muffin pan, layer with blue cheese and bake.  Once it’s cooled a few minutes, I remove and drizzle with the honey and balsamic.  This is a really quick recipe for an elegant and tasty little hors d’oeuvres.  Enjoy!

Ingredients

Yields 1 24-cup mini muffin pan

¼ box of shredded phyllo / kataifi*  (¼ lb)

½ stick butter, melted

1 ½ tbsps heavy cream

pinch of salt

¼ lb blue cheese, cut into ½-inch pieces

honey, for drizzling

balsamic vinegar, for drizzling

Procedure

Preheat oven to 375° F.  Grease the muffin pan with melted butter.

Using a sharp knife, cut the shredded phyllo lengthwise and then crosswise.  You want to create approximately ½-inch strands, so that the dough will fit easily into the muffin tins.

Place shredded phyllo in a bowl and break up strands that are stuck together using your hands.  Add melted butter, cream and salt and combine thoroughly.  (I use my hands for this to achieve even coverage).

Take small bunches of the shredded dough and press down into the individual muffin tins, so that the dough is packed tightly and comes up about 1/3rd of the way up in each one.  Place blue cheese pieces into all of the muffin tins, and top each with the remaining phyllo dough.  Pack the dough down tightly, so that it’s flush with the top of the pan.

Bake for 20 minutes.  Cool for 5 to 7 minutes, and carefully lift the little kunefes out of the tin using a small spoon.   They are delicate at this stage.  Drizzle with honey and a few drops of balsamic and serve warm.

*If you aren’t using the phyllo immediately, once removed from the box, cover with a damp paper towel.  Like regular phyllo sheets, this dough has a tendency to dry out quickly.

tags: blue cheese, kunefe, Turkish recipes, Turkish desserts, kanafeh, kunafah
categories: recipes, appetizers, vegetarian, all-5
Monday 01.24.11
Posted by Aliya LeeKong
 

Scallops with Thai Citrus Salad

View fullsize scallop-pic1-500x333.jpg
View fullsize scallop-pic2-500x333.jpg
View fullsize scallop-pic3-500x333.jpg

Scallops with Thai Citrus Salad

It’s amazing the difference a year makes.  I was actually in Thailand last winter and had the most beautiful pomelo salad, the inspiration for this recipe.  A pomelo is a huge, grapefruit-like fruit that is found all over Southeast Asia.  It’s sweet and lacks any of the bitterness typical of a grapefruit.  Pomelos have a thick, spongy pith, and the fruit shreds into segments easily, which makes it perfect for a salad.  When I got back, I had a hard time sourcing one, and then, lo and behold, a few weeks ago, I found them in Chelsea Market and on Fresh Direct!  They are a beautiful fruit, so I’m so happy they are becoming more accessible.

When I was in Bangkok, I had the opportunity to spend the day at Face Bangkok, a cool, open-air restaurant compound with a swanky bar, a Thai restaurant, an Indian restaurant, and even a spa on site!  The restaurant is part of a larger group that has branches in Jakarta, Beijing and Pudong, and is fantastic (if you happen to be visiting Bangkok) for a nice night out or drinks soaking up the chic scenery.  I did a bit of intensive Thai cooking there, and this is my version of one dish that I learned.

This salad has a few different flavors and textures that I think work really well with a beautifully-caramelized, sweet scallop (as well as on its own!).  If you can’t find a pomelo, delicious mandarins (satsumas are my fave) that are in season right now would work really well with all of the tangy and salty flavors.  The peanuts and toasted coconut provide a great texture, a little umami from the fish sauce, sweetness and tartness from the tart lime juice – it’s light and refreshing and perfect to break up winter’s heavy dishes and take in some seasonal citrus.  Enjoy!

Ingredients

Serves 4 as a main course or 6 for a starter

Salad:

¾ cup dried, unsweetened coconut (chips or shredded)

¾ cup peanuts, toasted and crushed

3 scallions, white and light green parts only, thinly sliced

½ shallot, finely minced

1 cup pomelo, segmented*

8-10 mint leaves, chiffonade

Citronette:

juice of 1 ½ limes

½ tsp salt

1 ½ tsps sugar

pinch of cayenne

1 ½ tsps fish sauce

1 ½ tbsps extra virgin olive oil

Scallops:

3 tbsps olive oil

2 lbs jumbo sea scallops

salt and freshly ground pepper to taste

1 tbsp butter

Procedure

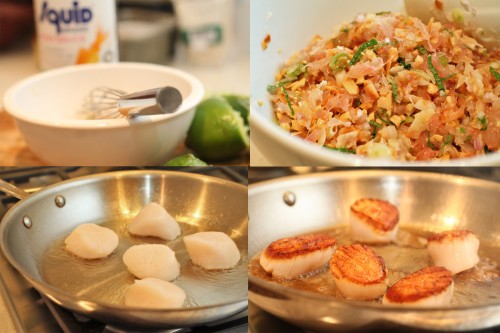
In a skillet over medium heat, add the dried coconut and toast until the color is deep and golden.  This process happens fairly quickly, so keep your eye on it.   Add to a bowl along with the crushed peanuts, scallions, shallot and pomelo (and any juice that resulted from segmenting the pomelo).

For the dressing, combine the lime juice, sugar, salt and cayenne and whisk to dissolve thoroughly.  Add the fish sauce and then slowly drizzle in the extra virgin olive oil whisking to combine.  Toss salad with dressing, add mint, and season to taste.

For the scallops, you want to develop a nice deep color on them.  Thoroughly dry the scallops before cooking and season generously with salt and pepper.  If they are wet, they won’t caramelize and will sort of steam in the pan.  Also, if you crowd the pan, they will also steam, so work in batches if necessary.

Heat a skillet over medium-high heat and add olive oil.  When it’s just about to smoke, add the scallops, dragging a little so that the side gets coated in olive oil.  Cook for about two minutes and add the butter.  Let cook for another minute or so and then flip.  They should have a nice brown crust on them.  At this point, I turn the heat down just a tad.  Let them cook on this side for another three minutes or so until they are cooked to your desired level.  I like mine so that the middle third looks a bit translucent and the top and bottom thirds are opaque, but remember different-sized scallops will take differing cooking times. This is what I use to cook jumbo or U10-sized scallops.

Serve scallops hot with the cool salad spooned over top.

*The pomelo is a pretty unique fruit. To segment, I like to cut off as much of the rind and pith as possible.  Then, I take out the larger, membrane-enclosed segments (much like a grapefruit or orange) and slip a pairing knife under the membrane.  Once this is peeled away, the inner fruit shreds into little pieces.  I like to do this over a bowl and catch all of the residual juice, which adds great flavor to the salad.

tags: seafood recipes, scallops, Thai citrus salad, citrus
categories: salads, recipes, all-5, soups & salads, main dishes-1
Thursday 01.20.11
Posted by Aliya LeeKong
 

The Fastest Baklava Recipe Ever

View fullsize baklava-pic1-500x282.jpg
View fullsize baklava-pic2-500x333.jpg
View fullsize baklava-pic3-500x333.jpg
View fullsize baklava-pic4-500x166.jpg

The Fastest Baklava Recipe Ever

I love a rich and fulfilling cooking process and usually don’t mind taking my time. But, authentic baklava is one of the most labor-intensive desserts as proven during my trip to Turkey.  I got a hands-on cooking lesson in homemade baklava, and it’s an insanely beautiful and lengthy process. Yufka dough, similar to the store-bought phyllo we get here, comprises the layers, and each baklava has 100 of them.  Yes, 100 sheets are rolled out to create this delicious dessert.

A few things struck me as I first made balls with the dough, then rolled out 6 or 7 individually to small discs, then placed the 7 on top of each other and rolled those out to the full size (not nearly as quickly or skillfully as the ladies showing me…how many more times?).  Typically, baklava recipes require painting each sheet of pastry with butter before placing the next layer on top, which is more than tricky with the thin phyllo.  But these ladies didn’t do that – they cut the layered pastry dough into little squares and then poured the butter all over…genius!

I decided to adopt this method using store-bought phyllo, and the result is the fastest baklava ever.  Layer phyllo and chopped nuts, cut carefully, cover with clarified butter, bake, douse in syrup.  That’s it!  This syrup is simple, incredibly delicious and with my personal twist of vanilla bean.  Baklava is undoubtedly sweet, but I think this one hits just the right amount of sweetness with lovely honey, vanilla, and cinnamon undertones. I make mine into bite-sized little squares so as not to overindulge…It’s fantastic to do ahead as the flavor gets better, and it keeps for about 5 days at room temperature.  Enjoy!

Ingredients

Yields 1 9-inch round cake pan

Pastry:

¼ cup unsalted walnuts, lightly toasted

¼ cup unsalted almonds, lightly toasted

¼ cup unsalted pistachios, lightly toasted

2 tbsps light brown sugar

½ tsp ground cinnamon

¼ tsp salt

pinch of ground cloves

2 sticks of unsalted butter, clarified*

1 box phyllo dough, thawed (1 lb)

honey

Syrup:

½ cup honey

½ cup water

½ cup sugar

1 vanilla bean, split and scraped

1 (1-inch) piece of lemon or orange rind

Preheat oven to 400° F.  Grease a 9-inch cake pan.

Phyllo dough dries out pretty quickly, so, in lieu of using a damp cloth on top of the dough and going back and forth, I suggest working quickly and having all of your other ingredients for the pastry ready to go.   The most difficult part will be (carefully!) cutting the pastry before adding the butter and baking.  You need a sharp knife and a bit of patience.

Place walnuts, almonds, pistachios, brown sugar, cinnamon, salt, and cloves in a food processor, and pulse until finely chopped (not powder).

Place all of the phyllo sheets on a clean cutting board.  You have to cut the sheets to fit the cake pan.  Take the cake tin and place it on top of all of the sheets at the furthest corner possible.  Use a sharp pairing knife to cut around the tin.  Then, move the cake pan to the opposite diagonal and cut around the remaining phyllo.  You should have two, even-layered circles of phyllo dough.  If the phyllo dough is just a tad short, and it’s not exact – don’t sweat it.  Use the slightly smaller layers for the bottom part and no one knows the wiser!

You are going to make three layers of phyllo and two of nuts.  Place one of the layered circles into the greased cake pan to form the bottom.  Cover with half of the nut mixture and drizzle a little honey in very thin streams across all of the nuts.  Divide the other layered circle into two equal halves of layers.  Place one of them over the nuts, and then again cover with the remaining half of the nut mixture and a little honey.  Place the final layers of phyllo on top.

Carefully, cut down the pastry 5 times across in equal widths.  Turn the tin 90?, and repeat the process.   Immediately, drizzle the clarified butter over the pastry so that the entire top and edges are covered.  Let sit for 2 minutes so that all of the butter soaks down.

Bake for 15 minutes.  Lower the heat to 325° F, and bake for another 40 minutes.

Make the syrup in the last 10 to 15 minutes of baking.  Combine all of the syrup ingredients in a saucepan and bring up to a boil.   Lower immediately to a simmer, simmer for 5 to 7 minutes, stirring often until slightly thickened, and remove from the heat discarding the vanilla bean and rind.  Be careful – it can foam up, so stirring will help prevent it from overflowing.  Also, sugar is extremely hot when heated like this so avoid the temptation to dip your finger and taste…

Remove baklava from the oven.  Carefully, re-cut the baklava along the same lines you cut before.  Pour the warm syrup evenly over the hot baklava, and let cool completely and uncovered.  All of the syrup should soak into the pastry.  The baklava tastes better if it sits longer, so I advise making it the night before you plan to serve it.

Baklava can be stored at room temperature for about 5 days.  Make sure it has completely cooled before covering to keep a good texture.

*Because of the quick method we’re using, you don’t want the milk solids from the butter to burn on the top of the baklava, so it only takes a few minutes to clarify the butter.  You basically want to melt the butter on low and simmer for a few minutes.  The water will evaporate, and the milk solids will settle to the bottom.  Skim the foam off the top, and the butter should be relatively clear.  When you use the butter, decant it – that is, pour it without letting any of the milk solids that are settled at the bottom pour into your container.

tags: easy desserts, easy baklava recipe, fast baklava recipe, baklava
categories: all-5, recipes, desserts-1
Tuesday 01.18.11
Posted by Aliya LeeKong
 

Homemade Strained Yoghurt

View fullsize yoghurt-pic1-500x333.jpg
View fullsize yoghurt-pic2-500x333.jpg
View fullsize yoghurt-pic3-500x166.jpg
View fullsize yoghurt-pic-4-500x333.jpg

Homemade Strained Yoghurt

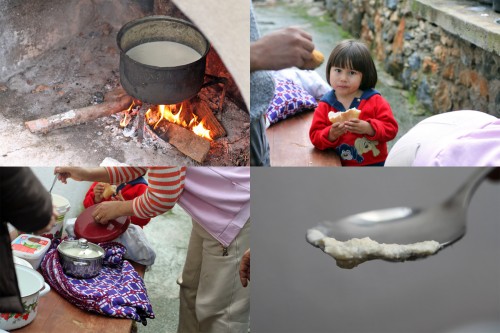
When I was in Bodrum, I got to visit a little agricultural village called Sazkoy, explore the area and have a delicious(!) homemade lunch with a family well-known for the Milas carpets they weave and sell.  The village is largely self-reliant, with most families having their own chickens, goats, cows, and sheep.  Many grow vegetables and some even have their own citrus trees, ripe with mandarins while I was there.

I got a tutorial in the tradition of yoghurt-making from a woman named Emine.  She also uses her fresh cows’ milk to make butter and curd cheese from whey on a regular basis, like most of the families in the area.  The yoghurt process was completely intuitive for her, reflexive after obvious years of making it.  Where I use a thermometer in my recipe, Emine dips her finger and instinctively knows the right temperature.

The key to yoghurt is that you need some to make some.  A little “starter” yoghurt is necessary and adds the appropriate bacteria.  I like to use a bit of Turkish or Greek yoghurt to start the process because they contain only live yoghurt cultures and not the preservatives, stabilizers or thickeners that other types do.  That said, basic store-bought yoghurt will work perfectly well here too.

The process is incredibly simple – heat milk almost to a boil, cool, add a bit of yoghurt, and keep warm to ferment.  To get a thicker consistency, I like to strain my yoghurt like they do in Turkey (as well as Greece, South Asia, the Middle East and even Mexico).  This yoghurt keeps for about 7 to 10 days, and you can use some of the homemade yoghurt to start the next batch!  It also has an incredibly creamy sweetness to it, slightly less tangy and fresher tasting than the store-bought kind.  Cheaper, tastier, and how cool is it to make your own.  Enjoy!

Ingredients

1 ½ quarts whole milk

2 tbsps starter plain yoghurt, room temperature

Procedure

In a saucepan, heat milk over medium heat until it starts to bubble and foam, almost at a boil.  It should reach 180° F.  Remove from heat and cool to 110° F.  (The woman I saw making this knows the temperature from dipping her finger in the milk, not from any thermometer.  It’s still hot but she could hold her finger in it comfortably.)  This temperature is important – significantly hotter and the bacteria will be killed and the yoghurt won’t set.  If the temperature is too low, again the bacteria won’t ferment, and the yoghurt won’t set.

In a ceramic bowl or pot that has a lid, add the 2 tablespoons of yoghurt.  Add a few spoonfuls of the milk to the yoghurt and whisk to combine.  Pour the rest of the milk in using a strainer to catch the skin that forms on top.  Whisk to combine thoroughly.

Cover with a lid and swaddle in thick kitchen towels or a blanket.  You want to keep this warm for the fermentation process.  I keep mine in the oven (off) with just the oven light on.

Yoghurt time can vary.  Mine took around 12 hours to set, but it all depends on the temperature, the climate, and the yoghurt starter you used.  It could take as little as 6 hours, and some people even claim as long as 24 hours.  I like to make it in the evening, so it can set overnight.

Once it’s set, refrigerate immediately.  It will firm up a bit more as it cools.  I like to then place it in a strainer lined with cheesecloth in the fridge for about 3 hours once it’s cooled to get a thicker consistency but feel free to use as is.

Store in an airtight container; it lasts for about a week.

tags: homemade yogurt, homemade yoghurt, yoghurt recipes
categories: all-5, breakfast, recipes, vegetarian
Friday 01.14.11
Posted by Aliya LeeKong
 

Kadikoy Market + Ciya Sofrasi

Kadikoy Market + Ciya Sofrasi

Over the holidays, I took an eye-opening, culinary trip to Turkey visiting the region of Cappadocia, Istanbul, and Bodrum.  You couldn’t have picked more different landscapes, and each came with regional specialties and stylistic differences in cooking.  It was, in sum, amazing, and I can’t wait to share some of my Turkish inspired recipes over the next few months.

But first…while in Istanbul, I spent the morning of New Years roaming Kadikoy market, a serious culinary destination on the Asian side of the city.   I spoke with a few home cooks and chefs, and this is THE place to shop for all of your food needs with everything from (ridiculously) fresh fish, fresh produce, spices, cheeses, prepared foods…you name it.   As the morning went on, the area became frenzied as people picked up their last minute provisions for the night.

There were some firsts for me…like being invited to have tea while in an offal shop.   Staring atkokoretsi, a lambs’ intestines specialty, or brains, or the tripe (that is stewed for a signature hangover cure there) while sipping sweetened tea was new!   I also drank an entire (well…almost) glass of pickle juice, which is to say the brine used to pickle different vegetables; it’s quite popular there for health purposes and is said to ward off sicknesses.  Finally, I tasted an unexpectedly delicious Turkish cave cheese and spooned a stuffed mussel from a street vendor into my mouth.

After much taste-testing (I’m a double-roasted pistachio Turkish delight kind of gal) and food shopping, I ended my tour of the market with lunch at the famous, Ciya Sofrasi and a chance encounter with the incredible Chef Musa, a visionary in the culinary world.  Chef Musa has developed what you could call an anthropological approach to his cooking – visiting the far reaches of the country to learn regional specialties and true home cooking from the diverse ethnicities that populate Turkey.  He also sources purveyors from around the country to find only the best, regional, seasonal ingredients – using everything from mountain greens to local wild mushrooms.

The restaurant is very casual with all of the salads, soups, stews, and desserts laid out for the picking.    We had a mountainous mezze plate with the best yoghurt and eggplant dip I’ve tasted, flavorful dolmas and fresh zaatar salad.  Then, on to the fresh sausage, a flurry of stews including my favorite lamb and quince, and an elegant dessert plate with what I can only describe as candied olives.  Delicious.

Both the market and any of the three Ciya restaurants (within a few feet of each other) are a must for a visit to Istanbul.  For the best in sweets, check out Beyaz Firin, which has everything from traditional Turkish desserts to French pastries and macarons.

tags: kadikoy market, ciya sofrasi, Istanbul
categories: all-5, travel
Wednesday 01.12.11
Posted by Aliya LeeKong
 

Sweet Bread

View fullsize sweet-bread-pic1-500x333.jpg
View fullsize sweet-bread-pic2-500x333.jpg
View fullsize sweet-bread-pic3-500x166.jpg

Sweet Bread

Welcome back! I hope that everyone had a really fantastic holiday season and New Year.  I just got back from an eye-opening culinary adventure in Turkey – exploring everything from traditional bread baking in a tandoor to how to make luscious strained Turkish yogurt to watching a woman in a village create her signature bergamot and mandarin preserves.  I’ll be posting more about Turkey in the coming weeks, but I did put a ton of pictures on Facebook if you want to check them out.

On to the usual…Sweet bread is one of those universal foods.  A quick google will generate recipes anywhere from a Romanian version to Italian panettone to Portuguese sweet bread or even our all-American banana bread.  Some include yeast and others are more of a quick bread, much like one I did a few months back.

This version is a West Indian tradition and is like a cross between a fruit cake and a bread loaf.  I’ve also seen it called coconut bread, and, although it pops up a lot around the holidays, it’s an all-occasion treat.  I love to make it for breakfast on a Sunday – a nice buttered slice of this loaf with hot coffee and fresh fruit is the perfect light meal.

Many versions of this bread I’ve seen include mixed peel, which are candied peels and fruits, a typical ingredient in fruitcake.  I like to substitute good old lemon, lime or orange zest – the flavor is natural, more subtle, and less candy-like (which makes me feel better when I have it for breakfast…).   This is a beautiful, not-too-sweet-loaf that works with afternoon coffee or even with a little vanilla sauce for dessert.  Enjoy!

Ingredients

Yields 1 8½” x 4¼” x 2¾” loaf pan

Bread:

2 cups all-purpose flour

1 ½ tsps baking powder

½ tsp baking soda

½ tsp salt

½ tsp cinnamon

¼ tsp nutmeg

¼ cup golden raisins

¼ cup dried currants

¼ cup chopped maraschino cherries

1 ½ cups grated fresh coconut

¼ tsp lemon, lime, or orange zest

½ stick unsalted butter, room temperature

1 cup sugar

2 eggs

½ tsp vanilla extract

1 tsp almond extract

2/3 cup milk

Glaze:

1 tbsp sugar

1 tbsp boiling water

Procedure

Preheat oven to 325° F.

In a bowl, sift together flour, baking powder, baking soda, salt, cinnamon and nutmeg.  Whisk ingredients to combine thoroughly.

In another bowl, combine raisins, currants, cherries, coconut, and zest.

In the bowl of a stand mixer or with a hand mixer, using the paddle attachment, cream together the butter and sugar.  With the mixer on low, add the eggs one at a time until incorporated.  Add in the extracts.

With the mixer on low, add 1/3rd of the flour mixture followed by ¼ cup of the milk.  Scrape down and repeat process another two times.  Add the dried fruit and coconut mixture, and make sure everything is fully incorporated.

Transfer to a greased loaf pan and bake for 60 to 70 minutes until an inserted toothpick comes out clean.

For the glaze, melt the sugar in the boiling water and brush onto sweet bread.  Place back in the oven for another minute or two just to develop the sheen.

Cool before unmolding and serving.

tags: sweet bread recipes, West Indian sweet bread, West Indian traditions
categories: all-5, breads & cakes, recipes, desserts-1
Monday 01.10.11
Posted by Aliya LeeKong
 

Spiced Sunchoke Soup

View fullsize sunchoke-pic1-500x333.jpg
View fullsize sunchoke-pic2-500x333.jpg
View fullsize sunchoke-pic3-500x333.jpg

Spiced Sunchoke Soup

I am still in the aftermath of my holiday party, and this is yet another dish I served that people seemed to really enjoy.  Yes, soup can be a fantastic hors d’oeuvres – I served this in little demitasse cups with some chopped cilantro and homemade croutons.  It looks elegant, and you can make it in advance and keep it warm, which for me is ideal when other items require more maintenance…

Sunchokes are root vegetables and look a lot like ginger, though taste nothing like it.  They have been popping up all over menus in NYC and Brooklyn.  My husband and I hit this adorable new place in Fort Greene called Roman’s (amazing, chocolate sorbet to die for), and he was shocked to see sunchoke soup on the menu.  He acted like they were biting my style (I almost cried laughing)…and I had to explain that they are seasonal and delicious and that’s why they are everywhere.

You might also see sunchokes labeled as Jerusalem artichokes, and their flavor does resemble the artichoke heart though they are not related at all.  I picked mine up from the Union Square Greenmarket, and they were perfectly sweet and creamy.  This soup incorporates some key spices – cumin, coriander, and turmeric – that really bring warmth to the dish but still allow the signature sunchoke flavor to shine through.  The coconut milk bumps up the sweetness and gives it a beautiful, creamy mouth-feel, and the shot of lemon juice brightens up all of the flavors.  This is easy enough as a go-to weeknight soup but refined enough for a dinner or holiday party.  Enjoy!

Ingredients

Serves 4 to 6 / Yields approximately 5 ½ cups

3 tbsps unsalted butter

1 onion, finely diced

½ tsp ginger, minced

1 small green chili, finely chopped (preferably thai or serrano, to your heat preference)

¾ tsp ground cumin

1 tsp ground coriander

¼ tsp turmeric

pinch of cayenne

3 or 4 cloves garlic, minced

7 medium-sized (12 oz) sunchokes, scrubbed, peeled, and thinly sliced*

1 bay leaf

2 ½ cups chicken or vegetable stock

1 can coconut milk

a few squeezes of fresh lemon juice

salt to taste

chopped cilantro or parsley

Procedure

Heat a dutch oven or other heavy-bottomed pot over medium-low heat and add butter.  When foam subsides, add onion and a bit of salt to draw out the moisture.  Let sweat for a minute or so.  Add ginger, green chili, cumin, coriander, turmeric and cayenne.  Cook for 5 to 7 minutes until onions are translucent and super soft.  Add garlic and cook for 1 minute until fragrant.

Add sunchokes and stir to combine.  Let cook for about 2 minutes until sunchokes begin to soften.  Add bay leaf and stock, bring up to a boil, and lower to a simmer.  Simmer covered for 20 to 25 minutes.  You want the sunchokes to easily break apart with your wooden spoon, which will really depend on how thinly you sliced them.

Remove bay leaf, and, in a blender or using a hand blender, puree until smooth.  Add coconut milk, lemon juice, and adjust seasoning to taste.  Serve hot with a little fresh chopped cilantro on top.

*After peeling the sunchokes, keep them submerged in cold water until ready to use.  Thinly slice right before throwing into the pot.

tags: soups for winter, sunchoke soup, sunchoke recipes, Jerusalem artichokes, weeknight meals, holiday recipes
categories: all-5, soups & salads, recipes, vegetarian, main dishes-1
Wednesday 12.22.10
Posted by Aliya LeeKong
 

Mango Cheesecake

View fullsize mango-pic1-500x333.jpg
View fullsize mango-pic2-500x333.jpg
View fullsize mango-pic3-500x333.jpg

Mango Cheesecake

I love this recipe.  This is surprisingly easy and straight forward to make, and mango cheesecake is one of those sleeper hits.  People who “don’t like cheesecake” will even love it.  And what I love is that it’s a fantastic do-ahead dessert for parties.  It’s always better to make this the night before, so it has a full 8 hours to cool.

I actually made it for my holiday party on Friday night but shrunk it down to miniature version.  It was the perfect poppable dessert – a creamy mango cheesecake in 1.5” pastry shell with a bit of glaze and a sweet raspberry on top.  These were inhaled – always estimate a 3-4x multiple of the number of party attendees!

The graham cracker crust is crisp and buttery, and the cheesecake comes out with a beautiful, silky, creamy texture, bright with sweet mango flavor.  I love the extra flavor and texture of this super simple glaze too.  I used alphonso mango puree because these mangoes, to me, have a truly rich, signature mango flavor.  If you are doing the tiny version, they only take 15 minutes in the oven and don’t need the water bath.  Enjoy!

Ingredients

Yields 1 9-inch springform pan

Crust:

2 cups graham cracker crumbs

1 ½ sticks of butter, melted

Filling:

2 (8-ounce) packages cream cheese, room temperature

1 cup whole milk ricotta cheese, room temperature

¾ cup sugar

4 eggs, room temperature

2 ¼ cups mango puree, preferably Ratna (from the ethnic grocer; alphonso mangoes)

Glaze:

Another ½ cup or so of mango puree

Sugar

lemon

Procedure

Preheat oven to 350° F

Wrap the springform pan tightly in foil all the way around.  You want to create a seal since we’re going to submerge it in water for cooking.  Generously grease all of the inside surfaces of the pan.

In a food processor, process crumbs with melted butter until sand-like texture.  Press firmly into the bottom of the pan and bake for 15 minutes.  Cool completely.

Blend cream cheese and ricotta with sugar until smooth and then add mango puree and eggs.  Pour mixture over cooled crust and place in a roasting pan.  We’re going to bake this in a water bath.  Add boiling water to the roasting pan until it reaches halfway up the sides of the cake pan.  Bake for an hour and 30 minutes or until slightly jiggles but starts to pull from the sides.  Cool at least 8 hours before serving.

Take remainder mango puree and add a little water in a saucepan.  Reduce by half and add sugar and lemon to taste.  The glaze should coat a spoon.  Cool completely and pour over cheesecake before serving.

tags: mango recipes, cheesecake recipes, easy desserts, holiday baking, holiday recipes
categories: all-5, breads & cakes, recipes, desserts-1
Monday 12.20.10
Posted by Aliya LeeKong
 

Teflam

View fullsize teflam-pic1-500x336.jpg
View fullsize teflam-pic2-500x333.jpg
View fullsize teflam-pic3-500x333.jpg

Teflam

This is a bit of a one-off post.  I usually try to give you posts that have a spice or an ingredient that you can find (perhaps with some digging) to incorporate into the food you cook at home.  This is a bit different because this spice is one I discovered while in Goa.  It’s nothing I had ever seen before, and I have been unable to find it anywhere here.  But I feel like holding on to this is like keeping a secret – so I thought I would share it with you.

One of my favorite things to do when travelling is to go to a local market.  And it’s always amazing to me to see that what is commonplace somewhere, literally growing like a weed and in everyone’s homes, can be so exotic elsewhere.

This allspice-looking berry is called teflam.  I’ve also seen it referred to as tirphal or teffal fruit.  It’s grown along the Konkan coast in India and is a distinctive ingredient in Goan cooking.

I bit into the fresh berries, which have a stronger taste than the dried, and, to me, they have a taste that is strongly reminiscent of kaffir lime, though with a bitter, peppery edge.  The Portuguese called them “acrid lime”, and many believe that these berries are related to the Sichuan peppercorn.  Quite frankly, there’s not a ton of consistent information out there about them.

I’d love to learn more about this spice myself, so if you have more information or have your own experience with teflam, please share!

tags: unusual spices, Goa, tirphal, teffal fruit
categories: all-5, spices-2
Thursday 12.16.10
Posted by Aliya LeeKong
 

Berbere-Spiced Lamb Chops

View fullsize IMG_1709.JPG

Berbere-Spiced Lamb Chops

So I made this recipe (1) because it tastes ridiculously good, (2) because I’m also doing these for my holiday party this week so thought I would kill 2 birds with 1 stone and (3) because I thought I might be able to come up with an adequate substitute for berbere for those with limited access to ethnic food stores.  #3 is giving me a really hard time.

Berbere is a key ingredient in Ethiopian cooking.  It gives their stews that blood-red color and signature spiced flavor.  Berbere comes in a ground form that’s a complex blend of dried chilies, garlic, ginger and red onion with such spices as fenugreek, ajwain, cardamom, cloves, cinnamon, cumin, nutmeg, black pepper, turmeric…Sometimes it’s mixed with red wine to form a paste.  Like masala, it’s a subjective blend, and I am still perfecting mine…

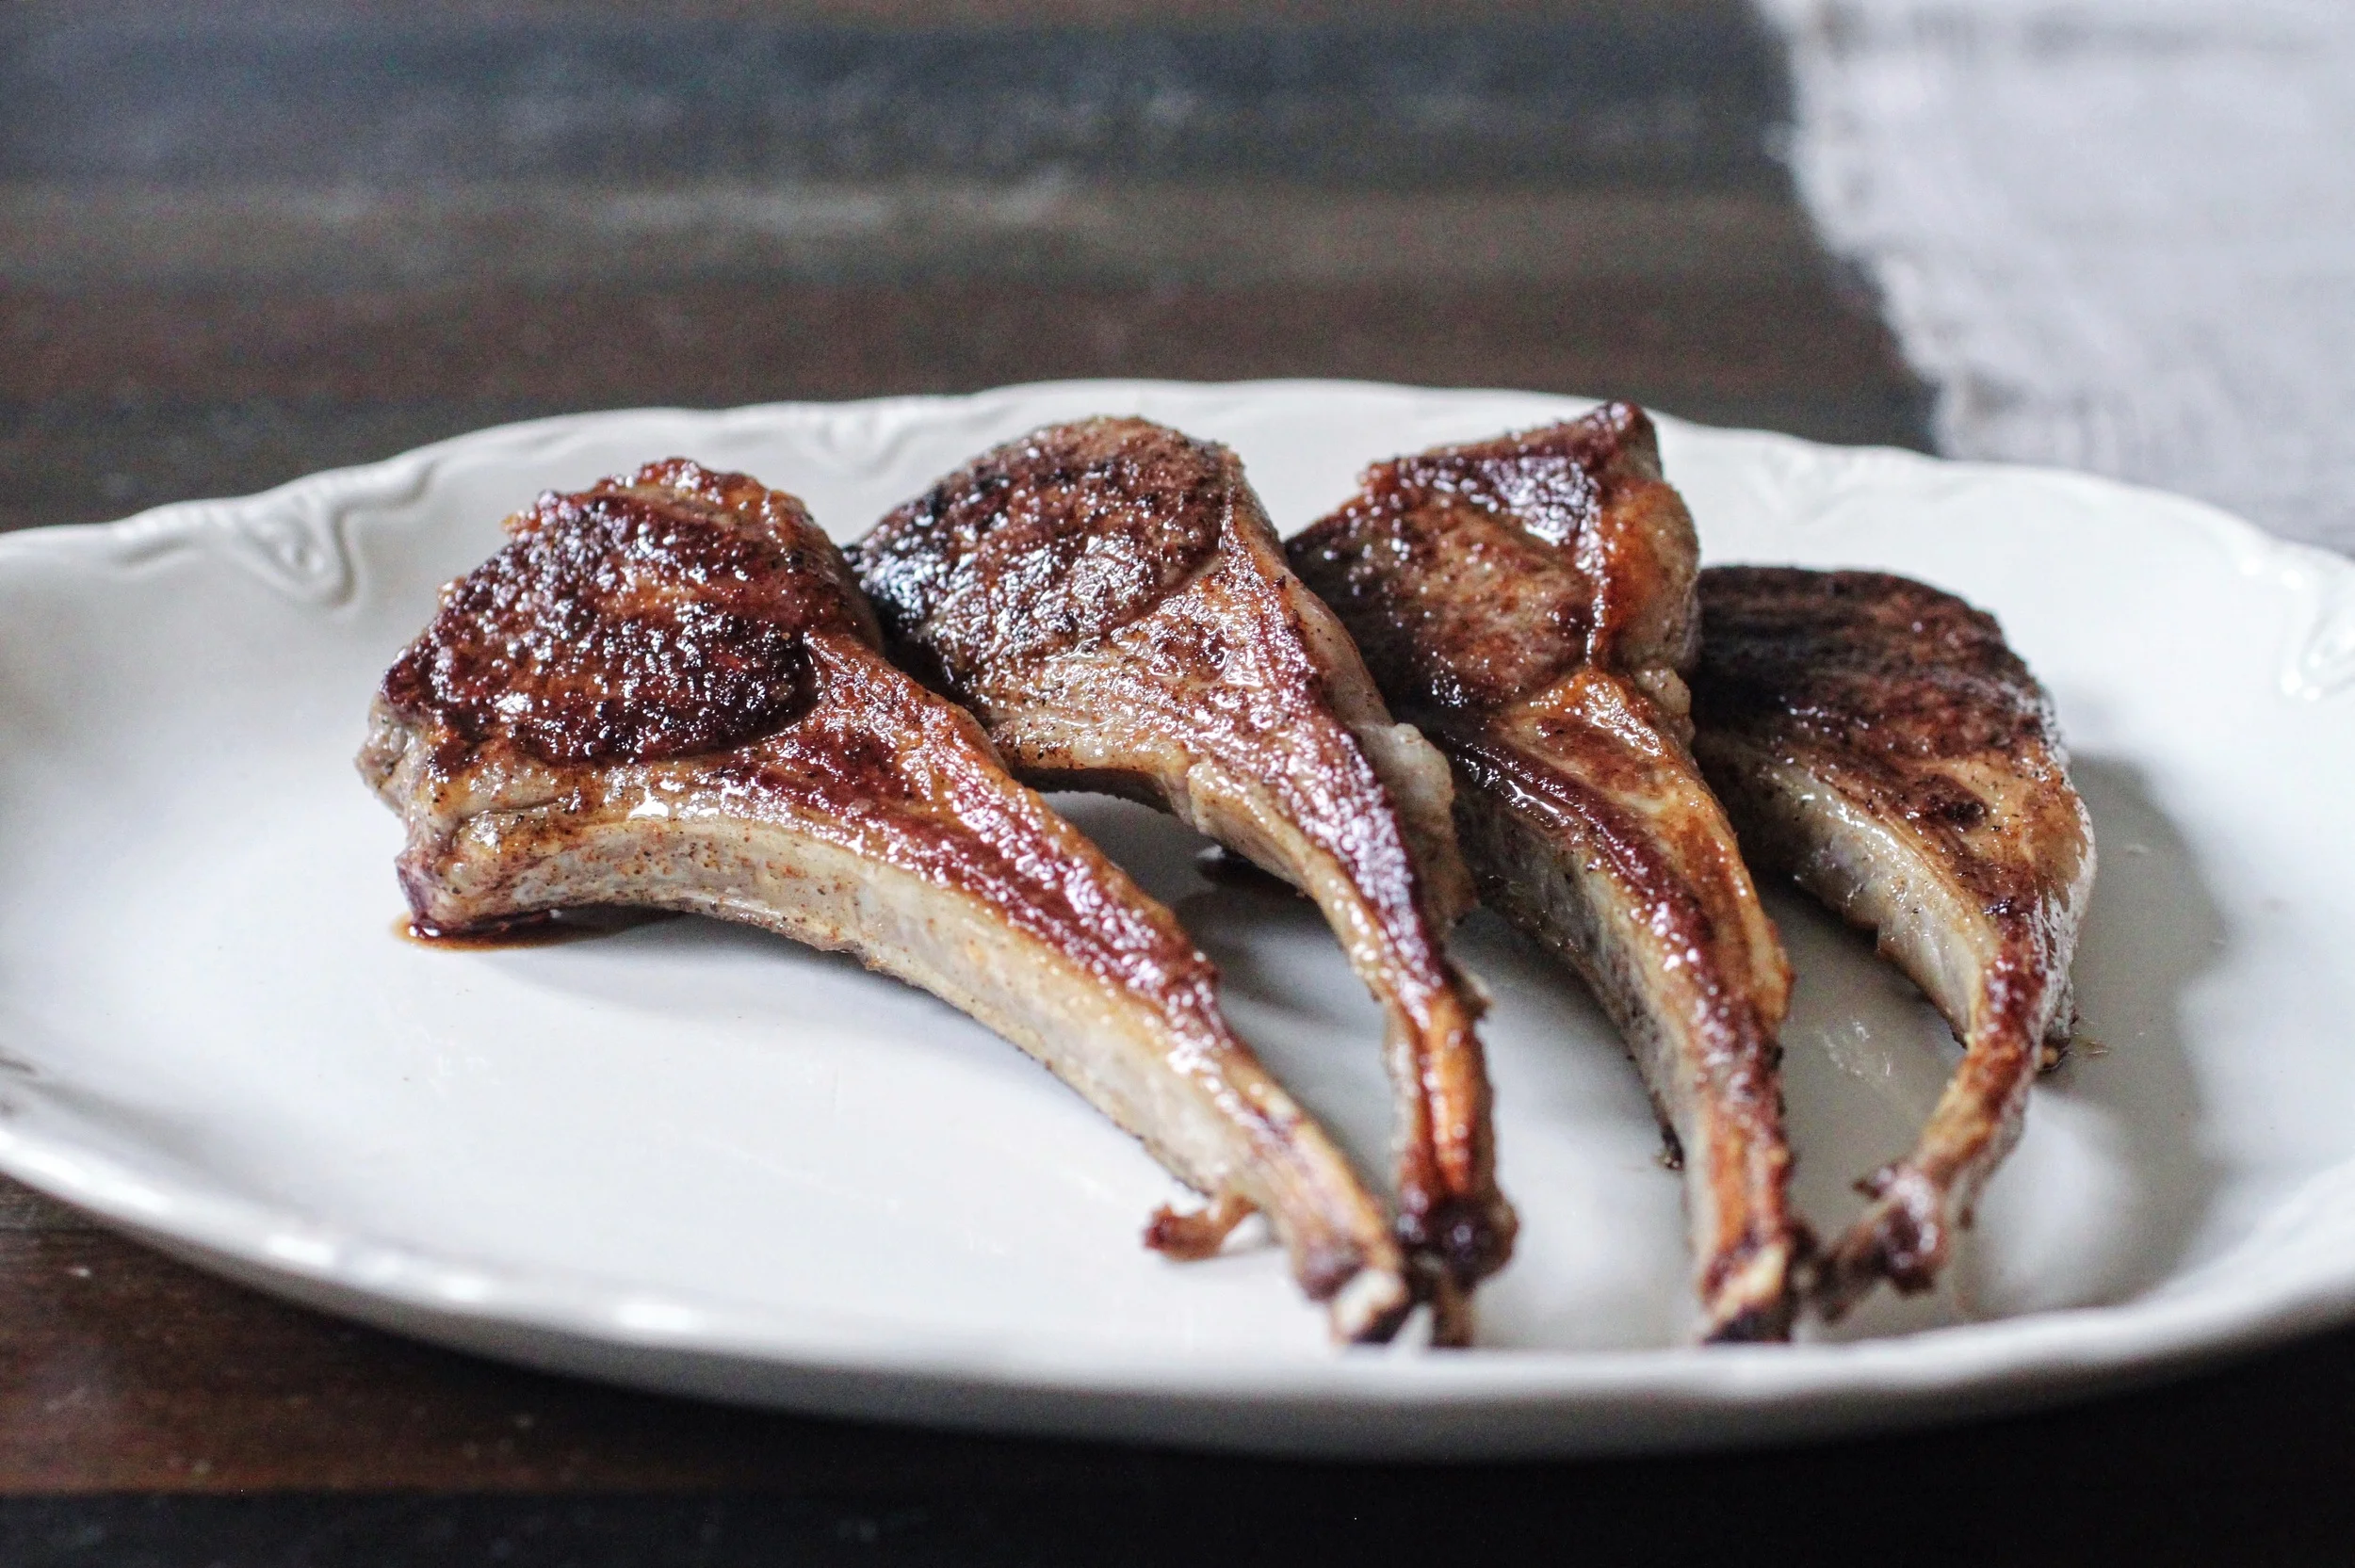
Berbere as a dry rub on lamb chops is just heavenly.  This dish is truly elegant and sinfully easy to make, particularly for a party.  The chops come out a bit charred with a smoky, red pepper flavor, a bit garlicky with hints of the spice blend.  I gave a quick and dirty substitute (without measurements) below, but I would advise going and tasting the real thing.  Either pick up a packet of the spice at a local ethnic store or online or even walk into an Ethiopian restaurant and ask for a bit to try.  Enjoy!

Ingredients

Serves 4

2 tsps berbere*

½ tsp ground mustard

¼ tsp finely ground black pepper

½ tsp garlic powder

kosher salt

1 rack of lamb, frenched and cut into single or double chops

olive oil

Procedure

Preheat oven to 400° F.

Combine berbere, ground mustard, pepper, and garlic powder.  Rub onto chops.  Season both sides with salt as desired.  Let chops sit for about a half hour until they come up to room temperature.

Heat a large skillet over medium-high heat.  Add enough olive oil to thinly coat the bottom of the pan.  Place chops in pan and cook 4 minutes each side for double chops and 2 to 3 minutes each side for single chops for medium rare.

Finish in the oven to desired level of doneness.

*To approximate, start with dried New Mexican chilies, which are a great base for the blend.  I would seed and rib and then blend to a powder.  Mix with a touch of paprika, garlic powder, onion powder, fenugreek, cumin, coriander, cardamom, black pepper, and ajwain if you have it.  Good luck!

tags: Berbere, Ethiopian cooking, lamb chops, dry rub, Ethiopian spices, holiday recipes
categories: all-5, main dishes, recipes
Wednesday 12.15.10
Posted by Aliya LeeKong
 

Double Chocolate Mint Cookies

View fullsize mint-cookie-pic1-500x333.jpg
View fullsize mint-cookie-pic2-500x333.jpg
View fullsize mint-cookie-pic3-500x166.jpg
View fullsize mint-cookie-pic4-500x166.jpg

Double Chocolate Mint Cookies

So my obsession with the holidays has me thinking of more and more ways to celebrate and put my own spin on the traditions we all know and love.  I’m also in the midst of trying to plan for my holiday party this week, and I love to give my guests a little of the familiar and a little of the unexpected.  That (and a deep craving for mint and chocolate!) was the inspiration for this recipe.

To be completely truthful, this recipe, like others I’m doing for this party, is a sneaky way to save time and be efficient.  I can make this dough at the beginning of the week, freeze it in long skinny cylinders, and then cut them into little rounds.  During the party, I can throw them into the oven towards the end of the night for 5 to 10 minutes, and voila!  Everyone gets fresh-baked, mini cookies, and my apartment smells like heaven…

I wanted to create pillowy, moist, brownie-rich, chocolate chip cookies scented with peppermint.   Who doesn’t love that?  The ingredient that adds a bit of the unfamiliar is ground cardamom; the spice has a menthol-like quality that works beautifully with the mint.  I’m a dark chocolate girl myself, but I threw in some white chocolate chips for the creaminess – it helps offset the bitterness of the dark chocolate and blends seamlessly with the mint.  Enjoy!

Ingredients

Yields approximately 2 dozen cookies (size-dependent)

1 cup all-purpose flour

½ cup unsweetened cocoa powder

½ tsp baking soda

¼ tsp baking powder

½ tsp ground cardamom

½ tsp salt

1 stick unsalted butter, room temperature

½ cup white sugar

1/3  cup light brown sugar

1 egg, room temperature

1 tsp peppermint extract

1 tsp vanilla extract

½ cup dark chocolate chunks or chips

½ cup white chocolate chunks or chips

Procedure

Preheat oven to 350° F.  Line two baking sheets with parchment paper.

In a bowl, sift together flour, cocoa powder, baking soda, baking powder, cardamom and salt.

In the bowl of a stand mixer or with a hand mixer using a paddle attachment, cream together butter and both sugars.  Add the egg and peppermint and vanilla extracts.   Add flour mixture and mix until almost completely incorporated.  It should mostly be sticking to the paddle at this point.  Scrape down, add in chips and mix for another 15 to 20 seconds until uniform.

At this point, I like to turn the cookie dough out onto plastic wrap, form into a cylinder, and freeze for about 10 minutes.  This makes it easier to cut into even sized, round cookies.  Also, at this point, you can freeze the dough for later use – overnight or longer.  Conversely, you can just drop rounded spoonfuls a few inches apart onto prepared baking sheets.

Bake for 9 to 11 minutes depending on how chewy or crunchy or what size you made the cookies.  Remember to add a few more minutes if you froze the cookies ahead of time and are putting them straight in.  Cool on the baking sheets for 5 minutes and then transfer to wire racks to cool completely.

tags: chocolate desserts, chocolate mint cookies, cookies, holiday baking, chocolate cookies, mint cookies, holiday recipes
categories: all-5, desserts, recipes
Monday 12.13.10
Posted by Aliya LeeKong
 

Turmeric

View fullsize turmeric-pic1-500x333.jpg
View fullsize turmeric-pic2-500x359.jpg

Turmeric

Turmeric, for me, is such an every day spice I haven’t really given it much consideration for a post.  You can find it in grocery stores these days, and it’s actually an herb in my daily vitamin!  But chatting with some friends, it seems that not a lot of people know about the spice – from its flavor to its medicinal characteristics.

First things first, turmeric, whose active ingredient is curcumin, is a rhizome or a root that looks a heck of a lot like ginger.  I think that’s a bit surprising to some.  The root is boiled, dried, cleaned, and crushed to powder form to get the signature deep orange-yellow spice we’re all used to seeing.  In some cultures, Malay and Indonesian specifically, even the leaves of the plant are used, in stir fry recipes or to wrap around something before cooking.

Second, its flavor is a bit bitter, hitting you at the back of your tongue, earthy, and (to me) distinctly mustard-esque.  It’s used a lot in East Asian, South Asian, Middle Eastern, and African cooking (and dyeing!) for its color.  Do NOT let it get on your clothes.  I’ve learned the hard way: it’s not coming out.  But its flavor is an aggregator – it helps meld together the aromatics like onion and garlic and the various spices in a dish.

When I was in India, every cook I worked with talked about the medicinal uses of turmeric.  As an antiseptic, many cooks put turmeric directly on raw fish or chicken to kill bacteria before cooking.  They also believed that the spice is excellent for digestion and that that is one of the main reasons for its inclusions in curries.  Other cooks told me about its anti-inflammatory properties.  A cold cloth with turmeric is just the trick for a kitchen burn or a cut from the slip of a knife (…they also mentioned that would hurt like all get out).  My vitamin includes the spice for its antibacterial and anti-inflammatory properties but also because the active ingredient, curcumin, is believed to be a strong antioxidant.

I personally like turmeric in soups, braises, with a chili crab stir fry, in rice with some cinnamon and cardamom.  It’s a great spice to play around with.  I use super small amounts – ¼ teaspoon to a ½ teaspoon max.  That’s all you need, or you risk the bitterness becoming more dominant in a dish.

categories: all-5, spices-2
Thursday 12.09.10
Posted by Aliya LeeKong
 

Ponche de Crème

View fullsize ponche-pic1-500x333.jpg
View fullsize ponche-pic2-500x333.jpg
View fullsize ponche-pic3-500x166.jpg

Ponche de Crème

I have a mild obsession with Christmas (and am all about West Indian dishes this week!).  I didn’t grow up with the holiday since I’m not Christian, but, as an adult, I am completely infatuated with the traditions.  This weekend I bought a massive tree and went O.C.D. decorating (my husband is not allowed to touch it) while listening to Christmas music and drinking my version of eggnog.  My mother-in-law stopped by during my decorating madness and exclaimed, after a sip or two of my eggnog, that it tasted just like ponche de crème (AND that it needed more rum…). Ponche de Crème is like West Indian eggnog – a favorite I have had at my husband’s family’s Christmas parties in the past.  It’s flavor is sweet and creamy, with a hint of spice, and that serious kick of rum.

What’s interesting to me about this recipe is how ubiquitous it is.  It’s definitely big in Trinidad and Tobago, but it is found throughout the Caribbean and even Venezuela has a version.  Theirs is called “Ponche Crema” and is a traditional drink that’s had during the festival of Navidenas.  All versions have similar ingredients – milk, eggs, sugar, rum – much like traditional egg nog in the U.S.  But the spices and aromatics differ regionally, and Venezuelans also have one that includes ground coffee or (better) coffee liqueur.  Yum!

This is now my default eggnog for the holidays.  Warning – ponche de crème  is extremely rich, indulgent and addictive.  It has a dessert-like quality that makes you feel like it’s a treat (which it is)…AND it sneaks up on you.  You might be at a party happily sipping away at this drink, chatting with friends, and then all of a sudden you’re just a liiiiittle bit too tipsy...  The ingredients that make this a stand out from traditional eggnog are aromatic bitters (which add interesting depth), lime zest (fruity brightness) and condensed milk (a luscious silky texture).  Enjoy!

Ingredients

Yields a little over 8 cups

1 quart milk

2 cups heavy cream

1 can condensed milk

zest of 1 lime

1 ½ tsps aromatic bitters

1 tsp vanilla extract

¼ tsp ground cinnamon

¼ tsp ground nutmeg

pinch of salt

7 egg yolks

¼ cup white sugar

½ cup dark rum

¼ cup brandy

Procedure

Place milk, cream, condensed milk, lime zest, bitters, vanilla extract, ground spices and salt in a pot over medium heat.  When the mixture comes up to a simmer, remove from heat.

In a bowl, beat together egg yolks and sugar until light and creamy.  Pour a little bit of the hot milk mixture into the yolks and whisk.  You want to bring the egg yolks up to temperature without cooking and solidifying the yolks.  Keep adding the milk mixture a little at a time until yolk mixture is up to the same temperature.  Return it all to the same pot and place back on the stove over medium-low heat.

Cook the mixture for about 2 to 3 minutes or until a thermometer registers 170° F – make sure to stir continuously.  Pour into a pitcher and add rum and brandy (and more than I suggested if you like it stronger of course).  Cover and refrigerate for a minimum of 4 hours or (better!) overnight.

Strain the mixture before serving to remove any pieces of zest or clumped spices.  Serve chilled over ice with a bit of fresh nutmeg on top.

tags: Christmas cocktails, eggnog, variations on egg nog, West Indian cocktails
categories: all-5, drinks & cocktails
Wednesday 12.08.10
Posted by Aliya LeeKong
 

Amigos

Amigos

I am not going to do this post, this place, this experience justice in my writing.  But I will still try.

Under the Nerul bridge in the Bardez district is a small, unpaved road that rolls down and loops around dead-ending into this amazing little restaurant, Amigos.  Across from mangroves and right at the Sinquerim river’s edge (umm, not the easiest to find), arriving there gives you the feeling that you’ve happened upon a little slice of sublime privacy, cut off from the rest of the world.   The restaurant is family run, helmed by Chef Sabitha, the matriarch of the family, and represents Goan home cooking at its finest.

This was to be the first (and best!) of a few restaurant experiences I planned during my trip.  I arrived the first day excited to see what culinary delights were in store for me.  I overzealously brought a chef’s coat and shoes, while the guys in flip flops and loose t-shirts expertly crumb-frying looked at me a bit skeptically.  But then…the power went out!  Day 1 was foiled.

I came back a few days later (more casually dressed mind you) and spent the day delving into Goan cuisine.  Sabitha and I became fast friends, and I found myself somewhere between guest chef and guest – her tying my apron on me as I’m triple-washing the greens and tea breaks to chat about her daughter’s desire to travel the world.

With 18 years of running this restaurant under her belt, Sabitha is fastidious, focused on the quality of her masalas and the freshness of the ingredients.  All of the recipes are her own – no training or cookbooks could teach her what she knows.  Her palate is expert, so that even when I came back to teach her a few dishes (my favorite part of the trip), she could identify when the spiced pumpkin soup needed more acidity or how much sweetness should be in the dark chocolate pudding we made.  And her speed?  Let’s just say working quickly because you never know when there’s going to be a power outage makes you lightning fast…

The fish recheado is judiciously made – tangy, spicy and sweet.  Recheado really means stuffed, and it’s a vestige of Portuguese culture.  The whole fish is split open and stuffed with a deep, red masala that includes kashmiri chilies, sometimes onions, garlic, ginger, cumin, cloves, cinnamon, sugar and vinegar.  I loved it rava-fried; in Goa, they use semolina instead of bread crumbs to fry, and it’s delicious.

Amigos is well-known for its fish, which is brought in fresh daily.  I know first-hand – a flapping fish unnerved me more than once when I was chopping… And the crab masala is to die for!  You have to call ahead or stop by and give them notice a day or two in advance.  You will then have some of the most delicious crab you’ve ever eaten.

This is a must if you are in Goa. It’s where the locals go to get amazingly high quality, casual home cooking. Gazing at the river, with an ice-cold shandy, and a plate of rava prawns…it doesn’t get much better.  I’m a huge fan of Sabitha, so please say hello for me if you do happen to make it there.

Amigos

Tel: +91 832 2301123

Below Nerul Bridge, Nerul, Bardez-Goa

tags: Goa
categories: all-5, travel
Tuesday 12.07.10
Posted by Aliya LeeKong
 

West Indian Cassava Pone

View fullsize pone-pic1-500x333.jpg
View fullsize pone-pic2-500x333.jpg
View fullsize pone-pic3-500x167.jpg

West Indian Cassava Pone

This dish has to be one of my favorite West Indian desserts.   After my first bite of this sweet, gelatinous “cake”, I became obsessed, which culminated in some serious lessons in Trinidadian cooking from my husband’s Aunt Cherry who lives in Port-of-Spain.  I’m one of those nervous bakers – constantly peering into the oven to make sure a cake is rising well, and my heart is in my throat during the moment of truth unmolding.  When she and I made this together, she didn’t even use measuring cups!  An unnerving confidence in her years of cooking that she could eyeball the right texture…

In different West Indian counties, I’ve seen pone made with root vegetables – cassava here but also carrots and sweet potato, always with coconut, and some with pumpkin and even raisins.  What’s fascinating is that there’s a soul food iteration of pone (I’ve mostly seen the sweet potato kind) that they make in the South.  Would love to cross compare!

There are dozens of pone recipes out there.  I am one of those that absolutely love the moist, gummy texture, but find that it can be a bit too dense at times (thus in some West Indian countries it’s called “heavy cake”).  So I modified the traditional recipes a bit to make the texture a bit lighter here but still with that gelatinous bite.  I also made it thinner, to be eaten like a dessert bar rather than a cake.  Evaporated milk gives a bit of silkiness, and the vanilla, cinnamon, nutmeg and, yes, black pepper that delicious pumpkin pie-like spice.  I also saw that some Southern pone recipes use molasses, so I incorporated a few tablespoons for some beautiful, caramelized sweetness and a deeper color.  Heat it and throw a scoop of ice cream on top for serious decadence.  Enjoy!

Ingredients

Yields 1 9” x 13” x 2” 3-quart baking dish

2 cups grated cassava

1 ½ cups grated fresh coconut

1 can evaporated milk

3 tbsps unsalted butter, melted

1 ½ tsps vanilla extract

1 cup light brown sugar

3 tbsps molasses

1/3 cup all-purpose flour

½ tsp baking powder

1 ¼ tsps ground cinnamon

1/8 tsp ground nutmeg

½ tsp salt

¼ tsp ground black pepper

Procedure

Preheat oven to 350° F.

In a bowl, whisk together coconut milk, melted butter, sugar and molasses until sugar is dissolved.

In a separate bowl, sift together flour, baking powder, cinnamon, nutmeg, salt and black pepper and whisk to combine.  Add wet ingredients a little at a time to the dry ingredients whisking until batter is smooth (don’t overmix).  Fold in grated cassava, and coconut.

Transfer mixture to a greased dish and bake @ 350° F for 45 minutes.  The edges should look brown and starting to separate from the baking dish.  Remember that, if you are using a different baking dish from what I specified, cooking time will vary.  Cool completely before cutting into squares and serving.

tags: pone, West Indian desserts, West Indian recipes, Cassava recipes, Cassava
categories: all-5, breads & cakes, desserts, recipes
Monday 12.06.10
Posted by Aliya LeeKong
 

Mace

View fullsize mace-pic1-500x333.jpg
View fullsize mace-pic2-500x333.jpg
View fullsize mace-pic3-500x333.jpg

Mace

I love this picture!  I actually took this while visiting a completely amazing spice farm in Goa.  We were walking through the lush forest of trees, examining spice by spice, and here we picked nutmeg and mace.  The brownish-black pit is the nutmeg, and the red web or aril is mace.

I was inspired to post about mace by a culturally fantastic article about nutmeg from this month’s Saveur magazine.  In it, you can see how nutmeg is used across many cuisines in so many different foods, from savoury West Indian dishes, to American desserts, to Italian greens.  And, inextricably intertwined, so it is with mace.

Mace’s flavor is quite similar to nutmeg though I would say a bit more delicate in some ways and stronger in others.  The warm, pumpkin pie-ness of nutmeg is a bit tempered here, whereas a peppery quality emerges and kind of hits you in the middle of your tongue.  It’s completely versatile like nutmeg, cinnamon or cardamom in that it’s additive to both sweet and savoury dishes. I love to throw it in to soups like a bay leaf and let the flavor permeate the liquid.  It’s also delicious in baked goods – biscotti, shortbread.  I like it in meat dishes as well – the peppery part picks up so well with beef, pork, or even game.

The crimson red of the mace lace turns to a more burnt orange through drying, but it’s one of those spices, like nutmeg, that retain its flavor well when stored ground.  So if you can only find it ground, it will still have great flavor.

tags: mace, Goa, spices
categories: all-5, spices-2
Thursday 12.02.10
Posted by Aliya LeeKong
 

Chili Cheese Toast

View fullsize cheese-toast-pic1-500x333.jpg
View fullsize cheese-toast-pic2-500x333.jpg
View fullsize cheese-toast-pic31-500x333.jpg

Chili Cheese Toast

I absolutely love when you are feeding someone who has no idea what cooking requires, and you serve them something sinfully easy to prepare, and they take a bite and look at you as if you performed a miracle of sorts.  That’s what happened the first time I gave my husband these cheese toasts…for breakfast no less.  You would have thought I had prepared foie from scratch.

Although these might look like a kicked-up pizza of sorts, chili cheese toasts are actually a very popular South Asian snack.  Every cook has her or his own version – perhaps a dash of chili powder, a touch of turmeric , some curry leaves.  My grandmother used to make a delicious version and bound all of the ingredients together with egg.  She then fried it on the stove top for ultimate crispiness.

I kept this version relatively simple, so feel free to modify to your heart’s content.  I didn’t feel like frying as I wanted this to be a tad healthier, so these are baked.  I also used sundried tomatoes instead of fresh ones to minimize the moisture, but feel free to use fresh tomatoes  – just try to remove as much liquid as possible before adding to the cheese mixture.

You get heat from the chilies, delicious green onion flavor, a bit of sweet and tart from the tomato, of course, lovely, tangy, bubbly cheese, and a nice satisfying crunch from the toast.   These make an amazing afternoon snack, but I love them for breakfast.  If you’ve got knife skills, you can make this in 10 minutes with the cooking time!  Enjoy!

Ingredients

Serves 2 to 4

1 jalapeno or Serrano pepper, finely chopped (any chili of your choice)

2 sundried tomatoes, finely chopped

1 scallion, green and light green part only, thinly sliced

1 cup mozzarella, shredded (preferably low-moisture)

3 tbsps cream cheese, room temperature

¼ tsp salt

freshly ground black pepper

4 slices white bread, toasted

chopped cilantro or parsley

Procedure

Preheat the broiler.

In a bowl, mix together chopped chilies, sundried tomatoes, scallions, mozzarella, cream cheese, salt and pepper.  Spoon equal amounts of mixture onto 4 slices of toasted white bread.  Spread to create an even layer on each piece of toast.

Place cheese toasts on a baking sheet and place under the broiler.  Broil for anywhere from 3 to 5 minutes until cheese has melted – keep it under a bit longer if you like your cheese to brown (like I do!).  Sprinkle with a bit of fresh cilantro or parsley before serving.

tags: South Asian snacks, Chili cheese toast, cheese toast recipe, South Asian cheese toast
categories: all-5, breakfast, recipes, snacks, vegetarian
Wednesday 12.01.10
Posted by Aliya LeeKong
 

Spicy Mussels with a Kokum-Coconut Broth

View fullsize mussel-pic1-500x333.jpg
View fullsize mussel-pic2-500x333.jpg
View fullsize mussel-pic3-500x333.jpg

Spicy Mussels with a Kokum-Coconut Broth

This Goa trip I just took has inspired a host of recipes – the fresh ingredients, bright flavors and colors, interesting cultural mix.  I seriously have to restrain myself to prevent all of my recipes from being monopolized by this cuisine.  This dish is one I was dreaming about after I made traditional Goan fish curry during my first few days there – an elegant take on mussels using a popular Konkani ingredient, kokum.

I posted about kokum before I left for my trip, but it’s effectively the dried rind of a local plum-like fruit.  It adds acidity and tartness to dishes there.  It’s often interchanged with fresh tamarind, so you could add a touch of that here instead if you happen to have it on hand.  You won’t get the same flavor, but I’ll bet it’s still delicious.

I love how cheap mussels are.  I average about 1 pound per person for a main, and at $3 a pound, there’s not a better deal.  They work incredibly well for entertaining – cheap yet elegant.

The combination of coconut and kokum was really popular in Goan dishes, though they tend to use freshly grated coconut.  A lot of their dishes also had this beautiful balance of tart, creaminess from the coconut, and a bit of sweetness from jaggery, which is unrefined cane or palm sugar.  Coconut milk is a lot easier to work with, so I used that here, and I used honey instead of sugar because I love the flavor.

The resulting broth is warmly spiced, with heat from the chili, acidity and tartness from the kokum and wine, and tempered by the creamy coconut milk.  A splash of fresh lemon juice and cilantro add brightness, and the dish is surprisingly light.  I toasted up some slices of a crunchy, French loaf with olive oil and a bit of salt and used it to sop up the sauce.  Decadent. Enjoy!

Ingredients

Makes 2 to 4 servings

2 lbs fresh mussels, scrubbed and beards removed*

3 tbsps butter

2 shallots, finely chopped

1 finger chili, halved and split

½ tsp ground coriander

¼ tsp ground cinnamon

¼ tsp ground black pepper

4 cloves garlic, minced

¼ cup white wine

1 can coconut milk

1 ½ tsps honey

1 to 3 pieces of kokum (depending on the strength/souring quality of the kokum)

1 handful cilantro, finely chopped

Salt to taste

2 scallions, green and light green parts only, thinly sliced

squeeze of lemon juice

Procedure

Heat a medium-sized pot or dutch oven over medium-low heat.  Add butter and when foam subsides, add shallots and a pinch of salt to draw out the moisture.  Cook for a minute or two and add in the chili and ground spices.  When shallots are translucent, add minced garlic and cook for 30 seconds or so or until it’s fragrant.

Add white wine and reduce until very little is left.  Add coconut milk, honey, kokum pieces, and 2 tablespoons of the cilantro.  Some kokum is extremely sour, so start with 1 piece and increase up to 3 depending on how tart you’d like your broth.  Bring mixture up to a boil and lower to a simmer.  Cook for 5 to 7 minutes or until the liquid has reduced by half.  Taste and adjust seasoning at this point.

Throw in the mussels and scallions.  Bring temperature up to a simmer again, and cook covered for a few minutes until mussels open.  Mine took somewhere between 3 and 4 minutes – you don’t want to overcook.

Squeeze fresh lemon juice over mussels, transfer to a bowl, and sprinkle remaining cilantro on top.  Serve hot with big pieces of toasted, crusty bread.

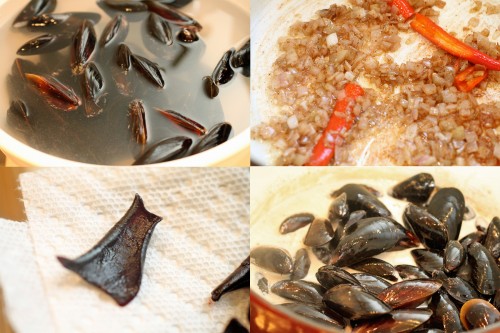
*I think a key to making delicious mussels is thoroughly cleaning them.  I like to scrape around the outside of each mussel with a pairing knife, removing any debris and hairy parts (beard).  Prepare an ice- cold bowl of water and add sea salt until the water tastes pretty salty.  Rinse off mussels, place in salt water, and refrigerate for a minimum of a half hour.  The mussels will release a lot of their sand and grit this way.  Remember to rinse again before cooking and discard any open mussels.

tags: mussels, seafood recipes, spicy mussels, kokum
categories: all-5, recipes, main dishes-1
Monday 11.29.10
Posted by Aliya LeeKong
 

Saffron & Roasted Garlic Spaghetti Squash Gratin

View fullsize squash-pic1-500x333.jpg
View fullsize squash-pic2-500x333.jpg
View fullsize squash-pic3-500x166.jpg
View fullsize squash-pic4-500x333.jpg

Saffron & Roasted Garlic Spaghetti Squash Gratin

Saffron, without a doubt, is an expensive spice to work with.  I’m a bit of a deal hunter when it comes to it and always search around when I’m traveling to see if I can get it on the cheap.  I remember spotting it in the medina in Marrakech for a ridiculously low price and basically carting home a bushel full.  It wasn’t incredibly fragrant (and quite frankly the color was off) but eh, it was saffron!  It’s been sitting in my spice cabinet ever since – the lousiest, tasteless saffron I’ve ever met…and somehow I still won’t part with it.

The saffron for this dish I picked up during my visit to Mercat de la Boqueria a few months back.  I still trekked around to each stall that sold it to make sure I got the cheapest one!  Got it right this time.  This stuff has an incredible perfume and was beautiful in this dish.

When I dug deep into why I thought spaghetti squash and saffron would pair well together, I realized the mental origin of this dish might seem a bit strange.  There’s a South Asian pudding that can be made with either rice or vermicelli called kheer; it’s often scented with saffron.  This, to me, was like a savoury version of it.

The saffron, of course, compliments the flavor of the spaghetti squash, which I boost a bit with a touch of brown sugar.  The sweet, roasted garlic adds a lovely nuttiness and works incredibly well with the freshly grated parm.  I love this dish.  It’s a bit sinful, but healthier as far as gratins go since we’re using squash.  Cheesy, creamy, nutty with the perfume of saffron – Enjoy!

Ingredients

Yields 1 2-quart casserole dish

2 medium-sized spaghetti squash

5 garlic cloves

olive oil

salt and freshly ground pepper

½ stick butter

¼ cup all-purpose flour

2 cups milk

¼ cup crème fraiche

generous pinch of saffron

pinch of cayenne

a few dashes of hot sauce

1 ½ tsps light brown sugar

½ cup freshly grated parmesan

Procedure

Preheat oven to 375° F.

Poke holes with a knife into the spaghetti squash on all sides and place on a foil-lined baking sheet.  Season garlic cloves with a little olive oil, salt and pepper and wrap separately in foil.

Bake the squash for 1 hour turning every 15 to 20 minutes.  Cooking time may vary depending on the size of the squash.  Let it cool.  Split the squash lengthwise (should easily cut) and remove the seeds.  The flesh should be easy to pull out – if not, place it cut side up back on the baking sheet and cook for a bit longer.  I like to use a fork around the edges to pull out the squash flesh.  You want all of it to be separate, like spaghetti.  Reserve in a bowl.

Remove the garlic after another 15 minutes or so.  It should be soft, caramelized, and smell nutty and fragrant.

Reduce oven to 350° F.

In a saucepan over medium-low heat, melt butter.  Add flour and cook 2 to 3 minutes, whisking continuously.  Add milk, crème fraiche, saffron, cayenne, hot sauce and sugar.  At this point, you can purée the roasted garlic and add it.  I actually just added the cloves right in and used my whisk and the heat to break it up.  Continue to whisk and simmer for 5 to 6 minutes.  It should be at a slow bubble.

Combine béchamel mixture with squash and transfer to a greased 2-quart baking dish.  Sprinkle the freshly grated parmesan all over the top, and bake for 45 to 50 minutes until brown and bubbly.

tags: spaghetti squash gratin, squash recipes, spaghetti squash recipes, gratin recipes, saffron
categories: all-5, vegetarian, recipes, side dishes, main dishes-1
Monday 11.22.10
Posted by Aliya LeeKong
 
Newer / Older