X

Sign up to receive exclusive recipes, tips, updates and other goodies from Aliya!

  • Home
  • Blog
    • All
    • Recipes
    • Spices + Ingredients
    • Lifestyle, etc.
    • Travel
  • The Cookbook
  • The App
  • Media
    • All Media
    • Video
  • About
  • Passions
Aliya LeeKong
  • Home
  • Blog
    • All
    • Recipes
    • Spices + Ingredients
    • Lifestyle, etc.
    • Travel
  • The Cookbook
  • The App
  • Media
    • All Media
    • Video
  • About
  • Passions

Homemade Chicken Thigh Shoyu Ramen

View fullsize Photo Dec 09, 1 52 57 AM.jpg
View fullsize Photo Dec 09, 1 54 59 AM.jpg
View fullsize Photo Dec 09, 1 55 07 AM.jpg

HOMEMADE CHICKEN THIGH SHOYU RAMEN

Secretly, when I go out of town, my husband goes to the store and buys instant ramen noodles.  He won't admit it or mention it when I'm gone, but I come back to the evidence stuffed in our trash can...

I decided to try to make ramen from scratch and outdo the store bought stuff!  Although, traditional ramen can take up to 3 days to make a proper broth, etc., I was not up to that task.  I was a bit under the weather and wanted this ramen to do double duty as my medicinal chicken soup.  SO I decided to do a delicious homemade chicken stock, infuse it with a little kombu and finish it with a shoyu-based tare.  All of the terms are a bit confusing, but Serious Eats does a great breakdown of all of the different types of ramen.

The best part of ramen are the fixings! What to put in your ramen? I used crispy chicken thighs, sliced red chilies, bean sprouts, baby bok choy, corn, scallions and some enoki mushrooms, and this kept it super fresh and light.  Whenever I’m in the Japanese store getting ingredients, I also pick up a few packs of fish balls from the freezer section.  These are made from fish paste, cook up quickly and taste delicious in ramen, particularly if you just make a simple dashi base (water + kombu + bonito flakes).  But you can get creative here: leftover chicken, spinach, ground beef, pork belly……whatever you want!  Enjoy!

Ingredients

Serves 4 to 6

For the Dashi and Tare:

2 quarts homemade or store-bought chicken stock

1 (10” x 4”) piece of kombu, wiped clean with a damp cloth

¼ cup shoyu (Japanese soy sauce)

2 tablespoons mirin

3 tablespoons sake

For the Ramen:

3 tablespoons canola oil, plus more if necessary

4 – 6 boneless chicken thighs, skin-on and room temperature

6 garlic cloves, minced

3 tablespoons toasted sesame oil

4-6 (3 oz) packages dried ramen noodles (if using fresh or homemade, replace each 3 oz dried with 5 oz. fresh)**

2 to 3 pieces baby bok choy, halved

½ cup enoki mushrooms, cleaned

3 large eggs, soft boiled*

2 scallions, thinly sliced

2 small red chilies, thinly sliced

2/3 cup corn, cooked

Salt, to taste

Other optional garnishes: togarashi, nori sheets, menma (fermented bamboo shoots), white pepper

Preheat the oven to 400° F.

For the dashi and tare:

Place the 2 quarts stock in a large pot and add the kombu.  Let soak 30 minutes.  Slowly, bring the stock up to a simmer and simmer for 6 minutes.  Remove the kombu and discard.  Reserve the stock in the pot until ready to serve.

In a separate bowl, combine the shoyu, mirin and sake and set aside.

For the Ramen:

In a large sauté pan, heat the canola oil over medium-high heat.  Make sure the chicken thighs are very dry and season on both sides with salt.  Place the thighs skin-side down in the hot pan and lower the heat to medium.  Cook for about 5 to 7 minutes until the skin crisps.  Flip and cook another minute.  Transfer to a sheet pan and finish in the oven for 10 minutes.  Let rest about 5 minutes and then slice the thighs to desired thickness.

In the same pan, add the minced garlic.  If the thighs haven’t rendered enough fat/drippings, add a little more oil, just enough to coat the garlic.  Cook for another 3 to 4 minutes until browned.  Strain infused oil into a bowl and add the sesame oil.  If you want, you can also blend the oil with the garlic to make it extra potent.  Set aside until ready to serve.

Heat a large pot of water.  Boil noodles per package directions until al dente.  Drain.

To Assemble:

Bring infused stock up to a boil and add the shoyu mixture.

Divide the cooked noodles and broth between the bowls.  Top with the sliced chicken, bok choy, enoki mushrooms, eggs, scallions, sliced chilies and corn.  Drizzle a teaspoon or two of the garlic sesame oil over each bowl.

Serve immediately.

*Eggs should be boiled only for about 7 minutes.  The yolk shouldn’t be completely set.

**If you are up to the task, making your own ramen noodles from scratch can be fun.  Ramen noodles aren’t just your average pasta noodle - they have to be able to stand up to sitting in a bowl of hot broth and keeping their signature chewy texture.  If you were to use a regular pasta dough, the noodles would be overcooked by the time you got through the entire bowl. 

What gives ramen noodles their texture and color, believe it or not, is the addition of one particular ingredient: Kansui, or alkaline minerals.  It’s difficult to find this ingredient if you don’t have a good Japanese store near you, but you can make it at home, I bet you have it in your pantry right now!  Baking soda. All you have to do is bake the soda for an hour at a low temp to change the properties from bicarbonate to carbonate.  It’s really that simple!

For the Noodles:

3 g baking soda
150 g lukewarm water
2 g sea salt
300 g all purpose flour

Preheat the oven to 250° F.  Sprinkle the baking soda on a sheet tray and bake it in oven for about an hour.  You can bake more than the recipe amount and keep the excess stored in an airtight jar indefinitely. 

Mix the water, baked baking soda and salt in a bowl until dissolved.  Measure flour into another bowl, and then add the water mixture.  Combine together and make a very flaky loose, crumbly dough.  Form mixture in to a ball and knead for about 5-10 minutes. 

The dough will be a lot more tough than pasta dough, and that is exactly what you want.  After the dough is smooth, wrap and keep at room temp for an hour. 

Cut the dough into 4- 6 pieces. You can then break out the pasta machine and roll the dough until the 2nd to last setting.  I cheat and put my dough through the spaghetti attachment instead of cutting by hand….up to you.
 

tags: ramen, homemade ramen, how to make ramen
categories: all 4, blog, main dishes, recipes, soups, soups & salads, traditions
Wednesday 12.14.16
Posted by Aliya LeeKong
 

Native American Heritage Day

NATIVE AMERICAN HERITAGE DAY

While Thanksgiving has long been my favorite holiday, I (unfortunately) haven't given it a ton of thought beyond a time for family and friends to get together, reset, eat, and share some beautiful moments.  The reality is the history of Thanksgiving is not so rosy, so I think I would be remiss not to pay homage to the Natives of our country.

Native American Heritage Day is the day after Thanksgiving, and it has me reminiscing about my trip to the Four Corners and the Navajo women I met and made fry bread with.  It often baffles me that Native American food is so elusive to the average person (myself included!), particularly when you think about how so many of our Thanksgiving tables originated with Natives teaching us about farming.  And when you think about it, it’s really just farm to table…right!?  They cooked according to their regions and what the land provided for them.

Over the past couple years, more and more chefs have been trying to revive this cuisine around America; it is, after all, the true heritage of this country.  As with other countries and their native cuisines, there are many different types of Native American foods based on regional tribal differences. Many cherish fry bread, and then there are some that refuse to make it because of the history of how it was born.  Eater had a great article about Native American food last summer that's a good read.

Here are a few Native recipes to get you started - enjoy!

NAVAJO FRY BREAD


CEDAR-PLANKED SALMON WITH MAPLE GLAZE AND MUSTARD MASHED POTATOES

Photo: Epicurious


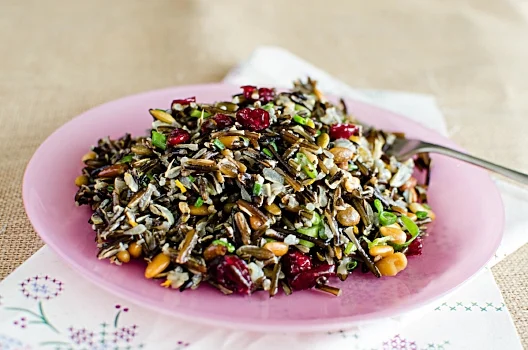
WILD RICE WITH CRANBERRIES

Photo: Merci Mama


MAQUE CHOUX

Photo; Maque Choux


CORN HUSK BREAD

Photo: Cooking with Mama


THREE SISTERS STEW

Photo: NYTimes

tags: native american culture, native american food, native american heritage day, national native american heritage month
categories: all 4, appetizers 1, breads & cakes, holiday, main dishes, lifestyle-1, soups & salads, soups, traditions, vegetarian-2
Friday 11.25.16
Posted by Aliya LeeKong
 

Chipotle-Miso Butternut Squash Soup

CHIPOTLE-MISO butternut SQUASH SOUP


I know, I know - chipotle plus miso??  Obviously, this has no root in real tradition, but those flavors together are literally incredible, something I first played around with in my mind before putting them together.  I love creating new soup recipes during squash season - that sweetness is the perfect canvas for spices and flavor.  Squash creates such a lush, smooth, silky texture without even adding any cream so it’s the perfect option for dairy-free days.  

The recipe below is for a spiced butternut squash soup, but you can easily substitute pumpkin, honeynut or kabocha squash for this recipe.  Most soups call for roasting the squash first, but I skip that step here.  The cubed, raw squash cooks up while it's simmering with all of the great flavors here.  I love the smokiness and heat of the chipotle mixed with the umami and sweetness of the miso.  Such a great, quick weeknight meal.  I served it along with my pan de coco (coconut bread subbing coconut milk in this recipe)….sooooooo good!

Serves 4 to 6

2-3 tablespoons unsalted butter
1 medium onion, diced
1 shallot, diced
3 cloves garlic, minced
1/2 teaspoon brown sugar
1 butternut squash, halved and seeded and cut into a 1-inch dice (optional: save the seeds for garnish)*
1/4 cup mirin**
4 cups vegetable or chicken stock
2 tablespoons white shiro miso**
1 chipotle in adobo (canned)
Salt and lemon juice, to taste
chopped chives, for garnish

In a soup pot, melt butter over medium-low heat.   Add onion and shallot
with a pinch of salt and cook for 5 to 7 minutes until translucent.  Add the
garlic and the brown sugar and cook for another minute.

Add in the cubed squash along with the mirin and cook for 2 to 3 minutes
until the wine has mostly absorbed.  Add the stock and bring up to a simmer.
Simmer for 35 minutes, partially covered, until all of the squash are
tender.

Add in the miso and chipotle and transfer to a blender or use a hand blender
to puree to your desired consistency.  Season with salt and adjust acidity with lemon juice if necessary..

Serve sprinkled with chives & toasted seeds (if using).

* To toast the squash seeds, preheat oven to 350 degrees.  Clean seeds of any pulp and dry on paper towels. Toss the seeds with oil, salt, cumin and smoked paprika.  Toast in oven until golden brown about 10-15 minutes.  Let cool on a tray and set aside for garnish on soup.

** Mirin is a type of Japanese rice wine.  This along with the miso can be found at Whole Foods or a specialty / Asian grocer.

tags: squash recipes, squash soup, how to make squash soup, butternut squash soup, butternut squash recipes, best butternut squash recipe ever
categories: all 4, appetizers 1, main dishes-1, man-friendly, quick & easy, recipes, soups, soups & salads, vegetarian-2
Wednesday 11.02.16
Posted by Aliya LeeKong
 

FATHER'S DAY GRILLING

FATHER'S DAY GRILLING

Father's Day falls in such a sweet spot of the year - the weather is always perfect and who doesn’t love a little family gathering outside!?  My plan to celebrate this weekend will be an afternoon of easy grilling - I can't go wrong keeping it a lil' meat-centric.  :) Below are some great grilling recipes to give you some ideas for this weekend.  Enjoy!


GRILLED BUTTERFLIED CHICKEN WITH CHARRED JALAPENO SAUCE


GRILLED LAMB SIRLOIN TACOS WITH CORN, PICKLED CHERRY PEPPERS AND CHIPOTLE CREMA


SALT & PEPPER BABYBACK RIBS

Photo: Food52


GRILLED PORK BANH MI

Photo: Food & Wine


GRILLED SHRIMP WITH KIMCHI-MISO BUTTER

Photo: Rasa Malaysia


GRILLED AVOCADO SALAD WITH GREEN GODDESS DRESSING

Photo: Salt & Wind


CORN WITH GREEN CHILI BUTTER & COCONUT


TAHINI OREOS

Photo: My Name is Yeh


RUM SWIZZLE

Photo: Bon Appetit

tags: father's day, what to cook for father's day, grilling ideas, what to grill for father's day, father's day brunch
categories: all 4, blog, lifestyle-1, man-friendly, recipes, salads, side dishes-1, soups & salads, main dishes-1
Wednesday 06.15.16
Posted by Aliya LeeKong
 

How to Make Your Every Day Salad Taste Good

HOW TO MAKE YOUR EVERY DAY SALAD TASTE GOOD

With spring on its way, I’m getting super impatient waiting for the fresh greens and veggies that are about to explode at the farmers' markets.  For me, and I feel like a lot of others, when the weather gets warmer I start to crave lighter, healthier foods.  The thought of a winter pot roast just isn’t doing it for me anymore.  But, truthfully, I'm not the biggest salad person!  I have, however, mastered how to dress up a salad (in a healthy way) to make it more appealing to a big eater like me, combining flavors and textures to make it crave-worthy.  Thought I would share a few of these tips with you guys!


THE BEST MIX-INS

You've got the greens - now what?  I think the perfect salad has a great raw base but works in one or two cooked elements.  Roasted beets and salad always seem to go hand in hand with me; a mixture of golden and red roasted with shallot, garlic, olive oil, fresh thyme and marjoram are the best.  If you aren't a beet fan, roasted sweet potatoes, squash, fennel, cherry tomatoes or asparagus are delicious.  A simple blanching of veggies (cauliflower, broccoli, green beans, etc…) is easy too - bring water to a boil, salt heavily, add veggies for a minute or two max depending on how large the cuts are and then shock the drained veggies in ice water.  You just want to get rid of that raw bite and keep the vibrant colors.  I love to keep blanched veggies in the fridge to throw into salads or even a fried rice....ok, back to salads! :) 


HERB IT UP

Fresh herbs are aromatic, healthy and go a long way in adding flavor with just a light chop and toss in (cilantro, parley, basil, dill, mint!)  There's this one stall at my local market that has amazing micro greens and mustard greens.  I love the spicy bite I get when I have a mixture of mustards greens with my regular green mix….such a great surprise.  Mint and cilantro are my favorite combo though - they just add such brightness and cut some of the bitterness of other greens.


MAKE A KILLER DRESSING

Photo: Teacher-Chef.com

Photo: Teacher-Chef.com

The dressing makes all the difference.  I always have olive oil, sherry vinegar, dijon mustard and lemons on hand.  A super simple vinaigrette and always a hit! 

We don't always think of oils as important, but it can completely change the flavor of a dressing.  Lately, I've been using grapeseed oil for a more milder flavor than EVOO; for me, I find extra virgin gets bitter so easily.  Other great oils are avocado oil (it has a faint aniseed flavor to it), hazelnut oil, walnut, macadamia and, of course, sesame oil.  Infused oils also add great flavor - think rosemary, garlic, and, of course, truffle.

Once you have the base of your vinaigrette figured out you can then add other ingredients to create a creamy dressing without the cream.  Mustard is an incredible emulsifier, the ingredient that makes a dressing thick, but there are so many other things you can add to do that.   My current fave is tossing some roasted shallots and garlic in the blender with dijon, sherry vinegar and grapeseed oil - so tangy and delicious.  Other great ingredients for a creamy dressing without the cream are tahini, miso, yogurt, avocado, and almond butter (or any nut butter, really).  Also, jam or jelly makes a great emulsifier, so if you like a touch of sweetness, try a tablespoon or two of currant or berry preserves.


ADD SOMETHING PICKLED

Pickled chilies are a staple in my fridge. I pretty much put them on everything I eat, so why not salad?  A little sour and a little heat….sooo good!  Olives are a no brainer - nice plump, juicy kalamata or green, stuffed with blue cheese.  Capers are a nice little pop of salty goodness which, by the way, are made even more delicious if you deep fry them!  You can also do a quick pickle of other veggies like radishes, red onion and daikon for a nice crunchy texture, or, if you are a bit experimental, of dried fruit.  Pickled raisins, sultanas or even cherries add a great sweet-sour bite.


CROUTON ALTERNATIVES

Love the crunchy topping of croutons but don’t want to eat the bread!?  There are lots of crunchy alternatives.  Of course, nuts are always a great option, but my latest experiment was with red quinoa.  I simply soaked as usual for 10-15 minutes and baked it in the oven until crispy!  You can also do it on the stove top.  Buckwheat is another great grain to toast up - some grocers even sell it toasted.  Sev is also a great crunchy alternative.  It is an Indian snack made out of seasoned chick pea flour paste and deep fried.  They come in various sizes, but are very thin…thinner than the crunchy chow mien noodles you usually see on “Asian” salads. 


TOP IT OFF WITH A SPICE BLEND

I often see people add salt and pepper to their salads before eating, so why not make a spice blend to give it more depth of flavor.  Egyptian Dukkah is always a great go-to.  Za'atar (usually a combination of sumac, sesame seeds and thyme) adds a sort of tangy and nutty flavor to any dish.  Advieh is a Persian spice mix usually containing dried rose petals, cardamon, cinnamon and cumin, so warming and aromatic. You can find these spice blends at the store if you aren’t the spice blending type of person.  I also stock up on Japanese rice seasoning blends (furikake) for a quick shake of flavor on my salad.  They usually have bonito flakes, dried seaweed and sesame seeds in them adding a little saltiness to your salad.  

Enjoy!


tags: how to make a good salad, how to make salad taste better, creamy dressing with no cream, salad dressing ideas
categories: all 3, appetizers 1, lifestyle-1, quick & easy, salads, soups & salads, vegetarian
Wednesday 03.16.16
Posted by Aliya LeeKong
 

The Very Versatile Winter Squash

THE VERY VERSATILE WINTER SQUASH

The leaves are changing colors, the air has a cool crisp smell to it and the farmers' market is booming with a ton of winter squashes.  Nothing says cold weather comfort food than a great squash soup, roasted root vegetables with your Sunday supper or a nice, warming Indian curry.  The only difficulty is choosing which squash to use in your dish!  I put together a few of my favorite ways to bring some warmth to your dinner table this winter.


SOUPS

The first weekend of October has passed, and the heating has kicked in.  You know winter is looming around the corner, and the upside is that it’s perfect soup-making (and eating!) weather.  Everyone loves a great squash soup; they are so versatile, being sweet and savory, and take easily to different cuisines depending on the spices you use.  My Sopa de Flor de Calabaza (Squash Blossom Soup), inspired by a traditional Mexican soup, is a delicious, silky and rich soup without any cream that uses butternut squash.   Another warm and comforting soup is my Pumpkin Soup with Garam Masala & Creme Fraiche.  This soup uses the traditional South Asian spice blend, garam masala (it’s spicy and full-flavored but has no real heat to it), and the warming spices in the blend pair perfectly with pumpkin.


ROASTED

Roasting squash is a no brainer, and cut into pieces, a good squash only needs about 20 to 30 minutes in a 400° F oven.  Of course, the old standby butternut is fantastic here, but kabocha, which is an Asian variety of winter squash, is also delicious.  It has a strong and sweet flavor that pairs well with spices.  Delicata is another great options because it has super thin skin and is really easy to peel. 

Above is a photo from my cookbook for a savoury, winter vegetable crumble; roasted squash on its own would be delicious with a salty, Parmesan-laced crumble topping..  The great thing about roasted squash is you can eat it as is, purée it (see below), stuff it before roasting, make it into a hash by itself or with sweet potatoes or even toss it into a salad that day or the next!  I personally love this Miso Harissa Delicata Squash salad recipe.


PURÉES

Photo: NYTimes

Photo: NYTimes

Another great use for winter squashes is purées.  They make a great substitute for the stand-by mashed potato side and are beyond easy to make.  This recipe is the most basic - a great building block in your kitchen arsenal that you can tailor to your tastes.  A few ideas: add roasted garlic, truffle oil, chopped olives, pickled chilies or sprinkle with za'atar to make it extra special.


CURRY

Photo: Indian Simmer

Photo: Indian Simmer

To me, nothing is more satisfy or warming to the soul than curling up on the couch with my pajamas, a good movie, or book, and a hearty bowl of curry and rice.   Curries originate from the Indian subcontinent and Southeast Asia.  They can be wet or dry with wet curries resembling stews in a significant amount of sauce and dry curries cooked with little liquid that evaporates and leaves a coating on the ingredients. Curries usually involve a variety of spices with the main spices being turmeric, coriander, and cumin on the Indian side of things; chili is always a player.  Southeast Asian curries make use of different chili pastes and other herbs, aromatics and spices like kaffir, lemongrass, and galangal.  Lucky for us, squashes play well with all different types of curry.  Check out this one for Acorn Squash with Fenugreek, Chili, and Amchur.


PASTA

Photo: Reclaiming Provincial

Photo: Reclaiming Provincial

When the weather turns cool, who doesn’t love coming home to lasagna or a big bowl of pasta on the table?  To make traditional lasagna a bit more interesting, try adding some squash in between the lush layers of pasta, cheese and sauce. OR get a bit more advanced and try this gnocchi.  If gluten isn't your thing, spaghetti squash makes a fantastic substitute.  Raw, it looks just like other squashes on the inside, but after it is cooked the insides fall out in ribbons resembling spaghetti.  This recipe uses the spaghetti squash as the star of the “pasta dish”.


DESSERTS & BREADS

Being such a versatile vegetable, squashes can also find themselves in the dessert category.  Hello…..pumpkin pie anyone!? But don’t just let the pumpkins have all the fun in the pies, butternut and acorn squash can hold their own in this category too!  Try my bread recipe using butternut squash with apples and maple to make a delicious moist bread to serve with afternoon tea.

Enjoy!


tags: butternut squash recipes, butternut squash bread, squash recipes, how to cook squash, how to roast squash, butternut squash soup, squash soup, spaghetti squash recipes
categories: all 2, holiday, lifestyle, main dishes, man-friendly, quick & easy, recipes, soups, soups & salads, vegetarian, side dishes-1
Thursday 10.08.15
Posted by Aliya LeeKong
 

Peak Season Corn: Buying/Cooking Tips + 6-Ingredient Salad

PEAK SEASON CORN: BUYING / COOKING TIPS + 6-INGREDIENT SALAD AND OTHER RECIPES

Corn is summer, and at no other point in the year is it as sweet and tasty as it is now.  This is all my family is eating right now and in so many different ways.  I wanted to give you guys a few tips on how to maximize your corn experience - from choosing the right cobs, cooking and shucking them, to a simple "how-to" corn salad and other recipes.

BUYING TIPS: Buying the right corn can make all the difference because corn gets starchy and loses sweetness after it's picked.  Obviously, you want freshly-picked corn with bright, plump kernels, but you don't have to peel back the husks and peek to check them.  

  • Look for bright green cobs where the husk is tight over the corn.

  • The silks at the end should be brown and slightly tacky and damp - if they are black and/or dried, the corn is a bit older.

  • Feel for the kernels through the husk to make sure they are plump.

  • Finally, check the top for wormholes and avoid any where it looks like they may have gotten through.

COOKING AND SHUCKING: I put these two together because I'm sharing with you my favorite way of cooking corn.  Some prefer boiling which requires shucking the cobs first and getting rid of all of that pesky silk before cooking.  Go for it if that's what you like (or if you want to give the kids something to do)! 

I personally prefer a quick roast in the husks.  25 minutes at 400˚F in the oven (right on the rack) or on the grill set up for indirect heat makes sure you have super moist, flavorful kernels.  The plus side?  Once they are cool enough to handle, all of the silk slides right off with the husks.  No mess!  I then eat them straight from the cob, cut them off for a salad (see below) or toss them back on the hot side of the grill for a little char right before serving!

6-INGREDIENT CORN SALAD "HOW-TO": Corn salad shouldn't be something that requires exact measurements.  Here is what generally goes into my corn salads.

  • Corn - cooked and off the cob (see roasting in the husks above).  For a modest side, I figure 1 cob per person.

  • Peppers - hot, sweet, roasted, pickled.  Add enough to add color.

  • Another surprise ingredient - Go seasonal with grape tomatoes, radishes, zucchini or arugula.  Think starchy with potatoes, lima/cannelini beans or even couscous or bulghur.  Again, enough to add color and mix to the salad.

  • Onion - shallots, red onion, scallion, Vidalia - raw, charred, caramelized, roasted.  Just enough for flavor.  You can overdo here, but not really under-do.

  • Herbs - basil, chives, cilantro, parsley, mint, tarragon.  Choose one or use a few to layer flavor.  You can't really go wrong.

  • Acid - cider vinegar, lime or lemon juice, sherry vinegar, pickled pepper juice.  A few splashes.

That's it!  Mix them together in a bowl and season with salt and freshly ground black pepper.  Taste and add whatever is missing from above.  Let the flavors marry for a few minutes before serving - it will taste even better the next day!

Looking for other recipes?  Check out a few other ones I love.....

CORN WITH GREEN CHILI BUTTER & TOASTED COCONUT


corn pudding pic1.jpg

SMOKY, SPICY CORN PUDDING


SOPA DE FLOR DE CALABAZA (SQUASH BLOSSOM SOUP)


Enjoy!!


tags: farm fresh corn, corn salad recipe, how to buy corn, shucking corn, corn buying tips
categories: all 2, recipes, salads, soups & salads, vegetarian, side dishes-1
Wednesday 08.19.15
Posted by Aliya LeeKong
 

My Top 5 Beach Picnic Recipes

MY TOP 5 BEACH PICNIC RECIPES

For those of us that don't live steps from the water, going to the beach means lugging around a lot of stuff (and just forget it if you have kids!).  The last thing you want when you are remembering 3 different sunscreens, beach blankets, chairs and towels is to get too complicated on the food side of things.  So I thought I would share some of my favorite beach picnic recipes to keep it simple and delicious.

BLUEBERRY-HIBISCUS SMASH

You have to stay hydrated while at the beach, and this is delicious with or without the vodka.  Blueberries, mint, lemon and hibiscus tea - It's tart, lightly sweet and super thirst-quenching.

RED LENTIL DUMPLINGS

LOVE these red lentil dumplings from 101 Cookbooks.  The lentils are blended with roasted tomatoes, smoked paprika and garlic and wrapped up in potsticker wrappers.  These are protein-packed but not too bulky for beach-eating, and I love that they taste great (and keep) at room temperature.

ISRAELI COUSCOUS SALAD WITH LEMON, FENNEL AND BASIL

The key to a great beach salad is one that can stand up to the warm weather and doesn't get all wilty.  This salad is great because the fennel adds that perfect bite, basil and lemon give it brightness, and the couscous adds a bit of bulk to keep you satisfied.

BAKED SWEET POTATO CHIPS

Whether it's for the car ride or while you're lazing, something salty and crunchy is always in order, and I happen to love this recipe for baked sweet potato chips.  You basically slice up sweet potatoes, and all the work happens while they dehydrate in the oven...

DARK CHOCOLATE, CINNAMON & OATMEAL COOKIES

At the end of the day after no one can see or care about your bloat, indulge in these amazing cookies.  These are my most treasured, favorite cookie recipe ever and a go-to whenever I'm craving chocolate chip cookies.  Crispy edges, chewy, oatmeal-y bite inside, bitter dark chocolate offset with a hint of cinnamon - the best!

tags: beach recipes, picnic ideas, what to bring to the beach, easy salads
categories: all 2, lifestyle, quick & easy, salads, soups & salads
Wednesday 07.22.15
Posted by Aliya LeeKong
 

(Coconut) Daal with Super Greens

View fullsize soup1.jpg
View fullsize soup4.jpg
View fullsize soup3.jpg
View fullsize soup2.jpg

(COCONUT) DAAL WITH SUPER GREENS

This frigid weather in NYC combined with a lingering cold has me thinking about (and making!) my favorite soups and stews.  As soon as the weather turns, I make a batch of soup each week to fill in for lunch or dinner where necessary.  It's one pot cooking at its best; soup tastes better as it sits, is a great way to pack a lot of nutrients into a bowl, AND is, quite frankly, the easiest way to use up random vegetables and ingredients you have lying around.

This is a twist on my mom's lentils, daal, which are spiced, nuanced and creamy.  Daal was a staple in our household, and when I go home to visit, there is always some in the fridge to remind me of my childhood.  In this soup, I make the lentils a bit more dilute and add in any greens I have lying around - kale, baby spinach, chard, a super greens blend - to up the cold-fighting vitamins.  I sometimes add in a bit of coconut milk for silkiness, and if I need a bit more bulk, I throw in some cooked rice, bulghur or quinoa. 

What I love is that this is a really satisfying soup, but it also couldn't be easier to make.  The lentils simply need to boil with a bit of turmeric for 20 to 25 minutes.  Sauté the spices, aromatics and greens on the side in one pan, toss in and let simmer another 5 minutes.  That's it.  Enjoy!

Ingredients

Serves 4 to 6

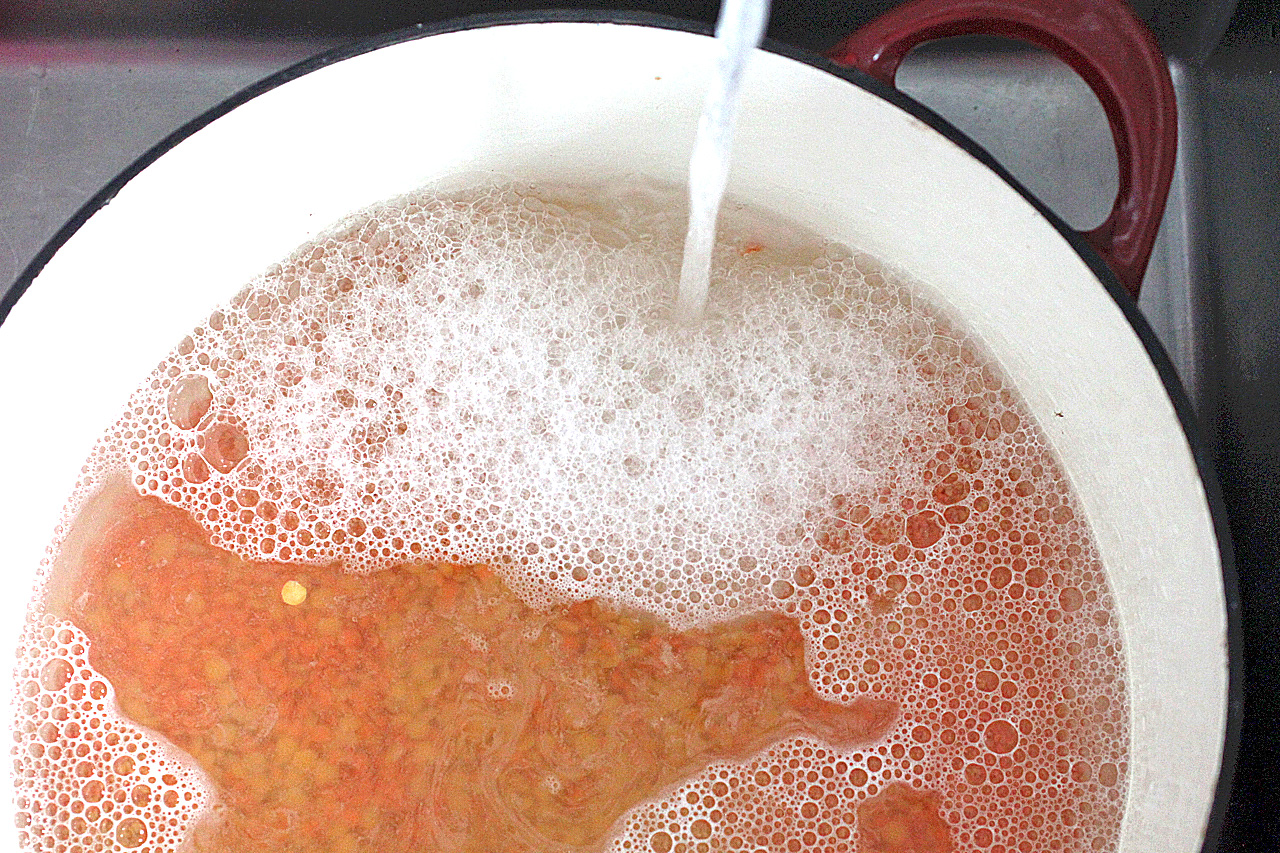
1 cup split lentils (I prefer a combination of red and yellow), picked through and rinsed thoroughly

½ teaspoon ground turmeric

2-3 tablespoons ghee or canola oil

1 teaspoon black or brown mustard seeds

½ teaspoon cumin seeds

1 shallot, minced

1 or two small green chilies, seeded and minced

3-4 garlic cloves, minced

½ teaspoon ginger, minced

½ teaspoon ground cumin

½ teaspoon ground coriander

1 plum tomato, seeded and chopped

1 bunch kale, baby spinach, chard or 2 handfuls of a super greens blend, washed

13.5 ounces fresh homemade, raw or canned light coconut milk (optional)

salt, black pepper, and lemon juice to taste

1 small handful of cilantro, finely chopped

Procedure

In a large pot or dutch oven, add the lentils, turmeric and 4 cups of water.  Bring up to a boil, lower to a simmer and simmer partially covered for 25 to 30 minutes until lentils are soft and break apart easily.  Add in another 1/2 cup of water if too much has evaporated and the lentils look thick.

Heat a medium-sized pan over medium high heat.  Add the ghee or oil and the mustard and cumin seeds.  When they start to sputter and pop, lower the heat to medium low and add the shallot, chili, garlic, ginger and ground spices.  Cook until the shallots are translucent and the spices smell toasted.  Add the tomato and a bit of water so the spices don't burn.  When the tomato starts to break down, add in the greens and let wilt slightly. 

Throw the vegetable mixture into the lentils.  If using, add in the coconut milk here as well.  Simmer for another 5 minutes for the flavors to combine, and then season generously with salt and pepper.  The lentils can take a decent amount of salt for the flavor to really pop, and I like to alternate with squeezes of lemon juice to get the right acid / salt balance.  Finish with the chopped cilantro.


tags: soup recipes, winter soups, daal, indian cooking, Indian recipes, coconut milk recipe
categories: all 2, soups, soups & salads, recipes, vegetarian
Friday 02.20.15
Posted by Aliya LeeKong
 

Sopa de Flor de Calabaza (Squash Blossom Soup)

View fullsize AliyaLeeKong_SopaDeFLor.jpg

Sopa de Flor de Calabaza (Squash Blossom Soup)

First, I want to say thank you to all of you guys that check my site or get my newsletter regularly – even when there is a bit of a lull.  You guys are truly what keep me coming back, inspiring me to share my recipes and thoughts on cultural foods.  With the weather turning a bit cool here in NYC, I’ve been on a soup-making kick as of late.  It just feels right – that warm comfort – and I’ve been experimenting like crazy: lentils with coconut, a kicked up chicken and barley soup, no-cream squash and apple.

This is a recipe straight from Exotic Table – inspired by a traditional Mexican soup.  Squash blossoms are the delicate, edible flowers of the zucchini plant and can often be found at the farmers’ market.  The traditional, Mexican version of this soup purées the squash blossoms right in, but I think they are more beautiful left whole, to finish the soup.  With the corn, potatoes, and squash, this soup is silky and rich without any cream, but a dollop of crème fraiche at the end really brings the flavor together.  Enjoy!

Ingredients

Serves 4 to 6

2-3 tablespoons unsalted butter

1 large yellow onion, finely chopped

1 jalapeno, finely chopped

2 Yukon gold potatoes, peeled and cut into a small dice

1 medium butternut squash, cut into a small dice

2 garlic cloves, minced

4 cups chicken stock

A small bunch of thyme

1 fresh or dried bay leaf

tiny pinch saffron (optional)

3 ears of corn, kernels removed and scraped for juice

8-10 large squash blossoms

Salt and freshly ground pepper

Crème fraîche, for garnish

Procedure

In a soup pot, heat the unsalted butter over medium-low.  Add the onions and jalapeno and sauté for 4 to 6 minutes until the onions are translucent.  Add the potatoes, squash and garlic and cook for another 2 minutes.

Add in the stock, thyme, bay leaf and saffron and bring up to a boil.  Reduce to a simmer and simmer for 10 minutes.

Now, add in the corn kernels and any juice from the corn and simmer for another 10 to 15 minutes until all of the vegetables are tender.

Remove the thyme bunch and the bay leaf, and purée the soup in a blender, working in batches.  Season to taste with salt and freshly ground black pepper.

I like the squash blossoms to be slightly raw, so I put 2 of them in each bowl along with a dollop of crème fraiche and pour the hot soup right over.  The soup wilts them just enough.

tags: squash blossom recipes, squash blossom soup
categories: all, recipes, soups & salads, vegetarian
Wednesday 09.25.13
Posted by Liz Neilson
 

An Easy Thanksgiving Side: Cranberry Salsa

View fullsize cranberry-pic1-500x333.jpg

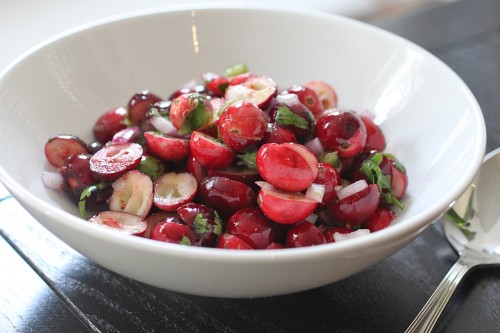
An Easy Thanksgiving Side: Cranberry Salsa

Thanksgiving is my favorite of favorites, and I’ve already gone on and on about how my sides turn into a total global mash up.  I love the day and although I go a little prep crazy, I do try to sneak in at least a few, no-brainer, quick dishes to make my life (and any voluntary sous-chefs!) a little easier.

This is a fast, Mexican-inspired side using seasonal fresh cranberries – don’t worry you can use frozen if that’s what you got.  I like to mix this up the night before and let all the flavors mingle (and the cranberries break down a bit).  It’s really tasty and adds a bit of heat and piquant flavor to the meal….enjoy!

Ingredients

Serves 6 to 8

3 cups fresh or frozen cranberries, halved

½ red onion, finely chopped

1 jalapeno, seeded and ribbed, finely chopped

2 – 4 tbsps sugar

pinch of salt

½ tsp lime zest

juice of half a lime

small handful of cilantro, finely chopped

Procedure

In a large bowl, mix all ingredients together.  Since different batches of cranberries can be sweeter than others, adjust the amount of sugar to your personal taste.

Refrigerate covered for at least a half hour to let the flavors marry.  Serve chilled.

tags: Thanksgiving ideas, cranberry salsa
categories: recipes, side dishes, all, soups & salads, vegetarian-1
Thursday 11.15.12
Posted by Aliya LeeKong
 

Rhubarb, Cucumber & Mint Salsa

View fullsize salsa-pic1-500x333.jpg
View fullsize rhubarb-pic2-500x333 (1).jpg
View fullsize salsa-pic3-500x333.jpg

Rhubarb, Cucumber & Mint Salsa

Increasingly, I’m realizing that every culture has its form of “salsa.”  When I was down in St. Lucia a few weeks back, I found out they have their version called souscaille.  In South Asian cuisines, it’s called kachumber, and in African cuisines, kachumbari.  At all points, it’s a fresh salad, often with onions or shallots, with acidity in the form of the juice or segments of citrus or vinegar.  I wanted to inject a little seasonality into my salsa this week, and spring’s tart rhubarb was the perfect add.

Rhubarb, contrary to popular belief, is a vegetable, and it has a crisp, fresh texture that’s somewhere between jicama and celery with a sourness that’s reminiscent of green apples.  I’ve played with it before in a dessert, a granita, but here I wanted to see what it could do from a savoury point of view.

The cucumber and rhubarb meld together beautifully.  You have the cooling, soothing, watery cucumber contrasted with the tart bite of the rhubarb.  The shallots add mellow onion flavor and the fresh mint a bright finish.  It would be perfect on fish or shrimp tacos or a simply grilled chicken breast.  Enjoy!

Ingredients

Yields approximately 2 ½ cups

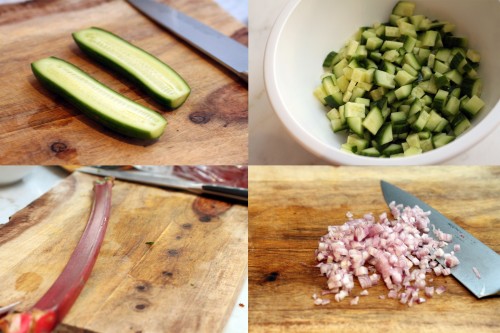
2 mini seedless cucumbers, cut into a small dice

1 stalk rhubarb, cut into small dice

1 shallot, finely chopped

juice of half a lime

½ tsp kosher salt

pinch cayenne pepper

pinch white sugar

small handful fresh mint, finely chopped

Procedure

In a small bowl, toss together the cucumbers, rhubarb and shallot.  Add the lime juice, salt, cayenne, sugar and mint mix thoroughly.

tags: rhubarb, salsa, recipes for spring
categories: all -1, condiments, recipes, side dishes, salads, soups & salads, vegetarian-1
Monday 04.30.12
Posted by Aliya LeeKong
 

Quick Use-Your-Veggies Quinoa Soup

View fullsize soup-pic1-500x333.jpg
View fullsize soup-pic2-500x166.jpg
View fullsize soup-pic3-500x166.jpg

Quick Use-Your-Veggies Quinoa Soup

I know what you’re thinking.  This chick went to Peru and came back plumb-quinoa-crazy since she just posted a quinoa recipe 2 weeks ago.  I feel you guys deserve an explanation, so I’m going to level with you.  I was actually working on an exciting recipe for some black sesame Arabic donuts with date molasses (sounds pretty delicious, no?), but I had a yeast malfunction issue. TWICE.  And after 2 trips to the store in the cold and a bit of heartache (I’m not a yeast novice.  I blame the yeast!), I decided to warm myself up with this soup and share it with you guys.  Donuts tbd…

I did, in fact, learn a version of quinoa soup in the Sacred Valley in Peru.  And I’ve made this soup a few times.  What I LOVE about it is that it gives you a chance to use up all of the random vegetables you might have sitting in your fridge.  I like to save onion scraps, carrot halves, any little bits of a vegetable – and all of that works well in the soup.  Not overcooking the veggies also adds a beautiful, textural crunch.
The soup I had in Peru was super rich, cooked with evaporated milk, egg, and luscious cubes of cheese.  I omit the egg, leave the cheese optional here and opt for a bit of heavy cream to thicken instead, but I have to admit the cheese is an amaaaazing part of the soup.  It’s so warm and comforting and really pops with flavor (while you get your protein punch from the quinoa).  If you keep cooked quinoa in your fridge like I do, this takes no time to make – 15 minutes (half an hour if you have to make the quinoa).  Either way, this is a perfect winter weeknight meal – enjoy!

Ingredients

Serves 4 to 6

2-3 tbsps olive oil

1 red onion, finely chopped

1 jalapeno, finely chopped

2 scallions, thinly sliced

1 ½ cups finely chopped mixed vegetables (carrot, celery, zucchini, etc.)

4 to 6 garlic cloves, minced

4 cups cooked quinoa*

2 quarts vegetable or chicken stock

1 cup cubed Monterey jack cheese (optional)

½ cup heavy cream

Handful of fresh cilantro, roughly chopped

salt and freshly ground black pepper

Procedure

Heat a medium-sized pot over medium heat.  Add olive oil and throw in the red onion and jalapeno as well as a bit of salt to draw out the moisture.  Cook for a few minutes until the red onions start to turn translucent.  Add in the scallions and mixed vegetables.  You want to cook for another few minutes but you want the vegetables to retain some crunch (so don’t overcook).

Add the garlic and sauté another 30 seconds and then throw in the quinoa and stock.  Bring the mixture up to a boil and then lower to a simmer.  Add in the cheese, if using, and the heavy cream and simmer for another 2 minutes so the flavors come together.  Add the cilantro and season to taste.

*As a rule of thumb, I assume quinoa triples in size.  So I made 1 1/3 cups of quinoa (in 2 2/3 cups water) for this recipe.

tags: soups for winter, quinoa, vegetarian meals, leftover veggies, quick soups, easy soups, weeknight meals
categories: main dishes, recipes, soups & salads, all -1, vegetarian-1
Monday 02.06.12
Posted by Aliya LeeKong
 

Farm Stand Corn & Mushroom Tortilla Salad

View fullsize corn-tortilla-pic2-500x333.jpg

Farm Stand Corn & Mushroom Tortilla Salad

I walked into a coffee shop the other day, Nina Simone playing in the background, an unidentifiable buzz and warmth in the room and the scent of hot beverages brewing, and it totally transported me; I feel ready for the cooler months ahead to be filled with days of apple picking, Fall dinners with friends in Fort Greene, weekend drives to go leaf peeping, the build to the holidays and rum toddies.  I’m finally facing the fact that it’s the end of summer and am filled with this mixture of wistful nostalgia and excited anticipation of the fall to come. That said, it’s my last hurrah! And I couldn’t help but take one last shot at summer with this beautiful salad inspired by the farm stands I visited out in the South Fork this past week and a Mexican tortilleria in Queens where I spent the day cooking.

In thinking about Mexican food and traditions, I wanted to visit Tortilleria Nixtamal because they make incredible corn tortillas in keeping with true Mexican tradition, a not-so-straightforward process that hinges on corn quality, cal, humidity, and timing (they happen to supply to many of the best of the best Mexican restos in town).  The restaurant also turns out gorgeous authentic food to boot, so I headed out to Queens to learn a few dishes from the Chef there, Santiago, and see just how this tortilla process works.  My time at Nixtamal and this dish is the basis for my next webisode of Exotic Table, so stay tuned!

One dish Chef Santiago taught me was a quesadilla with Oaxaca cheese, corn, and huitlacoche, a fungus that actually grows on the corn and is a Mexican delicacy.  Here, I decided to use that as inspiration for a salad, substituting some farm stand shitakes to add the earthy kick from otherwise hard-to-find huitlacoche and threw in some gorgeous grape tomatoes.  Bright and filled with end of summer flavors, this is a super easy dish to make at home, tortilla bowls included.  Enjoy!

Ingredients

Yields 4 servings

4 corn tortillas (the thinnest you can find)

Butter and olive oil

¾ cup shitake mushrooms, thinly sliced

1 shallot, finely chopped

1 jalapeno, seeded and finely chopped

1 ¼ cups fresh corn kernels (about 2 ears)

6 – 8 grape tomatoes, halved

handful of cilantro, chopped

farmer’s cheese or queso fresco

salt and freshly ground black pepper

Procedure

The first step is to make the tortilla “bowls.”  Rather than deep-frying to achieve pliability and moldability, I like to go a bit healthier and just use a skillet with a touch of butter and/or olive oil to get similar results. While doing this, you’re going to use small bowls that fit inside each other to mold the tortillas.  They will not turn out as crisp (and using thinner tortillas will help), but this method makes me feel better about calling this a salad.

Simply heat a medium-sized skillet over medium-high heat.  When hot, add the tortilla and flip at intervals until it puffs and browns a bit.  You’ll feel the edges start to get crispy.  At this point, add a ½ tablespoon of butter or olive oil and let coat the tortilla.   Place a small bowl upside down on a cookie sheet.  Remove tortilla carefully and place on top of the overturned bowl.  Take another bowl, overturned, and put it on top.  It should mold the tortilla to the shape of the bowl and hold it in place as it cools.   Repeat for remaining tortillas, and let cool while preparing the rest of the ingredients.

Heat the same skillet over medium-high heat, and add another tablespoon of butter with 1 to 2 tablespoons of oil.  When the foam subsides, add the mushrooms and let sit undisturbed in a single layer for about 2 minutes.  You want to develop a nice, golden brown on the mushrooms and bring out the flavor.   Stir the mushrooms and sauté for another minute or two to cook through.  Add salt at the end to taste and, using a slotted spoon, transfer to a bowl.

Add another tablespoon or two of butter or olive oil to the pan.  Add shallots and jalapeno and a bit of salt to draw out the moisture.  When shallots are translucent (about 3 to 4 minutes), add corn kernels and tomatoes and toss to mix thoroughly.  I like to crank the heat up a bit here to develop a more roasted flavor to the corn, but be careful because the corn can start to pop a bit.  Cook for 5 to 7 minutes until corn is cooked through and tomatoes have puckered a bit.

Remove from the heat, toss back in the mushrooms, season with salt and freshly ground pepper to taste and add some chopped cilantro, reserving some of the cilantro for garnish.  Spoon mixture into tortilla bowls and dollop farmer’s cheese or queso fresco to your heart’s content.  Garnish with remaining cilantro and serve warm or room temperature.

tags: corn, mushrooms, recipes for summer, Mexican recipes, Tortilleria Nixtamal
categories: recipes, soups & salads, all-2, vegetarian-1, main dishes-1
Monday 09.12.11
Posted by Aliya LeeKong
 

Scallops with Thai Citrus Salad

View fullsize scallop-pic1-500x333.jpg
View fullsize scallop-pic2-500x333.jpg
View fullsize scallop-pic3-500x333.jpg

Scallops with Thai Citrus Salad

It’s amazing the difference a year makes.  I was actually in Thailand last winter and had the most beautiful pomelo salad, the inspiration for this recipe.  A pomelo is a huge, grapefruit-like fruit that is found all over Southeast Asia.  It’s sweet and lacks any of the bitterness typical of a grapefruit.  Pomelos have a thick, spongy pith, and the fruit shreds into segments easily, which makes it perfect for a salad.  When I got back, I had a hard time sourcing one, and then, lo and behold, a few weeks ago, I found them in Chelsea Market and on Fresh Direct!  They are a beautiful fruit, so I’m so happy they are becoming more accessible.

When I was in Bangkok, I had the opportunity to spend the day at Face Bangkok, a cool, open-air restaurant compound with a swanky bar, a Thai restaurant, an Indian restaurant, and even a spa on site!  The restaurant is part of a larger group that has branches in Jakarta, Beijing and Pudong, and is fantastic (if you happen to be visiting Bangkok) for a nice night out or drinks soaking up the chic scenery.  I did a bit of intensive Thai cooking there, and this is my version of one dish that I learned.

This salad has a few different flavors and textures that I think work really well with a beautifully-caramelized, sweet scallop (as well as on its own!).  If you can’t find a pomelo, delicious mandarins (satsumas are my fave) that are in season right now would work really well with all of the tangy and salty flavors.  The peanuts and toasted coconut provide a great texture, a little umami from the fish sauce, sweetness and tartness from the tart lime juice – it’s light and refreshing and perfect to break up winter’s heavy dishes and take in some seasonal citrus.  Enjoy!

Ingredients

Serves 4 as a main course or 6 for a starter

Salad:

¾ cup dried, unsweetened coconut (chips or shredded)

¾ cup peanuts, toasted and crushed

3 scallions, white and light green parts only, thinly sliced

½ shallot, finely minced

1 cup pomelo, segmented*

8-10 mint leaves, chiffonade

Citronette:

juice of 1 ½ limes

½ tsp salt

1 ½ tsps sugar

pinch of cayenne

1 ½ tsps fish sauce

1 ½ tbsps extra virgin olive oil

Scallops:

3 tbsps olive oil

2 lbs jumbo sea scallops

salt and freshly ground pepper to taste

1 tbsp butter

Procedure

In a skillet over medium heat, add the dried coconut and toast until the color is deep and golden.  This process happens fairly quickly, so keep your eye on it.   Add to a bowl along with the crushed peanuts, scallions, shallot and pomelo (and any juice that resulted from segmenting the pomelo).

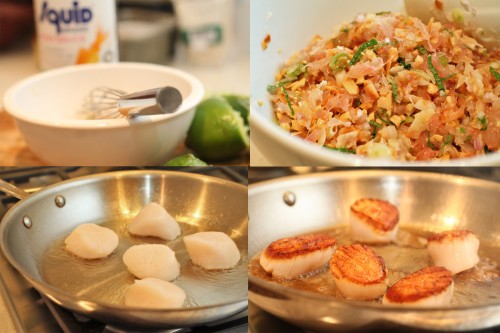
For the dressing, combine the lime juice, sugar, salt and cayenne and whisk to dissolve thoroughly.  Add the fish sauce and then slowly drizzle in the extra virgin olive oil whisking to combine.  Toss salad with dressing, add mint, and season to taste.

For the scallops, you want to develop a nice deep color on them.  Thoroughly dry the scallops before cooking and season generously with salt and pepper.  If they are wet, they won’t caramelize and will sort of steam in the pan.  Also, if you crowd the pan, they will also steam, so work in batches if necessary.

Heat a skillet over medium-high heat and add olive oil.  When it’s just about to smoke, add the scallops, dragging a little so that the side gets coated in olive oil.  Cook for about two minutes and add the butter.  Let cook for another minute or so and then flip.  They should have a nice brown crust on them.  At this point, I turn the heat down just a tad.  Let them cook on this side for another three minutes or so until they are cooked to your desired level.  I like mine so that the middle third looks a bit translucent and the top and bottom thirds are opaque, but remember different-sized scallops will take differing cooking times. This is what I use to cook jumbo or U10-sized scallops.

Serve scallops hot with the cool salad spooned over top.

*The pomelo is a pretty unique fruit. To segment, I like to cut off as much of the rind and pith as possible.  Then, I take out the larger, membrane-enclosed segments (much like a grapefruit or orange) and slip a pairing knife under the membrane.  Once this is peeled away, the inner fruit shreds into little pieces.  I like to do this over a bowl and catch all of the residual juice, which adds great flavor to the salad.

tags: seafood recipes, scallops, Thai citrus salad, citrus
categories: salads, recipes, all-5, soups & salads, main dishes-1
Thursday 01.20.11
Posted by Aliya LeeKong
 

Spiced Sunchoke Soup

View fullsize sunchoke-pic1-500x333.jpg
View fullsize sunchoke-pic2-500x333.jpg
View fullsize sunchoke-pic3-500x333.jpg

Spiced Sunchoke Soup

I am still in the aftermath of my holiday party, and this is yet another dish I served that people seemed to really enjoy.  Yes, soup can be a fantastic hors d’oeuvres – I served this in little demitasse cups with some chopped cilantro and homemade croutons.  It looks elegant, and you can make it in advance and keep it warm, which for me is ideal when other items require more maintenance…

Sunchokes are root vegetables and look a lot like ginger, though taste nothing like it.  They have been popping up all over menus in NYC and Brooklyn.  My husband and I hit this adorable new place in Fort Greene called Roman’s (amazing, chocolate sorbet to die for), and he was shocked to see sunchoke soup on the menu.  He acted like they were biting my style (I almost cried laughing)…and I had to explain that they are seasonal and delicious and that’s why they are everywhere.

You might also see sunchokes labeled as Jerusalem artichokes, and their flavor does resemble the artichoke heart though they are not related at all.  I picked mine up from the Union Square Greenmarket, and they were perfectly sweet and creamy.  This soup incorporates some key spices – cumin, coriander, and turmeric – that really bring warmth to the dish but still allow the signature sunchoke flavor to shine through.  The coconut milk bumps up the sweetness and gives it a beautiful, creamy mouth-feel, and the shot of lemon juice brightens up all of the flavors.  This is easy enough as a go-to weeknight soup but refined enough for a dinner or holiday party.  Enjoy!

Ingredients

Serves 4 to 6 / Yields approximately 5 ½ cups

3 tbsps unsalted butter

1 onion, finely diced

½ tsp ginger, minced

1 small green chili, finely chopped (preferably thai or serrano, to your heat preference)

¾ tsp ground cumin

1 tsp ground coriander

¼ tsp turmeric

pinch of cayenne

3 or 4 cloves garlic, minced

7 medium-sized (12 oz) sunchokes, scrubbed, peeled, and thinly sliced*

1 bay leaf

2 ½ cups chicken or vegetable stock

1 can coconut milk

a few squeezes of fresh lemon juice

salt to taste

chopped cilantro or parsley

Procedure

Heat a dutch oven or other heavy-bottomed pot over medium-low heat and add butter.  When foam subsides, add onion and a bit of salt to draw out the moisture.  Let sweat for a minute or so.  Add ginger, green chili, cumin, coriander, turmeric and cayenne.  Cook for 5 to 7 minutes until onions are translucent and super soft.  Add garlic and cook for 1 minute until fragrant.

Add sunchokes and stir to combine.  Let cook for about 2 minutes until sunchokes begin to soften.  Add bay leaf and stock, bring up to a boil, and lower to a simmer.  Simmer covered for 20 to 25 minutes.  You want the sunchokes to easily break apart with your wooden spoon, which will really depend on how thinly you sliced them.

Remove bay leaf, and, in a blender or using a hand blender, puree until smooth.  Add coconut milk, lemon juice, and adjust seasoning to taste.  Serve hot with a little fresh chopped cilantro on top.

*After peeling the sunchokes, keep them submerged in cold water until ready to use.  Thinly slice right before throwing into the pot.

tags: soups for winter, sunchoke soup, sunchoke recipes, Jerusalem artichokes, weeknight meals, holiday recipes
categories: all-5, soups & salads, recipes, vegetarian, main dishes-1
Wednesday 12.22.10
Posted by Aliya LeeKong
 

Pumpkin Soup with Garam Masala & Crème Fraiche

View fullsize pumpkin-soup-pic1-500x333.jpg
View fullsize pumpkin-soup-pic2-500x166.jpg
View fullsize pumpkin-soup-pic3a-500x333.jpg
View fullsize pumpkin-soup-pic3-500x333.jpg

Pumpkin Soup with Garam Masala & Crème Fraiche

A few years back I discovered the beautiful combination of pumpkin and garam masala.  I think I was making a pumpkin polenta and, like the Swedish Chef on the Muppets, kind of just threw it in.  I’ve been in love with the combo ever since.

Garam masala is a traditional South Asian spice blend.  It’s spicy and full-flavored but has no real heat to it.  The blend differs from region to region but usually includes peppercorns, cardamom, cloves, cumin, cinnamon, coriander and bay leaves but can also include nutmeg, star anise, and even saffron.  I usually make my own at home because sometimes it’s added whole and sometimes ground.  But you can find the spice blend in powdered form at most supermarkets these days.  It can completely overwhelm a dish, so the key is to use it sparingly.

I debated a lot of different forms for the spice / vegetable combo – everything from waffles to pumpkin pie.  I settled on soup because it’s the perfect fall food – warm, comforting, and aromatic.  There’s sweetness from the pumpkin, the garam masala spice in the background, a little kick from the cayenne and a fantastic tanginess and mouth-feel from the crème fraiche…really delicious.   I used smaller sugar pumpkins because they are sweeter and have a more developed flavor than the larger ones, but even butternut squash would be beautiful here if you have it on hand.  Enjoy!

Ingredients

Serves 4 to 6

2 small sugar pumpkins (3 to 4 lbs each), halved and seeded

olive oil

salt and freshly ground pepper

4 tbsps unsalted butter

2 medium onions, diced

1 tsp salt

1 tsp ground garam masala

½ tsp freshly ground black pepper

¼ tsp ground cayenne pepper

2 cloves garlic, minced

2 tsp brown sugar

few sprigs thyme

1 bay leaf

½ cup white wine

3 cups stock

1/3  cup crème fraiche

chives, for garnish

Procedure

Preheat oven to 400° F.  Drizzle the inside of the pumpkin halves with olive oil, and season with salt and pepper.  Place halves flesh side down on a foil-lined baking sheet, and roast for 45 to 50 minutes until very tender.  Let cool slightly, and then scoop out the flesh into a bowl and reserve.

In a soup pot, melt butter over medium-low heat.   Add onions, salt, garam masala, black pepper, and cayenne and cook for 3 to 4 minutes until translucent.  Add the garlic and the brown sugar and cook for another minute.

Now, add back in the pumpkin along with the thyme, bay leaf and white wine and cook for 2 to 3 minutes until the wine has mostly absorbed.  Add the stock and bring up to a simmer.  Simmer for 35 minutes partially covered to finish cooking and let all of the flavors combine.

Remove the thyme sprigs and the bay leaf.  Add the crème fraiche and either transfer to a blender or use a hand blender to puree to your desired consistency.  I like mine with a bit of texture.

Serve sprinkled with chives and a nice piece of crusty bread!

tags: pumpkin, soups, garam masala, soups for winter
categories: recipes, soups & salads, all-5, vegetarian-1
Wednesday 11.10.10
Posted by Aliya LeeKong
 

Sumptuous Beef & Rice Casserole w/ Raw Mango Salad

View fullsize pilau-pic1-500x333.jpg
View fullsize pilau-pic2-500x333.jpg
View fullsize pilau-pic3-500x333.jpg
View fullsize pilau-pic4-500x333.jpg
View fullsize pilau-pic5-500x333.jpg

Sumptuous Beef & Rice Casserole w/ Raw Mango Salad

The first time my mom made my husband pilau we were having a party at my place in NYC.  There were around 25 people over, celebrating, drinking wine and eating standing up because I didn’t have enough chairs for everyone.  The layout of my apartment is pretty open with the kitchen, dining, and living rooms all visible.  No joke, at the end of his 4th helping of the dish, my husband stood up abruptly, pronounced my mom had purposefully “roofied” him…and promptly went to sleep on the couch in front of the other 20-some-odd people!

In the spirit of dishes that work well for the holidays, I thought I would put this recipe out since it’s a delicious communal or even potluck dish.  Hanging with my parents this weekend meant my mom and I were seriously throwing down in the kitchen, and pilau was definitely on the menu.  Typically, there’s so much “a little of this, a little of that” that it’s pretty close to impossible to get a solid recipe out of the whole affair.   But I managed to pry this one out.  And even with this dish, it takes a bit of intuition and a little praying to get the beef and the rice to be cooked perfectly at the same time.  But it is so worth it.  For me, it’s old school comfort food, a taste memory that dates back to my early childhood.

I did a little research, and pilau = pilaf which is actually Turkish!  And this is extraordinarily exciting for me because I am planning a trip to Turkey later this year.  Cannot wait to cook their version…Much like another rice casserole I’ve mentioned, biryani, this dish originated in Persia and can be found throughout the world, taking its individual form in different cultures.   Afghani palau has carrots, raisins, and nuts; in parts of East Africa, coconut milk is included.  And West Indian pelau is closer to their peas and rice with the inclusion of chicken or another protein.

This version is a true combination of my mom and I.  The ingredients are largely hers, but I changed the technique to try to create the best textures and flavors possible.  I made a raw mango salad to go along with it, which provides the perfect cool and acidic balance to the warmly spiced rice and beef that melts in your mouth.  Enjoy!

Ingredients

Yields 6 to 8 servings

Pilau:

2 lbs beef chuck, cut into 1 ½ inch cubes

5 tbsps canola oil

1 stick of cinnamon

3 whole cloves

3 whole black peppercorns

3 whole cardamom pods, cracked open

1 ½ tsps cumin seeds

2 tsps black mustard seeds

1 large yellow onion, finely chopped

1-3 green chilies, finely chopped

½ tsp grated ginger

½ tsp of ground cumin

¼ tsp of ground coriander

4 cloves of garlic, minced

1 ½ bunches of fresh cilantro, chopped (including stems)

1 marrow bone (totally optional, I added it for extra flavor)

4 ½ cups light beef stock or beef stock + water

3 ½ cups of basmati rice

Salt and pepper to taste

Raw Mango Salad:

juice of 1 lime

2 ½ tsps rice wine vinegar

½ tsp salt

¼ tsp cayenne

1 raw mango, peeled, seeded and diced

1 cucumber, peeled, seeded and diced

1 apple, peeled, seeded and diced

½ red onion, minced

2 small sweet red peppers, minced

4 to 6 mint leaves, chiffonade

small handful of cilantro, finely chopped

Procedure

For the Pilau:

Preheat the oven to 325° F.

Thoroughly wash the basmati rice until the water runs clear.  You want to remove as much starch as possible.  Set aside.

Heat a large Dutch oven over high heat.  Liberally season the cubed beef.  Add oil to the pot and sauté beef for 2 to 3 minutes in batches.  You don’t want to overcrowd the pot or the meat won’t brown.  Also, you don’t want to cook the beef all the way through – just enough to brown the outside.  Using a slotted spoon, spoon beef onto an unlined plate and set aside.

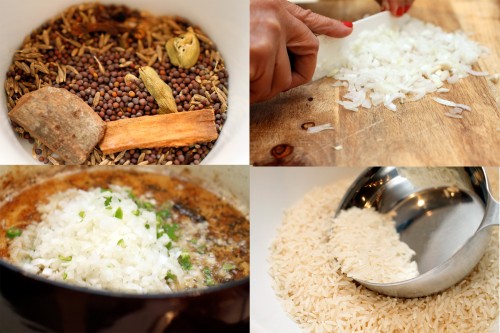
Turn the heat down slightly to a medium heat and add all of the whole spices.  When they start to pop, add onions, chilies, ginger, ground cumin and ground coriander and cook for 6 to 8 minutes.  Lower the heat if necessary – you want the onions to turn translucent but not brown.   Add the garlic and ½ of the chopped cilantro and cook for another minute.  Add beef back to the pot along with any juices that have accumulated on the plate and the marrow bone if using.

This is where it gets slightly tricky.  Pre-measure the 4 ½ cups of liquid – you can use a light stock, water or some combination of the two.  You want to keep track of how much liquid you’ve added because the rice will become sticky if you end up adding too much and will be dry if not enough is used.  Add liquid to the pot to just cover the meat.  Place the lid on the pot, and turn the heat up.  When the temperature comes up and it’s about to boil, place covered pot in the oven and cook for about 1 ½ hours or until the meat is fork tender.

Once meat is cooked, add rice and the remaining liquid to get to 4 ½ cups.  Re-season if necessary and place back in the oven for another 30 to 35 minutes until rice is cooked and fluffy.  Rice may take a little less or more time depending on the type of rice you are using, type of pot in which you are cooking, etc., so I would advise checking it at intervals.

When serving, use the other half of the chopped cilantro to garnish the top.

For the Raw Mango Salad:

Combine lime juice, rice wine vinegar, cayenne and salt in a small bowl to create a dressing.

In a separate bowl, toss together raw mango, cucumber, apple, red onion, sweet red pepper, mint and cilantro.  Add dressing and adjust seasoning if necessary.

tags: casserole, pilau, beef and rice casserole, comfort food, holiday recipes
categories: recipes, all-6, soups & salads, main dishes-1, man-friendly
Monday 10.18.10
Posted by Aliya LeeKong
 

Tunisian Bread Salad

View fullsize bread-salad-pic1-500x333.jpg
View fullsize Bread-salad-pic2-500x333.jpg
View fullsize bread-salad-pic3-500x333.jpg

Tunisian Bread Salad

I am completely in love with the concept of “bread salad”.  It feels like cheating.  Like you have this healthy bunch of vegetables and you just make them so much tastier by adding chunks of rustic bread that soak up all the lovely dressing.  But you still feel healthy doing it because you call it a salad.  I am famous for taking leftover cornbread and making a cornbread-bread salad with honey balsamic dressing.  And sometimes I even throw in a few vegetables too.

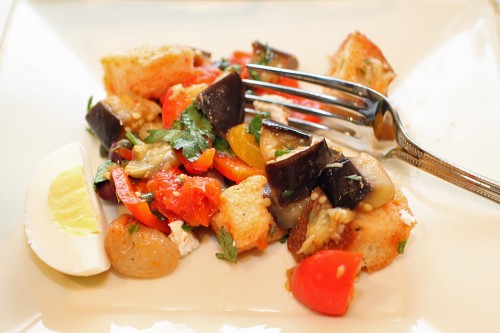
Most people know about panzanella or Tuscan bread salad, which is made from crusty Italian bread mixed with tomatoes, red onions, cucumbers and basil.  Delicious.  But Tunisian bread salad or even Mediterranean bread salad (similar) is less well known and equally (if not slightly more…) tasty.  You take beautiful seasonal vegetables – eggplant, peppers, tomatoes – and roast them off with some aromatics.  Mix those in with olives, herbs, capers, fresh cheese, and chunks of stale bread and toss with a delicious, harissa dressing and you have a beautiful, alternative, light and flavorful, bread salad.

This is a fantastic way to use up old bread (or so we all tell ourselves…).  But I’ve actually seen this as a roasted vegetable salad on its own, so if no bread is at hand or you want to be even healthier, you can leave it out and still have a delectable salad.  Store-bought harissa is fine, but I would suggest making your own like I do in my homemade harissa recipe; it’s cheaper, fresher, and healthier without the preservatives.

I love harissa in a salad dressing, and my dressing here has honey and harissa which, by the way, is a fantastic combination – I like to just slather the two on bread as a crostini or as an hors d’oeuvre to spruce up a weeknight dinner.  In any case, this salad is bright, flavorful and beautiful – great for entertaining.  Enjoy!

Ingredients

Yields 4 to 6 servings

Salad:

1 eggplant, cut into a medium (bite-sized) dice

1 red bell pepper, cut into a medium (bite-sized) dice

1 yellow bell pepper, cut into a medium (bite-sized) dice

8 oz mini sweet or cherry tomatoes

3 small shallots, quartered

3 or 4 whole garlic cloves

Olive oil

Salt & freshly ground black pepper

¼ cup niçoise olives, pitted

A generous handful of fresh mint, roughly chopped

A generous handful of fresh cilantro, roughly chopped

1 day-old round loaf of bread or whatever rustic bread you have on hand, cut into medium-sized cubes*

Garnish:

Fresh cheese (feta, goat or bocconcini will do), torn or crumbled into small pieces

2 tsps capers, rinsed and drained

1 or 2 hard-boiled eggs, quartered

Dressing:

¼ cup rice vinegar

1 tbsp harissa**

1 ½ tbsps honey

¼ cup extra virgin olive oil

Procedure

Preheat oven to 400° F.

In a bowl, toss together eggplant, bell peppers, tomatoes, shallots and garlic with olive oil, salt and pepper to coat.  On a baking sheet, arrange vegetables in a single layer.  Roast for 25 minutes until lightly browned.

For the dressing, whisk together the rice vinegar, harissa and honey in a bowl.  Drizzle in extra virgin olive oil, whisking to incorporate.

Using a slotted spoon, transfer roasted vegetables to a large bowl.  Add olives, herbs, and bread and toss with dressing.  Garnish with cheese, capers, and hard-boiled eggs.

*If you have fresh bread, just put the cubes of bread on a baking sheet, drizzle with olive oil, and bake at 350° F until lightly browned.  You just want it to be crisp enough to stand up to the salad dressing and not turn to mush.

**For harissa you can use my version here or use the store-bought kind.

tags: bread salad, Tunisian cooking, harissa, vegetarian sides, recipes for entertaining
categories: all-6, side dishes, recipes, salads, vegetarian-1, soups & salads
Monday 09.20.10
Posted by Aliya LeeKong
 

Black Salt 'Slaw

View fullsize slaw-pic1-500x333.jpg
View fullsize slaw-pic-2-500x358.jpg
View fullsize Slaw-pic3-500x333.jpg
View fullsize slaw-pic4-500x333.jpg

Black Salt 'Slaw

I grew up in a suburb in Florida, and, although there was a pretty large Indo-Pakistani community, the resources were very spread out.  That is to say, there was no central area to find food (think Adam’s Morgan in D.C. or Curry Hill in NYC), and there were maybe one or two good Indian grocers selling everything from spices to Indian sweets to household goods.

I used to love visiting my family in Toronto, an incredibly ethnically diverse city.  There are West Indian neighborhoods, Indian areas, Chinese, Philipino, Latin American – all distinct areas.   Ambling down Gerard Street, one of those streets that literally transport you into a different country, you can find row after row of Indian restaurants and shops– clothing, groceries, dvd’s, jewelers…you name it.

One of my favorite parts about the trip (because I can assure you shopping for clothes with the women in my family is nothing short of arduous) was visiting the various chaat houses.  Chaat is a general term and includes any Indian snacks that have puris, puffed rice, fried noodles or dumplings with potatoes, lentils, chickpeas or even mung bean, all doused in spicy, tart, tangy sauces.  “Junk food”, we’d call it.  I would devour these chaats and wash it all down with falooda (which I mentioned in my sugar plum post and which I will have to make at some point); it’s really what got me through these shopping trips.

Tamarind, cilantro, chilies, onions, and yoghurt were all featured heavily in these dishes, but it was the spice mix, the chaat masala, that really made them distinct.  Chaat masala includes a staggering number of spices, but one flavor that stands out from them all is black salt.  Black salt, or Kala Namak, is a grayish rock salt, and it, quite frankly, has a smell similar to eggs.  It has a sulphurous quality, and, although that may not sound too appealing, I assure you once mixed in it is delicious!

I thought I would make a ‘slaw for the summer that focuses on black salt.  I served it here over a beautiful, simple, grilled swordfish, but it would also be delicious with yesterday’s ribs.  The chili powder gives it a little heat, the honey sweetness, and it definitely has the tart and tangy quality of the chaats I remember as a child.  Enjoy!

Ingredients

Yields 6 to 8 Servings

For the dressing:

½ cup red wine vinegar

2 garlic cloves, minced

3 tbsps honey

3 tsps black salt

½ tsp salt, kosher or sea

½ tsp Indian chili powder or hot Hungarian paprika

½ tsp finely ground black pepper

I roughly ground the toasted seeds)

For the slaw:

½ head green cabbage

½ head red cabbage

1 or 2 carrots, julienned or shredded

1 bulb fennel, thinly sliced

2 green onions, thinly sliced (white and green parts only)

Procedure

This is super simple as most coleslaws are.  I like to combine all of the dressing ingredients, and let them marinate while I’m prepping the vegetables.

For the cabbages, wash thoroughly and remove the core.  You can either slice manually or use the slicer in your food processor to achieve the right sized pieces.  Combine with the carrots, fennel and green onions in a non-reactive bowl.

Pour the dressing over the vegetables, and keep refrigerated for 2 hours or so.  I like to toss the coleslaw every half hour  to make sure any dressing that has sunk to the bottom gets fully mixed in.  The flavors are much brighter when you let them sink in for a few hours.

tags: Black Salt, 'slaw, recipes for summer
categories: side dishes, recipes, vegetarian-1, all-7, soups & salads
Wednesday 08.18.10
Posted by Aliya LeeKong
 
Newer / Older