X

Sign up to receive exclusive recipes, tips, updates and other goodies from Aliya!

  • Home
  • Blog
    • All
    • Recipes
    • Spices + Ingredients
    • Lifestyle, etc.
    • Travel
  • The Cookbook
  • The App
  • Media
    • All Media
    • Video
  • About
  • Passions
Aliya LeeKong
  • Home
  • Blog
    • All
    • Recipes
    • Spices + Ingredients
    • Lifestyle, etc.
    • Travel
  • The Cookbook
  • The App
  • Media
    • All Media
    • Video
  • About
  • Passions

Crispy Miso (Baked!) Wings

wing2.jpg
wing1.jpg
wing3.jpg

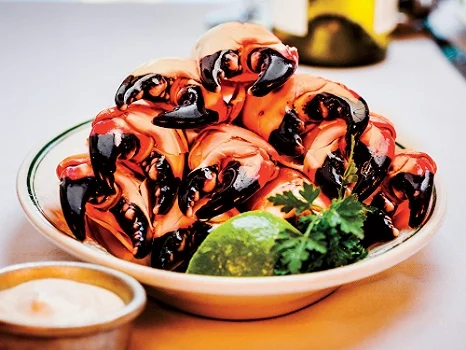
CRISPY MISO (BAKED!) WINGS

Super Bowl = wings!  And these are what I'm making.  The spread, for me, is what it's all about…..eating "bad" (but oh-so-good) food.  I figured it was time for me to up my wing game, and I’ve been slightly obsessed with putting white miso paste in everything lately.  There are a ton of varieties of miso, and you can find it in any Asian grocery store in the refrigerated section.  I use it in salad dressings, marinades for fish, meat and, of course, in my baked wings recipe. 

I LOVE some good wings, but I wasn’t so into deep-frying them and making a splattered mess of my kitchen.  But you can still get them crispy in the oven.   If you crank it up high enough and cook the wings on a rack over a sheet tray - the chicken skin fat will render out, they'll stay tender AND the skin will crisp up nicely!  These are slightly sweet, umami, and with a great kick.  Enjoy!

Serves 6

For the marinade + wings:

½ cup white miso paste

¼ cup plus two tablespoons mirin

3-4 tablespoons sriracha (plus more if you want extra heat)

3 tablespoons soy sauce

2 tablespoons sesame oil

1 tablespoon brown sugar

½ teaspoon rice wine vinegar

4 garlic cloves, finely chopped

3 lbs chicken wings, tips removed, drummettes and flats separated

Kosher salt

Toasted sesame seeds, for garnish

For the dipping sauce:

½ cup sour cream

½ lime, juiced

small handful of cilantro, chopped

Extra sriracha, to taste

For the marinade:  In a bowl, whisk together the miso, mirin, sriracha, soy, sesame oil, brown sugar and rice wine vinegar.  Set aside/refrigerate a half cup for the dipping sauce.  Add the minced garlic to the marinade and toss the wings with it until they are thoroughly coated.  Transfer to a plastic bag and refrigerate for a minimum of 5 hours and preferably overnight.

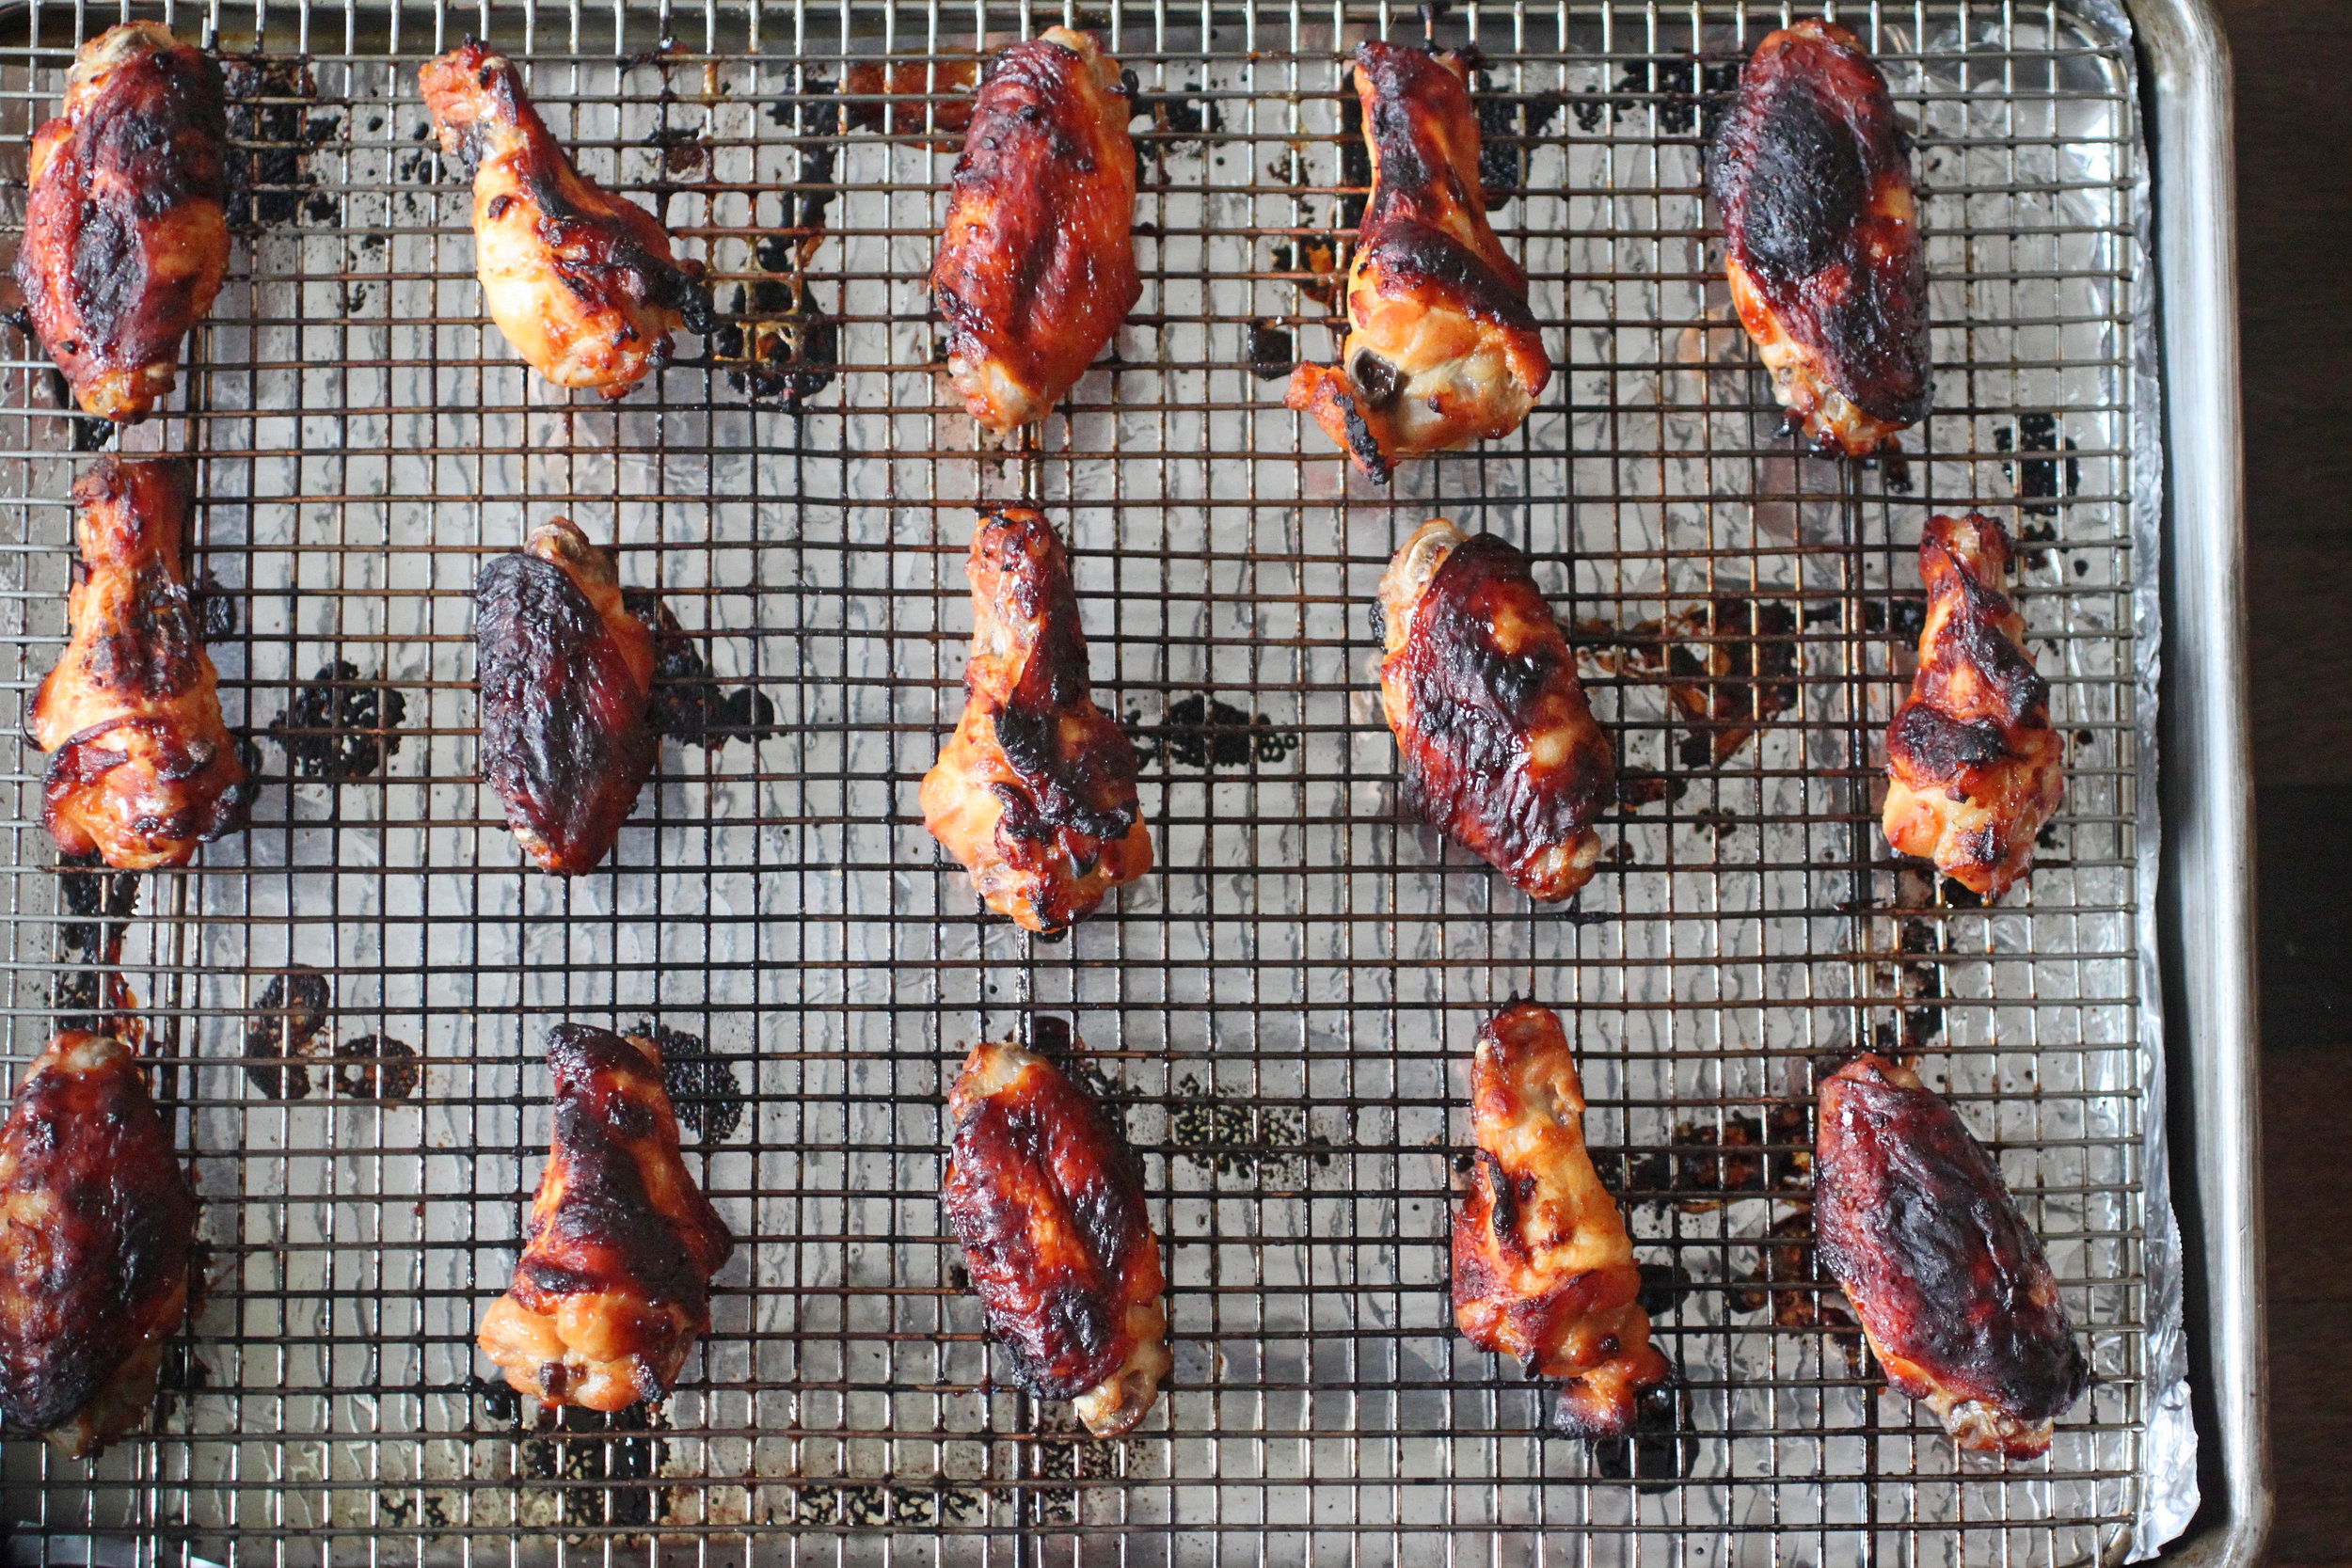
For the wings: Preheat oven to 400° F.  Put a wire rack over a baking sheet and set aside.

Transfer the marinated wings to a colander to drain, and then wipe off any excess.  The marinade can burn, so you want it dry-ish.  Season the wings with salt and transfer to the rack over the baking sheet.  Bake the wings for about 40 minutes, rotating half way through cooking..

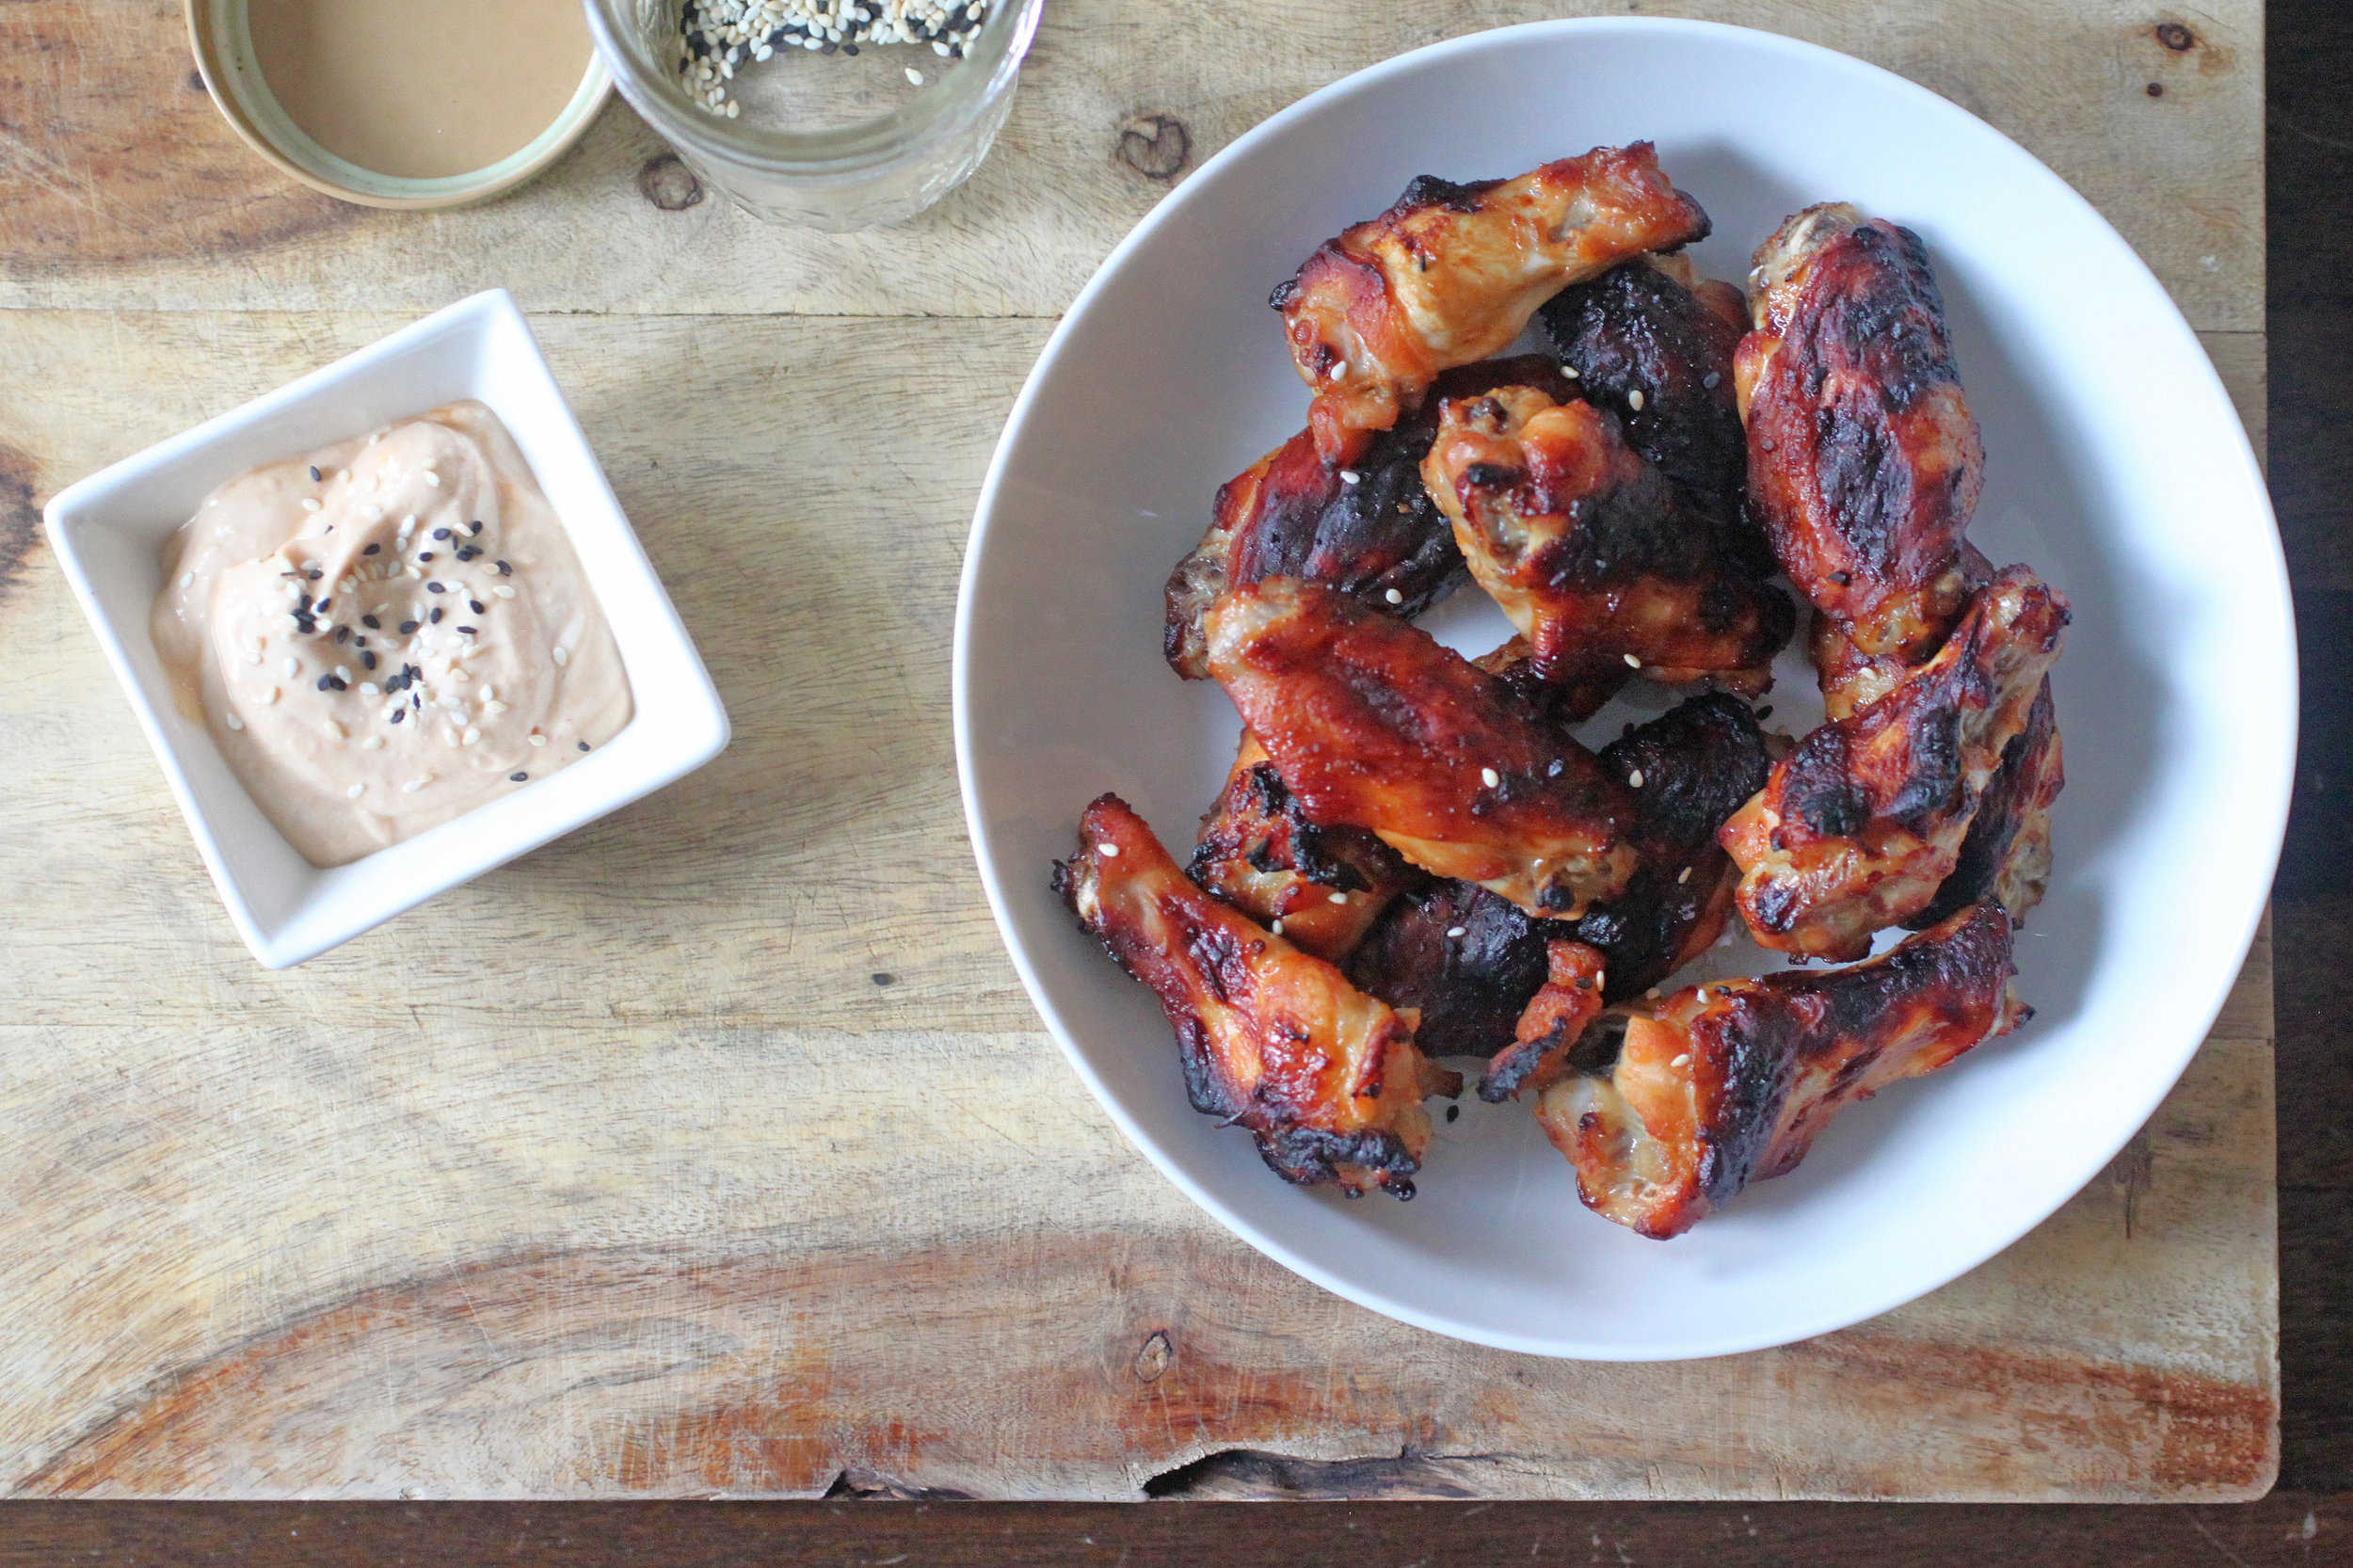
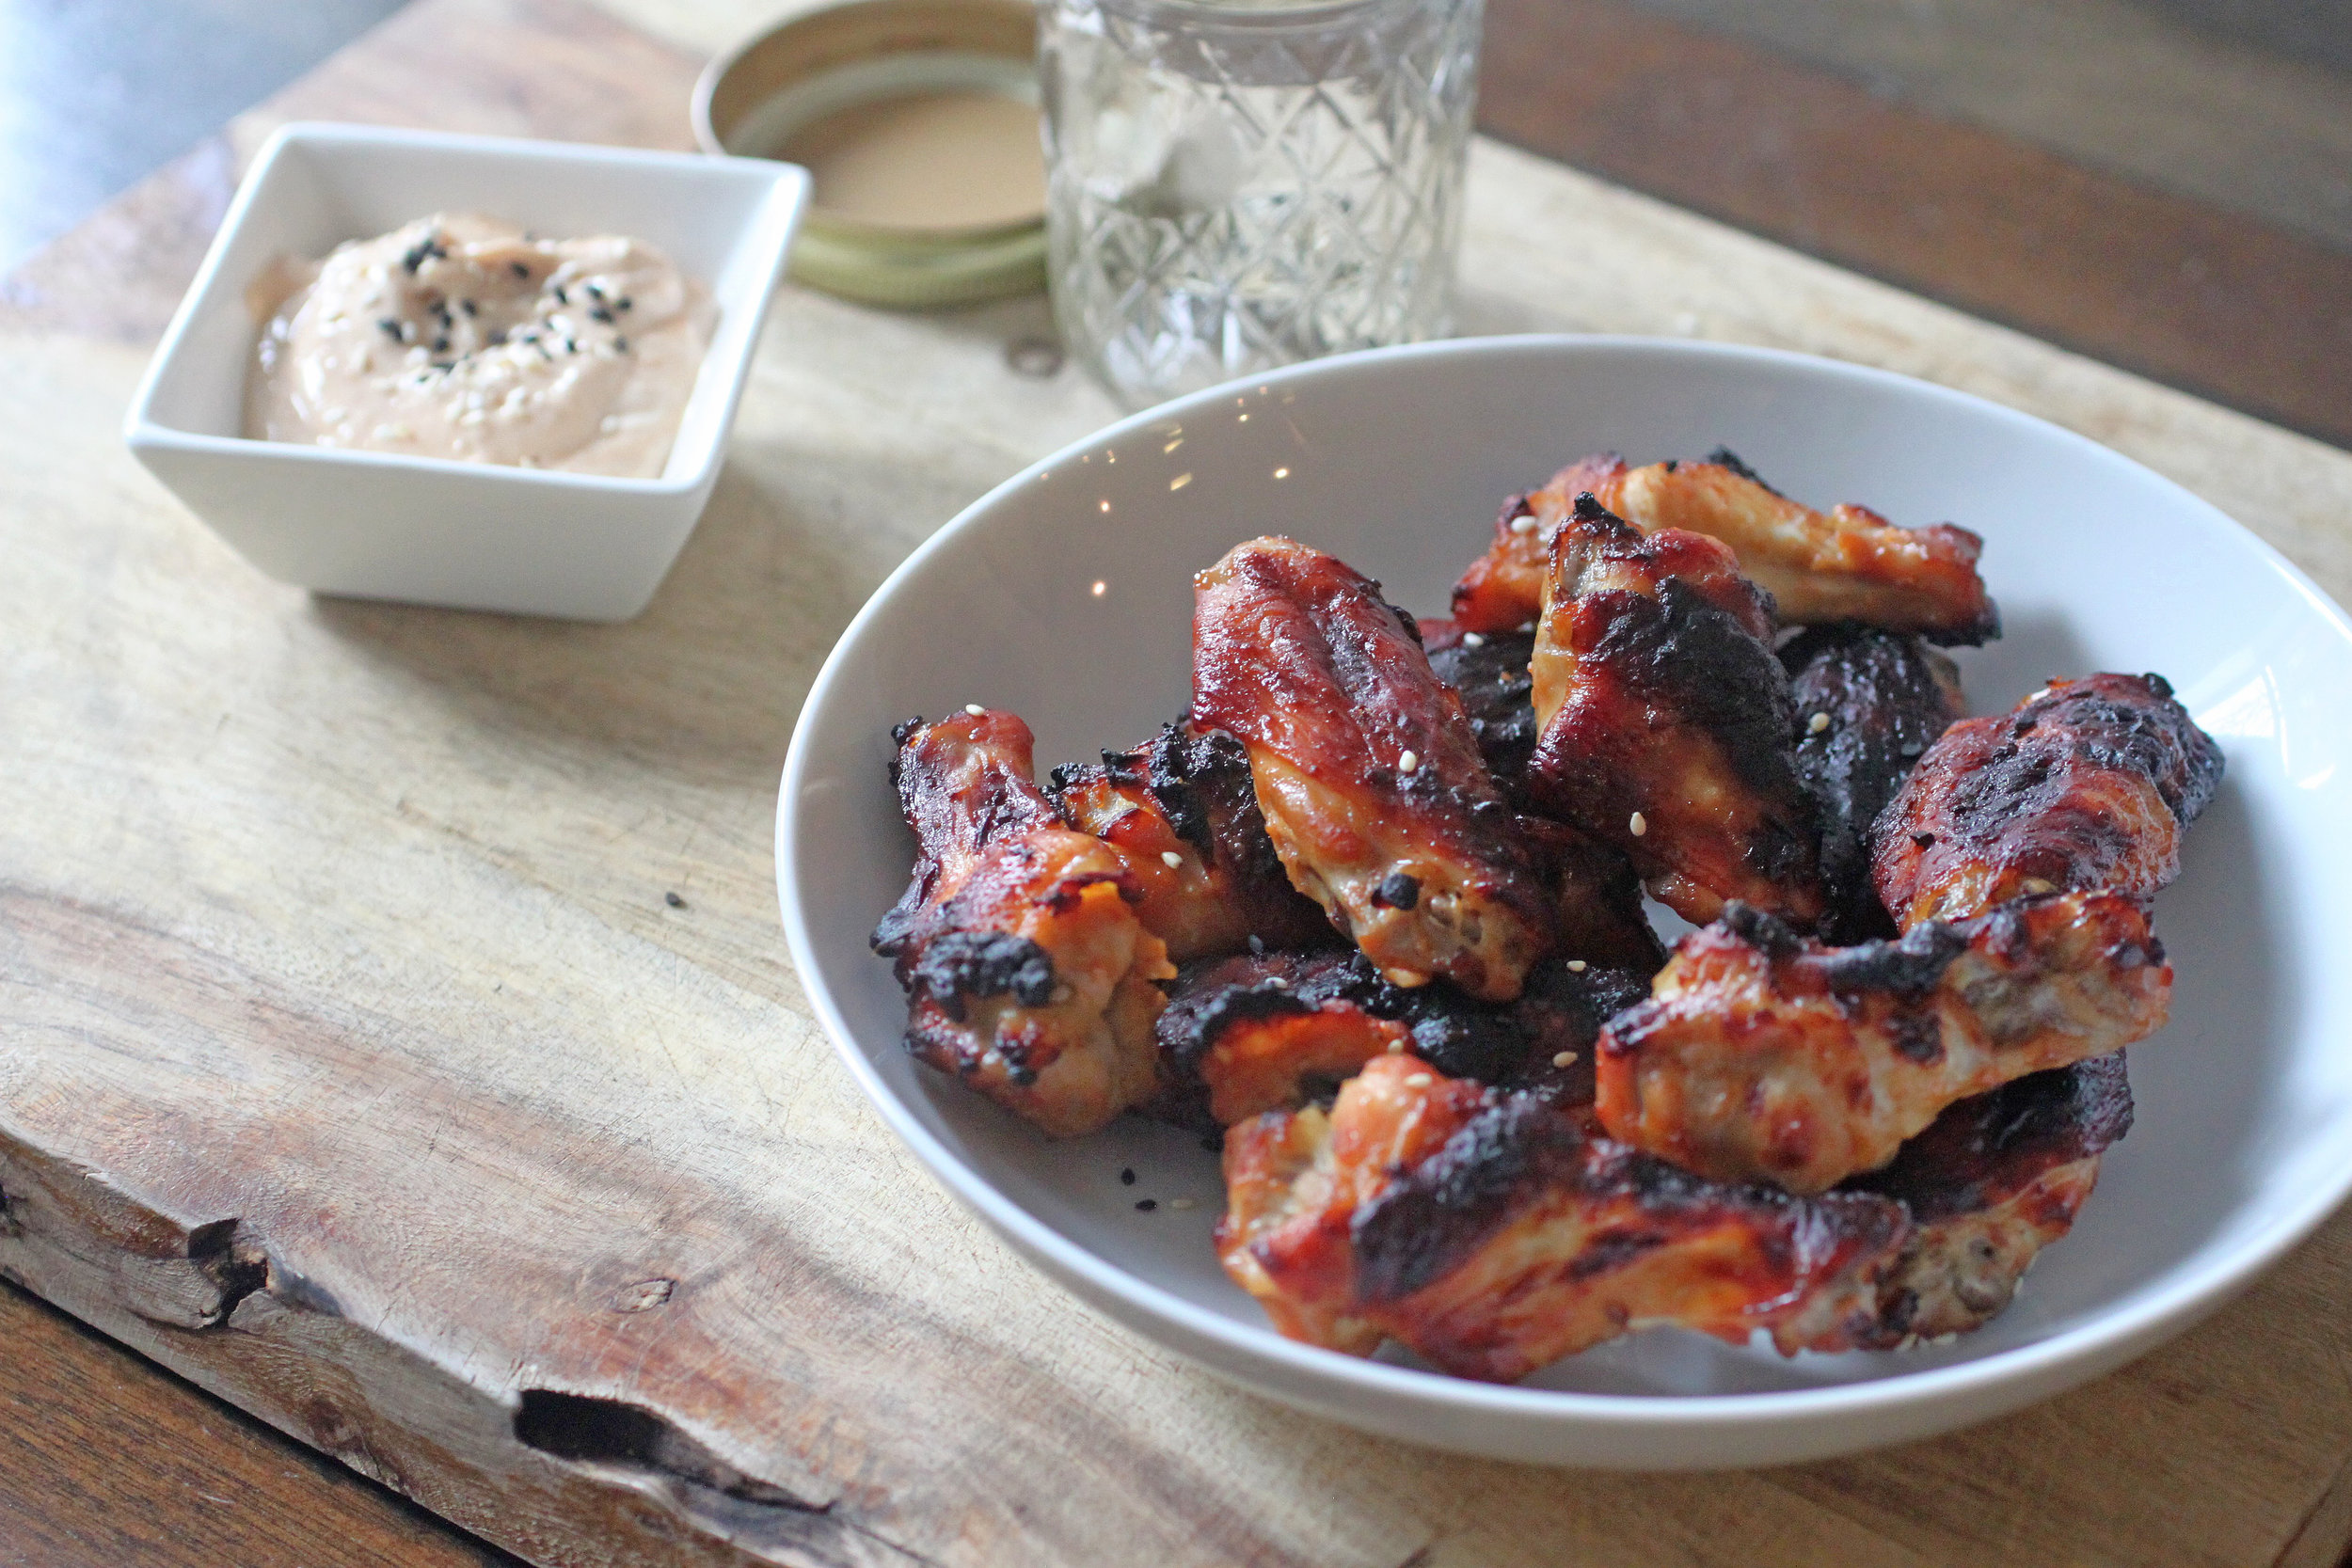
For the dipping sauce: In another bowl, add the reserved marinade and mix with the sour cream, lime juice, cilantro and more sriracha, depending on your heat preference.  

Serve hot with the dipping sauce and sprinkled with toasted sesame seeds!

tags: super bowl recipes, what to cook for the super bowl, Super Bowl, wings, crispy wings, best chicken wings recipe
categories: all 4, appetizers 1, blog, main dishes, man-friendly, quick & easy, recipes
Wednesday 02.01.17
Posted by Aliya LeeKong
 

Nigella + Sesame Seed Granola

Photo Jan 13, 5 47 32 AM.jpg
Photo Jan 13, 5 46 52 AM.jpg
Photo Jan 13, 5 43 52 AM.jpg
Photo Jan 13, 5 45 26 AM.jpg

NIGELLA + SESAME SEED GRANOLA

In keeping up with the New Year's goals of choosing healthier options, I’ve been craving granola a lot lately.  While I was in Venice of all places over the holidays, I had the most incredible (yes, incredible) granola I've ever tasted.  I wanted to recreate it and thought, well, how hard is it really to make my own granola!?  Why have I never thought about doing this before?  So, I grabbed a bunch of ingredients that I thought would recreate the flavors of that granola and decided to try this at home!  And let me tell you……It’s soooo easy.

The trick to a good granola is to cook it low and slow. The hardest part is really choosing your ingredients!  There are so many choices out there. I did a simple granola recipe below (albeit with nigella and sesame seeds) but next time I may add some rice puffs to the mix and maybe switch it up with dried strawberries.  It really depends on your flavor preference.  Also, if you prefer a granola that has more clusters, you can up the maple syrup and not mix the granola as much during cooking.  If you want very cluster-y granola, you can stir in some egg whites before cooking to achieve that.   

This is not like any other granola I've tasted.  It's nutty, sweet and roasted in flavor but with the sharp bite of the nigella seeds.  It is BEST made with ghee (does anything taste worse with butter?), but a neutral oil works well here too.  Enjoy!

Ingredients

Yields 7 cups

1 cup raw, unsalted cashews

3 cups organic rolled oats

1 cup sliced almonds

1 cup shredded, unsweetened coconut

¼ cup plus 2 tablespoons sesame seeds (white, black or a combo)

3 tablespoons nigella seeds

3 tablespoons maple, palm or light brown sugar

½ teaspoon kosher salt

½ cup pure maple syrup

¼ cup ghee or neutral oil (grapeseed, canola or sunflower)

1 cup dried fruit, diced (optional)


Preheat oven to 300° F.  Place a layer of parchment on a large cookie sheet and set aside.

I like to grind up some of the ingredients first for a more even texture.  To the bowl of a food processor, add the cashews and pulse a few times.  Add in the oats and almonds and pulse until you get an even, crumbly texture.

In a large bowl, combine the oat mixture with the coconut, sesame seeds, nigella seeds, sugar and salt.  Stir to combine all of the ingredients.  Pour the maple syrup and oil over the raw granola.  Mix until evenly coated and taste to make sure everything tastes to your liking. 

Spread the mixture on the prepared baking sheet evenly and transfer to the oven. Stir the mixture every 10-15 minutes or so to make sure everything is browning evenly.  It should take about 40-45 minutes total, depending on your oven.  If you are adding in the dried fruit, add it in during the last 10-15 minutes of cooking so it gets a bit drier and doesn’t make the granola soggy during storage.

Remove from the oven and let dry out on a rack until cool. Store in a mason jar; it should last for about 2 weeks or so.

Enjoy with yogurt and fresh fruit or as a cereal with almond milk!


tags: granola, homemade granola, how to make your own granola, nigella seeds, nigella seed granola
categories: all 4, breakfast-1, condiments, lifestyle-1, quick & easy, recipes
Wednesday 01.18.17
Posted by Aliya LeeKong
 

Chipotle-Miso Butternut Squash Soup

CHIPOTLE-MISO butternut SQUASH SOUP


I know, I know - chipotle plus miso??  Obviously, this has no root in real tradition, but those flavors together are literally incredible, something I first played around with in my mind before putting them together.  I love creating new soup recipes during squash season - that sweetness is the perfect canvas for spices and flavor.  Squash creates such a lush, smooth, silky texture without even adding any cream so it’s the perfect option for dairy-free days.  

The recipe below is for a spiced butternut squash soup, but you can easily substitute pumpkin, honeynut or kabocha squash for this recipe.  Most soups call for roasting the squash first, but I skip that step here.  The cubed, raw squash cooks up while it's simmering with all of the great flavors here.  I love the smokiness and heat of the chipotle mixed with the umami and sweetness of the miso.  Such a great, quick weeknight meal.  I served it along with my pan de coco (coconut bread subbing coconut milk in this recipe)….sooooooo good!

Serves 4 to 6

2-3 tablespoons unsalted butter
1 medium onion, diced
1 shallot, diced
3 cloves garlic, minced
1/2 teaspoon brown sugar
1 butternut squash, halved and seeded and cut into a 1-inch dice (optional: save the seeds for garnish)*
1/4 cup mirin**
4 cups vegetable or chicken stock
2 tablespoons white shiro miso**
1 chipotle in adobo (canned)
Salt and lemon juice, to taste
chopped chives, for garnish

In a soup pot, melt butter over medium-low heat.   Add onion and shallot
with a pinch of salt and cook for 5 to 7 minutes until translucent.  Add the
garlic and the brown sugar and cook for another minute.

Add in the cubed squash along with the mirin and cook for 2 to 3 minutes
until the wine has mostly absorbed.  Add the stock and bring up to a simmer.
Simmer for 35 minutes, partially covered, until all of the squash are
tender.

Add in the miso and chipotle and transfer to a blender or use a hand blender
to puree to your desired consistency.  Season with salt and adjust acidity with lemon juice if necessary..

Serve sprinkled with chives & toasted seeds (if using).

* To toast the squash seeds, preheat oven to 350 degrees.  Clean seeds of any pulp and dry on paper towels. Toss the seeds with oil, salt, cumin and smoked paprika.  Toast in oven until golden brown about 10-15 minutes.  Let cool on a tray and set aside for garnish on soup.

** Mirin is a type of Japanese rice wine.  This along with the miso can be found at Whole Foods or a specialty / Asian grocer.

tags: squash recipes, squash soup, how to make squash soup, butternut squash soup, butternut squash recipes, best butternut squash recipe ever
categories: all 4, appetizers 1, main dishes-1, man-friendly, quick & easy, recipes, soups, soups & salads, vegetarian-2
Wednesday 11.02.16
Posted by Aliya LeeKong
 

Breaking the Fast After Yom Kippur

BREAKING THE FAST AFTER YOM KIPPUR

Yom Kippur is arguably the most important holiday in the Jewish calendar.  It marks the end of the 10 day celebration of Rosh Hashanah (Jewish New Year) and translates to the “Day of Atonement”.  The day is set aside to atone for the sins of the past year with a complete 25- hour fast.  The fasting begins just before sunset the day before and goes until the next evening.  At sunset on Yom Kippur, you have a “Breaking Fast” meal that usually includes all types of breads, cured meats and food that were cooked the day before since during fasting you are not allowed to do any work (even cooking)! 

With this in my mind, I thought about easy breaking fast food, a homemade coconut bread recipe as well as some different ways to do lox.


CONCORD GRAPE HAND PIES 

These are beyond easy!  This is grape season, so just halve and remove the seeds from the sweetest grapes you can find.  Roll out a sheet of homemade puff pastry and use a pastry cutter or overturned glass to cut out rounds.  Place a small mount of the halved grapes in each circle.  Fold the circle in half to make a semi circle and use a fork to press the edges down tightly.  Paint with an egg wash and bake at 400° F for about 25 minutes.  Done!


PAN DE COCO (WITH A TWIST)

Pan de coco is a Dominican bread that's usually a bit more flat.  I combined it with my basic bread roll recipe, adding yeast to make it fluffy and light.  Think a Parker House roll and Pan de Coco had a baby.  It's soooo good.

Yields 16 rolls

¼ cup lukewarm water

(1) ¾ ounce packet yeast (active dry)

3 tablespoons butter, plus more for greasing and melting

¼ cup honey

2 ½ teaspoons salt

1 cup coconut milk

1 egg, beaten

4 – 4 ¼ cups all purpose flour

½ cup coconut flakes

Flake salt, for sprinkling


I make this recipe in a stand mixer, but you can easily do this by hand.  Start with the lukewarm water in the bowl of the stand mixer and sprinkle the packet of yeast over.  Mix gently to combine and let sit 5 minutes or so while you prepare the other ingredients.

In a medium pot, melt the butter.  Add the honey, salt and coconut milk and heat gently until warmed through and uniform.  Remove from the heat.  (It shouldn’t simmer but should be warm to the touch.)

Add the egg and 3 ¾ cups of flour to the yeast mixture and mix together with a fork.  Slowly pour in the milk mixture, using the fork to make a shaggy dough.  Using the dough hook attachment (or your hands), knead for about 3-4 minutes.  The dough should be soft and a bit tacky but should NOT stick to your hands.  If it's sticky, keep adding flour in tablespoon increments until you have the right, non-sticky consistency.

For rolls, divide the dough into 16 even-sized balls and place in a heavily greased, 9-inch cake tin.  Cover with a kitchen towel and let rise 45 minutes.  Preheat oven to 375˚ F.

After the rise, brush the rolls generously with melted butter, sprinkle with coconut flakes and bake for 30 to 35 minutes.  Brush again with butter once out of the oven and sprinkle with a little salt.  Enjoy hot!


LOX 2 WAYS

Photo: Food & Wine

Asian Salt & Sweet Lox

1 lb salmon filet, trimmed and all pin bones removed
1 cup soy sauce
1 tablespoon dark brown sugar
1/4 cup mirin
1 or 2 fresh chilies (thai, serrano, depends on your heat tolerance), roughly chopped
1 inch fresh ginger, roughly chopped
1 bunch cilantro, roughly chop (1/2 for cure, 1/2 for creme fraiche)
1 cup crème fraiche
1/2 lime, juiced

Place salmon in a large ziploc bag on a cookie (just in case the bag leaks).  Whisk together the soy sauce, sugar and mirin until the sugar dissolves.  Pour the mixture in the bag and add in the chilies, ginger and cilantro.  Let as much air out of the bag as possible and seal.  Put another cookie sheet on top and weight down with cans or something else heavy.  Place in the fridge and let sit for 24-48 hours.  After, rinse the filet under cold water until the filet is clean.  Pat dry with paper towels and let it dry out a bit in the fridge before slicing. 

Chop the remaining cilantro a bit more finely.  In a bowl, mix together the crème fraiche with the lime juice and finely chopped cilantro.  Slice the salmon with a sharp knife, serve with thecrème fraiche and enjoy!


Traditional Lox

1 lb salmon filet, trimmed and all pin bones removed
1/3 cup kosher salt
1/3 cup sugar
1/2 bunch fresh dill, finely chopped
3 lemons, zested
2 tablespoons smoke powder (optional)

Place salmon in a large ziploc bag on a cookie (just in case the bag leaks).  Mix together the remaining ingredients.  Pat the mixture onto both sides of the salmon.  Let as much air out of the bag as possible and seal.  Put another cookie sheet on top and weight down with cans or something else heavy.  Place in the fridge and let sit for 24-48 hours.  After, rinse the filet under cold water until the filet is clean.  Pat dry with paper towels and let it dry out a bit in the fridge before slicing.  Enjoy!


tags: Yom Kippur recipes, break fast recipes, breaking the fast, bread recipe
categories: all 4, appetizers 1, breads & cakes, blog, breakfast-1, desserts-1, holiday, lifestyle-1, quick & easy, recipes, traditions
Wednesday 10.12.16
Posted by Aliya LeeKong
 

Rose-Scented Falooda

View fullsize falooda3.jpg
View fullsize falooda2.jpg
View fullsize falooda1.jpg

ROSE-SCENTED FALOODA

This weekend kicked off the start of Eid Al Adha (or Feast of Sacrifice).  For those that are unfamiliar, it's the second of the two Muslim holy holidays and is considered the most holy, the other being Eid Al-Fitr, celebrating the end of Ramadan.

Although this holiday is considered the "Salty Eid" with savoury dishes being the mainstay of the celebration, it made me think about a sweet drink I grew up having at the sweet shops when I travelled.  Falooda is a rose-scented, sweet milk that is flecked with sweet basil seeds (tukmaria), a cornstarch vermicelli and ice cream.  It's such a distinct taste memory, an Indo-Pakistani bubble milk tea of sorts for a reference point, and was always a treat. 

I thought it would be fun to recreate and also do it a bit more naturally (to give to my little one!).  I used a rice vermicelli because falooda sev, the traditional cornstarch noodle, was too hard to find.  In lieu of a pre-fab, pre-sweeted rose syrup, I made my own to control for sweetness, but, by all means, it tastes great using either.  Finally, I used a touch of kewra essence because that flavor is part of my childhood, but it's totally optional (and also not the easiest to find).

Basil seeds, by the way, are very similar to chia seeds.  When you soak them, they swell and become gelatinous.  Like chia, they are considered a superfood, but, theoretically, you could sub in chia if they are too tough to find. 

Serves 4

2 teaspoons basil seeds

1/3 cup white or brown rice vermicelli, broken into 1- to 2-inch pieces

2 cups milk (whole, skim, almond, coconut)

3 tablespoons rose syrup*

1 1/2 tablespoons kewra essence (optional)

4 medium scoops ice cream (vanilla, honey, pistachio, or any flavor you think fits here)

In a small bowl, cover the basil seeds with water and let sit 5 to 10 minutes.  They will swell up, so you may need to add a bit more water.  Strain.

Cook the vermicelli per the package instructions - usually about 3 minutes in boiling (unsalted!) water.  Strain and transfer to an ice bath (water and ice) to cool down immediately and stop cooking.  Strain once cooled.

To the milk, stir in the rose syrup and kewra essence, if using.

Divide the basil seeds and vermicelli between 4 glasses.  Top with the rose milk and finish with a scoop of ice cream.  Serve immediately with a straw and a spoon!


*For the rose syrup, in a medium pot, bring 1 1/2 cups water, 1 cup dried rose petals and 1 cup white sugar (if using a natural brown sugar like palm or coconut, change this to 3/4 cup) up to a boil.  Remove from the heat, cover, and let steep until it cools to room temperature.  Strain, using the back of the spoon to press through as much of the liquid (and flavor) from the rose petals as possible.  Add a few tablespoons of rose water to intensify the flavor if need be - it all depends on the strength of the rose petals you're using.

tags: falooda recipe, natural falooda, kewra, rosewater, rose syrup recipe, how to make rose simple syrup, eid foods
categories: all 4, desserts, drinks & cocktails, holiday, quick & easy, recipes, traditions
Wednesday 09.14.16
Posted by Aliya LeeKong
 

Aged Hot Sauce & Other Things to do with Chili Peppers

AGED HOT SAUCE & OTHER THINGS TO DO WITH CHILI PEPPERS

I am slightly obsessed with hot sauce (I mean, obsessed).  I put that ish on everything.  Sometimes, I carry a small bottle in my purse because, you know, you just never know when you’ll need it...Right now, the market is bursting with all types of peppers, and there are so many different ways to make hot sauce or spice up ordinary kitchen condiments. Making your own hot sauce at home really isn’t that hard of a task.  You can do a quick stove top method (basic cooked), ferment in a salt brine solution for a few weeks (fermented/aged), or a quick pickle like my Haitian quick pikliz.

Fermented hot sauces might sound like something new, but they are in so many different cultures - super Southern (think Tobasco) and Asian (sriracha and kimchi to a certain degree) to name a few.  I personally like to make a green sauce and a red sauce. My green sauce is always a mix of serranos, jalapeños, and poblano peppers, roughly chopped.  I add some chopped onion, garlic and green bell peppers to round out the heat, pack it all in a jar and add a simple salt brine (1 1/2 cups water to 1 tablespoon salt).  Everything should be submerged, so if you're doing this at home, weight down if you must.  Initially, I cover the jar with muslin cloth, secured by a rubber band, and I let sit it sit on the counter for about a week to two weeks, stirring daily.  You will notice little bubbles (fermentation), but if white mold forms, skim it off.   You can ferment for as long as you like really - Tobasco takes 3 years!  I have experimented from a week to 8 weeks, so it's more about personal taste.

For the red sauce, I use hot cherry peppers, a couple scotch bonnets, and other red chilies like Fresnos or thai chilies.  Again, add onion, garlic and red bell peppers to round out the heat.  Same finish as the green sauce.  The hardest part is the waiting.  Also, I highly recommend wearing gloves when dealing with all these hot peppers!

Another fun way to experiment is with the salts in the brine or spices.  Think: a smoked, black Hawaiian sea salt or Himalayan pink. Spices like coriander, cloves, all spice, ginger, mustard seeds,  and even herbs will add great flavor.

After the peppers have fermented, I like to strain the pepper mix, reserving the brine.  Then, I purée adding back in the brine and a touch of vinegar until I reach the right consistency and flavor.  You can leave it like this, slightly chunky, or strain for a thinner hot sauce. Note: If the sauce is a little too hot you can add some sugar to smooth it out.   Finally, transfer to an airtight jar and store in the fridge.

Another great way to use up peppers from the market is to infuse them in vinegars or oils to make some kick-ass salad dressings!  For vinegars, I like to buy the tall thin glass jars with the pour spout and fill them with Thai bird chilies or any skinny peppers, really, that fit in the jar.  Then, it’s up to you which type of vinegar you want to infuse - no cooking necessary!  Fill the jar and let it sit for a week or more to infuse.  It's so simple - just make sure the chilies are covered by the liquid or they could mold. 

For the oil, I like to simmer canola or grapeseed oil on a low heat with garlic and spices.  Then, pour the hot oil over fresh or dried chilies and let sit until cool.  Strain and voilá!

Enjoy!!


tags: aged chili sauce, fermented chili sauce recipe, how to ferment chili peppers, pickled chili peppers
categories: all 4, blog, condiments, lifestyle-1, quick & easy, recipes
Wednesday 08.24.16
Posted by Aliya LeeKong
 

Not Your Average Oysters

NOT YOUR AVERAGE OYSTERS

It used to be that you could only eat oysters in months that end in "R", but, now oyster farming (rather than harvesting from the wild) makes them safe year-round.  And nothing says summer better than a bottle of wine and fresh oysters!  I recently took a day trip out to Greenport, Long Island and had some super fresh oysters at Little Creek Oysters, along with a bottle of local wine from Bedell Cellars.  I love this part of Long Island; there are so many vineyards to visit and have tastings as well as an abundance of local farm stands to get fresh produce, you can even pick your own at some spots!  The oysters are straight out of the Peconic Bay, and you can have them shucked or you can shuck yourself with a little lesson from the waitstaff.  I went for the shuck yourself, to get down and dirty, and to earn my dozen oysters for the day!  

I don’t know about you, but I like to have my first few oysters “naked”, and then I start to experiment with various toppings.  If I'm in a restaurant, I'll go for a mignonette, some fresh lemon juice or a few dashes of hot sauce, but, at home, it gives me the opportunity to use all of the crazy, multi-ethnic pantry items and sauces I have in the fridge.  A few thoughts:

(1) HORSERADISH - Horseradish and lemon juice are a great combo too.  You can buy store bought horseradish, or if you can find the fresh root make it yourself in a food processor.  (1) peel the horseradish root and chop in to a small dice (2) process in the food processor with a little salt until finely chopped (3) let sit for 5-10 minutes so the flavor strengthens….the longer the better! (4) add vinegar to preserve and give it a little cook.  Adding the vinegar stops the horseradish from blooming more flavor, so make sure it’s pungent enough to your liking before heading to this step. If you want to calm down the flavors add a little sugar for a nice balance.

(2) JALAPEÑO-BASED MIGNONETTE - A classic mignonette is made with finely diced shallots, pepper and vinegar.  I like to take mine a step further with some diced fresh or pickled jalapeños, chopped cilantro, lime juice, and I use apple cider vinegar to give it more of a kick!

(3) GO JAPANESE! - I love ponzu sauce, which is a Japanese, citrus-based sauce that has yuzu, lemon, sudachi and other tangy flavors.  I also always have ponzu shoyu, which is a blend of ponzu with soy sauce (which you can obv do yourself).  A few drops of either of these are great on oysters and can be mixed with some chili sauce for heat.  A little togarashi seasoning with ponzu is also a great touch.

(4) INDIAN PICKLES & CHUTNEYS - Indian pickles and chutneys also make for great toppings for oysters.   A good Indian pickle is typically a mustard-oil cured fruit or vegetable - think green mango, lime, carrots.   It has a really tart bite to it, so you using it sparingly is key here.  Also, a good coriander or coconut chutney is AH-MAZING on oysters with heat, sweetness, tang as is a tiny drop of tamarind paste.

(5) KIMCHI - If you happen to buy or make your own kimchi, finely chopping up a bit and throwing it on an oyster is kind of life-changing.  Just saying.

(6) OTHER CHILI SAUCES - Tabasco or Frank's aren't the only hot sauces out there that work on oysters.  I love Sriracha, sambal oelek or a good, West Indian pepper sauce made from scotch bonnets.   Salsa verde is perfect too.

(7) MOROCCAN-STYLE - Both harissa and preserved lemons are a fantastic topping for oysters.

There are so many different ways to play around with flavors for oysters - these are just a few (for the non-purist :))!  Enjoy!


tags: oysters, when to eat oysters, best oyster toppings, ponzu for oysters, global flavors oysters
categories: all 4, appetizers 1, blog, lifestyle-1, quick & easy
Friday 08.05.16
Posted by Aliya LeeKong
 

Japanese-Inspired 5-Ingredient Cheesecake

View fullsize cheesecake 3.jpg
View fullsize cheesecake2.jpg
View fullsize cheesecake1.jpg

JAPANESE-INSPIRED 5-INGREDIENT CHEESECAKE

The fact that National Cheesecake Day falls in the summertime is a bit odd to me.  That thick, tangy lusciousness somehow belongs during a time when you're not trying to eat light (and kill it in a bathing suit...).  BUT I recently tried a Japanese cheesecake, which is also called a Cotton cheesecake (because of how light and fluffy it is).  Think if an angel food cake and a cheesecake had a baby....Turns out, this crustless, spongy creation is the perfect summer dessert.

I set out to create a simplified version of it because summer desserts should be a bit easy.  I wanted a canvas, a simple cake, to showcase seasonal ingredients as its topping.  This cake is 5 ingredients, and the hardest step is just whipping the egg whites to stiff peaks and folding into the batter.  Other than that, foolproof!  I used yuzu juice as the acid in keeping with the Japanese theme and because it has a touch of salinity, which I looooove, but lemon juice or even key lime juice would be a great substitute.

When I’m indecisive about a topping for my cheesecake, my favorite go to is a whipped sour cream topping.  The tangy tartness of the sour cream with the bite of the creamy, sweet cheesecake is one of the more surprising taste combinations.  Who would have thought sour cream with cheesecake would be a thing!?  And it’s super simple to make.  For a more basic recipe I use sour cream, confectioner’s sugar and vanilla extract.  Just throw it all into the Kitchenaid and whip 'til smooth or whisk in a bowl if you don’t like lugging out your stand mixer. 

There were so many blueberries at my Saturday's farmers' market, so I thought I would test out a blueberry sauce with my cheesecake.  This recipe combines the blueberries with one of my favorite herbs, lemon verbena.  It’s a super simple sauce and starts off like you would a jam.  Instead of letting it boil down til thick, you simply take off the heat and let cool.  I like to steep the lemon verbena in boiling water to really bring out the flavor and then use the water when making the sauce.  In a sauce pan, mix the blueberries, corn starch, and sugar until the blueberries start to release their juices.  Gradually stir in the lemon verbena water and bring to a simmer.  Let cook for 5-10 minutes until desired consistency and some of the berries start to burst.  Turn off heat and let cool to room temperature.

Here's the 5-ingredient cheesecake recipe - enjoy!

Yields (1) 9-inch cake

1 can sweetened condensed milk
8 ounces cream cheese, room temp
6 eggs, room temp and separated
2 ½ tablespoons cornstarch
1 tablespoon yuzu, lemon or key lime juice

Preheat the oven to 350° F.

In a large bowl, whisk together condensed milk and cream cheese.  Fold in yolks, cornstarch and yuzu/lemon juice.

In a separate bowl, whip egg whites to stiff peaks.  Add a little bit of the egg whites to the cream cheese mixture to lighten and then fold in the rest in 3 increments.  Transfer to a greased, parchment-lined 9-inch cake tin or springform pan.  Place in a roasting pan and pour boiling water in the pan to halfway up the cake tin (if using a springform, make sure to wrap in foil all over to keep the water from seeping in.

Bake for 40 minutes.  Then, turn off the oven and leave the cheesecake in the oven for another 15 minutes.  Remove and let cool completely before refrigerating.  Refrigerate at least hours before serving.


tags: cheesecake recipes, japanese cheesecake, easy cheesecake recipe, cotton cheesecake, desserts
categories: all 4, desserts, holiday, quick & easy, recipes, traditions
Wednesday 07.27.16
Posted by Aliya LeeKong
 

Summer = Fish Tacos

SUMMER = FISH TACOS

I. Love. Tacos.  Tacos are the ultimate - easy food with literally endless combinations.  Summer is all about simplicity and lightness, so my favorite by far this time of year are fish tacos.  From grilled red snapper to lightly breaded mahi mahi or a nice “meaty” grilled swordfish, there’s nothing better for an easy weeknight meal (or for entertaining).  The hardest part is deciding on toppings!

The Baha-style, fried ones here took no time to whip up.  I never use a recipe, so I'm just going to tell you what I do.  For 4-6 people, take a 1 ¼ - 1 ½ lbs flaky white fish (snapper, mahi mahi, grouper, etc) and portion into strips.  Basicallly, make sure the size of the fish strip fits into your taco as one or two strips.  Divide a cup of flour evenly between two bowls.  Season one of the bowls with salt, pepper, paprika and any other powdered spices you like until it tastes good.  To the other bowl, whisk in beer until it has the consistency of wet paint. 

Dip the fish strips first into the flour bowl, shake off excess and dip into the beer batter.  Let any extra drip off and fry in about an inch to an inch and a half of oil (at 350° F) until golden brown (generally 3-5 minutes).  Transfer pieces to a paper towel-lined plate and sprinkle with some salt.  Make sure to fry in batches and not crowd the pan too much.

In terms of toppings, the combination for my lamb tacos are my go to, especially the chipotle crema, but, here, I just used some pickled shallot, cabbage, fresh chile, green onion, and cilantro.  My sauce was a smoked habanero crema (mayo/crema + smoked habanero sauce), but you can literally stir together mayo/crema/crème fraiche with any hot sauce you like until it tastes good. 

Since it's summer, my smoked peach chutney is another topping that would be ridiculous on some fish tacos.  The sweet, smokey flavors of the peach pairs perfectly with any fish dish.  Or you can do a simple pico de gallo (diced tomatoes, red onion, cilantro, jalapeño and lime juice), super easy and refreshing. 

Feel free to use soft or hard tacos.  I'm partial to corn tortillas myself.  Enjoy!


tags: fish tacos, how to make fish tacos, Baha-style fish tacos, baha fish taco recipe
categories: all 4, lifestyle-1, main dishes, quick & easy, recipes, traditions
Wednesday 07.06.16
Posted by Aliya LeeKong
 

Strawberry Season, a Pickle, & a Jam!

STRAWBERRY SEASON, A PICKLE & A JAM!

Well….it took forever, but it has finally arrived: strawberry season.  This little window only lasts about a month up here, and I try to get out to the fields to pick my own, when possible.  Right now, I have literally the sweetest strawberries I've ever tasted sitting in the fridge.  They are so good, just by themselves, but if you’re like me (and get a bit overly excited about berry picking...), you end up with strawberry overload!

I decided to mess around with some flavors for a new strawberry jam using some fresh basil from my garden and a vanilla bean.  Strawberries and basil are a match literally made in heaven.  I don't prefer my jam overly sweet, so I just add sugar (unrefined) until it tastes like it’s enough.  There isn't a specific recipe because, of course, it depends how many strawberries you have left, but here are a few guidelines: (1) Clean and quarter berries and let them heat up in a saucepan with a couple tablespoons of lemon juice until they start to release their liquid.  (2) Once there is some liquid in the pan, add the sugar, basil and a vanilla bean and then let it all simmer until it thickens.  Remember, when it cools, it will thicken up a bit more.  (3) Use the stems from the basil (cause that’s where all the flavor is) and wrap them in a cheesecloth sachet.  You can also tear up or chiffonade the leaves and add them to the strawberries.  (4) Add some pectin powder if you like, to speed up this process.  Ultimately, you can cool and use right away or transfer to sterilized jars and vacuum seal for later.

This year, I also wanted to experiment pickling green strawberries.  It’s a different kind of pickling liquid then you might think - less vinegar, a little more sugar and a lot of flavor!  The green strawberries turn a bit sweet, slightly tart and still retain a nice bite.  These pickled strawberry makes them a perfect addition to any summer salad or cheese plate.  Enjoy!

Photo: We You They Ate

Pickled Green Strawberries
Yields 2 pint jars

2 pints green strawberries, cleaned and hulled (cut in half or sliced, if you like)

1 cup water

½ cup rice wine vinegar

2 ½ tablespoons sugar

1 tablespoon honey

2 teaspoons kosher salt

1 ½ tablespoons coriander seeds

1 tablespoon black peppercorns

4 Kaffir lime leaves

2 (1" x ½") pieces lime rind


Divide the strawberries between the two mason jars and set aside. 

In a saucepan over medium heat, bring the rest of the ingredients to a simmer until the all of the sugar, salt and honey has dissolved.  Let cool to room temperature before pouring into the jars with the strawberries.  Let sit in the fridge over night for the best flavor.


tags: strawberries, strawberry recipes, pickled green strawberries, strawberry jam, how to pickle strawberries
categories: all 4, condiments, lifestyle-1, quick & easy, recipes, side dishes-1, vegetarian-2
Wednesday 06.08.16
Posted by Aliya LeeKong
 

Red Snapper with Lemon, Onions, Mustard & Habañero (Poisson Yassa)

View fullsize fish1_edited-2.jpg
View fullsize fish3.jpg
View fullsize fish2.jpg

RED SNAPPER WITH LEMON, ONIONS, MUSTARD & HABAÑERO (POISSON YASSA)

Summer has officially begun, and with that, besides grilling it up, I like to go a bit lighter.  This recipe is for a Senegalese-inspired fish, poisson yassa.  Fish (here, I used snapper) is marinated with onions, garlic, lemon, bay, mustard and habañero pepper.  After a quick sear of the fish and sauté of the onion mixture, it's all placed in the oven to bake and for the flavors to mingle. 

The flavor is so amazing - with the sweetness of the caramelized onions, the tart bite of the mustard and lemon, and the heat from the habañero.  I love that this preparation can also be used for chicken and lamb with obvious changes to cooking times.  Enjoy!

Serves 4

4 white onions, thinly sliced

5 garlic cloves, minced

Juice and zest of 2 lemons

1 habañero pepper, seeded, ribbed and thinly sliced

¼ cup canola or olive oil, plus more for cooking

¼ cup cider vinegar

1 ½ tablespoons Dijon mustard

1 tablespoons soy sauce

1 bay leaf, fresh or dried

4 filets red snapper (1 ½ - 2 lbs)

salt and freshly ground pepper

2 tablespoons unsalted butter

Handful of fresh herbs, finely chopped (parsley, chives, cilantro)

In a bowl, mix together the onions, garlic, lemon juice and zest, habañero pepper, oil, vinegar, mustard, soy and bay leaf.  This is the marinade for the fish.  Transfer to a plastic bag or baking dish and make sure the fish is thoroughly coated.  Marinate for a minimum of 30 minutes but preferably a few hours.

Preheat oven to 350° F.

Remove filets from the marinade (reserving the marinade), dry off and season with salt and pepper.

In a large cast iron skillet, heat enough oil to coat the bottom of the pan along with the butter over medium-high heat.  When hot, add the snapper skin-side down.  Cook for 3 minutes and remove to a plate (skin-side up).

Add the onion marinade mixture (juices and all!) to the skillet, reduce the heat slightly and cook for 6-8 minutes until the onions start to soften.  Remove from the heat, nestle the snapper filets in the onion mixture, cover with foil and transfer to the oven for 15 minutes.

Garnish with fresh herbs before serving.  It's traditionally served over rice, but I also love it with some crusty bread.


tags: fish recipe, poisson yassa, senegalese food, african cooking
categories: all 4, blog, main dishes, man-friendly, quick & easy, recipes, traditions
Wednesday 06.01.16
Posted by Aliya LeeKong
 

Essential Grilling Tips to Kick Off the Summer!

ESSENTIAL GRILLING TIPS TO KICK OFF THE SUMMER!

With the weather finally starting to warm up and the days getting longer, I can't wait to clean off my back porch and get my grill set up!  There’s nothing better than a little summer get-together with fresh salads, cocktails and grilled meats or fish.  I put together a few tips to help guide you through an easy grilling season...


CHARCOAL VS. GAS

This is the debate that sparks up at every BBQ get-together!  There aren't any real health differences cooking with either one, so it really just comes down to taste and preference.  Charcoal will give you more of a richer, smokier flavor whereas gas is a lot faster and a little less expensive to maintain.

I am partial to charcoal - the smoky flavor you get is so incredible, and for me, being close to the cooking process (thinking about heat and being intuitive about done-ness) is something I just love.  To start a charcoal grill, use a chimney, which makes it super easy to get the coals hot and ready to use.  Place paper or starter briquets on the underside of the chimney and then fill with charcoal.  Light the paper/briquets and let the coals catch fire, which should take around 20-25 minutes.  Dump out the charcoals into the grill when they have turned an ashy gray.  I'm not much for lighter fluid, so this is my favorite way. 


MAINTAINING YOUR GRILL

You want to oil the cold grates prior to grilling with a rag or paper towel.  This is basically the same as maintaining your cast iron pans at home - seasoning the grates will help to make the grill non-stick.

Also, always preheat the grill, and clean the grill while it is still hot before and after cooking.  The grill should be so hot that you can't keep your hand above it for more than 2 seconds. 


READY TO GRILL

A few points:

(1) Always let your meat come up to room temperature before grilling for a good 20-30 minutes.  This makes sure that your meat will cook evenly on the grill. 

(2) Season with spices or marinade overnight for the best flavor, but even a quick grill rub right before cooking makes for great flavor.  If you're using a marinade, make sure to pat the meat dry before cooking. 

(3) Save the basting of sauces towards the end of cooking so that they don’t burn the foods.  Most basting sauces contain brown sugar, tomato sauce, soy and other sugary ingredients that will char the meat before it is finished cooking. 

(4) Tongs and spatulas are the best tools to use when handling meat; never a grill fork as it releases all those good juices when you pierce the meat to turn.


LET'S GET COOKIN'!

The hardest thing to do while cooking?  Don’t touch the meat!  Let it sear and get those beautiful grill marks.  The meat will let you know when it is ready to be turned.  If you pick up the meat too early, it will stick to the grates.  After cooking, let the meat rest (about 5-15 minutes).  This way the juices will re-distribute.  If you cut into it right away, all the juices will flow out leaving you with a dry cut of meat. 

Using a meat thermometer is helpful, especially if you're grilling poultry.  I actually judge by the touch when I'm grilling red meat.  Use the skin on your hand between your thumb and your pointer finger as a guide.  The first pinch between the two fingers is soft and spongy – rare, ¼” back is a little spongy but springs back – medium, ½” back is firmer – well done.


GREAT GRILL ACCESSORIES

Photo: Sur La Table

Salt blocks are made from Himalayan salt, and they impart a subtle saltiness to foods and can be used directly on the grill. 


Photo: Amazon

Grill baskets are great for those foods that fall through the grates like asparagus, shrimp, onions etc…I love this one because I'm always cooking for a group and it's on the larger size.

Photo: Emile Henry

Pizza stones are amazing for making fresh pizza at home.  You can even stop by your local pizza place and ask to buy dough if you don’t have time to make your own.  This is actually what I own, and it works on the grill and in the oven.  What I love about this one is that you can cut directly on it making serving up that grilled pizza all the easier.


Photo: William Sonoma

Cedar planks & alder wood are amazing for grilling fish.  Not only do they keep the delicate fish from falling through the grates, they also infuse the fish with a rich, smokey flavor depending on the type of wood.  If you can find alder wood, the flavor is amazing!

tags: grilling tips, how to grill, grilling for memorial day, summer grill essentials
categories: all 4, blog, lifestyle-1, quick & easy, man-friendly
Monday 05.23.16
Posted by Aliya LeeKong
 

All About Crab Season + Crispy Spiced Crab Cakes

ALL ABOUT CRAB SEASON + CRISPY SPICED CRAB CAKES


I’ve previously expressed my undying love for crabs with this delicious recipe , and I just wanted to re-emphasize this love (ok…obsession!)  with the fact that soft shell crab season is just around the corner.  Crab is one of those delicate ingredients, sweet and flaky,  but can take on so many different preparations - deep-frying, pan-frying, baking, boiling, in a salad, soup, pasta, or rice dish.  For me, the marriage of crab with spices and butter is absolute heaven!!

Here are a bunch of crab recipes to experiment with along with my favorite, crispy, spiced crab cakes!


SOFT SHELL CRAB WITH CURRY BUTTER


Photo: NYTimes

Even though we are able to have crabs all year round, the soft shell crab is one of the varieties that has a true farming season (mid May - September, depending on the temperatures of the water).  During this time, the blue crab is molting its shell in order to grow in to a new, larger one.  When the crab loses (pretty much ejects itself from) its shell, they have to be taken out of the water immediately and harvested before they begin to grow their new, hard shell…you know the one that takes forever to crush and get to the juicy, delicious meat.  

As with most shellfish, it’s best to purchase live and take home immediately. Taking home a lobster and throwing in a pot of boiling water, or (gasp) sticking a knife in the head before throwing in said boiling water is a whole lot easier (in the sense of being humane and having less guilt) than cutting off the face of the soft shell crab, ripping out the gills from behind the face and then removing the apron on the underside of the crab….you tell me!  But, if you are adventurous in your cooking and you choose to tackle this task, this is a great step by step for cleaning them at home (and good luck to you, I will continue to have my local fishmonger clean them for me…thanks!).


SINGAPOREAN BLACK PEPPER SNOW CRAB

Photo: Saveur

I will never forget when I was vacationing in Hawaii having dinner at this completely ordinary looking restaurant and ordering a variety of sushi, one of which was a crab roll.  Crab roll - what comes to mind? The fake crab meat that's good...but not great.  When the food arrived, the crab roll was ridiculous, not to mention all the other sushi!  I’m talking fresh, amazing, shredded snow crab meat explosion wrapped in seaweed.  My mouth is watering just thinking about this meal again.  If you have the chance to experience fresh, just caught snow crab you should definitely jump at the chance.  This recipe is a delicious, simple way to enjoy the legs as well.


TRINIDAD CALLALOO WITH CRAB

Photo: Caribbean Pot


CRACKED DUNGENESS CRAB WITH LEMONGRASS, BLACK PEPPER & BASIL
 

Photo: My Recipes

Unfortunately, due to this crazy weather we have been having this year (thanks El Nino), Dungeness crab season has had a late start on the West coast.  The season finally kicked off at the end of March and ends in June. I love the sweetness of this crab meat - it complements different flavors so well and also is just perfect on its own with a bit of drawn butter.


STONE CRABS

Stone crabs are one of my favorite types, and especially since I found out how they are harvested.  The crabs are caught and one claw is removed and then the bodies thrown back in the water to regrow their claws (allowing it to have one to fend off predators).  How amazing!  As with most crab legs, these are great just steamed with a great mustard sauce or clarified butter.


CRAB CAKES WITH MUSTARD SEEDS & PARSNIPS

Serves 4-6; Yields 15 to 16 crab cakes

1 medium parsnip, peeled and cut into a medium dice

2-3 tablespoons canola oil plus more for frying

1 teaspoon mustard seeds

8 curry leaves (optional)

1 large shallot, finely minced

1-2 red and/or green chiles, finely chopped (ex. red jalapeno, jalapeno, thai)

3 - 4 garlic cloves

1 pound jumbo lump or lump crabmeat, drained and picked through for any shells

¾ cup breadcrumbs

1 egg, lightly beaten

½ teaspoon salt

¼ teaspoon freshly ground black pepper

handful of fresh herbs (chives, cilantro, parsley), roughly chopped

1 tablespoon unsalted butter for frying

kosher salt to taste

In a medium pot, cover parsnips with cold water by about 1 inch.  Bring up to a boil and cook for 6-8 minutes until fork tender.  Drain and pass through a ricer (best) or mash with a potato masher and let cool. 

While the parsnips are cooking, heat 2 tablespoons of oil in a medium saucepan over medium high heat.  Add mustard seeds and curry leaves if using, and, when they start to pop, reduce the heat to medium-low and add the shallots, chili and garlic.  Saute for 2 to 3 minutes until the shallots are translucent, remove and let cool.

In a medium bowl, combine crab with the pureed parsnips, the shallot mixture, breadcrumbs, egg, salt, pepper and herbs.  Form into 2 ¼ inch patties and let chill in the refrigerator for 15 minutes.

In a large sauté pan, heat 1/8” of oil with 1 tablespoon of butter.  Fry each crab cake 1-2 minutes per side until golden brown and removed to a papertowel-lined plate to drain.

Finish crab cakes with a sprinkle of salt as soon as they are out of the oil and serve hot.

Freezing: These guys freeze really well, and I love to make a double batch to keep some on hand for a quick weeknight meal.  Just let them thaw for a few hours in the fridge before frying up!


tags: soft-shell crab, soft shell crab recipes, how to cook crab, singaporean black pepper crab, crab cake recipe, crab cakes
categories: all 3, appetizers 1, blog, main dishes, quick & easy, recipes
Wednesday 05.18.16
Posted by Aliya LeeKong
 

How to Make Your Every Day Salad Taste Good

HOW TO MAKE YOUR EVERY DAY SALAD TASTE GOOD

With spring on its way, I’m getting super impatient waiting for the fresh greens and veggies that are about to explode at the farmers' markets.  For me, and I feel like a lot of others, when the weather gets warmer I start to crave lighter, healthier foods.  The thought of a winter pot roast just isn’t doing it for me anymore.  But, truthfully, I'm not the biggest salad person!  I have, however, mastered how to dress up a salad (in a healthy way) to make it more appealing to a big eater like me, combining flavors and textures to make it crave-worthy.  Thought I would share a few of these tips with you guys!


THE BEST MIX-INS

You've got the greens - now what?  I think the perfect salad has a great raw base but works in one or two cooked elements.  Roasted beets and salad always seem to go hand in hand with me; a mixture of golden and red roasted with shallot, garlic, olive oil, fresh thyme and marjoram are the best.  If you aren't a beet fan, roasted sweet potatoes, squash, fennel, cherry tomatoes or asparagus are delicious.  A simple blanching of veggies (cauliflower, broccoli, green beans, etc…) is easy too - bring water to a boil, salt heavily, add veggies for a minute or two max depending on how large the cuts are and then shock the drained veggies in ice water.  You just want to get rid of that raw bite and keep the vibrant colors.  I love to keep blanched veggies in the fridge to throw into salads or even a fried rice....ok, back to salads! :) 


HERB IT UP

Fresh herbs are aromatic, healthy and go a long way in adding flavor with just a light chop and toss in (cilantro, parley, basil, dill, mint!)  There's this one stall at my local market that has amazing micro greens and mustard greens.  I love the spicy bite I get when I have a mixture of mustards greens with my regular green mix….such a great surprise.  Mint and cilantro are my favorite combo though - they just add such brightness and cut some of the bitterness of other greens.


MAKE A KILLER DRESSING

Photo: Teacher-Chef.com

Photo: Teacher-Chef.com

The dressing makes all the difference.  I always have olive oil, sherry vinegar, dijon mustard and lemons on hand.  A super simple vinaigrette and always a hit! 

We don't always think of oils as important, but it can completely change the flavor of a dressing.  Lately, I've been using grapeseed oil for a more milder flavor than EVOO; for me, I find extra virgin gets bitter so easily.  Other great oils are avocado oil (it has a faint aniseed flavor to it), hazelnut oil, walnut, macadamia and, of course, sesame oil.  Infused oils also add great flavor - think rosemary, garlic, and, of course, truffle.

Once you have the base of your vinaigrette figured out you can then add other ingredients to create a creamy dressing without the cream.  Mustard is an incredible emulsifier, the ingredient that makes a dressing thick, but there are so many other things you can add to do that.   My current fave is tossing some roasted shallots and garlic in the blender with dijon, sherry vinegar and grapeseed oil - so tangy and delicious.  Other great ingredients for a creamy dressing without the cream are tahini, miso, yogurt, avocado, and almond butter (or any nut butter, really).  Also, jam or jelly makes a great emulsifier, so if you like a touch of sweetness, try a tablespoon or two of currant or berry preserves.


ADD SOMETHING PICKLED

Pickled chilies are a staple in my fridge. I pretty much put them on everything I eat, so why not salad?  A little sour and a little heat….sooo good!  Olives are a no brainer - nice plump, juicy kalamata or green, stuffed with blue cheese.  Capers are a nice little pop of salty goodness which, by the way, are made even more delicious if you deep fry them!  You can also do a quick pickle of other veggies like radishes, red onion and daikon for a nice crunchy texture, or, if you are a bit experimental, of dried fruit.  Pickled raisins, sultanas or even cherries add a great sweet-sour bite.


CROUTON ALTERNATIVES

Love the crunchy topping of croutons but don’t want to eat the bread!?  There are lots of crunchy alternatives.  Of course, nuts are always a great option, but my latest experiment was with red quinoa.  I simply soaked as usual for 10-15 minutes and baked it in the oven until crispy!  You can also do it on the stove top.  Buckwheat is another great grain to toast up - some grocers even sell it toasted.  Sev is also a great crunchy alternative.  It is an Indian snack made out of seasoned chick pea flour paste and deep fried.  They come in various sizes, but are very thin…thinner than the crunchy chow mien noodles you usually see on “Asian” salads. 


TOP IT OFF WITH A SPICE BLEND

I often see people add salt and pepper to their salads before eating, so why not make a spice blend to give it more depth of flavor.  Egyptian Dukkah is always a great go-to.  Za'atar (usually a combination of sumac, sesame seeds and thyme) adds a sort of tangy and nutty flavor to any dish.  Advieh is a Persian spice mix usually containing dried rose petals, cardamon, cinnamon and cumin, so warming and aromatic. You can find these spice blends at the store if you aren’t the spice blending type of person.  I also stock up on Japanese rice seasoning blends (furikake) for a quick shake of flavor on my salad.  They usually have bonito flakes, dried seaweed and sesame seeds in them adding a little saltiness to your salad.  

Enjoy!


tags: how to make a good salad, how to make salad taste better, creamy dressing with no cream, salad dressing ideas
categories: all 3, appetizers 1, lifestyle-1, quick & easy, salads, soups & salads, vegetarian
Wednesday 03.16.16
Posted by Aliya LeeKong
 

Not-So-Traditional Irish Soda Bread

View fullsize soda bread2.jpg
View fullsize soda bread1.jpg
View fullsize sodabread3.jpg

NOT-SO-TRADITIONAL IRISH SODA BREAD

I love indulging in a warm, baked-from-scratch loaf of bread.  But let's be honest: making it at home can be a long (see: tedious) task what with the letting the yeast rise, punching down, rising again...but that's why the quick bread was invented!  Quick breads are basically any breads that don't use yeast to rise - like banana bread.  With St. Patty’s Day just around the corner, I thought a take on the traditional Irish soda bread would be fun.

Irish soda bread is usually made with a few simple ingredients: flour (wheat or white), baking soda, buttermilk and salt. Once you have those basics, you can expand with any seeds, citrus, dried fruits you want to create a not-so-traditional soda bread.  This recipe is a slightly modified version of one from a great friend/chef, Tamsin Kelly, who makes this with her family for St. Patrick's Day.  I love the combination of caraway seeds, orange zest, and dried currants in this recipe, but you can substitute however you like (raisins, fennel seeds, etc…)!  Enjoy!

Yields (1) 9-inch cake tin 

4 cups plus 3 - 4 tablespoons all purpose flour
3 tablespoons white sugar
¾ teaspoon salt
1 ½ teaspoons baking soda
½ stick unsalted butter, cold and cubed
1 ½ cups buttermilk*
1 large egg, beaten
1 cup dried currants
2 tablespoons caraway seeds
zest of 1 orange


Preheat the oven to 350º F.  

To the bowl of food processor, add the 4 cups plus 3 tablespoons of flour, sugar, salt and baking soda.  Pulse until mixed.  Sprinkle the cold, cubed butter on top and pulse until the mixture resembles a coarse meal. 

Whisk the buttermilk with the egg and slowly add to the flour mixture, pulsing until the dough forms.  Pulse in the currants, caraway seeds and orange zest.  If the dough is too sticky, add another tablespoon of flour.  Do not overmix or it will toughen up!  You just want the flour blended, and you are ready to go.

I like to cook mine in a greased cast iron skillet or you can use a greased, 9-inch round cake tin.  Score an “X” in the dough (about 1/2” thick) and place in the middle of the oven for 60 minutes or until a toothpick comes out clean.  Rotate the dough halfway through cooking.  When done, transfer to a wire rack to cool.

Make sure to enjoy with a nice, rich, salty Irish butter!!

*I hardly ever buy buttermilk for a recipe since I always have milk, vinegar and lemon juice laying around.  For every cup of milk, use 1 tablespoon distilled white vinegar or lemon juice.  Just mix together and let sit for about 5 to 10 minutes.  It will thicken slightly and look a bit curdled and then it's ready to go!

tags: irish soda bread, quick bread recipe, how to make irish soda bread
categories: all 3, breads & cakes, breakfast-1, holiday, quick & easy, recipes, sweet & savoury, traditions
Wednesday 03.09.16
Posted by Aliya LeeKong
 

Spiced Ricotta Hotcakes with Pomegranate Molasses

View fullsize hotcakes4.jpg
View fullsize hotcakes1.jpg
View fullsize hotcakes2.jpg
View fullsize hotcakes3.jpg

SPICED RICOTTA HOTCAKES WITH POMEGRANATE MOLASSES

During the week for breakfast, if I'm being honest, I slurp down a protein shake before I run out the door.  I know, I know - breakfast is the most important meal, but I just can't manage it.  I think about food constantly - carefully planning for weeknight dinners, quick lunches and the perfect snacks.  And, of course, then I go all out for big, family dinners, holidays, and....brunch!!

These hotcakes are my latest, favorite addition to the brunch arsenal, and are everything you could want in a pancake.  Light, fluffy and almost custard-y from the ricotta, and with a spiced nuance from cinnamon, cardamom and (yes!) a touch of black pepper.  They aren't too sweet, either, which, for me, is important when it comes to pancakes.  Pomegranate molasses adds a tart counterbalance to the creaminess, not to mention a touch of fruity sweetness.  Oh, and they could not be easier to make...Enjoy!

Yields 8 pancakes

1 cup flour

1 ½ tablespoons sugar

1 teaspoon baking powder

¾ teaspoon ground cinnamon

½ teaspoon ground cardamom

¼ teaspoon salt

pinch finely ground black pepper

1 cup ricotta cheese*

2/3 cup milk

2 eggs, separated

½ teaspoon vanilla extract

butter for griddle

powdered sugar, for sprinkling

pomegranate molasses, for drizzling

In one bowl, whisk together the flour, sugar, baking powder, cinnamon, cardamom, salt and pepper.  In another, mix thoroughly the ricotta, milk, egg yolks and vanilla.  Stir the dry ingredients into the wet until just combined. 

Lightly beat the egg whites and fold into the batter.  Let the batter rest about 5 minutes.

Heat a griddle or cast iron of medium-high heat.  Add butter to just coat the surface of the griddle.  Use a ¼ (dry) measuring cup to pour equal amounts of batter and work in batches.  Cook for 3 minutes on one side; flip and cook another 2 to 3 minutes on the other side.

Serve hot, sprinkled with powdered sugar and drizzled with pomegranate molasses.

*My ricotta was on the drier side.  If there is a lot of liquid, I suggest drain it a bit with some cheesecloth and a strainer to keep it from changing the batter texture.


tags: hotcakes recipe, ricotta pancake recipe, how to make hotcakes, ricotta hotcakes recipe
categories: all 3, quick & easy, recipes, blog, breakfast-1
Wednesday 03.02.16
Posted by Aliya LeeKong
 

The Art of Blending Your Own Tea

THE ART OF BLENDING YOUR OWN TEA

There’s nothing better than staying in on a cold winter day with a great book and a warming cup of tea, and, with the temps outside here in NYC reaching the negatives this past weekend, that’s exactly what I did!  When I make tea, I tend to do a bit more than 1 bag and go.  I have my own sachets and add a little of this and that until I get what I want.  This weekend in the bitter cold was a bit of assam with a little earl grey with blue flowers and a star anise pod.  Blending your own tea is so fun and personal (not to mention makes great, handmade hostess gifts) - thought I would share a few thoughts on how to do it!


CHOOSE A BASE

The first part of the tea blending process is choosing your base tea flavor.  The most common are Black Tea (full-bodied, strong), green tea (mild, earthy almost grassy flavor), white Tea (mild and sweet), and oolong (floral and aromatic).  I'm also a big fan of rooiboos tea, which is a red tea with a mild, sweet flavor that doesn't have any caffeine.  Any of these bases can be bought online or in a specialty store and should makeup the majority of your tea mixture.  Depending on which base you choose you can then start to add other ingredients (citrus, fruity, florals, spices).  It may seem a little daunting at first, but just think of the tea combinations you see at the grocery store (like green tea peppermint, black tea cardamon) and then build from there!


HOW TO PAIR WITH OTHER FLAVORS

Now for the fun part! Creating different blends...  Think of the flavor and strength of the base tea and blend from there.  Black tea is a very bold tea and pairs well with other bold flavors: citrus, hibiscus, chocolate.  A mild green tea can lean towards the typical Asian flavors: ginger, lemongrass; whereas, a bolder green tea can be paired with light fruity flavors: blackberry, pomegranate, lemon.  White tea is a more delicate one to pair with, so I lean towards orange blossom or fresh mint with a little light spice.  Rooibos I love to blend with a bit of vanilla bean powder and rose.

You can use other dried teas (chamomile, lemon balm, rose hips, hibiscus, rose), fresh herbs (mint, basil, sage) and fresh fruit rinds and aromatics (lemon, orange, apple peel, ginger, lemongrass).  Start with a little, maybe a teaspoon, and add to your taste preference.


DON'T FORGET THE SPICE!

You know me, I can never resist a bit of spice.  Cardamom and black tea are a match made in heaven.  Star anise pods, cinnamon sticks, cloves and leftover vanilla beans are perfect and can go with both bold and milder teas.


HOW MUCH, HOW HOT & HOW LONG

Generally, my rule of thumb for teas is I use less tea when the leaves are smaller and a bit more when the leaves are bigger.  Vague, I know!  But for 8 ounces of water, if the tea is dense and tightly packed (think black tea or gunpowder green), I use 1 to 2 teaspoons.  If it's very loose with big leaves (white tea or hibiscus), I use about 2 to 3 teaspoons. 

Water temperature is important too.  For black, dark oolong, herbal/fruity and rooiboos teas, use boiling water for 3 to 5 minutes.  For white, green, and green oolong, stick to water that was boiled and has had some time to cool down - still hot but not scorching.  These teas usually only need 2 to 3 minutes to brew.

Enjoy and happy blending!

tags: tea recipes, how to blend your own tea, the art of tea blending, the perfect cup of tea
categories: all 3, blog, drinks & cocktails, lifestyle-1, quick & easy, recipes
Wednesday 02.17.16
Posted by Aliya LeeKong
 

3-Ingredient Chocolate Truffles

View fullsize truff4.jpg
View fullsize truff1.jpg
View fullsize truff2.jpg
View fullsize truff3.jpg
View fullsize truff5.jpg

3-INGREDIENT CHOCOLATE TRUFFLES

With Valentine's Day just a few days away, chocolate is on the brain.  Nothing says “I love you” more than a double decker box of chocolates…but making your own chocolate truffles is way simpler than most people think (and who doesn't prefer a handmade gift?). 

This is a super simple, 3-ingredient recipe to get you started to make decadent, silky, chocolate truffles.  Then, if you want, you can tailor to your preferences.  I'm including options for flavorings to add to the base or leave the recipe as is and just coat the truffles in a different ways (think cocoa powder, crushed pistachios, shredded coconut, etc…).  Enjoy!

Yields approximately 2 dozen truffles

12 ounces dark, semisweet or milk chocolate chips, roughly chopped (1 bag)
3/4 cup heavy cream
1/4 tsp salt

Place the chopped chocolate in a large mixing bowl.  In a saucepan, bring the heavy cream and salt to a simmer, just enough to dissolve the salt and watch that it doesn't boil over.  Pour the cream over the chocolate and allow to sit for 5 minutes before stirring.  Stir until the chocolate has melted and the mixture is smooth (this is also the time to add any liquid ingredients for flavor).

Allow to cool at room temperature for an hour.  Using a teaspoon or a small cookie scoop, scoop the truffles onto parchment paper.  Place in the fridge for 10 to 15 minutes to firm up a bit.  Roll in the palm of your hands to get them perfect (but quickly or they will start to melt!).  Roll them in whatever toppings you like and enjoy!

Mix-ins: 1/2 teaspoon vanilla extract, 2 tablespoons liqueur (coffee, rum, Grand Marnier, kirsch), 1 tablespoon orange blossom water, 1 tablespoon espresso, 1 1/2 teaspoons peppermint extract

To Coat: cocoa powder (with or without cinnamon, cardamom, etc), sweetened or unsweetened shredded coconut, crushed nuts (hazelnuts, almonds, pistachios), sprinkles, flake sea salt (just a pinch on top!)


tags: Valentine's Day, Valentine's Day gift, what to give for Valentine's day, chocolate, chocolate recipes, chocolate desserts, chocolate truffles
categories: all 3, blog, desserts, holiday, lifestyle-1, quick & easy, recipes
Friday 02.12.16
Posted by Aliya LeeKong
 

5 Champagne Cocktails to Ring in the New Year

5 CHAMPAGNE COCKTAILS TO RING IN THE NEW YEAR

With Christmas out of the way it is now time to focus on New Year's!  I usually head out of NYC for New Year's Eve, escape the madness, and have a quiet one with my family somewhere (preferably warm!). But, when I'm here, I love having a fun evening in with friends and family.  The thought of going out and dealing with all the crowds just isn’t my thing.  Besides, who doesn’t love a party with little finger bites to snack on along with some champagne cocktails!?  Keeping it super simple is key, and I want to share some easy, champagne cocktails with you - the best way to end the holiday season!


FRENCH 75

Photo: Tuxedo No. 2

The French 75 is a classic and super simple - gin, simple, lemon juice + champagne.  You can't go wrong with this one.


SORREL CHAMPAGNE COCKTAIL

This is hands-down one of my favorite champagne cocktails to make and is always a feature at my events.  Sorrel is a sweetened, hibiscus drink scented with cloves and cinnamon that hails from the West Indies.  I love to make a sorrel simple syrup and top with champagne for a gorgeous, sweet-tart, rose-colored cocktail.  Take 1 cup dried hibiscus flowers + 1 cup sugar + 1 cup water and bring up to a boil - if you want to up the ante, throw in a cinnamon stick and 4 whole cloves.  Remove from the heat and let steep 20 minutes.  Strain and cool the syrup.   Add 2 oz. of the cooled syrup to a champagne flute and top with the champagne of your choice!


GRAPEFRUIT AND GINGER SPARKLER

Photo: Serious Eats

With only 3 ingredients, grapefruit juice + Domaine de Canton ginger liqueur + champagne, this drink is easy, elegant and tasty.  Although I'm not a grapefruit eater myself, a touch of grapefruit in a cocktail (think: paloma) adds the perfect bitter note.  The ginger liqueur adds just the right amount of sweetness, and the whole thing goes down really easy....a bit too easy if you know what I mean.


FEEL THIS COCKTAIL

Photo: The Drink Blog

The basis for this cocktail is again citrus because 'tis the season.  Orange juice + lime juice form the base.  Add a little vodka, brown simple syrup, and champagne and top with raspberries to keep it festive! 


CHAMPAGNE SORBET FLOATERS

When in doubt, go to your grocery store (or local bodega...), pick up a pint or two of your favorite sorbet and throw it on top of champagne, prosecco, sparkline wine, cava or whatever you are serving.  It will look gorgeous, and, as the sorbet melts, it will infuse your champagne with fruity sweetness!


Wishing everyone a very happy New Year's and all the best in 2016!!!

tags: champagne cocktails, new years eve recipes, what to serve on new years eve, cocktail recipe, cocktails
categories: all 3, drinks & cocktails, holiday, lifestyle, quick & easy, recipes
Tuesday 12.29.15
Posted by Aliya LeeKong
 

Feast of the Seven Fishes (Italian and Beyond!)

FEAST OF THE SEVEN FISHES (ITALIAN AND BEYOND!)

It’s only a few days to Christmas and time to commit to a decision on what to make for your holiday dinner (if you haven't already!).  The thought of turkey makes you cringe, with good reason….so what else is there to make?  In my house, the go-to for Christmas dinner is always a plump, juicy roast (think standing rib roast or rack of lamb), but this year I am inspired by the ‘Feast of the Seven Fishes’, which is a traditional Italian celebration on Christmas Eve.  This meal typically consists of 7 seafood and fish dishes but I've seen some families have upwards of 10! I'm sticking to 3 or 4, thank you.  After enduring a 3 day food coma from Thanksgiving, the thought of an array of light seafood dishes for Christmas sounds delicious and not overly filling (not to mention getting a kick start on that New Year's resolution of eating healthy!).


FIRST COURSE: EASY APPETIZER

I like to have a couple simple snacks ready for when guests arrive.  Everyone always arrives hungry and ready to eat, and this means they can snack and stay out of the kitchen! ;)  Small bites or spreads are best for this feast since there are many more courses to come, so try to keep it simple and easy to make ahead!  I love this Peruvian Clams à la Parmesana recipe that's in my cookbook.  I learned about these in Lima, clams with a little chili paste, garlic and pisco and then topped with buttery-parmesan breadcrumbs.  You can assemble them ahead of time and pop them in when guests arrive - they only take 3 minutes under the broiler!  These Quinoa-Crusted Shrimp are another great, healthy option.


SECOND COURSE: RAW BAR OR SEAFOOD SALAD

Photo: Food & Wine

Photo: Food & Wine

For me, nothing beats a great raw bar to truly showcase the flavors of the sea.  Stone crabs, cooked lobster, or gorgeous jumbo shrimp served with a flavorful cocktail or tarator sauce are showstoppers.  Pair with a seasonal salad (think: fennel, mache, oranges and pomegranate) with a bit of balsamic and oil.


THIRD COURSE: HEARTY, WHOLE FISH

This course and the next should be the big dishes, the ones that showcase the entire meal.  A whole fish, such as red snapper or striped bass would be perfect here with a couple side dishes to go along.  A whole fish doesn't have to be daunting, and salt-crusting is the perfect technique! Take 4 cups kosher salt plus 8 egg whites and thoroughly mix together.  Make a bed on the baking pan with the salt mixture, lay the fish on top and add a thick coating on top, patting down to seal it all around.  Roast for 25 to 30 minutes at 400° F.  Crack open the salt layer with a spoon and peel back the skin for the most tender, flavorful (not salty I swear!) fish you've had.  Serve with your favorite chili-garlic sauce, chermoula or a lemon-basil vinaigrette.


FOURTH COURSE: PASTA OR, IN MY CASE, PAELLA!

If we were creating a traditional Feast of the Seven Fishes, this course would showcase a pasta dish.  But, since the feast is just a guideline to this epic meal, I am choosing to replace the pasta with a delicious seafood paella recipe.  The key to a great paella is the rice!  You can use short grain rice but if you can find it, bomba rice is what most fine-dining restaurants use and is the traditional rice for this dish.  And remember, you want that crunchy rice on the bottom of the pan….that’s the best part!


FIFTH COURSE: SOUP OR SEAFOOD STEW

Photo: Saveur

Photo: Saveur

Yes, can you believe it?  We are still eating!  If you have room after consuming the previous courses, take it down a notch with a warm brothy seafood or fish soup. This recipe for Ginger Crab is nothing short of amazing and is the type of food I grew up eating - food particular to the East Coast of Africa that blends all that's amazing about African, Indian and Arab foods.   


FINALLY: PALATE CLEANSER + DESSERT!

Ok, so I’m combining the last two courses because I just don’t think I can eat anymore at this point!  A great palate cleanser could be a simple citrus sorbet or semifreddo.  The traditional dessert with this feast is an array of Italian cookies, but since we are skipping the sixth course, I’ve decided to do a decadent South African Cape Malva pudding, a moist, butter-y cake with caramelized edges steeped in a warm brandy sauce.  Done!


Enjoy! 


tags: feast of the seven fishes recipes, feast of the seven fishes, seafood recipes, what to make for christmas, christmas recipes
categories: all 3, appetizers 1, blog, holiday, main dishes, man-friendly, quick & easy, recipes, traditions
Wednesday 12.23.15
Posted by Aliya LeeKong
 
Newer / Older