X

Sign up to receive exclusive recipes, tips, updates and other goodies from Aliya!

  • Home
  • Blog
    • All
    • Recipes
    • Spices + Ingredients
    • Lifestyle, etc.
    • Travel
  • The Cookbook
  • The App
  • Media
    • All Media
    • Video
  • About
  • Passions
Aliya LeeKong
  • Home
  • Blog
    • All
    • Recipes
    • Spices + Ingredients
    • Lifestyle, etc.
    • Travel
  • The Cookbook
  • The App
  • Media
    • All Media
    • Video
  • About
  • Passions

The Ultimate Eggplant Dip

THE ULTIMATE EGGPLANT DIP

So I feel like the eggplant doesn’t get a lot of love!  Recently, at the market, all the stands seem to have some sort of eggplant variety:  the most common (classic), Japanese, white, Thai green, fairytale (those small purple ones above), Sicilian, baby.  I have in the past bought the Thai green eggplants when I see them in the Asian supermarkets; they are the little green round ones that can fit in the palm of your hand and are my favorite when making a thai green curry.  I just throw them in whole and let them simmer in the curry (fairytales are great for that too). 

There are so many more ways to use eggplant, though - roasting and scooping out the inside to make a great dip, breading and sautéing for an eggplant parm, or just frying and making a caponata.  Personally, I love fire-roasting eggplants, outside on coals or a gas grill or just over your gas stove flame.  Eggplants take on incredible smokiness, so I wanted to share my favorite, smoky eggplant dip from my cookbook. 

This dip is based on baba ganoush, a traditional Middle Eastern mezze of smoky eggplant purée mixed with tahini and extra virgin olive oil.  I also add a dollop of crème fraiche and a sprinkling of chives to give it that rich, party-worthy dip feel.  Fried fingerlings or other small potatoes are the perfect match for this!  Enjoy!

Ingredients

For the eggplant dip:

3 whole Italian eggplants

1 clove roasted/raw garlic, minced

2 tablespoons tahini

1 tablespoon crème fraiche

Juice of half a lemon

Salt to taste

Chives, for garnish

For the fingerling chips:

canola or peanut oil for frying

1 pound fingerling potatoes, scrubbed, skin-on

Salt, to finish

For the eggplant dip: Preheat the oven to 400° F.

Prick the eggplants all over with a fork and then place on the open flame of a gas burner.  You want to char the skin all over the eggplant to impart smokiness.  If you don’t have a gas burner, you can do this on a grill or under the broiler. 

Once the skin is charred and shriveling, transfer to a baking sheet and finish cooking in the oven for another 25 to 30 minutes. 

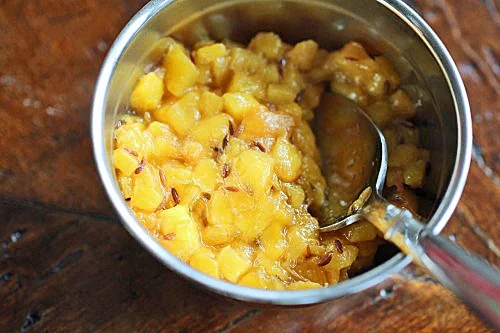
Let the eggplants cool before handling.  Split them open and scrape out all the flesh inside into a medium bowl.  Add the garlic, tahini, crème fraiche, lemon juice and salt and use a fork to mash everything together.  You want to create a creamy consistency but with texture.  You can also do this in the food processor if you want something smoother.  Taste and readjust seasoning.  Chill before serving.

For the fingerling chips: In a Dutch oven or large saucepan, heat 3 to 4 inches of oil to 360° F.  The oil should go less than halfway up the pot. 

Using a mandolin or with a very sharp knife, thinly slice the fingerling potatoes and transfer to a bowl of water.  Gently mix the potato slices, strain out the water and dry on paper towels.  The potatoes should be completely dry before adding to the oil or they will spatter and bubble up.

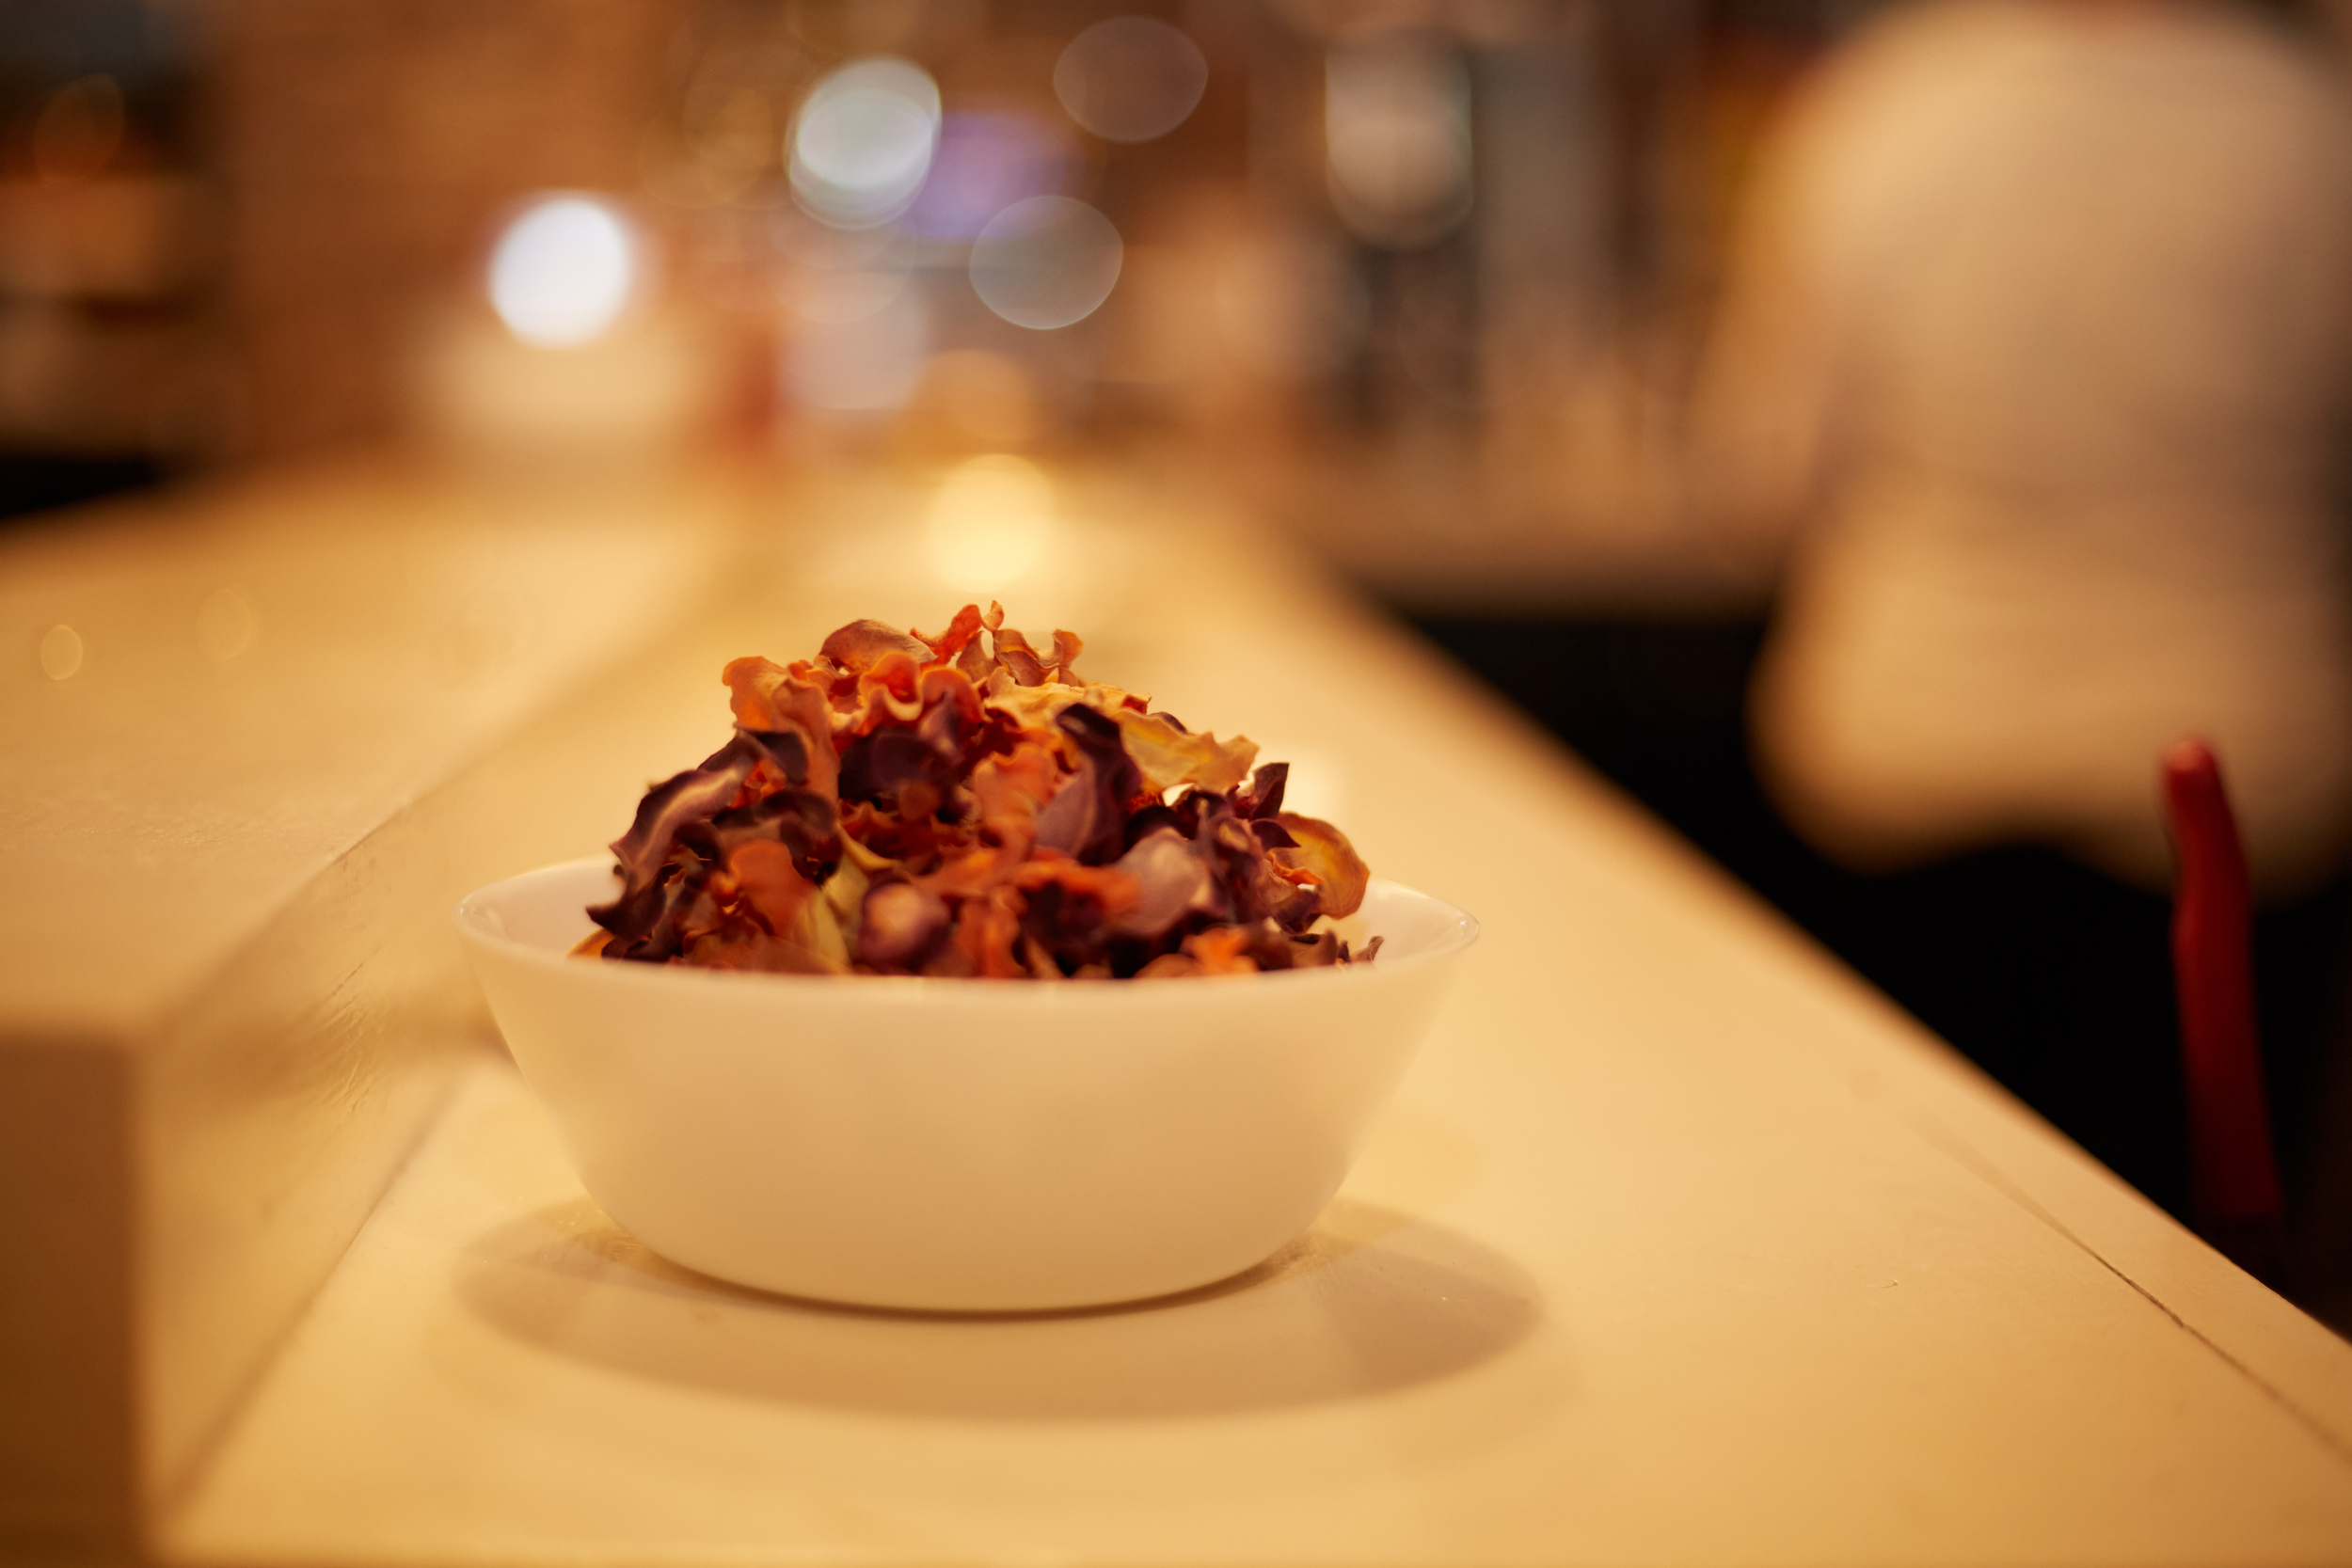
Add the fingerling slices to the oil, working in batches, and fry for about 45 seconds to 2 minutes depending on how thick you sliced them.  You basically want them golden brown.  Transfer them to a paper towel-lined plate and finish them with salt.

Serve the dip cold with fingerling chips on the side.


tags: eggplant recipes, how to cook eggplant, baba ganoush, how to make baba ganoush
categories: all 4, appetizers 1, blog, condiments, side dishes-1, vegetarian-2
Thursday 09.08.16
Posted by Aliya LeeKong
 

July 4th BBQ Sides

JULY 4TH BBQ SIDES

The last thing I want to do on a hot summer day is turn my oven on - I’m sure you all understand!  When entertaining on a gorgeous summer day, I like to keep my sides simple and easy to toss together so I'm not stuck in the kitchen all afternoon while my guests are enjoying the outdoors.  With July 4th creeping up this weekend, I’ve gathered a few ideas that may make an appearance at my BBQ this weekend.  Enjoy!


6-INGREDIENT CORN SALAD


KOREAN POTATO SALAD (GAMJA SALAD)

Photo: Two Red Bowls


NASI ULAM (MALAYSIAN MIXED HERB RICE)

Photo: Rasa Malaysia


SOUTH AFRICAN CHAKALAKA

Photo: Immaculate Bites


FREEKEH WITH SUMMER SQUASH AND BROWN BUTTER


TAHINI ROASTED (OR GRILLED) BROCCOLI


ROASTED CUMIN CARROT, RADISH & AVOCADO SALAD

Photo: Salt & Wind

tags: bbq sides, july 4th sides, global bbq sides
categories: all 4, blog, holiday, lifestyle-1, side dishes-1
Wednesday 06.29.16
Posted by Aliya LeeKong
 

FATHER'S DAY GRILLING

FATHER'S DAY GRILLING

Father's Day falls in such a sweet spot of the year - the weather is always perfect and who doesn’t love a little family gathering outside!?  My plan to celebrate this weekend will be an afternoon of easy grilling - I can't go wrong keeping it a lil' meat-centric.  :) Below are some great grilling recipes to give you some ideas for this weekend.  Enjoy!


GRILLED BUTTERFLIED CHICKEN WITH CHARRED JALAPENO SAUCE


GRILLED LAMB SIRLOIN TACOS WITH CORN, PICKLED CHERRY PEPPERS AND CHIPOTLE CREMA


SALT & PEPPER BABYBACK RIBS

Photo: Food52


GRILLED PORK BANH MI

Photo: Food & Wine


GRILLED SHRIMP WITH KIMCHI-MISO BUTTER

Photo: Rasa Malaysia


GRILLED AVOCADO SALAD WITH GREEN GODDESS DRESSING

Photo: Salt & Wind


CORN WITH GREEN CHILI BUTTER & COCONUT


TAHINI OREOS

Photo: My Name is Yeh


RUM SWIZZLE

Photo: Bon Appetit

tags: father's day, what to cook for father's day, grilling ideas, what to grill for father's day, father's day brunch
categories: all 4, blog, lifestyle-1, man-friendly, recipes, salads, side dishes-1, soups & salads, main dishes-1
Wednesday 06.15.16
Posted by Aliya LeeKong
 

Strawberry Season, a Pickle, & a Jam!

STRAWBERRY SEASON, A PICKLE & A JAM!

Well….it took forever, but it has finally arrived: strawberry season.  This little window only lasts about a month up here, and I try to get out to the fields to pick my own, when possible.  Right now, I have literally the sweetest strawberries I've ever tasted sitting in the fridge.  They are so good, just by themselves, but if you’re like me (and get a bit overly excited about berry picking...), you end up with strawberry overload!

I decided to mess around with some flavors for a new strawberry jam using some fresh basil from my garden and a vanilla bean.  Strawberries and basil are a match literally made in heaven.  I don't prefer my jam overly sweet, so I just add sugar (unrefined) until it tastes like it’s enough.  There isn't a specific recipe because, of course, it depends how many strawberries you have left, but here are a few guidelines: (1) Clean and quarter berries and let them heat up in a saucepan with a couple tablespoons of lemon juice until they start to release their liquid.  (2) Once there is some liquid in the pan, add the sugar, basil and a vanilla bean and then let it all simmer until it thickens.  Remember, when it cools, it will thicken up a bit more.  (3) Use the stems from the basil (cause that’s where all the flavor is) and wrap them in a cheesecloth sachet.  You can also tear up or chiffonade the leaves and add them to the strawberries.  (4) Add some pectin powder if you like, to speed up this process.  Ultimately, you can cool and use right away or transfer to sterilized jars and vacuum seal for later.

This year, I also wanted to experiment pickling green strawberries.  It’s a different kind of pickling liquid then you might think - less vinegar, a little more sugar and a lot of flavor!  The green strawberries turn a bit sweet, slightly tart and still retain a nice bite.  These pickled strawberry makes them a perfect addition to any summer salad or cheese plate.  Enjoy!

Photo: We You They Ate

Pickled Green Strawberries
Yields 2 pint jars

2 pints green strawberries, cleaned and hulled (cut in half or sliced, if you like)

1 cup water

½ cup rice wine vinegar

2 ½ tablespoons sugar

1 tablespoon honey

2 teaspoons kosher salt

1 ½ tablespoons coriander seeds

1 tablespoon black peppercorns

4 Kaffir lime leaves

2 (1" x ½") pieces lime rind


Divide the strawberries between the two mason jars and set aside. 

In a saucepan over medium heat, bring the rest of the ingredients to a simmer until the all of the sugar, salt and honey has dissolved.  Let cool to room temperature before pouring into the jars with the strawberries.  Let sit in the fridge over night for the best flavor.


tags: strawberries, strawberry recipes, pickled green strawberries, strawberry jam, how to pickle strawberries
categories: all 4, condiments, lifestyle-1, quick & easy, recipes, side dishes-1, vegetarian-2
Wednesday 06.08.16
Posted by Aliya LeeKong
 

A Bread Dough You Can Use for Everything

View fullsize Photo Mar 28, 5 47 10 PM.jpg
View fullsize Photo Mar 28, 4 14 47 PM.jpg
View fullsize Photo Apr 03, 12 42 45 PM.jpg
View fullsize Photo Jan 17, 12 27 40 PM.jpg

A BREAD DOUGH YOU CAN USE FOR EVERYTHING

Lately, I've been mildly obsessed with baking my own bread and not just your basic quick bread: the real stuff with yeast and what not.  It always seemed so time-consuming - brioches with 5 steps and 2 rising times, cinnamon buns that proof in the refrigerator overnight, sourdoughs with starters, weighing ingredients, waiting for them to rise....(I hope I haven't talked you out of reading on!)

Well, this recipe is none of those.  It's what I call my "universal" bread dough - a simple bread dough that requires only (1) 45-minute rise and can be used to make everything from soft, buttery, fluffy rolls, to cheese-stuffed buns or even pull-apart bread.  It's weeknight bread.  It's weekend-morning-made-THAT-morning bread.  It's guests-are-about-to-arrive bread.  It's everything.

I'm going to share the basic recipe and then some thoughts for ways to transform it.  I'm still experimenting myself with it...like every few days, so expect some more versions of this on Insta!

Yields 16 rolls

¼ cup lukewarm water

(1) ¾ ounce packet yeast (active dry)

1 cup milk

¼ cup honey

3 tablespoons butter, plus more for greasing and melting

2 teaspoons salt

1 egg, beaten

3 ¾ to 4 cups all purpose or "00" flour*

Flake salt, for sprinkling


I make this recipe in a stand mixer, but you can easily do this by hand.  Start with the lukewarm water in the bowl of the stand mixer and sprinkle the packet of yeast over.  Mix gently to combine and let sit 5 minutes or so while you prepare the other ingredients.

In a medium pot, bring the milk up to a simmer and add the honey, butter and salt.  Simmer for a minute or two, just until the butter melts and remove from the heat.

Add the egg and 3 ¾ cups of flour to the yeast mixture and mix together with a fork.  Slowly pour in the milk mixture, using the fork to make a shaggy dough.  Using the dough hook attachment (or your hands), knead for about 3-4 minutes.  The dough should be soft and a bit tacky but should NOT stick to your hands.  If it's sticky, keep adding flour in tablespoon increments until you have the right, non-sticky consistency.

For rolls, divide the dough into 16 even-sized balls and place in a greased, 9-inch cake tin.  Cover with a kitchen towel and let rise 45 minutes.  Preheat oven to 375˚ F.

After the rise, brush the rolls generously with melted butter and bake for 30 to 35 minutes.  Brush again with butter once out of the oven and sprinkle with a little flake salt.  Enjoy hot!

*For the rolls, I used all purpose flour, but for the savoury buns, I used 00 flour, which yielded a more delicate, fluffier texture.

Some fun options:

(1) Before baking, but after brushing with butter, sprinkle with spices!  Thing za'atar, an everything bagel spice blend (!!), furikake, simple nigella seeds...

(2) To make the savoury buns, roll out the dough into an 18"x12" rectangle and place it in front of you with one of the longer sides near you (a horizontal rectangle).  Mix together a stick of unsalted, room temperature butter with a half packet of softened, Boursin cheese.  You could also use regular cream cheese and then add in your own garlic, roasted garlic, chives, other herbs.  Spread this mixture all over the dough and sprinkle with a bit of salt.  You can also use other cheeses here by themselves or in addition to the cream cheese - mozzarella, a mexican blend....Roll the dough, starting with long side near you to form a cylinder, and then place in the freezer for five to ten minutes to make it easier to cut.  Use a serrated knife and cut the rolls into 1 ½-inch thick rolls.  Place cut side down in the greased tin.  Let rise an hour.  Brush with butter and bake at 375˚ F for closer to 40 minutes, until the buns are uniformly golden brown. 

(3) For pull apart bread, roll into a 6"x14" rectangle and cut into 12 pieces.  Spread the butter / cheese mixture on 11 of the pieces.  Stack layers horizontally in a parchment-lined loaf pan, ending with the non-buttered piece to book-end.  Cover and let rise.  Spread the remaining butter-cheese mixture on top with a sprinkle of salt before baking.  Bake at 375˚ F for closer to 35 to 40 minutes until golden brown.  Cover towards the end of baking if the cheese is browning too much.  (By the way, the photo to the side is a pull-apart cinnamon scone bread, but just wanted to give everyone an idea for what it could look like!)

Enjoy!!


tags: how to make bread, bread dough recipe, cheesy pull apart bread recipe, savory buns recipe, cheese buns recipe
categories: all 3, appetizers 1, breads & cakes, breakfast-1, side dishes-1, vegetarian
Wednesday 04.06.16
Posted by Aliya LeeKong
 

Spiced Up Thanksgiving Sides

SPICED UP THANKSGIVING SIDES

With Thanksgiving a week away, I'm getting my menu in order and always find myself a bit stumped on the sides, not only what to do but also the big jostle for oven room!  I'm a big believer in keeping the turkey classic and mashed potatoes luscious, buttery and minimal as a canvas, but beyond that, it's open season.  Experimenting with sides gives Thanksgiving that signature, that little mark that makes it particularly yours. 

The Standard: Stuffing

How to Change it Up: This has to be one of the best places to start experimenting!  There are so many variations on stuffing that there literally isn't enough room to write about them.  I make a version with challah, bacon and Aleppo chilies, but, really, it comes down to a great bread (brioche, sourdough, cornbread), aromatics (garlic, onion, shallot, celery), liquid (chicken broth, eggs, cream), and herbs (parsley, sage, chives).  From there, you can play with meats (pancetta, bacon, spicy chicken or pork sausage), fruits (apples, quince, apricots, currants), nuts and spices.  I loved the fruitiness of Aleppo chilies, but a bit of allspice or fennel seeds would also be great. 


The Standard: Mac 'n Cheese

How to Change it Up: I love a good mac 'n cheese, but I love macaroni pie even more: a baked mac 'n cheese with onions, garlic, and chilies that comes from my husband's side of the family.  The one above is a version with porcini mushrooms (to die for!).  This is a great do-ahead dish that needs a bit of reheating in the oven, but if it's stovetop for you, throw in some chipotles in adobo and top with garlic breadcrumbs, lobster and brandy if you're being fancy, or go Greek with feta, Kalamata olives and spinach.  Even a basic mac 'n cheese recipe can be taken to the next level with different cheeses (Gruyere, smoked cheddar, mascarpone) and a great topping (panko, fried onions, or an extra layer of cheese broiled to perfection).


The Standard: Sweet Potatoes

How to Change it Up: I never really grew up with sweet potato casserole, canned or fresh sweet potatoes kicked up with brown sugar and topped with marshmallows.  I happen to love them simply roasted or mashed and lightly sweetened like in this bake, but there are tons of ways to prepare them.  This version uses pecans and cornflakes in lieu of marshmallows to top the casserole.  If you're going the pie route, a few key spices can bring out that beautiful sweet potato flavor.  I personally add a bit of chai spice to make mine special.


                                   Photo: Bon Appetit

The Standard: Green Bean Casserole

How to Change it Up: Green beans are deliciously versatile and take on flavor easily!  I love the idea of simply cooking them a day in advance.  Then, you can sauté them right before serving using different sauces (homemade or store bought) to take them to the next level.  Think harissa and marcona almonds, basil pesto and cherry tomatoes, thai curry and butternut squash.  Want to go a totally different route?  This recipe calls for tempura-battering them and serving them with a shallot dip - I'm so tempted for this year!


The Standard: Parker House Rolls

How to Change it Up: I personally love parker house rolls as they are - fluffy and buttery.  But where I always like to play with breads is the butter.  Mixing in a few ingredients can totally change the tone of a bread dish, even store-bought ones.  I top my rolls with miso-butter, but I also love to add a bit of honey and spice for a chili-honey butter.  Sesame oil can add nuttiness, and herbs can add both brightness and elegance to your table butter.

Enjoy and Happy Thanksgiving to everyone!

tags: thanksgiving ideas, thanksgiving recipes, thanksgiving sides, how to spice up sides
categories: all 3, holiday, lifestyle, recipes, side dishes-1, traditions, vegetarian
Thursday 11.19.15
Posted by Aliya LeeKong
 

Aliya LeeKong X Jill Lindsey Supper Club + Carrot Tartare

ALIYA LEEKONG X JILL LINDSEY SUPPER CLUB + CARROT TARTARE

A few weeks ago, I hosted a supper club at a gorgeous store in Brooklyn, the namesake of the equally gorgeous Jill Lindsey.  It is the perfect venue - beautiful handmade home goods, rugs and furniture from Nicaragua (designed by Jill!), candles, jewelry; they host events and have a café area in the back.  Jill is the perfect partner, having worked in restaurants and well-versed in all of the front-of-the-house needs.   The one catch?  ....no kitchen!  So, yes, I served (with the help of the amazing Tamsin Kelly! thank you again!) a 5-course, sit-down dinner with my "easy-bake" countertop oven and an induction burner, both of which I brought with me.  Fun! and Terrifying!

Here is the menu and some great photos of all of the people (so many friends surprised me!) who came.  Photos are all by the talented MJ Batson of Corac Studios

View fullsize Seasonal_Supper_Aliyah_Leekong0019.jpg
View fullsize Seasonal_Supper_Aliyah_Leekong0020.jpg
View fullsize Seasonal_Supper_Aliyah_Leekong0024 1.jpg
View fullsize Seasonal_Supper_Aliyah_Leekong0003.jpg
View fullsize Seasonal_Supper_Aliyah_Leekong0035.jpg
View fullsize Seasonal_Supper_Aliyah_Leekong0032.jpg
View fullsize Seasonal_Supper_Aliyah_Leekong0038.jpg
View fullsize Seasonal_Supper_Aliyah_Leekong0042.jpg
View fullsize Seasonal_Supper_Aliyah_Leekong0037.jpg
View fullsize Seasonal_Supper_Aliyah_Leekong0055.jpg
View fullsize Seasonal_Supper_Aliyah_Leekong0058.jpg
View fullsize IMG_0141.jpg

I wanted to share the recipe with you for the star of the Carrot 3 Ways dish, a carrot tartare.  The inspiration for the tartare is an Ethiopian dish called kitfo.  I posted the recipe for kitfo yeeeeeaars ago, but it's basically a hand-cut steak tartare warmed in a spiced butter infused with cardamom, black pepper, and cayenne.  It is out of this world!!  I thought the spices played really nicely with the sweetness of seasonal carrots here in lieu of beef.  I served mine with dehydrated carrot chips and a brown butter carrot-sunchoke purée.  Enjoy!

CARROT TARTARE

Ingredients

Serves 4 to 6

3 medium carrots, peeled

5-6 tablespoons unsalted butter

½ teaspoon ground cardamom

1 teaspoon ground black pepper

¼-½ teaspoon cayenne

1 shallot, minced

2 garlic cloves, minced

Salt, to taste

Chives, for garnish

Procedure

Bring a medium pot of water up to a boil and season heavily with salt.  While the water is coming up, prepare an ice bath (a bowl of cold water with ice).  You want to cook the carrots and then shock them in the ice bath to stop the cooking. 

When the water comes up to a boil, add the carrots and cook until a fork slips easily into the thickest part of the carrot.  That can vary depending on the width, so I would say anywhere from 6 to 12 minutes.  Transfer immediately to the ice water to stop the cooking.  Remove and dry thoroughly.  At this point, you can move ahead or save them in the refrigerator for use a day or two later.

If you have a stand mixer with a meat grinder attachment, pass the cooled and dry carrots through the larger, coarse grinding plate.  If not, you can use a ricer or a food processor to achieve a ground carrot texture.  You don't want mush, so try not to take it too far!

Heat the butter in a medium saucepan over medium heat.  Add spices and toast for a minute or so until fragrant and nutty.  The butter should brown a bit.  Add the shallot and garlic and cook another 30 seconds to a minute.  Toss in the ground carrots until they are heated through.  They should be warm and touchable.

Serve warm (you can use a ring mold if you like) and top with chopped chives.

tags: jill lindsey, pop up restaurant, aliya leekong pop up, aliya leekong supper club, carrot tartare recipe, ethiopian kitfo, ethiopian spices
categories: all 3, holiday, lifestyle, side dishes-1, snacks 1, vegetarian, appetizers
Thursday 11.12.15
Posted by Aliya LeeKong
 

Squash Toast with Chipotle Honey + Pepitas

View fullsize squashtoast2.jpg
View fullsize squashtoast4.jpg
View fullsize squashtoast3.jpg
View fullsize squashtoast1.jpg

SQUASH TOAST WITH CHIPOTLE HONEY + PEPITAS

Okay, so I looove avocado.  BUT (and I know this might offend some of you), I'm not the biggest avocado toast fan.  I know!  In the beginning, it was pretty cute, but now, it's become a phenomenon and a food trend (with an $8+ price tag to boot at most of my local Brooklyn spots)!  Beyond that, it's Fall - the season has changed and so a time has come to explore some alternatives for your morning breakfast, snack or however you might traditionally eat toast.

Squash is everywhere, so why not mash up some buttery, sweet squash and slather it on toast?  Let's go a step further.  Why not spice up the squash with some minced shallots and jalapeño, top with some chipotle-infused honey, throw in some cream cheese and roasted pepitas....I think you get my point here.  Toast can be so much more!

That's what this squash toast is all about.  Hitting highs and lows of flavor and texture.  You've got crunchy, creamy, sweet, savory, spicy (I could go on)....Enjoy!

Ingredients

Serves 4 to 6

For the chipotle honey:

½ cup honey

1-2 dried chipotle chilies (adjust to your heat tolerance)

For the squash toast:

Canola or olive oil

1 medium-sized butternut squash or kabocha (2 to 3 lb) squash, halved and seeded

salt and freshly ground pepper to taste

1 small shallot, minced

1 jalapeno, seeded, ribbed and minced

small handful of cilantro, finely chopped

juice of half a lime

8 to 10 slices white/wheat country bread, lightly toasted

1/2 to 2/3rd cup cream cheese or mascarpone

1/3rd cup pepitas, roasted

Procedure

For the chipotle honey:

Add honey and chilies to a small saucepan.  Cook on low for a half hour, remove from the heat, and let cool and infuse another 20 minutes.  Strain if you want to.

For the squash toast:

Preheat the oven to 425° F.

To roast the squash, generously coat with oil, sprinkle with salt and pepper and roast flesh side down for about 30-40 minutes until mashable.

Spoon out squash into a bowl and add shallots, jalapeño, cilantro, and lime juice.  Mix together and adjust seasoning.

To assemble the squash toasts, slather a tablespoon or so of cream cheese on the toasts.  Top with a spoonful of the squash mixture and sprinkle a few toasted pepitas on top.

These are best enjoyed with the squash is warm.


tags: squash toast, avocado toast, squash toast recipe, how to infuse honey, hot honey recipe, chipotle honey
categories: all 2, blog, recipes, side dishes-1, vegetarian, breakfast-1
Thursday 10.22.15
Posted by Aliya LeeKong
 

Handmade Pasta: How-To + Recipe

HANDMADE PASTA: HOW-TO + RECIPE

If pizza is my ultimate comfort food, pasta is a very close second.  I actually haven’t made pasta from scratch for a really long time and, lately, with the weather getting cooler and the fact that I'm going to serve it at my pop-up in a few weeks, I’ve been wanting to break out my pasta roller and get started.  I bought a couple cookbooks for inspiration to get me started.  The dough recipe is actually super simple, and I find myself wondering why I don’t make pasta from scratch more often at home instead of buying it at the store.  Oh right, time! That little thing that tends to escape all of us...But if you are planning on having a dinner party, nothing is more impressive than serving a plate of homemade tagliolini!  And it's something you can make in advance and cook quickly while your guests are enjoying a drink (or two...). 


MAKING THE DOUGH

There are two types of dough when making pasta; one for the different shapes of noodles (spaghetti, tagliatelle, fettuccini etc…) and one for filled pastas (ravioli, tortellini, agnolotti etc…).  The only differences between these two is that the filled pasta dough just adds a little bit more liquid to make the dough more pliable for making shapes and is a bit thinner since you are often double layering it. 

My go-to recipe is pretty simple:

Serves 6-8

2 cups 00 or all purpose flour

2 eggs + 3 yolks

1 1/2 tablespoons water

1/2 teaspoon salt

Mixing is very simple. Just create a mound with the flour ( “00” is the most commonly used in Italy, but all purpose works just as well) pour all the liquid (whole eggs, yolks, water) in the center and slowly, with a fork, combine everything until the dough starts to come together and is not sticky.  Now comes the hard part: kneading!  You want to knead the dough for at least 10-15 minutes, doesn’t sound like a huge task but it is essential to create a smooth pasta dough.  You will see as you knead the dough the roughness when the dough first comes together starts to disappear the more you work the dough.  Once the dough is nice and smooth, form in to a ball and cover with plastic wrap and let it rest.  If you're rolling it right away, you can allow rest it for 30 minutes at room temperature.  If you're rolling it later, keep it in the fridge and allow the dough to come back up to room temperature just before.  Because of the eggs in the dough, you want to use this within 24hrs to ensure freshness or freeze it for later use. 


HAND ROLL OR MACHINE?

Having a pasta machine is essential to rolling out the dough.  You can, of course, do it with a rolling pin, but it will take a lot more time and effort, not to mention a lot of upper body and arm strength!  The process of kneading alone makes my arms and hands ache, but the result is just too delicious to give up on.  There's also just something soothing about the process of rolling out the dough with a machine, going through every size on the rollers and then creating your pasta shape.  The key is to start the pasta dough on the largest setting of the machine and work down from there, cutting the dough and doing it in batches. 

Start by cutting the dough into quarters.  Flatten the quarter piece a bit and put the dough through the largest setting, once through. Fold the dough on itself (take both ends fold over and meet in the middle) rotate 90 degrees and put through the machine on the same setting again - you basically just want to get a rectangular shape to start.  Raise or lower the setting (depending on the machine) and run through again.  You want to get thinner and thinner, running the dough once at each incremental setting.  If it gets too long, cut it in half and roll each piece separately.  After the dough has made its way through, I usually end on the second to last setting for stuffed pastas or the third to last for thick noodles.


SAUCES AND FILLINGS

And now for the good stuff: the filling and the sauces!  First, though, a note on cooking.  In boiling, heavily salted water, fresh pasta only takes 1 to 2 minutes to cook, so if you spend the time up front, know that, at the very least, you are saving on cook time! 

For my pop-up, I'm doing a roasted maitake mushroom pasta with pickled chilies, garlic and some Egyptian Dukkah.  I know - major and not so traditional.  BUT I love a good simple tomato sauce with noodles, and this recipe is such a great go to.  There are so many others to choose from; Bolognese, avocado-basil pesto, and classic brown butter and sage.  The possibilities are endless - it really just depends what mood you are in!  Same with choosing the filling for stuffed pastas, you can go the traditional route and do a ricotta filled ravioli or go with the season and do a pumpkin ravioli for fall, a pea ravioli for spring etc…

The important part is to make sure you have all the essential tools to create and roll out the perfect dough - the rest you can just make up as you go along!  That is the fun part after all..

Enjoy!


tags: how to make pasta, pasta how to, how to roll pasta, how to make ravioli, ravioli recipe, homemade pasta recipe
categories: all 2, holiday, lifestyle, main dishes, side dishes-1, vegetarian, traditions
Friday 10.16.15
Posted by Aliya LeeKong
 

The Very Versatile Winter Squash

THE VERY VERSATILE WINTER SQUASH

The leaves are changing colors, the air has a cool crisp smell to it and the farmers' market is booming with a ton of winter squashes.  Nothing says cold weather comfort food than a great squash soup, roasted root vegetables with your Sunday supper or a nice, warming Indian curry.  The only difficulty is choosing which squash to use in your dish!  I put together a few of my favorite ways to bring some warmth to your dinner table this winter.


SOUPS

The first weekend of October has passed, and the heating has kicked in.  You know winter is looming around the corner, and the upside is that it’s perfect soup-making (and eating!) weather.  Everyone loves a great squash soup; they are so versatile, being sweet and savory, and take easily to different cuisines depending on the spices you use.  My Sopa de Flor de Calabaza (Squash Blossom Soup), inspired by a traditional Mexican soup, is a delicious, silky and rich soup without any cream that uses butternut squash.   Another warm and comforting soup is my Pumpkin Soup with Garam Masala & Creme Fraiche.  This soup uses the traditional South Asian spice blend, garam masala (it’s spicy and full-flavored but has no real heat to it), and the warming spices in the blend pair perfectly with pumpkin.


ROASTED

Roasting squash is a no brainer, and cut into pieces, a good squash only needs about 20 to 30 minutes in a 400° F oven.  Of course, the old standby butternut is fantastic here, but kabocha, which is an Asian variety of winter squash, is also delicious.  It has a strong and sweet flavor that pairs well with spices.  Delicata is another great options because it has super thin skin and is really easy to peel. 

Above is a photo from my cookbook for a savoury, winter vegetable crumble; roasted squash on its own would be delicious with a salty, Parmesan-laced crumble topping..  The great thing about roasted squash is you can eat it as is, purée it (see below), stuff it before roasting, make it into a hash by itself or with sweet potatoes or even toss it into a salad that day or the next!  I personally love this Miso Harissa Delicata Squash salad recipe.


PURÉES

Photo: NYTimes

Photo: NYTimes

Another great use for winter squashes is purées.  They make a great substitute for the stand-by mashed potato side and are beyond easy to make.  This recipe is the most basic - a great building block in your kitchen arsenal that you can tailor to your tastes.  A few ideas: add roasted garlic, truffle oil, chopped olives, pickled chilies or sprinkle with za'atar to make it extra special.


CURRY

Photo: Indian Simmer

Photo: Indian Simmer

To me, nothing is more satisfy or warming to the soul than curling up on the couch with my pajamas, a good movie, or book, and a hearty bowl of curry and rice.   Curries originate from the Indian subcontinent and Southeast Asia.  They can be wet or dry with wet curries resembling stews in a significant amount of sauce and dry curries cooked with little liquid that evaporates and leaves a coating on the ingredients. Curries usually involve a variety of spices with the main spices being turmeric, coriander, and cumin on the Indian side of things; chili is always a player.  Southeast Asian curries make use of different chili pastes and other herbs, aromatics and spices like kaffir, lemongrass, and galangal.  Lucky for us, squashes play well with all different types of curry.  Check out this one for Acorn Squash with Fenugreek, Chili, and Amchur.


PASTA

Photo: Reclaiming Provincial

Photo: Reclaiming Provincial

When the weather turns cool, who doesn’t love coming home to lasagna or a big bowl of pasta on the table?  To make traditional lasagna a bit more interesting, try adding some squash in between the lush layers of pasta, cheese and sauce. OR get a bit more advanced and try this gnocchi.  If gluten isn't your thing, spaghetti squash makes a fantastic substitute.  Raw, it looks just like other squashes on the inside, but after it is cooked the insides fall out in ribbons resembling spaghetti.  This recipe uses the spaghetti squash as the star of the “pasta dish”.


DESSERTS & BREADS

Being such a versatile vegetable, squashes can also find themselves in the dessert category.  Hello…..pumpkin pie anyone!? But don’t just let the pumpkins have all the fun in the pies, butternut and acorn squash can hold their own in this category too!  Try my bread recipe using butternut squash with apples and maple to make a delicious moist bread to serve with afternoon tea.

Enjoy!


tags: butternut squash recipes, butternut squash bread, squash recipes, how to cook squash, how to roast squash, butternut squash soup, squash soup, spaghetti squash recipes
categories: all 2, holiday, lifestyle, main dishes, man-friendly, quick & easy, recipes, soups, soups & salads, vegetarian, side dishes-1
Thursday 10.08.15
Posted by Aliya LeeKong
 

7 Ways to Preserve the Season

7 WAYS TO PRESERVE THE SEASON

This past weekend, shopping at my local farmers' market, I noticed that the fall squashes have now arrived.  As much as I love the cooler weather, I will really miss the abundance of local fresh berries and summer fruit and vegetables.  Funny enough, you can still find a lot of gorgeous peaches, tomatoes, and other summer fruit still lingering.  This transition has got me thinking about different ways of preserving, something that's in every culture around the world and has existed for centuries.  It's not only a way to enjoy those flavors later in the next season but is also a fantastic way to reduce waste (and save some $ to boot)....


PICKLING

2015-09-18 02.16.59.jpg

Pickling is always a great way to preserve vegetables (and even some fruits)!  I have messed around with pickles from so many different cuisines - from traditional Indian pickles in mustard oil to Italian giardiniera to a quick, spicy Haitian pickled cabbage, called pikliz that I love!  I always have a few pickles in my fridge to dress up everything from Sunday eggs to a nice seared piece of fish.  If you've been on my Instagram, you are probably over it with my pickled cherry pepper obsession....


CHUTNEYS

Chutneys are another savory way of preserving fruits and vegetables. They have both sweet and sour flavors and are great for those holiday cheese platters, to enjoy with a winter roast or as a condiment to take that sandwich to the next level.  Personally, with it still being grill weather, this smoked peach chutney is absolutely to die for on pork chops, with some fromage d'affinois, or on your morning toast.


BLANCH AND FREEZE

What if you want to keep it simple?  Easy, just blanch and freeze your vegetables in resealable bags.  Think vegetables in the freezer section of the grocery store, only yours are directly from the source!  These will make for a much tastier version of stir fry in the dead of winter, I promise you. 

Just have a pot of salted, boiling water (should taste like the sea), an ice bath (ice with cold water) and lots of resealable bags ready and you are set.  Drop in the boiling water until the veggies are still crisp but that raw taste is gone.   Then submerge in ice bath to stop the cooking and keep the vibrant color.  Don't hold in the ice bath too long or all the vitamins and minerals (the healthy stuff) will seep out.  You just want the veggies to be cold.  Drain, dry off, portion in to bags and place in the freezer.  Super simple!


HERB SALTS

If you’re like me and you love having fresh herbs around the house, you are probably wondering how to use up those plants before they start to wilt (and die).  There is, of course, the go to method of freezing herbs in ice cube trays (either in broth, butter, water or oil), but another fun way to preserve them is to turn the herbs into salts. 

You take a bunch of basil, rosemary or any single or combination of herbs you want and process in a food processor with some kosher salt.  Then, transfer to a parchment-lined baking sheet and dry out the mixture in a low temp oven around 225°F for an hour or two until crumbly.  Then back in the food processor to make more fine (only, if you want) and voila! Instant herb salts for your pantry! 

Of course, these are delicious on different meats or a roast chicken.  But pack some in a little bottle, and you have the perfect hostess gift!  Remember to store the salt in an airtight container, and it will keep for about 3 months.


JAMS

Photo: Huffington Post

Photo: Huffington Post

Now, for my favorite fruits which have a growing season of only a month or two, at best: fresh berries and stone fruit!  It's the best day of the year when you finally see rows and rows of these at the market, and the saddest day when you realize their season is over...Luckily this year seemed to last longer than last, and my pantry has a ton of jam to show for it.  At first it was just a couple jars for me, and then I started thinking holiday gifts!! 

People sometimes get intimidated by jam making - have the right ratio of sugar and pectin to set it and give that traditional, jammy texture.  But it can be as simple as fruit, lemon juice and sugar like in this Strawberry Preserve recipe from Blackberry Farm.  and, don't forget! Jam can also be savory.  I created this Chili Jam recipe when I worked for a restaurant, and it went on everything from our lamb burgers to a cheese toast!

Note:  If you frequent your farmers market, ask them if they have any bruised or over ripened fruit. This is perfect for jam and also will most likely be discounted!


PRESERVE IN ALCOHOL

Photo: Bon Appetit

Photo: Bon Appetit

Running out of jam ideas?  Alcohol is also an incredible preservative.

I preserved my cherries from July in brandy using a simple ratio: for 1 pint jar filled with cherries, fill 2/3rds with sugar and then pour brandy to 1/4 “ from the rim.  Shake the jar a bit to dissolve the sugar and store in a cool dark place until you're ready to use.  Add a stick of cinnamon or a used vanilla bean for a bit of extra flavor. 

These brandied cherries are perfect ladles over a (big!) bowl of vanilla ice cream or poured over a holiday bundt cake.  You can also infuse flavors in the alcohol by simmering with vanilla or cinnamon. 

Not an alcohol drinker?  Simply try this recipe from Bon Appetit which preserves the cherries in syrup.


SHRUBS

Shrubs are another, lesser known way of preserving summer fruits, though you can do this with many, other fruits throughout the year too.  It's basically a fruit-forward drinking vinegar, that are excellent with some club sode but also make a great cocktail base, year-round.  I made one recently with strawberries, peaches and basil.

Enjoy!


tags: preserves, jams, chutneys, pickles, shrubs, shrub recipe
categories: all 2, condiments, recipes, side dishes-1, vegetarian
Friday 09.25.15
Posted by Aliya LeeKong
 

Peak Season Corn: Buying/Cooking Tips + 6-Ingredient Salad

PEAK SEASON CORN: BUYING / COOKING TIPS + 6-INGREDIENT SALAD AND OTHER RECIPES

Corn is summer, and at no other point in the year is it as sweet and tasty as it is now.  This is all my family is eating right now and in so many different ways.  I wanted to give you guys a few tips on how to maximize your corn experience - from choosing the right cobs, cooking and shucking them, to a simple "how-to" corn salad and other recipes.

BUYING TIPS: Buying the right corn can make all the difference because corn gets starchy and loses sweetness after it's picked.  Obviously, you want freshly-picked corn with bright, plump kernels, but you don't have to peel back the husks and peek to check them.  

  • Look for bright green cobs where the husk is tight over the corn.

  • The silks at the end should be brown and slightly tacky and damp - if they are black and/or dried, the corn is a bit older.

  • Feel for the kernels through the husk to make sure they are plump.

  • Finally, check the top for wormholes and avoid any where it looks like they may have gotten through.

COOKING AND SHUCKING: I put these two together because I'm sharing with you my favorite way of cooking corn.  Some prefer boiling which requires shucking the cobs first and getting rid of all of that pesky silk before cooking.  Go for it if that's what you like (or if you want to give the kids something to do)! 

I personally prefer a quick roast in the husks.  25 minutes at 400˚F in the oven (right on the rack) or on the grill set up for indirect heat makes sure you have super moist, flavorful kernels.  The plus side?  Once they are cool enough to handle, all of the silk slides right off with the husks.  No mess!  I then eat them straight from the cob, cut them off for a salad (see below) or toss them back on the hot side of the grill for a little char right before serving!

6-INGREDIENT CORN SALAD "HOW-TO": Corn salad shouldn't be something that requires exact measurements.  Here is what generally goes into my corn salads.

  • Corn - cooked and off the cob (see roasting in the husks above).  For a modest side, I figure 1 cob per person.

  • Peppers - hot, sweet, roasted, pickled.  Add enough to add color.

  • Another surprise ingredient - Go seasonal with grape tomatoes, radishes, zucchini or arugula.  Think starchy with potatoes, lima/cannelini beans or even couscous or bulghur.  Again, enough to add color and mix to the salad.

  • Onion - shallots, red onion, scallion, Vidalia - raw, charred, caramelized, roasted.  Just enough for flavor.  You can overdo here, but not really under-do.

  • Herbs - basil, chives, cilantro, parsley, mint, tarragon.  Choose one or use a few to layer flavor.  You can't really go wrong.

  • Acid - cider vinegar, lime or lemon juice, sherry vinegar, pickled pepper juice.  A few splashes.

That's it!  Mix them together in a bowl and season with salt and freshly ground black pepper.  Taste and add whatever is missing from above.  Let the flavors marry for a few minutes before serving - it will taste even better the next day!

Looking for other recipes?  Check out a few other ones I love.....

CORN WITH GREEN CHILI BUTTER & TOASTED COCONUT


corn pudding pic1.jpg

SMOKY, SPICY CORN PUDDING


SOPA DE FLOR DE CALABAZA (SQUASH BLOSSOM SOUP)


Enjoy!!


tags: farm fresh corn, corn salad recipe, how to buy corn, shucking corn, corn buying tips
categories: all 2, recipes, salads, soups & salads, vegetarian, side dishes-1
Wednesday 08.19.15
Posted by Aliya LeeKong
 

Haitian (Quick) Pikliz

View fullsize pikliz1.jpg
View fullsize pikliz2.jpg
View fullsize pikliz3.jpg
View fullsize pikliz4.jpg

HAITIAN (QUICK) PIKLIZ

As of late, I've been feeling like pickled foods are everything (and said as much to Food Republic this week!).  They add just the right amount of vibrancy and acidity to certain dishes, and this pikliz, a Haitian version, is no different.  Haitian pikliz is a traditional condiment for the country - typically cabbage, onions, sweet and hot peppers, and spices soaked in vinegar and lime juice.  It's tart with serious heat and depth of flavor. 

My version is a bit different - rather than soaking the vegetables and waiting 3 to 5 days to eat it, I use a quick pickling technique that allows you to wait until it's cooled and enjoy right away.  I also add a bit of daikon radish (totally optional) for a bit of extra crunch.  The key to the incredible flavor is scotch bonnet peppers, typically a five alarm fire in your mouth.  Don't let the scotch bonnet peppers scare you though - it's not like they are light work, but they won't burn your tongue off either here; the vinegar tames them.

This has been my staple for grilling season - kind of like coleslaw but with the benefit of hot sauce.  Whole fish charred on the grill topped with this pikliz has been a weeknight fave.  It goes great with chicken and especially pork, because it helps cut the fat.  In Haiti, it's often paired with fried pork called griot (my recipe: here).  Crunchy, fragrant, acidic, with that heat and flavor of the peppers...

Also, a pet peeve of mine...don't let the pickling liquid go to waste!  A little pour in eggs, soups, a stir fry or a rice dish adds just the right kick.  Enjoy!

Ingredients

Yields a 1 quart mason jar

2 cups green cabbage, thinly sliced (I used savoy, the light green leaves only)

½ cup daikon radish, thinly sliced (optional)

1 small white onion, thinly sliced

1 medium carrot, grated

2 small sweet peppers or ½ bell pepper, thinly sliced

4-5 scotch bonnet, seeded and thinly sliced

2 scallions, thinly sliced

5 garlic cloves, minced

1 ½ cups raw cider vinegar

juice of ½ lime

1 ½ teaspoons kosher salt

1 scant teaspoon unrefined sugar

14 black peppercorns

4 whole cloves

Procedure

To a 1 quart mason jar, add the cabbage, daikon radish (if using), onion, carrot sweet and hot peppers, scallion and garlic.  It will probably be overflowing, but press down all of the vegetables as best as you can.

In a medium saucepan, bring the cider vinegar, lime juice, salt, sugar, peppercorns and cloves up to a boil.  Remove from heat and pour over the vegetables.  Close the jar and let cool to room temperature before using.  You can eat right away.

At this point you can refrigerate to store, but I like to keep it at room temperature for an extra day for a bit of fermentation and then refrigerate.  It should keep for about 3 weeks.


tags: haitian pikliz recipe, pikliz recipe, how to pickle cabbage, pickled cabbage, haitian cooking
categories: all 2, condiments, side dishes-1, vegetarian
Wednesday 07.29.15
Posted by Aliya LeeKong
 

Corn with Green Chili Butter and Toasted Coconut

View fullsize AliyaLeeKong_CoconutGreenChiliCorn.jpg

Corn with Green Chili Butter and Toasted Coconut

I mentioned a few weeks back that I would be posting one recipe a month from Exotic Table leading up to the cookbook release, and here is another fun one just in time for Labor Day, barbecuing, and glorious, end-of-summer cookin’: my corn with green chili butter and toasted coconut.

The story behind this one is that I grew up eating this rich corn curry—pieces of corn on the cob simmered in a delicious stew with coconut, green chilies, and cilantro. When summer comes around and corn is in season, I’m not usually in the mood for stews, so I came up with this recipe to satisfy my cravings—buttery, grilled corn with sweetness, heat, and the crunch of toasted coconut.

Think of it like Mexican street corn…but East African-style!  This is deliciously simple and will add the perfect spice to your everyday grilled corn.  Enjoy!

Ingredients

Serves 4 to 6

6 ears of corn

1 stick unsalted butter, room temperature

½ teaspoon salt

½ teaspoon honey

1 serrano chili, finely minced, seeds and ribs removed

2 tablespoons chopped cilantro

3 tablespoons unsweetened dessicated coconut, toasted

salt, to finish

Preheat the oven to 400°F or preheat the grill. Roast/grill corn in the husks for 25 minutes. Remove the husks and any remaining silk.

In a small bowl, combine butter, salt, honey, serrano chili, and cilantro.

Liberally spread chili butter on corn and sprinkle with the toasted coconut. Finish with a bit of salt and serve.

categories: recipes, all, vegetarian, side dishes-1
Tuesday 08.27.13
Posted by Liz Neilson