X

Sign up to receive exclusive recipes, tips, updates and other goodies from Aliya!

  • Home
  • Blog
    • All
    • Recipes
    • Spices + Ingredients
    • Lifestyle, etc.
    • Travel
  • The Cookbook
  • The App
  • Media
    • All Media
    • Video
  • About
  • Passions
Aliya LeeKong
  • Home
  • Blog
    • All
    • Recipes
    • Spices + Ingredients
    • Lifestyle, etc.
    • Travel
  • The Cookbook
  • The App
  • Media
    • All Media
    • Video
  • About
  • Passions

Nigella + Sesame Seed Granola

Photo Jan 13, 5 47 32 AM.jpg
Photo Jan 13, 5 46 52 AM.jpg
Photo Jan 13, 5 43 52 AM.jpg
Photo Jan 13, 5 45 26 AM.jpg

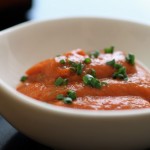
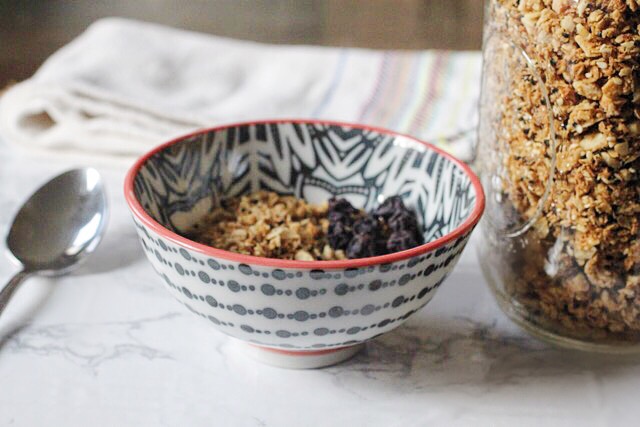
NIGELLA + SESAME SEED GRANOLA

In keeping up with the New Year's goals of choosing healthier options, I’ve been craving granola a lot lately.  While I was in Venice of all places over the holidays, I had the most incredible (yes, incredible) granola I've ever tasted.  I wanted to recreate it and thought, well, how hard is it really to make my own granola!?  Why have I never thought about doing this before?  So, I grabbed a bunch of ingredients that I thought would recreate the flavors of that granola and decided to try this at home!  And let me tell you……It’s soooo easy.

The trick to a good granola is to cook it low and slow. The hardest part is really choosing your ingredients!  There are so many choices out there. I did a simple granola recipe below (albeit with nigella and sesame seeds) but next time I may add some rice puffs to the mix and maybe switch it up with dried strawberries.  It really depends on your flavor preference.  Also, if you prefer a granola that has more clusters, you can up the maple syrup and not mix the granola as much during cooking.  If you want very cluster-y granola, you can stir in some egg whites before cooking to achieve that.   

This is not like any other granola I've tasted.  It's nutty, sweet and roasted in flavor but with the sharp bite of the nigella seeds.  It is BEST made with ghee (does anything taste worse with butter?), but a neutral oil works well here too.  Enjoy!

Ingredients

Yields 7 cups

1 cup raw, unsalted cashews

3 cups organic rolled oats

1 cup sliced almonds

1 cup shredded, unsweetened coconut

¼ cup plus 2 tablespoons sesame seeds (white, black or a combo)

3 tablespoons nigella seeds

3 tablespoons maple, palm or light brown sugar

½ teaspoon kosher salt

½ cup pure maple syrup

¼ cup ghee or neutral oil (grapeseed, canola or sunflower)

1 cup dried fruit, diced (optional)


Preheat oven to 300° F.  Place a layer of parchment on a large cookie sheet and set aside.

I like to grind up some of the ingredients first for a more even texture.  To the bowl of a food processor, add the cashews and pulse a few times.  Add in the oats and almonds and pulse until you get an even, crumbly texture.

In a large bowl, combine the oat mixture with the coconut, sesame seeds, nigella seeds, sugar and salt.  Stir to combine all of the ingredients.  Pour the maple syrup and oil over the raw granola.  Mix until evenly coated and taste to make sure everything tastes to your liking. 

Spread the mixture on the prepared baking sheet evenly and transfer to the oven. Stir the mixture every 10-15 minutes or so to make sure everything is browning evenly.  It should take about 40-45 minutes total, depending on your oven.  If you are adding in the dried fruit, add it in during the last 10-15 minutes of cooking so it gets a bit drier and doesn’t make the granola soggy during storage.

Remove from the oven and let dry out on a rack until cool. Store in a mason jar; it should last for about 2 weeks or so.

Enjoy with yogurt and fresh fruit or as a cereal with almond milk!


tags: granola, homemade granola, how to make your own granola, nigella seeds, nigella seed granola
categories: all 4, breakfast-1, condiments, lifestyle-1, quick & easy, recipes
Wednesday 01.18.17
Posted by Aliya LeeKong
 

The Ultimate Eggplant Dip

THE ULTIMATE EGGPLANT DIP

So I feel like the eggplant doesn’t get a lot of love!  Recently, at the market, all the stands seem to have some sort of eggplant variety:  the most common (classic), Japanese, white, Thai green, fairytale (those small purple ones above), Sicilian, baby.  I have in the past bought the Thai green eggplants when I see them in the Asian supermarkets; they are the little green round ones that can fit in the palm of your hand and are my favorite when making a thai green curry.  I just throw them in whole and let them simmer in the curry (fairytales are great for that too). 

There are so many more ways to use eggplant, though - roasting and scooping out the inside to make a great dip, breading and sautéing for an eggplant parm, or just frying and making a caponata.  Personally, I love fire-roasting eggplants, outside on coals or a gas grill or just over your gas stove flame.  Eggplants take on incredible smokiness, so I wanted to share my favorite, smoky eggplant dip from my cookbook. 

This dip is based on baba ganoush, a traditional Middle Eastern mezze of smoky eggplant purée mixed with tahini and extra virgin olive oil.  I also add a dollop of crème fraiche and a sprinkling of chives to give it that rich, party-worthy dip feel.  Fried fingerlings or other small potatoes are the perfect match for this!  Enjoy!

Ingredients

For the eggplant dip:

3 whole Italian eggplants

1 clove roasted/raw garlic, minced

2 tablespoons tahini

1 tablespoon crème fraiche

Juice of half a lemon

Salt to taste

Chives, for garnish

For the fingerling chips:

canola or peanut oil for frying

1 pound fingerling potatoes, scrubbed, skin-on

Salt, to finish

For the eggplant dip: Preheat the oven to 400° F.

Prick the eggplants all over with a fork and then place on the open flame of a gas burner.  You want to char the skin all over the eggplant to impart smokiness.  If you don’t have a gas burner, you can do this on a grill or under the broiler. 

Once the skin is charred and shriveling, transfer to a baking sheet and finish cooking in the oven for another 25 to 30 minutes. 

Let the eggplants cool before handling.  Split them open and scrape out all the flesh inside into a medium bowl.  Add the garlic, tahini, crème fraiche, lemon juice and salt and use a fork to mash everything together.  You want to create a creamy consistency but with texture.  You can also do this in the food processor if you want something smoother.  Taste and readjust seasoning.  Chill before serving.

For the fingerling chips: In a Dutch oven or large saucepan, heat 3 to 4 inches of oil to 360° F.  The oil should go less than halfway up the pot. 

Using a mandolin or with a very sharp knife, thinly slice the fingerling potatoes and transfer to a bowl of water.  Gently mix the potato slices, strain out the water and dry on paper towels.  The potatoes should be completely dry before adding to the oil or they will spatter and bubble up.

Add the fingerling slices to the oil, working in batches, and fry for about 45 seconds to 2 minutes depending on how thick you sliced them.  You basically want them golden brown.  Transfer them to a paper towel-lined plate and finish them with salt.

Serve the dip cold with fingerling chips on the side.


tags: eggplant recipes, how to cook eggplant, baba ganoush, how to make baba ganoush
categories: all 4, appetizers 1, blog, condiments, side dishes-1, vegetarian-2
Thursday 09.08.16
Posted by Aliya LeeKong
 

Aged Hot Sauce & Other Things to do with Chili Peppers

AGED HOT SAUCE & OTHER THINGS TO DO WITH CHILI PEPPERS

I am slightly obsessed with hot sauce (I mean, obsessed).  I put that ish on everything.  Sometimes, I carry a small bottle in my purse because, you know, you just never know when you’ll need it...Right now, the market is bursting with all types of peppers, and there are so many different ways to make hot sauce or spice up ordinary kitchen condiments. Making your own hot sauce at home really isn’t that hard of a task.  You can do a quick stove top method (basic cooked), ferment in a salt brine solution for a few weeks (fermented/aged), or a quick pickle like my Haitian quick pikliz.

Fermented hot sauces might sound like something new, but they are in so many different cultures - super Southern (think Tobasco) and Asian (sriracha and kimchi to a certain degree) to name a few.  I personally like to make a green sauce and a red sauce. My green sauce is always a mix of serranos, jalapeños, and poblano peppers, roughly chopped.  I add some chopped onion, garlic and green bell peppers to round out the heat, pack it all in a jar and add a simple salt brine (1 1/2 cups water to 1 tablespoon salt).  Everything should be submerged, so if you're doing this at home, weight down if you must.  Initially, I cover the jar with muslin cloth, secured by a rubber band, and I let sit it sit on the counter for about a week to two weeks, stirring daily.  You will notice little bubbles (fermentation), but if white mold forms, skim it off.   You can ferment for as long as you like really - Tobasco takes 3 years!  I have experimented from a week to 8 weeks, so it's more about personal taste.

For the red sauce, I use hot cherry peppers, a couple scotch bonnets, and other red chilies like Fresnos or thai chilies.  Again, add onion, garlic and red bell peppers to round out the heat.  Same finish as the green sauce.  The hardest part is the waiting.  Also, I highly recommend wearing gloves when dealing with all these hot peppers!

Another fun way to experiment is with the salts in the brine or spices.  Think: a smoked, black Hawaiian sea salt or Himalayan pink. Spices like coriander, cloves, all spice, ginger, mustard seeds,  and even herbs will add great flavor.

After the peppers have fermented, I like to strain the pepper mix, reserving the brine.  Then, I purée adding back in the brine and a touch of vinegar until I reach the right consistency and flavor.  You can leave it like this, slightly chunky, or strain for a thinner hot sauce. Note: If the sauce is a little too hot you can add some sugar to smooth it out.   Finally, transfer to an airtight jar and store in the fridge.

Another great way to use up peppers from the market is to infuse them in vinegars or oils to make some kick-ass salad dressings!  For vinegars, I like to buy the tall thin glass jars with the pour spout and fill them with Thai bird chilies or any skinny peppers, really, that fit in the jar.  Then, it’s up to you which type of vinegar you want to infuse - no cooking necessary!  Fill the jar and let it sit for a week or more to infuse.  It's so simple - just make sure the chilies are covered by the liquid or they could mold. 

For the oil, I like to simmer canola or grapeseed oil on a low heat with garlic and spices.  Then, pour the hot oil over fresh or dried chilies and let sit until cool.  Strain and voilá!

Enjoy!!


tags: aged chili sauce, fermented chili sauce recipe, how to ferment chili peppers, pickled chili peppers
categories: all 4, blog, condiments, lifestyle-1, quick & easy, recipes
Wednesday 08.24.16
Posted by Aliya LeeKong
 

Strawberry Season, a Pickle, & a Jam!

STRAWBERRY SEASON, A PICKLE & A JAM!

Well….it took forever, but it has finally arrived: strawberry season.  This little window only lasts about a month up here, and I try to get out to the fields to pick my own, when possible.  Right now, I have literally the sweetest strawberries I've ever tasted sitting in the fridge.  They are so good, just by themselves, but if you’re like me (and get a bit overly excited about berry picking...), you end up with strawberry overload!

I decided to mess around with some flavors for a new strawberry jam using some fresh basil from my garden and a vanilla bean.  Strawberries and basil are a match literally made in heaven.  I don't prefer my jam overly sweet, so I just add sugar (unrefined) until it tastes like it’s enough.  There isn't a specific recipe because, of course, it depends how many strawberries you have left, but here are a few guidelines: (1) Clean and quarter berries and let them heat up in a saucepan with a couple tablespoons of lemon juice until they start to release their liquid.  (2) Once there is some liquid in the pan, add the sugar, basil and a vanilla bean and then let it all simmer until it thickens.  Remember, when it cools, it will thicken up a bit more.  (3) Use the stems from the basil (cause that’s where all the flavor is) and wrap them in a cheesecloth sachet.  You can also tear up or chiffonade the leaves and add them to the strawberries.  (4) Add some pectin powder if you like, to speed up this process.  Ultimately, you can cool and use right away or transfer to sterilized jars and vacuum seal for later.

This year, I also wanted to experiment pickling green strawberries.  It’s a different kind of pickling liquid then you might think - less vinegar, a little more sugar and a lot of flavor!  The green strawberries turn a bit sweet, slightly tart and still retain a nice bite.  These pickled strawberry makes them a perfect addition to any summer salad or cheese plate.  Enjoy!

Photo: We You They Ate

Pickled Green Strawberries
Yields 2 pint jars

2 pints green strawberries, cleaned and hulled (cut in half or sliced, if you like)

1 cup water

½ cup rice wine vinegar

2 ½ tablespoons sugar

1 tablespoon honey

2 teaspoons kosher salt

1 ½ tablespoons coriander seeds

1 tablespoon black peppercorns

4 Kaffir lime leaves

2 (1" x ½") pieces lime rind


Divide the strawberries between the two mason jars and set aside. 

In a saucepan over medium heat, bring the rest of the ingredients to a simmer until the all of the sugar, salt and honey has dissolved.  Let cool to room temperature before pouring into the jars with the strawberries.  Let sit in the fridge over night for the best flavor.


tags: strawberries, strawberry recipes, pickled green strawberries, strawberry jam, how to pickle strawberries
categories: all 4, condiments, lifestyle-1, quick & easy, recipes, side dishes-1, vegetarian-2
Wednesday 06.08.16
Posted by Aliya LeeKong
 

7 Ways to Preserve the Season

7 WAYS TO PRESERVE THE SEASON

This past weekend, shopping at my local farmers' market, I noticed that the fall squashes have now arrived.  As much as I love the cooler weather, I will really miss the abundance of local fresh berries and summer fruit and vegetables.  Funny enough, you can still find a lot of gorgeous peaches, tomatoes, and other summer fruit still lingering.  This transition has got me thinking about different ways of preserving, something that's in every culture around the world and has existed for centuries.  It's not only a way to enjoy those flavors later in the next season but is also a fantastic way to reduce waste (and save some $ to boot)....


PICKLING

2015-09-18 02.16.59.jpg

Pickling is always a great way to preserve vegetables (and even some fruits)!  I have messed around with pickles from so many different cuisines - from traditional Indian pickles in mustard oil to Italian giardiniera to a quick, spicy Haitian pickled cabbage, called pikliz that I love!  I always have a few pickles in my fridge to dress up everything from Sunday eggs to a nice seared piece of fish.  If you've been on my Instagram, you are probably over it with my pickled cherry pepper obsession....


CHUTNEYS

Chutneys are another savory way of preserving fruits and vegetables. They have both sweet and sour flavors and are great for those holiday cheese platters, to enjoy with a winter roast or as a condiment to take that sandwich to the next level.  Personally, with it still being grill weather, this smoked peach chutney is absolutely to die for on pork chops, with some fromage d'affinois, or on your morning toast.


BLANCH AND FREEZE

What if you want to keep it simple?  Easy, just blanch and freeze your vegetables in resealable bags.  Think vegetables in the freezer section of the grocery store, only yours are directly from the source!  These will make for a much tastier version of stir fry in the dead of winter, I promise you. 

Just have a pot of salted, boiling water (should taste like the sea), an ice bath (ice with cold water) and lots of resealable bags ready and you are set.  Drop in the boiling water until the veggies are still crisp but that raw taste is gone.   Then submerge in ice bath to stop the cooking and keep the vibrant color.  Don't hold in the ice bath too long or all the vitamins and minerals (the healthy stuff) will seep out.  You just want the veggies to be cold.  Drain, dry off, portion in to bags and place in the freezer.  Super simple!


HERB SALTS

If you’re like me and you love having fresh herbs around the house, you are probably wondering how to use up those plants before they start to wilt (and die).  There is, of course, the go to method of freezing herbs in ice cube trays (either in broth, butter, water or oil), but another fun way to preserve them is to turn the herbs into salts. 

You take a bunch of basil, rosemary or any single or combination of herbs you want and process in a food processor with some kosher salt.  Then, transfer to a parchment-lined baking sheet and dry out the mixture in a low temp oven around 225°F for an hour or two until crumbly.  Then back in the food processor to make more fine (only, if you want) and voila! Instant herb salts for your pantry! 

Of course, these are delicious on different meats or a roast chicken.  But pack some in a little bottle, and you have the perfect hostess gift!  Remember to store the salt in an airtight container, and it will keep for about 3 months.


JAMS

Photo: Huffington Post

Photo: Huffington Post

Now, for my favorite fruits which have a growing season of only a month or two, at best: fresh berries and stone fruit!  It's the best day of the year when you finally see rows and rows of these at the market, and the saddest day when you realize their season is over...Luckily this year seemed to last longer than last, and my pantry has a ton of jam to show for it.  At first it was just a couple jars for me, and then I started thinking holiday gifts!! 

People sometimes get intimidated by jam making - have the right ratio of sugar and pectin to set it and give that traditional, jammy texture.  But it can be as simple as fruit, lemon juice and sugar like in this Strawberry Preserve recipe from Blackberry Farm.  and, don't forget! Jam can also be savory.  I created this Chili Jam recipe when I worked for a restaurant, and it went on everything from our lamb burgers to a cheese toast!

Note:  If you frequent your farmers market, ask them if they have any bruised or over ripened fruit. This is perfect for jam and also will most likely be discounted!


PRESERVE IN ALCOHOL

Photo: Bon Appetit

Photo: Bon Appetit

Running out of jam ideas?  Alcohol is also an incredible preservative.

I preserved my cherries from July in brandy using a simple ratio: for 1 pint jar filled with cherries, fill 2/3rds with sugar and then pour brandy to 1/4 “ from the rim.  Shake the jar a bit to dissolve the sugar and store in a cool dark place until you're ready to use.  Add a stick of cinnamon or a used vanilla bean for a bit of extra flavor. 

These brandied cherries are perfect ladles over a (big!) bowl of vanilla ice cream or poured over a holiday bundt cake.  You can also infuse flavors in the alcohol by simmering with vanilla or cinnamon. 

Not an alcohol drinker?  Simply try this recipe from Bon Appetit which preserves the cherries in syrup.


SHRUBS

Shrubs are another, lesser known way of preserving summer fruits, though you can do this with many, other fruits throughout the year too.  It's basically a fruit-forward drinking vinegar, that are excellent with some club sode but also make a great cocktail base, year-round.  I made one recently with strawberries, peaches and basil.

Enjoy!


tags: preserves, jams, chutneys, pickles, shrubs, shrub recipe
categories: all 2, condiments, recipes, side dishes-1, vegetarian
Friday 09.25.15
Posted by Aliya LeeKong
 

Haitian (Quick) Pikliz

View fullsize pikliz1.jpg
View fullsize pikliz2.jpg
View fullsize pikliz3.jpg
View fullsize pikliz4.jpg

HAITIAN (QUICK) PIKLIZ

As of late, I've been feeling like pickled foods are everything (and said as much to Food Republic this week!).  They add just the right amount of vibrancy and acidity to certain dishes, and this pikliz, a Haitian version, is no different.  Haitian pikliz is a traditional condiment for the country - typically cabbage, onions, sweet and hot peppers, and spices soaked in vinegar and lime juice.  It's tart with serious heat and depth of flavor. 

My version is a bit different - rather than soaking the vegetables and waiting 3 to 5 days to eat it, I use a quick pickling technique that allows you to wait until it's cooled and enjoy right away.  I also add a bit of daikon radish (totally optional) for a bit of extra crunch.  The key to the incredible flavor is scotch bonnet peppers, typically a five alarm fire in your mouth.  Don't let the scotch bonnet peppers scare you though - it's not like they are light work, but they won't burn your tongue off either here; the vinegar tames them.

This has been my staple for grilling season - kind of like coleslaw but with the benefit of hot sauce.  Whole fish charred on the grill topped with this pikliz has been a weeknight fave.  It goes great with chicken and especially pork, because it helps cut the fat.  In Haiti, it's often paired with fried pork called griot (my recipe: here).  Crunchy, fragrant, acidic, with that heat and flavor of the peppers...

Also, a pet peeve of mine...don't let the pickling liquid go to waste!  A little pour in eggs, soups, a stir fry or a rice dish adds just the right kick.  Enjoy!

Ingredients

Yields a 1 quart mason jar

2 cups green cabbage, thinly sliced (I used savoy, the light green leaves only)

½ cup daikon radish, thinly sliced (optional)

1 small white onion, thinly sliced

1 medium carrot, grated

2 small sweet peppers or ½ bell pepper, thinly sliced

4-5 scotch bonnet, seeded and thinly sliced

2 scallions, thinly sliced

5 garlic cloves, minced

1 ½ cups raw cider vinegar

juice of ½ lime

1 ½ teaspoons kosher salt

1 scant teaspoon unrefined sugar

14 black peppercorns

4 whole cloves

Procedure

To a 1 quart mason jar, add the cabbage, daikon radish (if using), onion, carrot sweet and hot peppers, scallion and garlic.  It will probably be overflowing, but press down all of the vegetables as best as you can.

In a medium saucepan, bring the cider vinegar, lime juice, salt, sugar, peppercorns and cloves up to a boil.  Remove from heat and pour over the vegetables.  Close the jar and let cool to room temperature before using.  You can eat right away.

At this point you can refrigerate to store, but I like to keep it at room temperature for an extra day for a bit of fermentation and then refrigerate.  It should keep for about 3 weeks.


tags: haitian pikliz recipe, pikliz recipe, how to pickle cabbage, pickled cabbage, haitian cooking
categories: all 2, condiments, side dishes-1, vegetarian
Wednesday 07.29.15
Posted by Aliya LeeKong
 

Grilled Butterflied Chicken with Charred Jalapeño Sauce

View fullsize chicken3.jpg
View fullsize chicken1.jpg
View fullsize jalapenos1.jpg
View fullsize chicken2.jpg

GRILLED BUTTERFLIED CHICKEN WITH CHARRED JALAPEÑO SAUCE

Once it gets hot out, grilling becomes my go-to for weeknight dinners (and weekend entertaining!).  It's simple, healthy and you can grill just about anything.  I know because I do throw on everything - from your standard barbecue fare to split romaine hearts to potatoes.  A good, grilled chicken is second-to-none, crispy, seasoned skin with tender, smoky meat underneath - and the butterflying technique means you get both of your wishes: evenly cooked meat plus super crackly skin.  Plus, it's easy, and there's no marination or brining necessary to have delicious grilled chicken.

This sauce (like many other recipes!) came out of a need to use up what I had.  I went to the market, and I didn't find any poblanos, which were my first choice.  But they shouldn't have been!  The jalapeños are perfect here, and the sauce has a spicy, acidic kick and a creamy (with no cream..) texture.  It's perfect with this chicken, but I could also see this with a pork chop, a lamb sirloin or even a whole grilled fish.  Happy grilling!

Enjoy!

Ingredients

Serves 4

For the chicken:

Handful of wood chips wrapped in foil ( optional; I like to use applewood)

1 whole chicken, 3 ½ to 4 lbs

2 teaspoons garlic powder

2 teaspoons sweet paprika

1 teaspoon onion powder

1 teaspoon dried oregano leaves

½ teaspoons ground black pepper

Canola oil

Kosher salt

For the sauce (yields approx. 2/3 cup):

8 jalapenos, whole

3-4 pickled cherry peppers along with 4-5 tablespoons of the pickling liquid

1 garlic clove

1 ½ teaspoons honey

Small handful of cilantro (stems + leaves)

Kosher salt and freshly ground pepper, to taste

Canola oil

Procedure

Set up your grill for indirect grilling, either piling charcoal on one side or turning only half the burners on.  I like the inside of my grill to linger around 400-450˚ F.  We're going to cook the chicken on the side without direct heat for the majority of the time and then finish it over the high heat to crisp the skin and get that char.  This is a good time to throw on the wood chips as well which will give a great smoky flavor to the chicken, but it's totally optional.

For the chicken: Butterflying a chicken isn't as complicated as it sounds.  Start with the chicken breast-side down and have some kitchen shears by your side.  Starting at the bottom of the bird, cut along each side of the backbone straight through the ribs to the neck opening.  Set aside the backbone and giblets and reserve for making stock.  Take each side of the flaps in front of you and open the chicken up flat.  Flip onto the other side and press down on the breastbone to flatten (you'll hear a crack at some point!).  Done.

Mix together the garlic powder, sweet paprika, onion powder, oregano, and black pepper.  Coat the chicken lightly in oil and sprinkle the dry rub all over.  Your hands are already messy, so just go ahead and rub it in good.  Then, season generously with salt all over.

Make sure to oil your grill as well, and place the chicken breast up on the side without the charcoal or the burners.  I like to face the legs towards the heat source and the neck side away since the legs typically take a bit longer.  Cover your grill and cook for 30 to 40 minutes.  I like to check for doneness with a cake tester or (very) small knife inserted at the thigh joint - if inserted to the bone and pulled out it's hot, the meat is done.  You can conversely make sure it's cooked to about 150-155˚ F.   For the last 3 to 5 minutes, I flip the bird over, skin and breast side down, over the direct heat side of the grill.  This makes sure you get that thin, crispy skin.

Allow the bird to rest for about 5 to 7 minutes before carving.

For the sauce: While the bird is cooking, throw the jalapeños right over the direct heat side and char on all side.  The skin should turn black and blistered.  Transfer to a plastic bag while it cools.  When cool enough to handle, use a paper towel to rub off the charred skin.  Then, with a knife, remove the stem, ribs and seeds.  Chop roughly.

Transfer the jalapeños to a blender and add the pickled cherry peppers, pickling liquid, garlic, honey and cilantro.  Season with salt and pepper.  Run the blender and then stream in the oil as needed to create the sauce.  I like to just get the blade moving and make sure the sauce is uniform and not too thick.  It should look creamy and coat a spoon.  Remember to taste and adjust the seasoning if necessary.

Serve the chicken hot with the sauce on the side. 

tags: grilled chicken recipe, grilled chicken, grilled whole chicken, grilled butterflied chicken, roasted jalapeno, roasted pepper sauce, chicken with peppers
categories: all 2, condiments, man-friendly, recipes, main dishes
Wednesday 07.08.15
Posted by Aliya LeeKong
 

Rhubarb, Cucumber & Mint Salsa

View fullsize salsa-pic1-500x333.jpg
View fullsize rhubarb-pic2-500x333 (1).jpg
View fullsize salsa-pic3-500x333.jpg

Rhubarb, Cucumber & Mint Salsa

Increasingly, I’m realizing that every culture has its form of “salsa.”  When I was down in St. Lucia a few weeks back, I found out they have their version called souscaille.  In South Asian cuisines, it’s called kachumber, and in African cuisines, kachumbari.  At all points, it’s a fresh salad, often with onions or shallots, with acidity in the form of the juice or segments of citrus or vinegar.  I wanted to inject a little seasonality into my salsa this week, and spring’s tart rhubarb was the perfect add.

Rhubarb, contrary to popular belief, is a vegetable, and it has a crisp, fresh texture that’s somewhere between jicama and celery with a sourness that’s reminiscent of green apples.  I’ve played with it before in a dessert, a granita, but here I wanted to see what it could do from a savoury point of view.

The cucumber and rhubarb meld together beautifully.  You have the cooling, soothing, watery cucumber contrasted with the tart bite of the rhubarb.  The shallots add mellow onion flavor and the fresh mint a bright finish.  It would be perfect on fish or shrimp tacos or a simply grilled chicken breast.  Enjoy!

Ingredients

Yields approximately 2 ½ cups

2 mini seedless cucumbers, cut into a small dice

1 stalk rhubarb, cut into small dice

1 shallot, finely chopped

juice of half a lime

½ tsp kosher salt

pinch cayenne pepper

pinch white sugar

small handful fresh mint, finely chopped

Procedure

In a small bowl, toss together the cucumbers, rhubarb and shallot.  Add the lime juice, salt, cayenne, sugar and mint mix thoroughly.

tags: rhubarb, salsa, recipes for spring
categories: all -1, condiments, recipes, side dishes, salads, soups & salads, vegetarian-1
Monday 04.30.12
Posted by Aliya LeeKong
 

Sweet Chili Jam

View fullsize chili-jam-pic1-500x333.jpg
View fullsize chili-jam-pic2-500x333.jpg
View fullsize chili-jam-pic3-500x333.jpg

Sweet Chili Jam

Happy 4th of July!  I hope everyone is having a fantastic day, and enjoying a nice bbq with friends and family (I know I am!).  I have gone waay too far with my menu today – lamb burgers with pickled cukes, some shrimp cakes, grilled corn, roasted potato salad, spiced grilled shitakes, a big green salad with cherry tomatoes and asparagus, pineapples soaked in orange liqueur, and a great pitcher of rum punch…

As promised, here’s the chili jam I use (on basically everything…) on my lamb burgers.  Sweet, spicy, tart, and jammy…a beautifully versatile condiment that is soooo easy to make.  Enjoy!

Ingredients

Yields approximately 3 cups

2-3 tbsp oil

3 medium white onions, thinly sliced (~2 lbs)

3 plum tomatoes, seeded and chopped

10 red fresno chilies or combination red fresno / red finger chilies, finely chopped

1 cinnamon stick

1 dried bay leaf

¾ cup apple cider vinegar

1/3  cup brown sugar

1 cup water

Salt to taste

Procedure

In a medium-sized pot, heat oil over medium heat.  Add onions and a bit of salt and cook slowly to caramelize, about 25 to 30 minutes.  You don’t want the onions to brown quickly but rather develop a caramel color as they soften and sweeten, so keep the heat at about medium-low and stir at intervals.

Add the rest of the ingredients and bring up to a boil for 5 minutes, covered.  Lower to a simmer for another 25 minutes, removing the lid and stirring for the last 5 to 10 minutes of cooking.

Remove bay leaf and cinnamon stick and process in a food processor to a jam-like texture.

tags: jam, sweet chili jam, condiments
categories: all-3, condiments, sweet & savoury, appetizers, recipes
Monday 07.04.11
Posted by Aliya LeeKong
 

Spicy Creole Ketchup

View fullsize ketchup-pic1-500x333-150x150.jpg
View fullsize ketchup-pic2-500x333.jpg
View fullsize ketchup-pic3-500x166.jpg

Spicy Creole Ketchup

As a promised follow up to the smoked herring croquettes I posted on Monday, here is a delicious dipping sauce for them or wherever you’d usually use ketchup.  In Haiti, smoked herring is often eaten in a Creole sauce that contains onions, tomatoes, habaneros, vinegar and ground cloves.  To me, that translates almost directly to ketchup!

If you read the recipe, one thing I do might seem a bit strange if you haven’t seen it before.  I cook the sugar in oil first, almost to the point of burning.  This is actually how a lot of West Indian stews start off, though many use a jarred product called browning which is effectively the same thing.  It imparts a caramelized flavor that isn’t altogether unlike molasses, and it worked really well as a ketchup base.

The resulting ketchup is a touch smoky, with heat from the habaneros and spice from the cloves and nutmeg.  It will keep for weeks as is but is also safe to load into sterilized bottles if you wish to keep it longer.  Enjoy!

Ingredients

Yields approximately 2 cups

1 (28-oz) can whole tomatoes in purée

2 tbsps olive oil

1/3 cup dark brown sugar

1 small red onion, cut into a medium dice

½-1 habanero pepper, seeded and ribbed, finely chopped

healthy pinch of ground cloves

healthy pinch of ground nutmeg

4 cloves garlic, minced

1 tbsp sundried or regular tomato paste

1/3 cup cider vinegar

Salt to taste

Chives, finely chopped

Procedure

In a blender, pour entire contents of the can of tomatoes and purée until smooth.

Heat a heavy saucepan over medium heat.  Add oil.  Add sugar and cook stirring for 2 to 3 minutes until the sugar turns gelatinous and sticks together.  It should darken in color, and you should smell like its about to burn.  Add chopped onion, habanero, and spices, and cook for another 4-5 minutes until the onions have softened.  Don’t worry if the sugar solidifies when you add the onions – it will redissolve.  Add minced garlic and tomato paste and cook for another 2 minutes.

Add puréed tomatoes and vinegar.  Bring to a slow bubble and simmer for an hour, stirring every now and then.

Remove from the heat and let cool.  Return everything to the blender and purée until smooth.  Refrigerate for at least 2 hours before serving.  Fold in chopped chives before serving.  This ketchup will keep for about a month – longer if placed in sterilized jars.

tags: ketchup, condiments, dipping sauce, spicy, Creole recipes
categories: all-4, condiments, appetizers, recipes
Wednesday 03.23.11
Posted by Aliya LeeKong