X

Sign up to receive exclusive recipes, tips, updates and other goodies from Aliya!

  • Home
  • Blog
    • All
    • Recipes
    • Spices + Ingredients
    • Lifestyle, etc.
    • Travel
  • The Cookbook
  • The App
  • Media
    • All Media
    • Video
  • About
  • Passions
Aliya LeeKong
  • Home
  • Blog
    • All
    • Recipes
    • Spices + Ingredients
    • Lifestyle, etc.
    • Travel
  • The Cookbook
  • The App
  • Media
    • All Media
    • Video
  • About
  • Passions

Filé Powder

View fullsize file-pic1-500x333.jpg

Filé Powder

I am headed to New Orleans this weekend to do some serious Creole cooking, so I thought it would be appropriate to end this week with an ingredient that is key to NOLA cuisine – filé powder.  This spice is made from the dried, young leaves of the American sassafras tree (NOT the root bark, where root beer flavor comes from).

Filé powder is a key ingredient in that most beloved of dishes, gumbo.  The flavor is distinctive and to me tastes earthy or green.  Some describe it as a combo between thyme and savory, but I find it really hard to pin down.

There seems to be an argument out there – when to include the spice, when not.  Gumbo has long been a debatable food, with each cook having his or her own secrets.  Many believe that when okra is included, filé shouldn’t.  And vice versa.  Both actually go beyond adding flavor to thicken gumbo and give it that signature texture.

A few things about filé powder…(1) It should be added to gumbo at the end and not to the entire pot!  If filé is boiled, it becomes super stringy, so just stir it in off the heat or to individual bowls.  (2) Filé loses flavor when stored for long periods of time, so buy in small quantities…

tags: Filé Powder, Filé, New Orleans, NOLA cuisine
categories: spices-1, all-4
Friday 05.13.11
Posted by Aliya LeeKong
 

Rhubarb-Kewra Granita

View fullsize rhubarb-pic1-500x333.jpg
View fullsize rhubarb-pic2-500x333.jpg
View fullsize rhubarb-pic3-500x166.jpg
View fullsize rhubarb-pic4-500x333.jpg

Rhubarb-Kewra Granita

I mentioned screw pine extract (kewra) a few weeks back and its intoxicating, floral perfume.  When I spotted some beautiful rhubarb at the greenmarket, I just knew it was a match made in heaven.  As the weather has been warming up, I thought a spiked granita would be a great way to showcase both of the flavors.

Granitas are awesome because they are great for lazy cooking days.  They require so little – water or juice, fruit or another base ingredient, sugar, any other fun items you want to throw in, and a freezer.  No ice cream maker is necessary, and in a few hours, you have a lovely frozen treat.  I added a bit of vodka to make mine, but it can totally be left out for a kid-friendly/nonalcoholic version.

Screw pine, which is used in Asian and Middle Eastern cooking, is found in both sweet and savoury dishes.  When sweet, the dish is often a milk-based dessert – a fantastic way to feature the delicious scent.  But, truthfully, it’s really complimentary to fruits and balanced the tartness of the seasonal rhubarb here perfectly.

Here, I cooked the rhubarb down with some sugar and lemon juice, puréed, strained, and added the kewra and vodka.  Ridiculously easy.  A few hours of freezing and scraping with a fork, and the granita was complete – crunchy, melt-on-your-tongue ice, sweet, tart and floral.  Enjoy!

Ingredients

Serves 6 to 8

3 ½ cups rhubarb, cut into ½” pieces (approximately 5 to 6 stalks)

2 ½ cups water

1 cup sugar

generous squeeze of lemon juice

3 tbsps screw pine extract

¼ cup vodka (completely optional but nice)

Procedure

In a medium pot, add rhubarb, water, sugar, and lemon juice.  Bring up to a simmer and simmer covered for 3 to 5 minutes until rhubarb basically falls apart.

Transfer to a blender and purée until smooth.  (Be careful when blending hot items!  Hold down the top with a towel.)  Strain mixture through a fine mesh strainer (cheesecloth-lined preferably) in a bowl.  Add screw pine extract and vodka, if using.

Transfer mixture to a metal baking dish – I used a 12”x14.5”x2.5 inch lasagna pan – and place uncovered in the freezer.  Remove after an hour and use a fork to scrape / disrupt the ice crystals.  Repeat process every 45 minutes for the next 3 or 4 hours until completely frozen and desired texture.

Cover with plastic wrap if not serving immediately.

tags: rhubarb, kewra, granita
categories: drinks & cocktails, recipes, all-4, desserts-1
Monday 05.09.11
Posted by Aliya LeeKong
 

Mahlab

View fullsize mahlab-pic1-500x412.jpg
View fullsize mahlab-pic2-500x412.jpg

Mahlab

A few weeks ago, I made some yummy cherry clafoutis.  The tradition is to leave the cherries whole in the dish, pits and all, because the pits impart this amazing, complex, nutty, almond flavor (though a complete annoyance to eat!).  I used a bit of almond extract in my recipe to bring some of that flavor into play, but, if I had thought about it a bit more, I would have ground up mahlab and added it to the batter.

These adorable little guys are found within the pit of a certain wild black cherry that’s indigenous to parts of Europe and the Middle East.  The kernels are dried and usually ground to a powder before being used in cooking.  The flavor definitely has notes from the cherry as well as a bitter almond flavor.  It’s not unlike marzipan with a touch of aftertaste and certainly has a floral quality to it.

Mahlab is more often used in baking than anything else – Greek, Armenian, Lebanese pastries all include ground mahlab (also called mahleb, mahlepi, mahalab).  In Egypt, it’s used as part of a sweet dip for bread that includes honey, sesame seeds, and olive oil.  Once cherry season hits, I will be baking up a storm with this stuff – I envision cherry and sweet cheese tarts with hints of this spice.  I also think it would be incredible in ice cream or a luscious panna cotta.

Mahlab does not have a long shelf life and keeps better in its whole form.  I like to buy the seeds and just grind a bit when I need some.  Like mace, nutmeg or even cayenne, a little goes a long way, so use conservatively.  It takes a bit of time for your palate and hand to become balanced with this one, so remember to taste constantly when adding.

tags: Mahlab, ingredients
categories: spices-1, all-4
Friday 05.06.11
Posted by Aliya LeeKong
 

Pork Belly “Griot”

View fullsize belly-pic1-500x333.jpg
View fullsize belly-pic2-500x333.jpg
View fullsize belly-pic3-500x166.jpg
View fullsize belly-pic4-500x166.jpg

Pork Belly “Griot”

A signature dish in Haitian cooking is Griot.  Cubes of pork shoulder are marinated overnight or for a few days in a combination of habanero chile, garlic, shallot and bitter oranges.  The pork is then stewed in its juices until cooked through.  Finally, the delectable pieces are deep-fried to a crispy finish and served with an eye-wateringly good sauce, Sauce Ti Malice, again spiked with habanero.

My version of this dish is a bit labor-intensive, I have to admit, but is completely worth it.  If you are one of those people that shy away from fatty pieces, this dish is not for you, but for those that love pork belly, the method I used can be adapted to any flavors you like and results in a meltingly delicious dish.

I like to start by brining the pork belly to keep it juicy during the cooking process.  I infuse the brine with the same marination ingredients used in the original dish. If you have extra time, you can start with a dry marinade the first day, then brine and cook the next, and finish the third.  Whew!  Three day pork belly…are you up for the challenge?

The belly is then cooked confit, which is to say its cooked in its own fat.  You can use olive oil or duck fat if you like as a substitute.  I like the belly to cool in the cooking fat overnight.  The flavor develops, and, in fact, since confit has long been used as a method of preservation, you can keep it like that for at least a week.  The belly is then carved up, seared to create a crisp exterior, and served however you like.  I make a Haitian habanero-infused vinegar, called pikliz, and dress a light salad with it.  The pork belly is crackingly crisp with an indescribable melting tenderness, peppered with hints of garlic and habanero.  Enjoy!

Ingredients

Serves 6 to 8 as an entrée; serves 12 to 16 as an appetizer

1 (3 ¼-½ lb) pork belly, with skin

3 lbs lard (or olive oil / duck fat to cover)

Brine:

9 cups water

1 ¼ cups kosher salt

1/3 cup light brown sugar

12 garlic cloves, minced

2 shallots, minced

zest of 1 lemon

zest of 2 oranges

2 habanero peppers, minced

2 tsps black peppercorn

4 cloves

8 bay leaves

1 small bunch of thyme

Procedure

As I mentioned, I infuse the brine with the flavors of a typical Haitian griot marinade.  If you have time, you can marinate the pork belly in the garlic, shallots, zests, and habaneros overnight, and make the brine without these ingredients.  Otherwise, we’ll start with the brine.

In a medium-sized saucepan, heat 4-5 cups of the water with all brine ingredients.  Cover and bring up to a boil.  Boil covered for 2 minutes and then pour into a pitcher that contains the remaining amount of water, making sure that this water is ice cold (to cool down brine).  This allows you to save time and not wait for the brine to cool thoroughly before pouring over the pork belly.

I like to use a 1 to 2 gallon ziploc freezer bag for the brining.  Place the belly in the bag and pour in the cooled brine.  Remove as much air as possible before sealing.  Let brine at room temperature for 5 hours.  Conversely, you could also keep it in the refrigerator overnight for a maximum of 8 to 9 hours.

Preheat oven to 225° F.

Melt lard in a dutch oven.  Remove pork belly from brine, rinse off excess salt and ingredients, and dry thoroughly.  Carefully, slip pork belly into the lard and cook in oven for 3 ½ to 4 hours until fork tender.  Move belly to a baking dish or other storage container and cover completely in lard.  Refrigerate for a minimum of 12 hours.

To finish, make sure the pork belly has had time to sit out, so the lard can easily be wiped of.  Remove skin with a sharp knife (it peels off pretty easily).  Cut into serving-sized pieces (smaller for hors d’oeuvres or appetizer, larger for entrée size).

Heat a large skillet over medium-high heat.  Pan should be pretty hot.  Place pork belly, fat side down into the skillet and reduce heat to medium-low.  Some of the fat should render out – pour out if too much is accumulating in the pan.  Flip, when brown (3 to 5 minutes), and finish the other side.  If it’s a thick piece, after browning, place on a baking sheet in a 300° F oven to warm through.

tags: pork belly, griot, Haitian cooking
categories: appetizers, recipes, all-4, main dishes-1
Monday 05.02.11
Posted by Aliya LeeKong
 

Kewra (Pandan or Screw Pine Essence)

View fullsize kewra-pic1-500x333.jpg
View fullsize kewra-pic2-500x166.jpg

Kewra (Pandan or Screw Pine Essence)

How do I even begin to describe this incredible extract?  Heady. Floral.  More of a scent than a flavor, disarming even…For me, the scent of kewra is indelible, reminding me of growing up, time spent with family and the amazing treat of drinking water or milk sweetened with rooh afza, a syrup infused with screw pine essence and rose.  It brings a smile to my face, the pure definition of a taste memory.

Essences that are used in Asian and Middle Eastern cooking like orange blossom water or even rose flavoring are becoming more and more accessible, but this unique extract has yet to make the jump.  Screw pine essence is also called kewra extract (a slightly milder version) or pandan extract and is distilled from the pandanus flowers.  It’s used in Asian cooking in both sweet and savoury applications – drizzled over biryani, part of South Asian sweets, in Thai kaya (a coconut jam) or sweet rice.

Literally, a few drops over plain jasmine or basmati rice…it can transport a meal!  It adds complexity and, again, it’s more of a scent, so it doesn’t interfere with all of the other spices.  I LOVE it in desserts.  It’s wonderful with cream or milk-based ones, but it’s also beautiful with fruit; I’ve been working on a lovely granita recipe as of late with seasonal rhubarb and kewra.

I advise looking for kewra or the transparent /light yellow liquid version of screw pine extract.  It also comes in a green paste form, which I find to be a bit overpowering and which also colors your food green.  You can pick screw pine up at most Asian grocers.

tags: kewra, screw pine essence, screw pine, pandan
categories: all-4, spices-1
Friday 04.29.11
Posted by Aliya LeeKong
 

Harissa-Cheese Stuffed Fried Olives

View fullsize olive-pic1-500x333.jpg
View fullsize olive-pic21-500x333.jpg
View fullsize olive-pic3-500x166.jpg

Harissa-Cheese Stuffed Fried Olives

When I opened up the menu at Balaboosta a few weeks back, the words Fried Olives jumped off the page and into my imagination.  I tasted them mentally before they even got to the table, and then when they did…let’s just say it only reinforced the fact that I’m trying these goodies way too late in life.  Why are they NOT more popular?  The world (or at least you lovely readers) should know about this delicacy…

I did a bit more research, and it seems like fried olives may have originated in the Le Marche region of eastern Italy.  There, they take pancetta, ground meats, cheese, herbs and spices and stuff large green olives, breading them and then deep-frying them to a golden crisp.  Olive all’Ascolana is the name of the dish.

I felt a slightly North African take on this tradition would be delicious.  I stuffed them with a spicy, harissa cream cheese before rolling them in breadcrumbs laced with freshly grated Parmigiano-Reggiano.  A bit of tang from the cream cheese, some fiery heat from harissa, a touch of sweetness from honey – the briny olives become even more complex and with a deeply satisfying, deep-fried crunch.  If you have never tried fried olives, now is your chance.  They are incredibly easy to make and work for everything from a movie night to an elegant hors d’oeuvres for a dinner party.  Enjoy!

Ingredients

Yields 50 fried olives

2 tbsps ricotta cheese, room temperature

2 tbsps cream cheese, room temperature

2 tbsps harissa*

2 tsps honey

50 large pitted green olives, rinsed and dried**

½ cup panko or plain breadcrumbs

¼ cup parmesan

¼ cup flour

1 egg, beaten

Oil for frying

fleur de sel (optional)

Procedure

In a bowl, mix together ricotta, cream cheese, harissa, and honey until uniform.  Transfer to a pastry bag fitted with the smallest pastry tip you have.  You can also use a Ziploc bag to do this, and use scissors to cut off a small piece of the corner of the bag.  Pipe filling into all of the olives.

Set up a dredging station.  Mix together the breadcrumbs and parmesan in one bowl.    Place the flour in another and the beaten egg in between.  Roll the olives in the flour and dust off any excess.  Dip into the egg and then roll in the parm-breadcrumb mixture until all are coated.

In a dutch oven or pot, heat 3 to 4 inches of oil to 360° F.  Carefully, drop olives into the oil, working in batches depending on the size of your vessel.  Fry until a deep golden brown and remove to a paper towel-lined plate.  If the olives are not too salty, sprinkle with a little fleur de sel.

Let cool slightly before serving / eating.

* For harissa you can use my version here or use the store-bought kind.  Feel free to adjust the amount to your heat tolerance depending on the type of harissa you end up using.

**For the olives, I like to use the ones that are oil-cured, rinsing them of any herbs and spices and then drying them thoroughly.  Water and hot oil don’t do well together, so I would avoid using olives soaked in a water-based brine that may have absorbed some of the liquid.


tags: stuffed olives, harissa, fried olives, hors d'oeuvers, holiday recipes
categories: all-4, appetizers, recipes, vegetarian
Monday 04.25.11
Posted by Aliya LeeKong
 

Heavenly Jaggery

View fullsize gur-1-500x333.jpg
View fullsize IMG_7323-500x333.jpg

Heavenly Jaggery

This ingredient is like a secret weapon – it adds sweetness (but not too much), caramelized overtones and even a bit of nuttiness in my opinion.  If you have never tasted jaggery, or gur in Hindi, it’s addictively delicious, and for the seasoned cook, will readily become a substitute for sugar in desserts or even for adding measured sweetness to savoury dishes.

Jaggery is unrefined, naturally processed sugar cane, date palm or even coconut palm sap.  The sap is boiled down and formed into blocks, and the color varies from golden to a deeper brown.  With less processing comes less depletion of vitamins and minerals, and jaggery is even used in Ayurvedic medicine to treat a host of health issues.

When I was in Goa, jaggery was used, not only because of its incredible taste, but because it’s much cheaper than refined sugar.  A form of this unrefined, economical sugar is found in cuisines around the world from South Asian to East Asian to West Indian and Latin American.  Chancaca, piloncillo, and rapadura are common Latin American names for it, where it is found in a similar block form, but I’ve even seen it here in Dean and Deluca broken up and labeled palm sugar.

What I love about jaggery is really its truly unique flavor – some crazy combination of molasses, brown sugar and butterscotch…but just not that sweet.  It also has a low melting and high burning temperature, so it works well in everything from sauces to dry rubs.  Its block form requires chopping it up or, better, crushing it with your fingers to use it (part of the joy of cooking…).

Online purveyors carry it and even Amazon, but you can find it at most ethnic grocers under one of the numerous names it goes by.  As I mentioned, it varies in color – go for the darker version for the most complex and rich taste.

tags: jaggery, gur
categories: all-4, spices-1
Friday 04.22.11
Posted by Aliya LeeKong
 

Amarena Cherry & Dark Chocolate Clafoutis

View fullsize amarena-pic11-500x333.jpg
View fullsize amarena-pic2-500x333.jpg
View fullsize amarena-pic3-500x166.jpg

Amarena Cherry & Dark Chocolate Clafoutis

I am showing you all of my cards today.  A secret of mine is whenever I am having guests over and haven’t given dessert much thought, I fall back on my old standby of dark chocolate and cherries.  I create a dessert – a tart, a pudding, a trifle, whatever – where I can work in those flavors, often with heavy doses of cream.  I think it started from childhood, where black forest was my birthday cake of choice (yes…every year).  It’s such a beautiful combination and, I think, a real crowd pleaser.

I have already professed my love for all things amarena cherry, so when trying to think of delicious ways to cook with them, I decided to (1) keep it simple and (2) not resist the urge to combine them with dark chocolate.  On the first point, I went with a clafouti because cherries in clafoutis are a time-honored, classic tradition.  Of course, I then had to go and grate dark chocolate all over them.

Clafoutis should be part of your culinary arsenal.  The sweetened, crepe-like batter takes literally minutes to make in your blender, and you can use most fruits you like – cherries, blueberries, strawberries, plums.  The fruit is spread in a baking dish or, like here, in individual ramekins, batter is poured in, into the oven and, within the hour, you have a beautiful, custardy, fruity dessert.  Here, I drain Amarena cherries (in syrup) in lieu of fresh fruit, since it’s not quite the season yet.  I also reduced the sugar amount because of that, so bump it up if you are using fresh fruit.  I love the shaved dark chocolate as well – just gives it a nice finish.  Enjoy!

Ingredients

Yields 6 6-ounce ramekins

2 eggs

1/2 cup heavy cream

1 tbsp vanilla extract

2 tsps almond extract

3 tbsps light brown sugar

1/8 tsp salt

¼ cup all purpose flour, sifted

butter and white sugar for greasing/dusting ramekins

1 cup Amarena cherries, drained of syrup

dark chocolate for grating

confectioner’s sugar, for garnish (optional)

Procedure

Preheat oven to 375° F.

In a blender, blend together eggs, heavy cream, extracts, sugar and salt.  Add flour and blend for 10 seconds.  Scrape down the sides and blend for another 10 to 15 seconds until flour is incorporated and there are no lumps.  Rest batter in the refrigerator for 15 minutes.

Grease the ramekins and lightly dust with sugar, shaking out any excess, and place on a large baking sheet.  Spread the cherries evenly between the ramekins.  Pour batter evenly into the six ramekins.  Using a microplane or other grater, grate dark chocolate (to your desired level) over each.

Transfer baking sheet into the oven and bake for 15 to 20 minutes until lightly browned.  Remove and let cool slightly before serving.   Dust with powdered sugar, if desired.


tags: Clafoutis, Amarena Cherry, dark chocolate
categories: all-4, recipes, desserts-1
Monday 04.18.11
Posted by Aliya LeeKong
 

Tunisian Tabil

View fullsize tabil-pic1-500x333.jpg
View fullsize tabil-pic2-500x519.jpg

Tunisian Tabil

Quatre épices, berbere, dukkah, baharat, paanch phoron, ras el hanout, Chinese five spice, evencurry…distilling a host of spices into a mix that’s easy to use and embodies the true flavors of a cuisine.  Tunisia’s version is called tabil, a word that loosely refers to “seasoning” in Arabic but has now come to mean this coriander-heavy spice blend.

Tabil includes a fragrant blend of (at its most) coriander, caraway, anise, fennel, garlic, red pepper, black pepper, cumin, clove and turmeric, and (oftentimes) some subjective subset of those spices.  To mimic the Tunisian sun, homemade versions rely on dry roasting the spices before combining.  The blend is used in stews, to flavor meat, poultry, stuffings, soups and vegetables and, besides harissa, is a foundational ingredient in Tunisian cooking.

The first time I tasted tabil, I went straight to the kitchen and made pork meatballs heavily seasoned with it.  Amazing.  The licorice-y fennel and anise bring out all that’s best in the pork.  I also love it with winter or summer squash, sweet root veggies, and to enhance your basic oven-roasted potatoes.  On the lighter end, a beautiful mixed green salad with toasted pistachios or pinenuts and citrus work beautifully with a salad dressing using tabil as the base.

There are so many imaginative ways to work in this spice, and although you can grind it to powder form, I’m a fan of leaving it a bit coarsely ground.  I love when a red pepper flake or bit of caraway lingers a touch longer after a bite.

tags: tabil, spices, spice blend, Tunisian spice blend
categories: all-4, spices-1
Friday 03.25.11
Posted by Aliya LeeKong
 

Spicy Creole Ketchup

View fullsize ketchup-pic1-500x333-150x150.jpg
View fullsize ketchup-pic2-500x333.jpg
View fullsize ketchup-pic3-500x166.jpg

Spicy Creole Ketchup

As a promised follow up to the smoked herring croquettes I posted on Monday, here is a delicious dipping sauce for them or wherever you’d usually use ketchup.  In Haiti, smoked herring is often eaten in a Creole sauce that contains onions, tomatoes, habaneros, vinegar and ground cloves.  To me, that translates almost directly to ketchup!

If you read the recipe, one thing I do might seem a bit strange if you haven’t seen it before.  I cook the sugar in oil first, almost to the point of burning.  This is actually how a lot of West Indian stews start off, though many use a jarred product called browning which is effectively the same thing.  It imparts a caramelized flavor that isn’t altogether unlike molasses, and it worked really well as a ketchup base.

The resulting ketchup is a touch smoky, with heat from the habaneros and spice from the cloves and nutmeg.  It will keep for weeks as is but is also safe to load into sterilized bottles if you wish to keep it longer.  Enjoy!

Ingredients

Yields approximately 2 cups

1 (28-oz) can whole tomatoes in purée

2 tbsps olive oil

1/3 cup dark brown sugar

1 small red onion, cut into a medium dice

½-1 habanero pepper, seeded and ribbed, finely chopped

healthy pinch of ground cloves

healthy pinch of ground nutmeg

4 cloves garlic, minced

1 tbsp sundried or regular tomato paste

1/3 cup cider vinegar

Salt to taste

Chives, finely chopped

Procedure

In a blender, pour entire contents of the can of tomatoes and purée until smooth.

Heat a heavy saucepan over medium heat.  Add oil.  Add sugar and cook stirring for 2 to 3 minutes until the sugar turns gelatinous and sticks together.  It should darken in color, and you should smell like its about to burn.  Add chopped onion, habanero, and spices, and cook for another 4-5 minutes until the onions have softened.  Don’t worry if the sugar solidifies when you add the onions – it will redissolve.  Add minced garlic and tomato paste and cook for another 2 minutes.

Add puréed tomatoes and vinegar.  Bring to a slow bubble and simmer for an hour, stirring every now and then.

Remove from the heat and let cool.  Return everything to the blender and purée until smooth.  Refrigerate for at least 2 hours before serving.  Fold in chopped chives before serving.  This ketchup will keep for about a month – longer if placed in sterilized jars.

tags: ketchup, condiments, dipping sauce, spicy, Creole recipes
categories: all-4, condiments, appetizers, recipes
Wednesday 03.23.11
Posted by Aliya LeeKong
 

Smoked Herring Croquettes

View fullsize herring-pic1-500x333.jpg
View fullsize herring-pic3-500x333.jpg
View fullsize herring-pic4-500x161.jpg

Smoked Herring Croquettes

One of the infinitely amazing things about living in New York City is the rich food culture and history we have.  There are grocers or markets or shops to cover every ethnic cuisine, and, if you are a boutique food shopper like me, there is so much pleasure to be derived from sourcing ingredients, exploring shops, and developing your “go-to’s”.

If you live in the city and haven’t been to the Lower East Side institution, Russ and Daughters, you are missing out on some world famous smoked salmon and one of the best sources for Eastern European Jewish foods.  The shop has been around since 1914, and they have everything from hand-rolled bagels and spreads to caviar and halvah.

This is another recipe I developed for the event I’m cooking for in April.  Smoked herring is eaten throughout the Caribbean, and Russ and Daughters has some lovely, really woodsy fillets.  I was inspired by a Haitian dish that has smoked herring in a Creole sauce to create these crisp and fluffy croquettes.  I’m still working on a recipe for a Creole ketchup of sorts to dip these into so look out for that, but these would be delicious with an aioli, a mustard-based sauce, or just by themselves.

I love using beautiful Yukon gold potatoes in croquettes like these.  You get all of the flavor of the smoked herring, which is pretty intense (warning: use gloves when handling the herring unless you want your hands to smell like them for days…), but the potatoes lend a pillowy lightness.  You can bread them in Panko if you like, but I went for old-school Progresso plain breadcrumbs to get the texture I wanted. Crispness followed by a delicate bite, smoky, salty, a touch of heat…these are fantastic as hors d’oeuvres but could be made bigger or flatter into a cake and pan-fried for a great appetizer or entrée.  Enjoy!

Ingredients

Yields approximately 2 dozen croquettes

2 medium-sized Yukon gold potatoes, peeled and quartered

2 smoked herring fillets*

2-3 tbsps unsalted butter

1 shallot, finely diced

½ habanero, minced

3 garlic cloves, minced

1 green onion, finely minced

1 ½ tbsps cilantro, finely chopped

1 egg yolk

Salt and freshly ground pepper

1 egg, beaten

½ cup plain breadcrumbs

Frying oil

Procedure

In a saucepan or small pot, cover potatoes with cold water by 1 inch.  Bring up to a boil and boil, uncovered, for 20 minutes until very tender.  Drain and set aside.

In another medium-sized saucepan, bring water up to a simmer.  Add herring filets and simmer for 2 to 3 minutes, just until cooked through.  Remove and drain / dry off thoroughly.  Flake into a bowl and set aside.

Heat a small sauté pan over medium-low heat. Add butter.  Once foam subsides, add diced shallot, habanero and a pinch of salt to draw out the moisture.  Cook for 2 to 3 minutes until shallot is translucent.  Add garlic and cook for another 30 seconds to a minute and remove from heat.

In a bowl, mash potatoes.  Add flaked herring, shallot mixture, minced green onion, chopped cilantro and egg yolk.  Combine thoroughly and season to taste.

To form the croquettes, I like to use a small ice cream scoop or medium melon baller to get uniform pieces. Then, I use my hands to shape them into balls.

Set up a breading station with a bowl each for the egg and breadcrumbs.  Dip croquettes in the egg and then coat with breadcrumbs, shaking off any excess.

In a dutch oven or pot, heat 3 to 4 inches of oil to 360° F.  Carefully, drop croquettes into the oil, working in batches.  Fry until a deep golden brown and remove to a paper towel-lined plate.

Serve warm with dipping sauce of your choice.

*The smoked herring fillets I got were deboned for the most part (except for a few pin bones).  They also were not extremely salty.  If you are using salt-crusted or salt-cured smoked herring, you want to soak the herring in several changes of boiling water to remove some of the saltiness.  Again, use gloves when handling unless you want to smell like smoky fish for days…

tags: croquettes, smoked herring, seafood recipes
categories: all-4, appetizers, main dishes, recipes
Monday 03.21.11
Posted by Aliya LeeKong
 

Amarena Cherries

View fullsize amarena-pic1-500x333.jpg
View fullsize amarena-pic2-500x333 (1).jpg
View fullsize amarena-pic3-500x373.jpg

Amarena Cherries

Last Sunday, I was perusing Brooklyn Larder (an amazing store in Park Slope focused on cheese, handmade prepared food, and specialty grocery) with friends when I came across these Amarena cherries.  I happened to read about them just the week before, so I was giddy that fate intervened and there they were right before me.  The thrill of food discovery on a random afternoon at my fingertips, I nabbed a bottle, cracked it open in the store (after paying of course…) and plastic spooned a few of them into my mouth.  HEAVEN.

Amarena cherries are small, dark, sour cherries from the Emilia-Romagna region in Italy.  They are preserved in a tart, sugar syrup, and this particular brand includes ingredients like clove, cinnamon, lemon peel and sweet almond oil, a truly spectacular combination.  There is another brand that is a bit more popular, Fabbri, with a nearly hundred-year-old tradition, a cool porcelain bottle and (of course!) a secret syrup recipe…

In my opinion, these cherries are everything a cherry should be – sweet, a bit tart, soft but still toothsome, with a robust cherry flavor.   My mind has been racing with ways to use these in cooking; I feel like I have to really highlight their taste, so look out for recipes in the coming weeks.  Otherwise, these make an incredible topping for ice cream or panna cotta.  I envision them in a simple champagne cocktail or spooned over a sponge cake with whipped cream for a cherry shortcake of sorts.  It’s completely legal as a breakfast food, so I can only imagine how incredible these would be on top of hot, cinnamon waffles.

Unfortunately, these luscious cherries are not cheap because they are imported from Italy and a high quality product.  BUT they are completely splurge-worthy!  and I’m sure they go a long way if you are not opening up the fridge, cracking off the top and spoon feeding yourself at intervals like I am…

tags: amarena cherries, sour cherries, ingredients
categories: all-4, spices-1
Friday 03.18.11
Posted by Aliya LeeKong
 

Crab & Callaloo Quiche

View fullsize quiche-pic1-500x333.jpg
View fullsize quiche-pic2-500x333.jpg
View fullsize quiche-pic3-500x333.jpg
View fullsize quiche-pic4-500x166.jpg

Crab & Callaloo Quiche

So I’ve been flushing out dishes for an event for April.  The event is for Heifer International and honors their Pass on the Gift tradition, specifically for their Haiti projects.  It’s an incredible organization that promotes sustainable solutions for impoverished families worldwide, and I’m really excited to be involved with them.

I’m designing some Haitian-inspired dishes for the event, and this one comes from a popular West Indian side called callaloo, made from the eponymous greens.  The greens are the leaves of the dasheen bush or taro plant and are also used in Pacific Island and Asian cooking.  They can be found at West Indian markets but swiss chard, spinach and even collards make a great substitute here.

Callaloo, the side, is thick and stew-like with roots tracing back to West Africa.  The greens are flavored with salt pork, shallots or onions, garlic, ginger, habanero pepper and bouillon.  The mixture is roughly blended and coconut milk is used to thin it out.  Oftentimes, crab is added, and it’s such a rich, distinctive dish.  I was eating a spinach and bacon quiche one day, and the callaloo just mentally translated. I had to see what would happen if I changed its form.

My husband went a bit nuts for this, I have to admit.  He grew up eating callaloo and couldn’t get over how the flavor of the dish could transplant into a quiche.  The greens, the crab, a salty porkiness, garlicky and heat from the chilies – it’s an exciting combination.  Oh, and this crust recipe, though involved as most tart shells are, is pretty easy and foolproof as far as crusts go – crunchy, buttery and neutral (could definitely work for sweet applications).  It’s my go-to crust.  Enjoy!

Ingredients

Crust:

1 ½ cups all-purpose flour

¾ tsp salt

¼ tsp sugar

1 stick unsalted butter, cold and cut into small cubes

1 egg

1 tsp water

Filling:

1 slice thick-cut bacon, cut into small dice

½ habanero pepper, seeded and ribs removed, minced

1 small shallot, cut into a small dice

¼  tsp minced ginger

2 or 3 cloves garlic, minced

1 bunch callaloo, spinach, or swiss chard, roughly chopped, blanched and squeezed of excess water* (equivalent to 1/3rd cup cooked)

¼ lb peekytoe, lump, or jumbo lump crabmeat

1 scallion, finely chopped

1 tsp fresh thyme, finely chopped

1 tbsp cilantro, finely chopped

1 egg

2 egg yolks

3/4 cups coconut milk

Salt and freshly ground pepper to taste

Procedure

Preheat oven to 375° F.

For the crust, in a food processor, pulse together flour, salt and sugar.  Scatter the cold cubes of butter over the dry ingredients and pulse until the butter is cut in and the texture looks like sandy peas or a coarse meal.  In a small bowl, lightly beat together the egg and water.   Add in increments, pulsing, until the dough sticks together.  There will still be a lot of crumbly bits that haven’t incorporated – that’s okay.

Turn the dough out onto a work surface or a piece of parchment paper.  LIGHTLY, knead the dough to make sure everything is incorporated.  I literally just press it together a bit.  Place into plastic wrap and create a flattened disk.   Refrigerate for a minimum of 2 to 3 hours (and up to a day).

On a floured work surface or in between pieces of parchment paper (with flour), carefully roll out the dough with a rolling pin until uniform thickness and large enough for a 9 or 9 ½ inch tart shell.  Carefully transfer to the greased tart shell and press carefully into the sides.  Try not to stretch the dough at all.  Trim any excess edges and dock or prick holes all over the surface of the dough with a fork.  Wrap shell in plastic wrap and freeze for a minimum of a half hour.

Remove tart shell from freezer and plastic wrap and place on a baking sheet.  Fit a piece of parchment paper on the surface of the dough and weight down with dried beans or baking weights.  Bake for 20 minutes.  Remove baking weights or beans and parchment paper and bake for another 10 minutes to brown.  Let cool slightly.

Turn oven temperature down to 350° F.

For the filling, heat a medium skillet over medium-high heat.  Add bacon and brown.  Remove bacon with a slotted spoon and transfer to a paper towel-lined plate.  Turn heat down to medium-low, and add pepper, shallot and ginger.  Add a touch of salt to draw out the moisture.   Cook for 2 to 3 minutes until shallots are translucent.  Add garlic and cook for another minute until fragrant.  Remove to a bowl and let cool.

Add to the shallot mixture, the browned bacon, blanched callaloo, crab, scallion, thyme and cilantro.  Mix thoroughly and season to taste.

In a separate bowl, beat together egg, egg yolks and coconut milk and lightly season.

Spread crab and callaloo mixture evenly over the bottom of the tart shell.  Pour egg / coconut milk mixture evenly on top.  Bake for 25 minutes.   The edges should be firm and the middle slightly jiggly.

*Callaloo should NOT be eaten raw.  It contains a toxin, calcium oxalate, that can cause itching and constriction of the throat. Always cook callaloo thoroughly before consuming.  To blanch the callaloo or other greens, bring water in a medium-sized pot up to a boil.  Add a great deal of salt.  Also, prepare an ice bath (a bowl with ice and cold water).  Add callaloo to pot.  Cook for 2 to 3 minutes.  Strain and plunge into the ice bath to stop cooking.  Remember to wring out any excess water from the greens.

tags: crab, callaloo, quiche, brunch recipes
categories: all-4, breakfast, main dishes, recipes, vegetarian-1
Monday 03.14.11
Posted by Aliya LeeKong
 

Verjus

View fullsize verjus-pic1-500x333.jpg

Verjus

Although this ingredient has been used in restaurants for years, it hasn’t somehow caught on for homecooking, which is a pity.  Verjus literally translates to “green juice” and is the pressed juice of unripened grapes (red, white or a mix).  It is often a biproduct of the wine-making process, made from the higher acid grapes that winemakers remove from the vines before the ripening process.

Unlike wine, however, the grapes are not fermented and so aren’t alcoholic.  Verjus became popular in the Middle Ages in Europe and can be found in many a French sauce.  However, verjus or verjuice has long been used in the Middle East, namely Syria and Lebanon where it is calledhusroum and in Iran where it’s known as abghooreh.

The flavor of verjus is acidic, but gentle, and a bit sweet.  It’s somewhere on the scale between wine and vinegar with white having a slightly sharper character and red one more earthy and round.  A good rule of thumb is that you can basically use it anywhere that calls for lemon juice.  It is great in salad dressings when you don’t want that over-the-top-mouth-puckering vinegar flavor.  It’s also delicious to poach fruit, and I love it for marinades, to deglaze a pan, or add a little complexity to a sauce, particularly sauces that have a sweeter edge to them like barbeque.

You can find verjus at most gourmet stores these days.  Once opened, a bottle will keep in the fridge for about 2 months or so.

categories: all-4, spices-1
Friday 03.11.11
Posted by Aliya LeeKong
 

Mimolett

Mimolett

I’ve talked a bit about my trip to Turkey and what an extraordinary culinary destination it is.  But what I haven’t mentioned are the personal trials and tribulations I experienced getting there – 2 days stuck in JFK  (folded over chairs and publicly toothbrushing), missed connecting flights, luggage that apparently never left JFK (we found out in Cappadocia…), and, most importantly, lost time that pushed back the whole trip and my packed food schedule!  By the time I got to the second city, Istanbul, I was exhausted and debated staying in for the night rather than visiting this stunning restaurant, Mimolett.  So happy I went…

Photo: Mimolett

First, the restaurant is in the Picadilly Circus-equivalent of Istanbul.  It qualifies as destination dining.  But if you can get past that (and you should), the space is ridiculously unassuming and decadent all at the same time.  A classic bar, descent into a double-height dining room in warm neutrals with dark wood, an intimate chef’s table outside an open kitchen, a wine boutique with tasting room and beautiful outdoor seating with breathtaking views of the Bosphorus.

Photo: Mimolett

I had the opportunity to chat at length with the chef, Murat Bozok, who has a compelling story.  After getting his business degree in Istanbul with the family’s hopes that he would work for their textile company, he decided to uproot, move to the States, and get his culinary degree.  He worked for a few big hotels after but had his eyes on fine dining and learning from the best chefs in the world.  He sought out the likes of Pierre Gagnaire, Gordon Ramsay and Joel Robuchon  – and ended up working for them all!  Perfect training grounds for his eventual return to Istanbul and the opening of his flagship restaurant, Mimolett.

Photo: Mimolett

And the food is executed with the detail he picked up at all of these incredible places.  Delicate soups laced with truffle, rabbit meatballs he adapted from his friend’s mother, lauded foie gras.  I’ve chatted with him since my amazing meal there, and, he’s pushed beyond his French repertoire and created a Turkish-focused degustation menu for which I’m sad I haven’t gotten to experience.

Murat is building a brand for the future and has upcoming appearances on Masterchef.  Watch out for him to become the first Michelin-starred chef of Turkey!

tags: Turkey, Istanbul
categories: all-4, travel
Wednesday 03.09.11
Posted by Aliya LeeKong
 

Peruvian-Style Roast Chicken

View fullsize chick-pic1-500x333.jpg
View fullsize chick-pic2-500x333.jpg
View fullsize chick-pic3-500x333.jpg

Peruvian-Style Roast Chicken

A few weeks back on Facebook, I asked people to share their favorite family dishes – authentic, traditional food they love to eat at home.  As you know, I love to take old world flavors and traditions and reinvent them in ways that we can use in our every day cooking.  One dish that came up was aji de gallina, a typical Peruvian dish.  Chicken is cooked and topped with a rich creamy sauce that includes walnuts, garlic, breadcrumbs, and parmesan and is spiced with the yellow aji amarillo pepper.  The sauce is incredibly addictive and the aji lends such distinctive flavor and just the right amount of heat.

I had a craving the other night for roast chicken, which I think is the ULTIMATE in winter, comfort food.  Roast chicken is also a complete blank canvas, and, like everyone else, I’m constantly searching for ways to take it to the next level.  When I looked at the components of the Peruvian sauce, the ingredients called to mind a tasty stuffing, so I decided to convert aji de gallina into a roast chicken spiced with aji amarillo and filled with a beautiful, nutty, cheesy stuffing.

If you can get past the whole trussing part, roast chicken is extraordinarily easy and satisfying to make.  This recipe creates a gorgeous result – golden brown, tender and juicy, and snap-crispy skin.  The aji and cumin butter rub is what gives the skin that great texture.  The stuffing – bacon, onion, garlic, spices, walnuts, parm – creates the moisture inside the chicken.  I always make a little more stuffing than what fits in the bird and throw it into some ramekins because stuffing always goes quickly!  Enjoy!

Ingredients

Stuffing:*

2 slices thick-cut bacon, cut into small dice

1 medium onion, diced

1 ½ tsps ground aji amarillo

½ tsp ground cumin

3 or 4 garlic cloves, minced

½ cup white wine

¼ cup chicken stock

¼ cup heavy cream

5 slices white Pullman bread, cubed

½ cup raw walnut halves, toasted and crushed

1/3 cup ground parmesan

1 egg, beaten

Chicken:

5 tbsp unsalted butter, room temperature

1 ½ tsps ground aji amarillo

½ tsp ground cumin

1 4 – 5 lb roasting chicken

salt and freshly ground black pepper

Procedure

Before I start, there are a few keys to a crispy, succulent roast chicken.  First, the chicken must be completely dry.  After removing the covering and rinsing and drying the inside of the chicken, I like to place it, uncovered, on a rack on a baking sheet on a low shelf in the fridge (not touching anything!).  I leave it there for a couple of hours or even up to a day.  The air circulates and dries out the chicken from all sides.  Second, the chicken has to be at room temperature before putting it in the oven.  Take it out of the fridge at least an hour before you plan to cook.  The next things are a hot starting temperature and lots of salt!  Which we’ll get to…

Preheat the oven to 475° F.

For the stuffing, in a medium skillet on medium heat, add the diced bacon.  Cook for a few minutes until browned and crispy, remove using a slotted spoon to a paper towel-lined plate, and set aside.  Add the diced onion, aji, and cumin back into the pan with the bacon fat (should be enough but add a little oil or butter if not).  Cook for 3 to 5 minutes until the onions are translucent, add the minced garlic and cook for another minute.  Add the white wine and let reduce, stirring, until it’s almost all evaporated.  Add in the chicken stock and cream and reduce the heat, simmering for another 2 to 3 minutes until thickened.  Remove from heat and let mixture cool.

In a large bowl, add the bread cubes, crushed walnuts, parmesan, egg, bacon and onion mixture.  Stir to evenly distribute.  (Don’t do this until you are ready to stuff the chicken, so the stuffing doesn’t get soggy.)

For the chicken, combine softened butter with aji and cumin.  Massage butter all over the outside and inside of the bird.  Season generously with salt and freshly ground black pepper, and stuff with the stuffing.

At this point, you want to truss the bird for even cooking.  Here’s a great video (http://ruhlman.com/2010/07/how-to-truss-a-chicken.html) .

Place the stuffed, trussed chicken on a rack in a roasting pan, breast-side up, and into the oven.  Cook for 25 minutes and reduce the heat to 375° F.  Cook for another 45 minutes or so.  The safe internal temperature of cooked chicken is 165° F.  I check the temperature with a thermometer inserted into the thigh joint and actually take mine out of the oven around 155° F.   I then rest it on a cutting board for 15 minutes to finish cooking.

Slice (the juices should run clear) and serve!

*For this dish I create more stuffing than I can fit in the bird because I don’t think what can fit inside is enough for a side dish!  I like to take the leftover stuffing and throw it into buttered ramekins or a small, greased baking dish.  For the last 25 minutes of cooking, I throw the excess stuffing into the oven and let it get browned and crispy.

tags: roast chicken, Peruvian cooking, comfort food, recipes for winter
categories: all-4, recipes, main dishes-1
Monday 03.07.11
Posted by Aliya LeeKong
 

Yuzu Kosho

View fullsize yuzu-kosho-pic1-500x333.jpg
View fullsize yuzu-kosho-pic2-500x333.jpg
View fullsize yuzu-kosho-pic3-500x333.jpg

Yuzu Kosho

I am on a citrus kick these days with it being in season.  I talked a little bit about lovely Southeast Asian kaffir limes last week.  This week it’s all about a Japanese citrus, yuzu.  Yuzu is one of those crossover fruits that has popped up on menus and cocktail lists all over (the juice is such a great add to drinks…).  It’s flavor is so distinctive – some notes of lime, grapefruit and mandarin, a Meyer lemon-like sweetness, acidity, and, at the same time, it has a signature, aromatic, floral muskiness that I personally find irresistible.

The rind of the yuzu is actually equally prized as the juice in Japanese cookery, and that brings me to this delicious condiment.  Yuzu kosho is a coarse paste made from ground yuzu rind, chilies, and salt.  It’s a specialty of a region in Southern Japan called Kyushu, and I’ve recently seen it pop up on non-Japanese restaurant menus around the city.  It made me think a bit deeper about how to use this stuff in non-traditional ways.

There are two types: red and green.  The red version is milder and sweeter, a combination of ripe yuzu and red chilies.  The green version has more of a bite as it’s made from the unripe fruit and green chilies.  Both are spicy, salty, sour and piquant.  It’s the perfect ingredient for vinaigrette and sauces.  It’s lovely in fish, chicken, and beef marinades – I like to add a sweet element like sugar or soy for the beef.  Perfect for grilling.  I also love that it gives such body to a brothy soup, and, lately, I’ve been dreaming about its kick in a creamy, sweet potato mash…

tags: Japanese ingredients, citrus, yuzu
categories: all-4, spices-1
Friday 03.04.11
Posted by Aliya LeeKong
 

Lamb Biryani

View fullsize biryani-pic1-500x333.jpg
View fullsize biryani-pic2-500x333.jpg
View fullsize biryani-pic3-500x333.jpg

Lamb Biryani

So I’m going to disclaim this recipe by pointing out that I generally try to showcase recipes that are relatively easy to recreate in the home.  But every now and then, in order to achieve that superlative dish or in keeping with the authenticity of a food, the recipe requires a little more blood, sweat and tears…this happens to be one of those.  The spice list alone is daunting!  It looks like the kitchen sink (of spices, so to speak) is thrown in here but I swear that it is all additive to the flavor…

My mother-in-law is to blame.  You see, this is a celebratory food, had at weddings or other special occasions, and so a lot of time and care is taken with the preparation.  She had this at our wedding celebration a few years back and recently developed a craving.  I promised to show her how to make this and so created this slightly modified recipe for her (yes, it could get even MORE complicated).

The dish originated in Persia but was brought by traders to South Asia where it’s been popularized.  It’s eaten all over the region as well as in the Middle East.  There are a million different versions out there – meat, chicken, mutton, game, fish, vegetables, potatoes, egg, different spices, nuts, and dried fruits.  Each family has its own secret ingredients and preferences, and I’m sharing mine with you…

At first glance, this looks a lot like pilau, but the flavors are completely different.  This is a layered casserole – with a rich thick meat stew forming the base and rice, fried onions, nuts, saffron and other spices layered on top.  The dish is rich and heady, not so much from heat but the spice blend packs a punch.  The meat is cooked until falling apart, the fried onions a bit crispy, soft rice texture and then some crunch from the almonds.  This is the type of dish that sits in the fridge and can be eaten for days as its taste improves…enjoy!

Ingredients

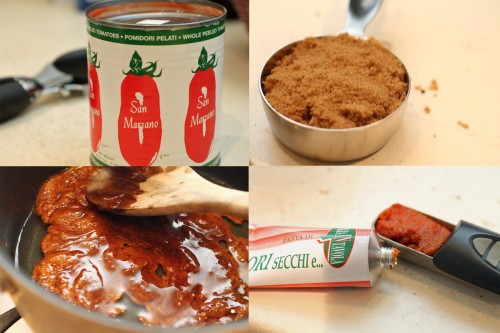
3 lbs trimmed boned lamb shoulder or beef chuck, cut into 1 ½- to 2-inch cubes

2 medium white onions, cut into thick strips
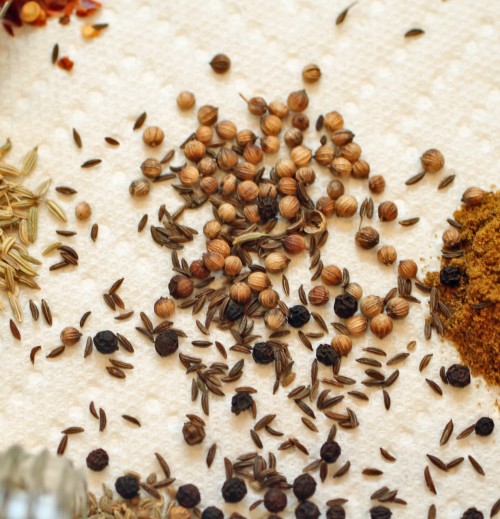
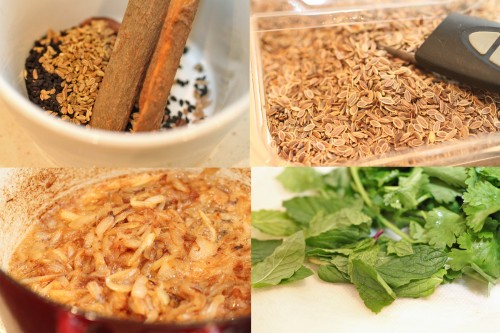
4 black peppercorns

4 cloves

2 cinnamon sticks

3 black cardamom pods, cracked open

1 tsp cumin seeds

1 tsp nigella seeds

½ tsp aniseed

1 tsp dill seeds

2 crushed, dried bay leaves

2 pinches of saffron

1 tsp garlic powder

¾ tsp turmeric

1 ½ tsps chili powder

¾ tsp ground fenugreek

1 tsp ground cumin

½ tsp ground coriander

½ tsp paprika

1 or 2 green chilies, finely chopped (jalapeno or serrano)

6 cloves garlic, minced

2 tsps ginger, minced

2 plum tomatoes, chopped

1 cup chicken, beef or lamb stock

1/3 cup yoghurt, beaten*

¾ cup milk

8 to 10 mint leaves, chopped

Large handful of cilantro, chopped

lemon juice to taste

3 ½ cups of rice, half-cooked with 1 clove, 2 peppercorns, 1 cinnamon stick, and 1 black cardamom**

¾ cup sliced almonds, toasted

2 tsps black cumin seeds, toasted

Salt and freshly ground pepper to taste

Canola oil

Procedure

Preheat oven to 350° F.

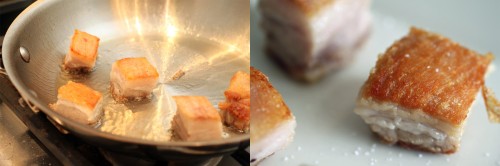
Heat a dutch oven or other heavy bottomed pot that has a fitted lid over medium-high heat.  Season cubed lamb or beef generously with salt and pepper.  Add a few tbsps of oil to coat the bottom of the pan, and sear the meat for 2 minutes per side in batches to avoid overcrowding the pot.  You want to develop a nice brown and overcrowding will steam the meat.  Remove to a plate and set aside.

Turn heat down slightly, and add the onions to the same pot.  You want to brown the onions to develop the signature taste of biryani.  Cooking time will vary for this, but it takes about 10 minutes, stirring frequently.  Remove onions to a separate plate.

Add all of the whole and ground spices (use only 1 pinch of the saffron), chilies, garlic and ginger and cook for 3 to 4 minutes being careful not to burn (reduce heat if necessary).   You are looking for a change in the smell, a toasted nuttiness that will signify the spices are cooked.

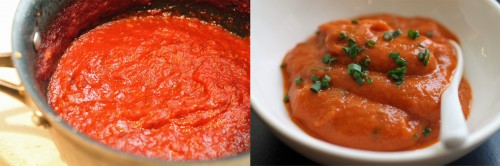
Add back in the meat (along with any juices), half of the onions (reserving the other half for later), as well as the tomato and stock.  Bring mixture up to a boil, cover tightly and place in the oven.  Cook for an hour.  Remove from the oven, stir in the beaten yoghurt, and place back in the oven for another 30 minutes.

In the meantime, heat the milk in a small saucepan over medium heat until simmering.  Add the saffron and turn off the heat.  The saffron should infuse the liquid with its flavor and color, and we are going to pour this over the rice at the end.

Remove pot from the oven, place on the stovetop, take off the lid, and simmer on medium uncovered for another 5 to 10 minutes.  You want to remove any excess liquid as the resulting stew should be pretty thick.  Add in the chopped mint and cilantro (reserving some for garnish), add lemon juice and season to taste.

Layer half of the partially cooked rice right on top of the meat mixture.  Cover with the remaining browned onions, half of the toasted almonds, and chopped herbs.  Create another layer with the rest of the rice.  Pour the saffron-milk mixture all over the top.  Add the remaining toasted almonds as well as the black cumin seeds and chopped herbs.  Cover tightly and place back in the oven for another 20 to 25 minutes until the rice is cooked through.

*It is a well-known “secret” that beating yoghurt with a whisk before adding it to a curry or stew will prevent it from breaking.

**When you partially cook the rice, remember to season with salt generously and include some of the whole spices for added flavor.  If you are boiling or using a rice cooker, strain any excess water before adding it to the meat mixture.

tags: lamb, biryani, special occasion
categories: all-4, main dishes, recipes
Monday 02.28.11
Posted by Aliya LeeKong
 

Kaffir Lime

View fullsize kaffir-pic1-500x333.jpg
View fullsize kaffir-pic2-500x333.jpg
View fullsize kaffir-pic3-500x379.jpg

Kaffir Lime

A few weeks ago, I mentioned how taken aback I was to find kaffir limes while food shopping at a non-ethnic grocer.  All citrus originated in South and Southeast Asia and was introduced to Europe during the Middle Ages.  It’s interesting to think how some forms of it, like kaffir limes, are just getting recognized in the West.  I asked a few friends who said they had no idea what a kaffir lime looked, tasted, smelled like, so I thought I would talk a little more about them.

Many know about kaffir lime leaves, which are used throughout Thai, Laotian, Cambodian, Malay, Indonesian and other Southeast Asian cooking.  They are so unusual, with their double-leaf structure, and citrus aroma.  But I think the limes themselves are equally interesting and get much less play because they aren’t as readily available or people just don’t know how to use them.

Kaffir limes are dwarf-like, a verdant green, with a rough, wrinkled, knobbly texture.  Not so pretty.  There isn’t a ton of flesh or juice to them really, and neither is really used in cooking.  It’s their rind that is prized because it’s packed with aromatic oils.  A little goes a long way.

The zest of kaffir lime is a key ingredient in many Southeast Asian curry pastes.  I love using it because it’s slightly lemon-floral-grassy notes work well in place of regular lime zest, and it’s one of those sweet or savoury ingredients.  It can elevate a fruit salad for breakfast to something spectacular, blended with fleur de sel (kaffir lime salt!) it’s a fantastic finish to a nicely seared piece of fish, and I don’t even want to get into the mojito possibilities…

tags: Kaffir Lime, citrus, limes, ingredients
categories: all-4, spices-2
Friday 02.25.11
Posted by Aliya LeeKong
 

Savoi Plantation

Savoi Plantation

My trip to Goa a few months back was packed with so many different culinary adventures, and one of my favorite experiences was visiting a 200-year-old, organic, spice plantation called Savoi.  The farm was about an hour outside North Goa in an area called Ponda, and I ended up making that trek TWICE.  I was rained out the first time (of course, the rain started when I was five minutes away) and walking the grounds in mud was not an option (why did I wear flip-flops?). 

The first time, I ended up staying for lunch inside the tree house-like pergola.  After a greeting of cool kokum juice and some biscuits, a feast ensued! Deliciously-stuffed, fried pomfret, fried shrimp, fresh salads and pickles, lentils, spicy crab, sour plum masala, finishing with cool, vermicelli pudding, and cucumber cake.  The experience was pretty magical – watching the rain pelt down in the middle of lush, misty forest, in India and stuffed silly.  Amazing.

The plantation has crops like coconuts, pineapple, jackfruit, and betel nut along with intercrop spices – black pepper, clove, cardamom, curry leaf, turmeric, and vanilla bean to name a few. Walking around the plantation, you learn where all the spices originally come from, how they are grown, and medicinal qualities to the different plants.

Betel nuts, by the way, are the seeds of a type of palm and are widely chewed (wrapped in betel leaves) because they’re a stimulant.  The telltale sign that someone is chewing is a blood red-stained mouth.  Check out how dangerous betel nut picking is!

Although there are a few other spice plantations nearby, many (shadily) offer commissions to taxi drivers, which Savoi doesn’t do.  There is a pretty cool temple 15 to 20 minutes away called Mangueshi Temple – a great day would be driving out to see this temple in the morning, followed by lunch and walking the grounds of Savoi, and then heading back to North Goa to hit the beach for the afternoon…

tags: Savoi Plantation, Goa, travel, betel nuts
categories: all-4, travel
Wednesday 02.23.11
Posted by Aliya LeeKong
 
Newer / Older