X

Sign up to receive exclusive recipes, tips, updates and other goodies from Aliya!

  • Home
  • Blog
    • All
    • Recipes
    • Spices + Ingredients
    • Lifestyle, etc.
    • Travel
  • The Cookbook
  • The App
  • Media
    • All Media
    • Video
  • About
  • Passions
Aliya LeeKong
  • Home
  • Blog
    • All
    • Recipes
    • Spices + Ingredients
    • Lifestyle, etc.
    • Travel
  • The Cookbook
  • The App
  • Media
    • All Media
    • Video
  • About
  • Passions

Roasted Garlic, Cheese & Herb Baked Rice

View fullsize rice-pic1-500x333.jpg
View fullsize rice-pic2-500x333.jpg
View fullsize rice-pic3-500x166.jpg

Roasted Garlic, Cheese & Herb Baked Rice

This is not your every day, throw-in-the-oven-rather-than-on-the-stovetop rice.  My inspiration for this dish is Tah Chin, a Persian rice pilaf that layers saffron rice with chicken and bakes it to perfection.  The rice is bound with yoghurt and egg yolks and during its slow-baking process forms this beautiful crust where it hits the baking dish, not wholly unlike soccarat (which is the crusty layer found at the bottom or paella).  Suffice it to say, I veered a bit off of tradition with this version….

Many of the items are similar to the original – the long grain rice (though trying this with Valencia or Bomba rice sounds pretty alluring), saffron, yoghurt and egg yolks.  But that is where it ends!  I leave out the chicken and created this to be an easy (and slightly more elegant…) substitute for mac n’ cheese, a lovely casserole side.  Thus, I included some butter and crème fraiche for richness and tang, some cheeses for good measure, roasted garlic and herbs for depth of flavor.

It was truly an experiment, and I love the result…First of all, it’s beautiful! I plan to just leave the cutting board and knife out for people to help themselves at my next dinner party.   I warn you, however, to do this as close to serving time as possible.  It was all I could do to snap a few pics before my husband hacked off a third of it and ran off!  The smell of it drove him mad…the roasted garlic and cheese, creaminess and that crusty layer of rice – amazing.  Enjoy!

Ingredient

Yields (1) 9”x13” baking dish

3 cups long grain rice

3 tbsps kosher salt

½ stick unsalted butter

½ cup yoghurt

½ cup crème fraiche

pinch saffron

4 egg yolks

1 cup grated mozzarella cheese

¾ cup grated grana padano or parmigiano reggiano cheese

12-13 roasted garlic cloves

¾ cup chopped herbs

freshly ground black pepper

Procedure

Preheat oven to 350° F.

Rinse the rice in changes of hot water until the water runs clear.  In a medium pot, bring 6 cups of water up to a boil.  Add 1 ½ tablespoons of the salt and the washed rice.  Let cook 6 to 8 minutes (rice should start to soften but still be raw at the center), drain and rinse lightly.  Transfer to a large bowl.

In a small saucepan, melt butter with yoghurt and crème fraiche over medium heat.  When it starts to bubble, shut off the heat and add the saffron.  Let it bloom for 5 minutes.  Place the egg yolks in a medium bowl.  Add spoonfuls of the saffron mixture to the egg yolks stirring constantly – you want to bring the egg yolks up to temperature slowly.

To the drained rice, now add the saffron-egg yolk mixture, the cheeses, roasted garlic cloves, chopped herbs, the other 1 ½ tablespoons of salt and freshly ground black pepper to taste.  Combine thoroughly.

Grease a 9” x 13” baking pan and line the bottom with parchment paper.  Transfer the rice mixture to the baking pan, cover with foil and bake for 1 hour and 35 minutes.  Let cool slightly and then loosen the side of the rice from the dish.  Turn out onto a cutting board and serve hot in slices or squares as you choose.

tags: baked rice, saffron, vegetarian sides, roasted garlic, cheese
categories: all -1, side dishes, recipes, vegetarian-1
Monday 05.21.12
Posted by Aliya LeeKong
 

Parsnip Cakes with Spring Garlic & Chile

View fullsize parsnip-pic1-500x333.jpg
View fullsize parsnip-pic2-500x333.jpg
View fullsize parsnip-pic3-500x222.jpg

Parsnip Cakes with Spring Garlic & Chile

Walking through the Union Square Greenmarket the other day (as the weather shifted from the low 40’s to the low 60’s), it felt to me that the season is being a bit ambivalent, unsure of whether it’s winter or spring.  Piled high were the hearty root vegetables of the winter – rutabagas, salsify and parsnips – next to the burgeoning spring crop with lovely spring garlic and rhubarb making an appearance.  I nabbed some of the spring garlic and for breakfast this Sunday created these little cakes, as an ode to this in-between season.

Parsnip is an incredibly flavorful and versatile vegetable.  The flavor is somewhere between a potato and a carrot, and it’s signature sweetness works beautifully with butter, spices, and heat. Spring garlic, on the other hand, is like a two-for-one sale – garlic and green onion flavor in one!  If you can’t find any, using a bit of garlic with leek or green onion works really well here too.

This recipe couldn’t be simpler or more forgiving – cook the parsnips til tender, add other ingredients, fry until golden.  You could easily use potatoes instead of parsnips here if you have them on hand.  I love these for breakfast with some scrambled eggs and a touch of sriracha to dip.  But these could also be a great dinner side to accompany roast chicken or a nice piece of fish.  A crisp bite with that sweet, creamy parsnip flavor, garlic, onion and the heat from the chilies…Enjoy!

Ingredients

Serves 4 to 6

2 lbs parsnips, peeled and cut into a medium dice

1-2 red and/or green chilies, finely chopped (red jalapeno, jalapeno, Thai)

2 spring garlic shoots, finely chopped (approximately 1/3 cup)

½ cup all-purpose flour

¾ tsp kosher salt

½ tsp sugar

handful of fresh herbs (chives, cilantro, parsley), roughly chopped

unsalted butter for frying

kosher salt to taste

Procedure

Put diced parsnips in a pot and cover with cold water.  Place over medium-high heat, cover and bring to a boil.  Lower to a strong simmer and simmer until fork tender (approximately 10-15 minutes depending on the size of your dice).  Drain in a colander and let air dry for a few minutes.

In a large bowl, mash parsnips with a potato masher or use a ricer to break them up.  Add the chilies, spring garlic, flour, salt, sugar and herbs and mix until a uniform texture (don’t overmix though or they’ll get a tad gummy).

Heat a sauté or cast iron pan over medium heat and add butter.  For the parsnip cakes, I like to use an ice cream scoop so I can be sure I get even amounts.  I love to use my hands here, making a flat patty out of the parsnip mixture and then just sliding them into the pan.  They don’t have to be perfectly shaped.

Fry for 3 to 4 minutes per side just to develop that nice golden crust, and work in batches if necessary to finish off the mixture.  Let drain on a paper towel-lined baking sheet.  Sprinkle with a bit of salt while it’s hot for extra flavor.

Serve immediately.  I like mine with a bit of sriracha on the side to dip.

tags: parsnip, spring garlic, vegetarian sides
categories: all -1, appetizers, breakfast, side dishes, vegetarian-1
Monday 03.19.12
Posted by Aliya LeeKong
 

Tunisian Bread Salad

View fullsize bread-salad-pic1-500x333.jpg
View fullsize Bread-salad-pic2-500x333.jpg
View fullsize bread-salad-pic3-500x333.jpg

Tunisian Bread Salad

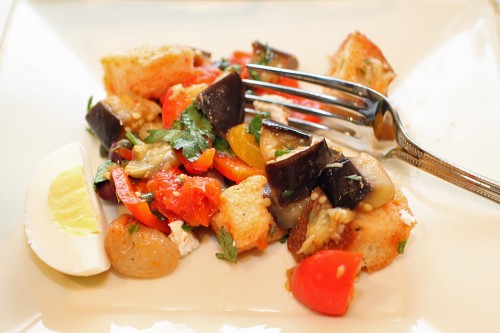
I am completely in love with the concept of “bread salad”.  It feels like cheating.  Like you have this healthy bunch of vegetables and you just make them so much tastier by adding chunks of rustic bread that soak up all the lovely dressing.  But you still feel healthy doing it because you call it a salad.  I am famous for taking leftover cornbread and making a cornbread-bread salad with honey balsamic dressing.  And sometimes I even throw in a few vegetables too.

Most people know about panzanella or Tuscan bread salad, which is made from crusty Italian bread mixed with tomatoes, red onions, cucumbers and basil.  Delicious.  But Tunisian bread salad or even Mediterranean bread salad (similar) is less well known and equally (if not slightly more…) tasty.  You take beautiful seasonal vegetables – eggplant, peppers, tomatoes – and roast them off with some aromatics.  Mix those in with olives, herbs, capers, fresh cheese, and chunks of stale bread and toss with a delicious, harissa dressing and you have a beautiful, alternative, light and flavorful, bread salad.

This is a fantastic way to use up old bread (or so we all tell ourselves…).  But I’ve actually seen this as a roasted vegetable salad on its own, so if no bread is at hand or you want to be even healthier, you can leave it out and still have a delectable salad.  Store-bought harissa is fine, but I would suggest making your own like I do in my homemade harissa recipe; it’s cheaper, fresher, and healthier without the preservatives.

I love harissa in a salad dressing, and my dressing here has honey and harissa which, by the way, is a fantastic combination – I like to just slather the two on bread as a crostini or as an hors d’oeuvre to spruce up a weeknight dinner.  In any case, this salad is bright, flavorful and beautiful – great for entertaining.  Enjoy!

Ingredients

Yields 4 to 6 servings

Salad:

1 eggplant, cut into a medium (bite-sized) dice

1 red bell pepper, cut into a medium (bite-sized) dice

1 yellow bell pepper, cut into a medium (bite-sized) dice

8 oz mini sweet or cherry tomatoes

3 small shallots, quartered

3 or 4 whole garlic cloves

Olive oil

Salt & freshly ground black pepper

¼ cup niçoise olives, pitted

A generous handful of fresh mint, roughly chopped

A generous handful of fresh cilantro, roughly chopped

1 day-old round loaf of bread or whatever rustic bread you have on hand, cut into medium-sized cubes*

Garnish:

Fresh cheese (feta, goat or bocconcini will do), torn or crumbled into small pieces

2 tsps capers, rinsed and drained

1 or 2 hard-boiled eggs, quartered

Dressing:

¼ cup rice vinegar

1 tbsp harissa**

1 ½ tbsps honey

¼ cup extra virgin olive oil

Procedure

Preheat oven to 400° F.

In a bowl, toss together eggplant, bell peppers, tomatoes, shallots and garlic with olive oil, salt and pepper to coat.  On a baking sheet, arrange vegetables in a single layer.  Roast for 25 minutes until lightly browned.

For the dressing, whisk together the rice vinegar, harissa and honey in a bowl.  Drizzle in extra virgin olive oil, whisking to incorporate.

Using a slotted spoon, transfer roasted vegetables to a large bowl.  Add olives, herbs, and bread and toss with dressing.  Garnish with cheese, capers, and hard-boiled eggs.

*If you have fresh bread, just put the cubes of bread on a baking sheet, drizzle with olive oil, and bake at 350° F until lightly browned.  You just want it to be crisp enough to stand up to the salad dressing and not turn to mush.

**For harissa you can use my version here or use the store-bought kind.

tags: bread salad, Tunisian cooking, harissa, vegetarian sides, recipes for entertaining
categories: all-6, side dishes, recipes, salads, vegetarian-1, soups & salads
Monday 09.20.10
Posted by Aliya LeeKong
 

Creamy Cauliflower Puree with Fenugreek

View fullsize Cauliflower-pic1-500x333.jpg
View fullsize Caulfilower-Puree-Ingredients-500x333.jpg
View fullsize cauliflower-pic3-1-500x333.jpg

Creamy Cauliflower Puree with Fenugreek

So it’s the middle of summer.  I know a bathing suit looms in the near future, and despite all attempts I’ve let things like pork buns, sausage orecchiette, a hot dog on the run, and delicious pastries from Duane Park Patisserie interrupt an otherwise (mildly) healthy flow of food.  Let’s not even bring up the subject of wine.

My fridge is loaded with fruits and veggies, sending subliminal messages of health across my apartment.  I was seriously in the throes of a carb-craving the other day, and with nothing other than fruits and veggies decided to get a little creative.  The result?  A lusciously, creamy cauliflower puree flecked with crushed fenugreek leaves.

Okay, so in reality, this still has butter and some milk, but it’s definitely better for you than equally buttery mashed potatoes.   The cauliflower, cooked until super tender, is fresh and creamy when pureed.  Fenugreek, as a seasoning, is used in so many different cultures – South Asian, Ethiopian (like in the clarified butter), Iranian, Turkish, Afghani…to name a few.  I chose the leaves here over the seeds because the flavor of the leaves is much more subtle and lacks the typical bitterness of the seeds.  Fenugreek leaves have a flavor not unlike celery, and, when warm, emit a sweetness of sorts.

This is a sinfully easy side dish to make.  Fenugreek leaves can be purchased at most specialty spice stores, and even health food stores.  Enjoy!

Ingredients

Yields 6 to 8 servings

3 small heads or 2 large heads of cauliflower, cored and cut into even-sized florets

3 garlic cloves

6 cups milk

1 stick butter

1 ½ tsps ground fenugreek leaves*

chopped chives

salt & freshly ground pepper

Procedure

In a medium pot, bring cauliflower, garlic, a pinch of salt and milk up to a simmer.  Do not boil.  Simmer covered for 12-15 minutes or until cauliflower is very tender.

Strain cauliflower and garlic from milk mixture, reserving both.  Melt butter with ground fenugreek in a small saucepot for 5 to 7 minutes.

Puree cauliflower in a blender with 1-1 ¼ cups of reserved milk and melted fenugreek butter, working in batches if necessary.  Adjust milk amount based on desired texture of the puree.  Season with salt and freshly ground pepper and garnish with chives.

*In order to grind the fenugreek leaves without any of the stems, place a small sieve over a paper towel.  Add fenugreek leaves and crush the leaves between your fingers and/or against the sieve, itself.  The ground fenugreek will fall through the sieve onto the paper towel.

tags: cauliflower puree, fenugreek, vegetarian sides, cauliflower side dish
categories: all-7, side dishes, recipes, vegetarian-1
Thursday 08.05.10
Posted by Aliya LeeKong
 

Freekeh with Summer Squash and Brown Butter

View fullsize freekeh-pic1-500x333.jpg
View fullsize Freekeh-pic21-500x156.jpg
View fullsize freekeh-pic31-500x333.jpg
View fullsize freekeh-pic41-500x333.jpg

Freekeh with Summer Squash and Brown Butter

I was having lunch with a Lebanese girlfriend of mine recently when she pointed out freekeh on the menu.  I had never heard of it, so, of course, I had to order!  It was served like a pilaf to accompany a fish, tasted like a nuttier, slightly smoky brown rice, and had a toothsome texture.

After some research, I was really surprised that it’s not more well known.  Freekeh is a roasted green wheat and can be found throughout Lebanon, Syria, Egypt and Jordan.  It’s an incredibly healthy whole grain, comparable (if not superior) to quinoa, a rich source of nutrients with high fiber and protein.  It’s harvested young and then roasted in the fields over an open fire, giving it that smoky quality.

The mixed summer squash at the Union Square Greenmarket looked too shiny and beautiful to resist the other day, and I thought it would pair well with the freekeh.  I roast the squash off here with some sweet cherry tomatoes and prepare the freekeh similarly to rice.  The coriander and cinnamon work really well with the sweetness of the squash and the smokiness of the freekeh, and the pine nuts are great for texture.  This is so delicious I’ve given up my carnivorous ways for a few days, snacking on it at intervals.

And the pièce de résistance?  Nutty, glistening, warm brown butter.  I love to use brown butter in place of regular butter in a dish like this or even in breads and cakes; it really elevates and deepens the flavor.

Freekeh also goes by the name frik, farik or even roasted green wheat, so if you are shopping for it, I would ask by all names.  I picked up my freekeh at Sahadi’s on Atlantic Ave. in Brooklyn, but I know a number of the Middle Eastern specialty shops in the area carry it.   Kalustyan’s also carries it in store and online.

Enjoy!

Ingredients

Yields 4 to 6 servings

2 cups freekeh, whole (not cracked)

1 lb mixed summer squash, medium dice

¾ cup cherry tomatoes, whole

olive oil, salt, & pepper

2 ½ tbsps canola oil

1 onion

½ tsp ground coriander

½ tsp ground cinnamon

¼ tsp white pepper

1 scallion, thinly sliced

4 garlic cloves, minced

3 cups vegetable or chicken stock

¼ cup pine nuts, toasted

4 tbsps brown butter *

handful of parsley, chives, and/or cilantro, chopped

Procedure

Preheat oven to 400° F.

Pour freekeh in a bowl and pick through for any stones or off pieces.  Rinse freekeh with several changes of water until the water runs clean.  Cover the freekeh with fresh water and soak for a half hour.  Strain off all excess water.

Combine diced squash and tomatoes in a bowl.  Lightly coat in olive oil and season with salt and pepper.  Transfer to a baking sheet in a single layer and roast for 15-20 minutes until soft but still with a bit of firmness.

Heat a pot or a dutch oven over medium-low heat.  Add canola oil.  When hot, add onions and coat with the fat.  Add coriander, cinnamon, white pepper and a pinch of salt to draw out the moisture.  You just want to sweat out the onions until they are translucent, so be careful the heat isn’t too high or they will start to brown.

When the onions are translucent, add scallions and garlic.  Cook for one minute, and then add freekeh.  Toast the freekeh in the pot, stirring occasionally, for 5 minutes.  The freekeh should become aromatic.

Add the vegetable or chicken stock, and bring up to a boil.  Lower to a simmer and simmer covered for 45 minutes.  Turn off heat, remove cover, and let stand uncovered 5 minutes.

Toss in the summer squash, tomatoes, pine nuts, and brown butter.  Add chopped herbs and adjust seasoning as necessary.

* Brown butter is really easy to make, but it has to be watched.  Simply heat the butter in a pan over medium low.  Once the foam starts to subside, watch the color of the milk solids that sink to the bottom of the pan.  They should turn brown, and the butter should take on the smell of toasted hazelnuts.  At that point, remove immediately from the heat by pouring into another container.  The solids go from brown to black quickly, so it’s important to stop the cooking process as soon as the hazelnut stage is achieved.  Also, I like to scrape the solids off the pan into whatever I’m cooking – there’s a ton of flavor there.

tags: freekeh, recipes for summer, roasted green wheat, whole grain sides, vegetarian sides
categories: all-7, side dishes, vegetarian-1
Tuesday 07.27.10
Posted by Aliya LeeKong