X

Sign up to receive exclusive recipes, tips, updates and other goodies from Aliya!

  • Home
  • Blog
    • All
    • Recipes
    • Spices + Ingredients
    • Lifestyle, etc.
    • Travel
  • The Cookbook
  • The App
  • Media
    • All Media
    • Video
  • About
  • Passions
Aliya LeeKong
  • Home
  • Blog
    • All
    • Recipes
    • Spices + Ingredients
    • Lifestyle, etc.
    • Travel
  • The Cookbook
  • The App
  • Media
    • All Media
    • Video
  • About
  • Passions

Black Cardamom

View fullsize cardamom-pic1-500x333.jpg
View fullsize cardamom-pic2-500x333.jpg
View fullsize cardamom-pic3-500x333.jpg

Black Cardamom

It drives me mildly insane that people think black cardamom is, in some way, a lesser version of green cardamom.  That’s the (erroneous) word on the street.  But the truth is that they have different flavors and applications, so no spice rivalry is allowed here.

Cardamom, in general, is known for having astringency, a warm, camphorous, palate-clearing flavor.  Where green is more pungent and menthol, black cardamom is earthier, less eucalyptus and more lovely, woodsy smokiness; there’s a picture of green cardamom in this post on peaches with cardamom streusel.  Green cardamom is used a lot in South Asian desserts, coffee and other sweet stuff; black cardamom works better in savoury applications – added to Indian tandoori marinades and stews and found in Asian soups and vegetable stir fry dishes.

I absolutely love using black cardamom, which is also referred to as brown cardamom (not to be confused with the third type – Thai cardamom…which could be a whole other post).  It is fantastic in plain white or brown rice, thrown in whole or split to add a little kick.  When the seeds are ground, they make a delicious addition to a barbeque dry rub for chicken, beef or pork, and I also (secretly) throw some in to the braising liquid of my beef short ribs…shhh.

I have yet to see these in a regular grocer (one can only hope), but they can definitely be found in East Asian specialty stores as well as Indian and Middle Eastern grocers.

tags: black cardamom, brown cardamom
categories: spices-2, all-7
Friday 09.03.10
Posted by Aliya LeeKong
 

North African Harissa

View fullsize harissa-pic1-500x333.jpg
View fullsize harissa-pic2-500x333.jpg
View fullsize harissa-pic3-500x166.jpg

North African Harissa

A friend of mine was telling me about her favorite roast chicken dish, which requires slathering a whole chicken with harissa and olive oil before roasting.  Sounds absolutely lovely – spicy, a bit tart and salty, with crispy skin.  She mentioned that, to make it, she picked up pre-fab harissa from the grocery store, so I investigated.  It’s upwards of $8 per bottle – exorbitant, I think.  It’s too easy to do at home and can be done for a fraction of the cost, so I’m giving you a delicious, homemade version.

Harissa is a hot chili paste that is a staple in North African cuisines, especially in Tunisian and Algerian foods.  Just like recipes in other cultures, harissa ingredients vary from household to household and region to region – some include cumin, others tomatoes, and even rose petals.  Yes, “rose” harissa – how amazing does that sound.  In Tunisia, harissa is served with every meal – as a condiment, rubbed on meats, incorporated into stews, mixed in with couscous…

Tunisians use Nabeul and Gabes peppers, which are hotter but similar in flavor to readily available Anaheim and Guajillo chilies here in the States.  Dried chilies have more complex flavor than fresh, so dried are typically used.  This recipe is for a milder harissa because I like to use it as a salad dressing base and mixed in with mayo on sandwiches; I tend to add fresh or pickled chilies to those, so I want to control my heat.  But you can make this harissa as spicy as you want – I add urfa chilies for heat and a bit of smokiness, but chipotles would also be wonderful here, as would dried, hot Indian chilies if you want it even hotter.  Enjoy!

Ingredients

Yields ½ cup

3 New Mexican / Anaheim medium-sized dried red chilies

4 Guajillo medium-sized chilies

2 tsps crushed red pepper or Urfa Biber chilies

1 tsp caraway seeds

½ tsp fennel seeds

Pinch of saffron (optional)

1 ½ tsps ground coriander

½ tsp turmeric

1 tsp salt

2 sundried tomatoes (packed in oil or rehydrated)

2 garlic cloves

Olive oil

Lemon juice

Procedure

Remove seeds and ribs from the dried chilies and place in a heat-safe bowl.  I like to use kitchen scissors for this – it’s easy to just split them open and brush out the seeds / pull out the ribs.  Pour boiling water over chilies and let them soak 15 – 20 minutes until softened.

You can do this in either a food processor or a blender.  If you are doing this in the food processor, use a spice grinder to grind the crushed red peppers or urfa chilies, caraway seeds, fennel seeds and saffron first before adding those to the food processor.   If working with a blender, add those ingredients first and blend until ground before moving on to the next step – it’s like one big spice grinder.

Add ground coriander, turmeric, salt, sundried tomatoes, and garlic cloves.  Remove chilies from water and wring out any excess moisture.  Add to the blender or food processor.  Pulse adding olive oil, a tablespoon at a time, until a thick paste is achieved and all of the chilies have been ground up.  Add lemon juice to taste and adjust seasoning as necessary.

Transfer to a jar and cover harissa with a layer of olive oil to preserve it.  Keep refrigerated.  It will keep for up to a month in the fridge.

tags: homemade harissa, harissa, North African cooking, urfa biber
categories: spices-2, all-7
Thursday 09.02.10
Posted by Aliya LeeKong
 

Homemade Salt Pork

View fullsize salt-pork-pic1-500x333.jpg
View fullsize salt-pork-pic-2-500x333.jpg

Homemade Salt Pork

All of the bbq’ing this summer has me thinking about an ingredient that people don’t really make at home that much: salt pork.  What is it.  It’s effectively unsmoked bacon, a cut of pork from the belly, back, and/or sides that is cured with salt.  It differs a little from pancetta in that pancetta uses slightly different spices, has a longer cure time, and is hung out to dry, but they are pretty close.  This version is a mere 5-day affair, and, at the end of it, you can say you made your own unsmoked bacon.  Impressive.   I love it.

Salt pork is a flavoring agent.  I have no other words to use than that it gives a “salty” and “porky” flavor to whatever it is added.  And since it’s mainly fat, it subtly adds a certain mouth feel, a warmer, creamier texture to any dish.  I consulted my favorite butchery book, The River Cottage Meat Book, the first time I made this.  I have since modified salt and sugar amounts and added in a few extra spices for good measure.

What I really love about making this, besides the fact that it keeps in your fridge for about a month, is that it is one of those foods that has applications in so many different cultures.  Baked beans, collard greens, chowders, stews – it can be found throughout American cooking.  However, it’s also a large part of French and other European cuisines like in the dish petit salé, and West Indians use it in everything from peas and rice to callaloo.  I personally add it to (almost) everything:  Sunday morning spicy, scrambled eggs, pasta with black pepper, a scrumptious cornbread with honey chili butter, Brazilian feijoada (which I have to make again soon), any sauce to liven up a fish dish…it’s really endless.  Hope you enjoy this as much as I do!

Ingredients

2 lbs pork belly, without the skin

3 cups coarse sea salt

2/3 cup light brown sugar

3 tsp black peppercorns

2 tsp whole coriander

2 garlic cloves

Procedure

I start off with the pork belly without the skin – it’s just a personal preference.  You can leave the skin on if you’d like.

First, wash and dry off the pork belly.  Combine all of the other ingredients in a bowl.  Place pork belly in a non-reactive container.  Rub with a portion of the salt mixture until thoroughly coated.  Cover with plastic wrap and weight down with something – tomato cans, a serving dish, whatever works.

After 24 hours, the pork belly will have released some liquid.  Pour off this liquid.  Rub all sides again with the salt mixture, recover, and weight.  Repeat this process for five days.

At the end of five days, rinse and remove excess salt from the bacon, dry and wrap in cheesecloth.  It can be stored in the refrigerator and is good for up to a month.

tags: salt pork recipe, how to make salt pork, unsmoked bacon
categories: spices-2, all-7
Wednesday 09.01.10
Posted by Aliya LeeKong
 

Elliot’s in the Park

Elliot’s in the Park

In all the times I’ve visited or stayed in London, I have never had the opportunity to check out Victoria Park in East London.  And it’s quite stunning.  It has a section for the Old English Garden, a deer enclosure, and a serene lake with a fountain surrounded by ducklings and swans.  A beautiful setting for a fantastic evening.

A few weeks back, some friends of mine invited me to join a group at Elliot’s in the Park. Elliot’s was a pop-up restaurant that was hosted at the Pavilion Café in Victoria’s Park every Friday this summer.  The chef recreated the five-course menu weekly, using locally-sourced and seasonal ingredients.  The full-time restaurant will be opening in October in Borough Market – a spectacular wholesale and retail food/green market (top 5 in the world).  This pop-up restaurant was a cool way for the chefs to do a little pre-marketing, and it worked: they were booked solid.

The evening started with some “fizz”, as they call it, and canapés on the deck – oat crisps, spiced popcorn, and chicken oysters in pine salt.  Bottle Apostle provided all of the wine pairings (one with each course) and had some incredible selections.   The fizz was one of the best champagne’s I’ve tasted – Champagne Gallimard Brut Réserve N.V. It’s made by a small champagne house and is exclusively from Pinot Noir grapes.  Dangerously good – fruity with rose-lychee undertones.  I’ve asked my local wine guy to find out if we can get it; he said no one imports here because of how small the purveyor is but is on the case!  It retails for the equivalent of $30 in the UK, which makes it even more dangerous.  Fingers crossed.

After canapés, we made our way over to the communal tables for dinner.  It began with English asparagus with mussels and tarragon butter.  Bright and yummy with edible flowers and paired with a German Sauvignon Blanc.  The next course was my favorite – a crispy Cornish mackerel served with Celtic mustard and dill pickled cucumbers.  It was paired with a deliciously floral and green apple Austrian white – Anton Bauer, Gruner Veltliner “Gmork” 2009.  This was followed up by braised Old Spot pork shoulder with broccoli and spring onion that paired with a deep Portuguese red.

Two desserts!  A goat’s milk mousse with blackberry jam and Belgian speculoos.  What the heck are speculoos?  They are Dutch/Belgian/French shortcrust biscuits (I must try to make), and here they were crushed on top for texture.  This was followed up by English strawberries with sour cream and elderflower.  Beautiful.  The dessert wine was spectacular, and we all snuck in a second glass. It was South African, Paul Cluver Weisser Riesling Noble Late Harvest 2009 and reminded me of some I brought back from South Africa from the Simonsig winery.  Dessert wines from South Africa are generally delicious and always really well priced.

The night was really spectacular – nothing beats a novel experience with great friends.  Local people in the know have a lot to look forward to when Elliot’s restaurant opens up in the fall!


tags: London
categories: all-7, travel
Tuesday 08.31.10
Posted by Aliya LeeKong
 

Melon-Orange Blossom Gelato

View fullsize melon-gelato-pic1-500x333.jpg
View fullsize melon-gelato-pic2-500x333.jpg
View fullsize melon-gelato-pic3-500x333.jpg

Melon-Orange Blossom Gelato

Ice cream is somewhat of a problem for me.  You might find me on any given night at home, with a pint of mint chip or vanilla swiss almond on the couch circa 11 p.m.  Or walking in Soho, stopping at the Van Leeuwen truck for their earl grey.  Or at Cones grabbing some corn ice cream in the West Village.  Or inhaling mochi in single bites at Nobu.  Or…get the picture? In the winter, I crave the super creamy, bitter coffee flavors with chunks of chocolate, but the summer leads me to lighter, more subtle ones.  Therein lies the inspiration for a light-as-air, delicately-flavored, slightly floral melon-orange blossom gelato.

I’ve mentioned orange blossom water in a previous post, and it is a flavor that is found throughout Middle Eastern foods, particularly the desserts.  That said, it can be found in Mediterranean cuisine as well as French – it’s often used to flavor madeleines. The water is distilled from the blossoms of the sour orange tree, which is also known as the bitter orange or Seville orange tree.  Since it’s from the blossoms, the flavor is certainly more floral than fruity – quite exceptional, really.

Although I call this a gelato, it’s only because it’s lower in fat and lighter in texture than ice cream.  It’s truly a cross between a sorbet and a gelato because of the high water content of the melons.  It’s extraordinarily light – like a milky ice that melts when it hits your tongue spreading the soft melon flavor while the perfume of the orange blossom hits you at the end.  One thing I’d like to say about orange blossom water – each brand is very different.  The one I’m using now is a bit diluted, so, in this case (and, quite frankly, whenever a recipe calls for it), add a bit less and check for flavoring before adding more.  The flavor can be a bit cloying in excess.  Enjoy!

Ingredients

Yields approximately 2 quarts

1 ¾ cups heavy whipping cream

1 cup whole milk

½ tsp kosher salt

¼ cup sugar

¼ cup honey

2 tbsps orange blossom water

½ tsp orange zest

1 medium melon (approx. 1 ¼ lbs), seeded and cut into small cubes

1 squeeze of fresh lemon juice

Procedure

Place cream and milk in a saucepan.  Add salt, sugar, honey, orange blossom water, and orange zest.  Bring mixture up to a boil.  Once it starts boiling, turn off the heat, cover, and let steep for 10 to 15 minutes.

Place cut melon and a squeeze of lemon juice in a blender, and blend on high for a few minutes until completely pureed.  Strain cream mixture into a container, add melon puree, and refrigerate for at least 6 hours or even overnight.  You want the mixture to be the same temperature as the refrigerator or under 40° F.

Process ice cream in an ice cream maker per instructions.

If you don’t have an ice cream maker, place chilled mixture in a baking dish and place in the freezer.  After 40 minutes, take it out and stir it up with a whisk, or (best) a hand-mixture to incorporate air and until a uniform texture.  Place back in the freezer and repeat this every 30 minutes.  After about 2 ½ to 3 hours, the ice cream should be good to go.

tags: melon gelato, orange blossom gelato, orange blossom water, melon desserts, recipes for summer
categories: desserts-1, all-7
Monday 08.30.10
Posted by Aliya LeeKong
 

Curry Leaf (also Kadhi Patta or Sweet Neem Leaf)

View fullsize curry-leaf-pic1-500x333.jpg
View fullsize curry-leaf-pic-2-500x166.jpg

Curry Leaf (also Kadhi Patta or Sweet Neem Leaf)

I know when “curry” is added to anything it’s as if the word, like the spice blend, takes over – the connotation of that powerful flavor is embedded in our brains.  That said, I cannot express in more uncertain terms than “curry leaves do NOT taste like curry!”

The fragrant curry leaf is found mostly in South Asian cooking (surprise!), particularly South Indian.  They get their name because of their use in curries, but the leaves can also be pan-roasted with a little oil to add flavor to a host of dry dishes.  Curry leaves are woodsy, lemony, and actually a little smoky, with no curry flavor whatsoever.  The flavor is subtle and deep all at the same time, a bit elusive for descriptive purposes, but a flavor that becomes easily embedded in taste memory.

I have to say that curry leaves are on my deserted-on-an-island-and-can-only-bring-10-spices list.  I absolutely love to heat a little oil up, add curry leaves and brown mustard seeds (a dynamically delicious combo) and make just about anything.  Beautiful in buttered rice.  A great base for a quick sautéed shrimp dish with some garlic, onions, chilies, and cilantro.  It’s amazing in coconut-based stews and lovely with kernel corn.  It adds incredible depth of flavor without overpowering any of the other flavors of a dish.

The fresh leaf has the strongest flavor although it has a short shelf life.  The leaf can be frozen for storage purposes, but it does lose some of its flavor that way.  Curry leaves can be found at South Asian specialty stores, but I actually pick mine up at Chelsea Market at the Manhattan Fruit Exchange.  They have some that are locally grown from a certified organic farm.  If you still feel unsure about how to use them, I will certainly be posting recipes in the coming months that will show how versatile they can be.

tags: curry leaf, Kadhi Patta, Sweet Neem Leaf, South Asian cooking
categories: spices-2, all-7
Friday 08.27.10
Posted by Aliya LeeKong
 

Squash Blossom Dolmas

View fullsize Squash-pic1-500x333.jpg
View fullsize Squash-pic2-500x333.jpg
View fullsize Squash-pic3-500x333.jpg
View fullsize Squash-pic4-500x169.jpg

Squash Blossom Dolmas

What is a “dolma” you might be asking?  A dolma is any number of stuffed vegetables – squash, onions, peppers, tomatoes, leafy greens or even eggplants.  It’s a tradition of the Ottoman Empire found throughout Greece, Turkey, the rest of the Mediterranean and the Middle East.  Think grape leaves, which are one of the more recognizable forms, found at the late-night gyro spot (is that just me??).  The stuffing is usually rice and/or lamb with nuts, dried fruits, spices and herbs.  When in a small form like a grape leaf or like these, they are pretty snackable.

I picked up some beautiful, delicate squash blossoms from the farmer’s market and was debating what to do with them.  They have a bit of that elusive, squash-like flavor and are visually captivating.  I’ve seen squash blossoms everywhere fried – tempura-fried, stuffed and fried, lightly batter fried.  And, yes, they do taste delicious fried.  That said, I wanted a bit of crunch but without the headache (and fattiness) of frying.  Making a squash blossom dolma, stuffed with a subtle, flavorful rice mixture and baked to lightly-crisped perfection, was the answer.

I must say the spices are pretty light here, which adds to the delicate nature of this dish.  For that reason, I like to be generous with the herbs because they lend such brightness to the dolmas.  These make a lovely (and conversation-provoking I can assure you) party appetizer, served alongside a dill-yogurt-dipping sauce.  They taste best warm though – once they cool, they lose a bit of their edge.  Also, this stuffing is pretty universal – if no squash blossoms are on hand, you could easily stuff peppers or blanched, swiss chard leaves with this.  Enjoy!

Ingredients

Yields 4 servings as a side or an appetizer

16 Squash blossoms, stems trimmed and stamens removed

2 tbsps butter

1 shallot, minced

¼ fennel bulb, minced

½ tsp ground coriander

¼ tsp ground cinnamon

pinch of ground cloves

2 garlic cloves, minced

½ cup white rice (jasmine or basmati are both fantastic)

¾ cup water or vegetable stock

1 ½ tbsps chopped, toasted pine nuts

½ tsp lemon zest

a generous handful of mint & dill, finely chopped

salt & freshly ground pepper

melted butter for greasing

Procedure

Preheat the oven to 400° F.

Rinse the squash blossoms gently and leave to dry fully in a colander or over paper towels while preparing the stuffing.

In a small saucepan, heat butter.  When foam subsides, add shallot, fennel, coriander, cinnamon and clove.  Sauté for a few minutes until shallots are translucent (will happen quickly because of how finely chopped they are).  Add garlic and sauté another 30 seconds or so until the garlic becomes fragrant.

Add rice and let toast with the butter and vegetables, stirring frequently.  Add water or vegetable stock and increase temperature.  Bring up to a boil, lower to a simmer, and cook covered for 20-25 minutes.   When rice is cooked, fluff with a fork, add pine nuts, lemon zest, chopped herbs, and salt and pepper to taste.

Carefully, stuff the squash blossoms with the rice mixture using a small spoon or even a melon baller.  Don’t overfill – allow the ends of the flowers to close.  Transfer to a greased baking sheet and drizzle with a little melted butter.  Season with a few pinches of salt, and bake for 15 minutes.  The outside should brown and be a bit crispy.  Serve warm!

tags: squash blossoms, dolmas, squash blossom recipes, recipes for summer
categories: appetizers, recipes, vegetarian-1, all-7
Thursday 08.26.10
Posted by Aliya LeeKong
 

Dinner @ Can Recasens

Dinner @ Can Recasens

I feel like taking a red-eye from NYC to Europe is a gift and a curse.  In my mind, getting there first thing in the morning is like cheating an extra day out of the trip.  I always have these grandiose visions of getting to the hotel, showering, and heading out for a day of adventure.  This almost never happens.

My first day in Barcelona, I ended up spending half the day waiting for the room to be ready because the hotel wouldn’t let us check in “early”…arghhh!  I felt trapped, sleepy, and un-showered…not a great combo.  And as I waited, I watched as the sun clouded over, the skies turned a deep gray, and then opened up…a thunderstorm our first night in Barcelona.  I was told it only rains 28 days out of the year…. what luck!

That said, I heard about a cute, local, uber-authentic spot in an area called Poble Nou.  The name of the place was Can Recasens, and I trekked (through the rain!) for dinner.  Family-owned, this place was a butcher shop until 2003 when it was converted to a full restaurant.  As you enter the front, you are surrounded by shelves of different olive oils, vinegars, and spices and a case full of cured meats and cheeses (all of which are for purchase).  Why do the shelves in shops like these look so elegant whereas in my apartment kitchen, it’s just clutter…in any case, it was more reminiscent of a quaint, Catalonian specialty shop than a restaurant, incredibly warm and vibrant.

I felt like I was entering someone’s home, a series of small adjoining rooms, each named after an artist.  The rooms were full of diners, none of whom were speaking English.  If Spanish diners are there at 11 p.m. on a rainy Thursday, the food must be the truth…

Meats, cheeses and wine – that’s what to expect (as well as being completely dehydrated the next day…).  The dinner started with a lovely cava and a salad loaded with oranges, lamb’s lettuce, mint, pine nuts, chili oil and crispy, fried onions.  Then came a Spanish cab, delicious, nutty pernil(Iberian acorn-fed ham, a house specialty), luscious sobrassada (cured sausage from the Balearic islands) with rosemary honey, caramelized chorizo from Leon, melted gruyère cheese over roasted red peppers…Many items are featured as torrades, meats and cheeses stacked or melted over crunchy bread.  They also have fondues as well as fustes, which are large wooden cutting boards piled high with various Catalan meats, sausages, pates, and cheeses.

We finished with something that was called chocolate mousse but was a bit lost in translation. I would definitely go back for a casual and (slightly) lighter alternative for dinner.  All in, a completely delectable evening and well worth the trek through the rain…

tags: Barcelona
categories: all-7, travel
Tuesday 08.24.10
Posted by Aliya LeeKong
 

Deadly Cape Malva Pudding

View fullsize malva-pic1-500x333.jpg
View fullsize Malva-pic2-500x333.jpg
View fullsize malva-pic3-500x333.jpg
View fullsize Malva-pic3-rev-500x168.jpg

Deadly Cape Malva Pudding

In a previous post on luscious bobotie, I mentioned some fun cooking I did while travelling around South Africa and a dessert I had there, Cape Malva pudding.  When Americans think pudding, it’s usually the sweet, cornstarch-thickened milk kind or, more often, the Jell-O sort.  But, historically, puddings are sweet or savoury and actually take a more solid form (like a Yorkshire or even a bread pudding).  In Europe or in places where Europeans migrated, these sorts of puddings are really popular, and this one is Dutch in origin, brought to South Africa sometime after the Dutch East India Company established Cape Town in the 1600’s.

At some point during try # 572 (exaggeration but it took me fooorever to create a recipe that I was 100% happy with), I was texting with a girlfriend who spent some time modeling in South Africa.  She’s always interesting to talk to because she was born in Somalia, spent the early part of her life in Kenya, and then grew up in Seattle.  She has travelled all over the world, and unlike the rest of us, can eat things like Malva pudding and still stay thin enough to model!  Anyway, when I mentioned that I was making it, she wrote back one word: DEADLY.  Can’t wait until she comes to New York in a few weeks so I can attempt to fatten her up with this…:)

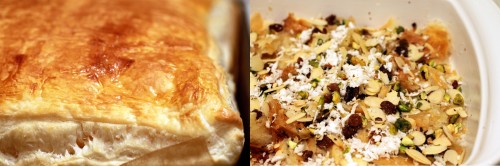
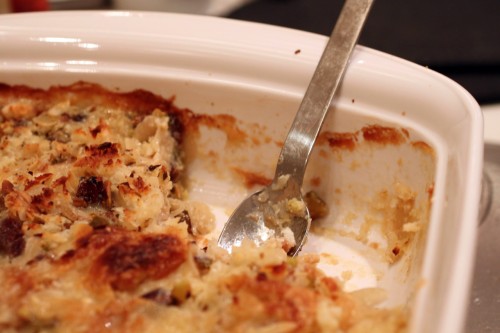
This dessert is, indeed, deadly, the type that gets even better the next day.  The result is slightly spongy, super moist and buttery, with an amazing caramelized exterior.  The sauce is thin and meant to be poured over the pudding to soak in and give it added moisture and flavor.  I used brandy in my sauce, but Amarula would be fantastic here.  The sauce can easily be made as is without the alcohol if you’re serving this to kids, and it’s still lovely.  Malva pudding is typically served in the Cape warm and with a side of custard (as if it needs anything else!).  Devonshire cream, mascarpone, whipped cream, or even ice cream are the perfect accompaniments.  Delicious.  Enjoy!

Ingredients

Yields 1 10-12 cup Bundt or ring-shaped cake pan

Pudding:

1 ½ cups flour

1 ½ tbsps baking soda

2 tsps baking powder

3/4 tsp salt

3 tbsps butter, softened at room temperature

1 ½ cups sugar

4 eggs, room temperature

2 tbsps red wine vinegar, room temperature

3 ½ tbsps apricot jam, room temperature

2 tsps vanilla extract

1 ½ cups milk, room temperature

Sauce:

¾ cup fresh cream

½ cup sugar

½ stick butter

1/3 cup water

1 tsp vanilla extract

1 – 2 tbsps brandy (whatever works for your tipsy scale)

Procedure

Preheat the oven to 350° F.

In a bowl, sift together the flour, baking soda, baking powder and salt.  Set aside.

All ingredients should be at room temperature.  In a stand mixer with a paddle attachment, cream together butter and sugar.  With the mixer still running, add eggs one at a time.  Once incorporated, add vinegar, apricot jam, and vanilla extract.  With the mixer on low, add one third of the flour mixture and then one third of the milk.  Repeat process two more times.

At this point, I stop the mixer and scrape down the sides.  Then, I turn it back on long enough to make sure that all of the flour is incorporated.  You don’t want to over mix and develop the glutens in the flour, but you do want to make sure that there are no dry spots in the mixture.

Pour into a heavily greased and well-floured Bundt, or other ring-shaped pan (single piece – no detachments – and preferably non-stick) or baking dish of your choice.  It should come up a little over halfway the size of the dish as it will rise significantly.  Bake at 350° F for 45 minutes, longer if needed – until an inserted cake tester or toothpick comes out clean.  The outside should be well caramelized.

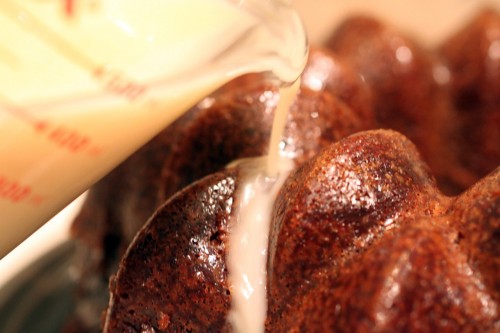
For the sauce, simply heat all of the ingredients in a small saucepan, whisking to make sure all of the sugar is dissolved.  Keep warm until you are ready to pour.  If you let this sit too long, a skin will form on top.  If this happens, just strain before pouring.

If you are unmolding the pudding, cool for about 15 minutes, run a knife around the edge if necessary and turn onto a plate.  Poke holes all over the pudding with a knife or a skewer, and slowly pour or spoon the sauce over all sides.  You want the sauce to soak in everywhere.  If you pour too quickly, the sauce will just pool and will make only the bottom part of the pudding moist.

If you are not unmolding, simply poke holes all over and pour the sauce right in.

tags: cape malva pudding, South African food, South African cooking, South African recipes
categories: breads & cakes, recipes, desserts-1, all-7
Monday 08.23.10
Posted by Aliya LeeKong
 

Omani Lemons

View fullsize Omani-1-500x333.jpg
View fullsize Omani-21-500x333.jpg

Omani Lemons

Indeed, Omani lemons are not lemons at all!  They are dried limes and also go by the names black lime, loomi, amani and noomi basra (to name a few).

I scooped these up one day at a Middle Eastern specialty store and have been adding them to braises and rice dishes ever since.  They go a long way, so one of them has enough flavor for around 3 cups of basmati rice (with which it goes especially well).

Omani lemons are used in cooking throughout the Middle East and even North India. Typically, (fresh) Omani limes are boiled in salt water and then dried in the sun.  This preservation process turns them anywhere from a light tan to black in color and hollow in the center.  Their flavor is tart, more like the peel than the juice, without any sweetness, and they also have an indescribable muskiness.  They are fantastic as a souring agent in place of lemon juice in a sauce.

To use them, you can poke a small hole in one or two and throw them into whatever slow-cooking pot is at hand.  They can also be crushed or even powdered, and they are sold whole, crushed or powdered at various ethnic grocers.

tags: dried limes, black lime, loomi, amani, noomi basra, Middle Eastern cooking, Middle Eastern ingredients
categories: spices-2, all-7
Friday 08.20.10
Posted by Aliya LeeKong
 

Black Salt 'Slaw

View fullsize slaw-pic1-500x333.jpg
View fullsize slaw-pic-2-500x358.jpg
View fullsize Slaw-pic3-500x333.jpg
View fullsize slaw-pic4-500x333.jpg

Black Salt 'Slaw

I grew up in a suburb in Florida, and, although there was a pretty large Indo-Pakistani community, the resources were very spread out.  That is to say, there was no central area to find food (think Adam’s Morgan in D.C. or Curry Hill in NYC), and there were maybe one or two good Indian grocers selling everything from spices to Indian sweets to household goods.

I used to love visiting my family in Toronto, an incredibly ethnically diverse city.  There are West Indian neighborhoods, Indian areas, Chinese, Philipino, Latin American – all distinct areas.   Ambling down Gerard Street, one of those streets that literally transport you into a different country, you can find row after row of Indian restaurants and shops– clothing, groceries, dvd’s, jewelers…you name it.

One of my favorite parts about the trip (because I can assure you shopping for clothes with the women in my family is nothing short of arduous) was visiting the various chaat houses.  Chaat is a general term and includes any Indian snacks that have puris, puffed rice, fried noodles or dumplings with potatoes, lentils, chickpeas or even mung bean, all doused in spicy, tart, tangy sauces.  “Junk food”, we’d call it.  I would devour these chaats and wash it all down with falooda (which I mentioned in my sugar plum post and which I will have to make at some point); it’s really what got me through these shopping trips.

Tamarind, cilantro, chilies, onions, and yoghurt were all featured heavily in these dishes, but it was the spice mix, the chaat masala, that really made them distinct.  Chaat masala includes a staggering number of spices, but one flavor that stands out from them all is black salt.  Black salt, or Kala Namak, is a grayish rock salt, and it, quite frankly, has a smell similar to eggs.  It has a sulphurous quality, and, although that may not sound too appealing, I assure you once mixed in it is delicious!

I thought I would make a ‘slaw for the summer that focuses on black salt.  I served it here over a beautiful, simple, grilled swordfish, but it would also be delicious with yesterday’s ribs.  The chili powder gives it a little heat, the honey sweetness, and it definitely has the tart and tangy quality of the chaats I remember as a child.  Enjoy!

Ingredients

Yields 6 to 8 Servings

For the dressing:

½ cup red wine vinegar

2 garlic cloves, minced

3 tbsps honey

3 tsps black salt

½ tsp salt, kosher or sea

½ tsp Indian chili powder or hot Hungarian paprika

½ tsp finely ground black pepper

I roughly ground the toasted seeds)

For the slaw:

½ head green cabbage

½ head red cabbage

1 or 2 carrots, julienned or shredded

1 bulb fennel, thinly sliced

2 green onions, thinly sliced (white and green parts only)

Procedure

This is super simple as most coleslaws are.  I like to combine all of the dressing ingredients, and let them marinate while I’m prepping the vegetables.

For the cabbages, wash thoroughly and remove the core.  You can either slice manually or use the slicer in your food processor to achieve the right sized pieces.  Combine with the carrots, fennel and green onions in a non-reactive bowl.

Pour the dressing over the vegetables, and keep refrigerated for 2 hours or so.  I like to toss the coleslaw every half hour  to make sure any dressing that has sunk to the bottom gets fully mixed in.  The flavors are much brighter when you let them sink in for a few hours.

tags: Black Salt, 'slaw, recipes for summer
categories: side dishes, recipes, vegetarian-1, all-7, soups & salads
Wednesday 08.18.10
Posted by Aliya LeeKong
 

Baby Back Ribs with Pomegranate Molasses

View fullsize ribs-pic1-500x333.jpg
View fullsize ribs-pic2-500x333.jpg
View fullsize ribs-pic3-500x333.jpg

Baby Back Ribs with Pomegranate Molasses

So first, I’m going to apologize.  I love taking all of the pictures for the site, and I take a lot of care in trying to bring un-stylized, real pictures that showcase what the food’s all about.  I was so looking forward to the moment I pulled these tender ribs from the broiler and took the money shot:  a whole rack of ribs, glistening and shiny, caramelized from the bbq sauce.  I couldn’t wait to post it.

Unfortunately for the photos (but not the deliciousness…), the ribs were literally so tender they fell apart!  I ended up with a mouth-watering, caramelized, heap of ribs that required only a fork (but mostly my fingers).  I legitimately ate half a rack before I even took the finished picture…

Pomegranate molasses is one of those essential ingredients in Mediterranean and Middle Eastern cooking.  It’s really just pomegranates that have been cooked down in sugar, water, and maybe a bit of lemon juice to form a syrupy concentrate.  It’s absolutely delicious in both sweet and savoury applications.  Mixed with a bit of sparkling water, it’s a refreshing drink.  It can be used in cakes, cookies, mousses, anything.  And, also, makes a lovely ingredient for sauces – would go incredibly well with duck and made a really killer bbq sauce here.

It sounds a bit scary, but I wrapped these guys up in plastic wrap and then covered them with foil, cooking them in the oven for about 4 hours at 250° F.  A bit of at-home-not-so-sous-vide.  But that’s what made them the most tender ribs I’ve ever made.  Who needs a grill in a NYC apartment!  The pomegranate molasses adds a tart and fruity kick to a really easy bbq sauce and tastes delicious with the dry-rubbed, juicy, falling-off-the-bone ribs.  Enjoy!

Ingredients

Yields 4 to 6 servings

2 whole racks baby back ribs (approximately, 5 lbs)

Dry Rub:

1 tbsp dried thyme

2 tsps ground coriander

1 ½ tbsps garlic powder

1 ½ tbsps onion powder

1 tsp cinnamon

2 tsps Spanish paprika (pimentón)

2 tsps hot Hungarian paprika

1 tsp black pepper

1 tbsp salt

1 ½ tbsps packed light brown sugar

BBQ Sauce:

3 tbsps butter

2 shallots, fine dice

4 garlic cloves, minced

1 ½ cups ketchup

¾ cup water

¼ cup red wine vinegar

3 tbsps light brown sugar

4 ½ tbsps pomegranate molasses

½ tbsp lemon juice

¾ tbsp Worcestershire sauce

¾ tsp cayenne

1 ½ tsps Dijon mustard

Procedure

In a bowl, combine all of the dry rub ingredients and mix well.

Tear two pieces of foil large enough to wrap around each rack of ribs, and place shiny side down on a surface.  Tear equal-sized pieces of plastic wrap, and place on top of the foil sheets.  Pat dry the ribs, and place each rack on the plastic wrap.  Sprinkle both sides of the ribs generously with the dry rub, and pat the dry rub into the meat.  Wrap tightly in the plastic wrap, followed by the foil.  Refrigerate the ribs for a minimum of 1 hour and up to 1 day in advance.

Preheat the oven to 250° F.  Let the ribs come up to room temperature (very important!).  Place the foil and plastic-wrapped ribs on baking sheets on the middle rack in the oven, and cook for 4 hours.  Remove, and let cool briefly.

In a saucepan, melt the butter over medium heat.  Add the shallots and garlic, and sauté for a few minutes until the shallots are translucent.  Add the rest of the sauce ingredients, lower the heat to a simmer, and cook stirring frequently for about 20 minutes.

Turn the oven temperature up to broil.  Carefully remove the ribs from the foil and plastic wrap and pour off any accumulated juices.  Place back on the backing sheet, baste with the bbq sauce, and broil for 5 to 7 minutes until caramelized.

tags: baby back ribs, pomegranate molasses
categories: recipes, main dishes-1, all-7
Tuesday 08.17.10
Posted by Aliya LeeKong
 

Black Mission Fig Crème Brûlée

View fullsize Fig-Creme-pic1-500x333.jpg
View fullsize Fig-Creme-Pic2-500x333.jpg
View fullsize Fig-creme-pic3-500x333.jpg
View fullsize Fig-Creme-Pic-4-500x166.jpg

Black Mission Fig Crème Brûlée

The idea for this dish came to me the last time I was in Florida visiting my parents.  My mom picked up these delicious black mission figs from the farmer’s market.  When I go home, I completely resort back to childhood, opening and closing the fridge, perusing for snacks each time I pass the kitchen.  This time, I kept intermittently pulling the figs out of the fridge, cutting them in half, sprinkling each half (generously…) with brown sugar, and torching them for a brûlée’d snack of sorts.  Sweet, subtle, with a satisfying caramelized crunch from the brown sugar.  And with whipped cream?  Heavenly.

Fig trees grow throughout the Mediterranean, Middle East, and even South Asia, figuring prominently in the dishes of those regions.  My mom reminded me the other night that it was such a treat – going over to a “favorite” aunt’s house when she was a girl, plucking ripe figs from the tree in her yard, and eating them fresh on the spot.  Figs perish easily, and their flavor quickly declines off the tree.  I can only imagine at this point the intensity of flavor of a freshly picked fig.

The creamy, sweet, crunchy, caramelized taste of my torched figs is more elegantly recreated here in crème brûlée form.  I cook down the figs, puree them, and infuse the cream with the puree to form the base of the custard.  I use a combo of sugar and honey to sweeten it and include a vanilla bean for depth.  Is there anything more satisfying than a cleanly scraped vanilla bean?

Ok.  Maybe the crack-crack-crack of the sugar layer over the luscious, creamy custard…

If I was serving this at a party, I would garnish with fanned out, thin slices of fig.  I inhaled it too quickly here to show you that…Enjoy!

Ingredients

Yields 6 5-inch oval ramekins

5 or 6 fresh mission figs, stemmed and cut into a medium dice

¼ cup water

2 cups heavy cream

1 vanilla bean, split and scraped

¼ tsp salt

5 egg yolks

1/4 cup + 1 tbsp sugar

2 tbsp honey

Procedure

Preheat the oven to 325° F.

In a saucepan, heat figs, water, and 1 tbsp sugar over medium-low heat.  Cook for about 5 minutes until figs break down and liquid dries up.

Transfer cooked figs to a blender.  Purée, using a little of the heavy cream if necessary.  Transfer mixture to a medium saucepan, adding the rest of the heavy cream, vanilla bean, and salt.  Bring mixture up to a boil on medium heat.  Remove from heat, cover, and let steep 15 minutes.

In a medium bowl or stand mixer, whisk egg yolks, 1/4 cup sugar, and honey until well blended and light yellow in color.  It should look very creamy at this point.

Strain cream mixture through a fine sieve and add it in small amounts to the yolks, whisking after each addition.  You want to slowly bring up the temperature of the yolks (not scramble).  Transfer custard to a measuring cup or something that pours easily.

Place paper towels in two different baking dishes and divide ramekins between the two.  Carefully, pour the custard ¾ of the way up into the ramekins.  Then, add water to the baking dishes so that it comes about halfway up the sides of the ramekins.  I bake these in a water bath, and the paper towels help the ramekins from sliding around and also help reduce the risk of splash as you pour the water into the dishes.

Bake at 325° F for 35 minutes.  It should still jiggle slightly.  Remove from water bath and let cool at room temperature for 10 minutes.  Cover in plastic wrap (don’t let it touch the surface), and chill in the refrigerator for at least 2 hours in order to set the custard.

Coat the top of the custard in each ramekin with a layer of sugar.  Turn over to remove excess.  Carefully, using a torch, brûlée the sugar, working in circles evenly over the ramekins.

Note: if you use larger or deeper ramekins, the cooking time will inevitably be longer.  The key things are the water bath and also that it still jiggles when it comes out.  You want smooth, creamy custard, not overcooked and curd-like.

tags: Crème Brûlée, Black Mission Fig, Fig Crème Brûlée, fig desserts
categories: all-7, desserts-1
Monday 08.16.10
Posted by Aliya LeeKong
 

A Day @ Hélène Darroze

A Day @ Hélène Darroze

I looked up the word serendipity to make sure I am really using it right. “Serendipity is a propensity for making fortuitous discoveries while looking for something unrelated.”  Yes!  That sufficiently describes being able to spend a day in the kitchen of Hélène Darroze at the Connaught in London.

But first, a little background.  I am a godparent to a little bundle  whose parents are dear friends of mine, extraordinarily sweet …and also not exactly the plan-ahead-kind-of-folks.  So I found out, with about two weeks notice, that they would love if I could come to my godchild’s christening…in Bolton, England, the father’s hometown.  Where IS that exactly.  About 20 minutes outside Manchester, and it took planes, trains, and automobiles to get there!

Needless to say, I used this excuse to spend a little time in London.  I am a GOOP reader, and Gwyneth's endorsement of the Connaught was all I needed to book a room there.  They have both traditional and modern wings, and the rooms were stunning (I’m a modern gal, myself).

Another great friend of mine who lives out there and is seriously on the pulse of the London lifestyle declared the Connaught Bar “brilliant!”, which it was.  Amazing bespoke martinis and a room that oozes elegant, glittering sex appeal.  Like the Blue Bar at the Berkeley’s sophisticated older cousin.  A few pics that don’t do it justice

So the serendipitous part.  The restaurant at the Connaught happens to be none other than Hélène Darroze. She, herself, is iconoclastic – a Michelin-starred chef who left her family’s traditions to start her own.  She trained under Alain Ducasse during a time when female French chefs were scarce (they still are) and has a restaurant in the Left Bank in Paris and this one at the Connaught.  BOTH hold Michelin stars…

Hélène and her awesome Chef de Cuisine, Raphael, spent some time at Per Se while I was there, so I gave Chef Raphael a quick call asking begging him to let me come trail for the day.  And he agreed!  He was so kind and accommodating, and the kitchen there is such a complex operation.  I left totally amazed and impressed.

Only 6 chefs work in the fine dining kitchen, and they quickly turned out dishes for service like the escabeche-style marinated mackerel with warm potatoes with pesto and pimientos del piquillo (yes, that’s one dish) and duck foie gras from les landes with a seasonal fruit chutney and grilled country bread (another).

You’ll notice in these pictures the lighting is different.  That’s because they are plated on the “pass”, which is the area of the kitchen where dishes get their final touches; this one has a warming light.  The line-caught calamari ravioli with Swiss chard, confit tomatoes and capers from Pantelleria, black ink reduction, and Parmigiano Reggiano emulsion looked amazing as did the poached, soft-boiled egg with white asparagus and truffles.

The Chef also showed me the Sommelier’s Table, which is a super-cool subterranean (I think!  The place was a maze, and we took an elevator and some stairs to get there.) private dining room adjacent to a temperature and humidity-controlled wine room.  The wine room is built from some imported, French stone that is supposed to be the best material for maintaining the room’s ideal conditions.  The concept behind this dining room is that the patrons choose specific wines from the vault, and the chefs design (on the spot!) a bespoke menu for the evening’s dinner.

It was an incredible day.  I feel so fortunate to have had this opportunity, so thank you to Chef Hélène and Chef Raphael for allowing me a glimpse of a brilliant restaurant.

tags: London, The Connaught
categories: all-7, travel
Friday 08.13.10
Posted by Aliya LeeKong
 

Urfa Biber

View fullsize urfa-biber-500x333.jpg

Urfa Biber

NYTimes magazine predicted a few months ago that this Turkish pepper would be popping up all over the place, and I’m so happy for it.  This is an IT spice if ever there was one.

Urfa biber is made by coarse-grinding a Turkish chili called the Urfa chili.  These chilies are grown in southeastern Turkey, close to Syria.  They range in color from burgundy to purplish-black, and they go through a two-part process, alternatingly dried in the sun and wrapped overnight – a process that develops the amazingly smoky, sweet and earthy character of the pepper.

The flavor is like ancho chilies on steroids, although it has a little more heat.  It hits you more at the front of your tongue, in a black pepper kind-of-way, and has a beautiful smokiness to it.  This is my go-to these days for grilled meats, but I also use them in Sunday breakfast scrambled eggs with pancetta and green onions and to give sautéed fish more depth of flavor.

The peppers have a pretty high oil content, and the ground spice should look shiny.  I keep it in my freezer, and it stays for months that way.  Here are two sources for the spice: World Spice Merchants and Kalustyan’s.

tags: Turkish pepper, Turkish chili, Urfa chili
categories: all-7, spices-2
Thursday 08.12.10
Posted by Aliya LeeKong
 

Crunchy Coconut Corn Fritters

View fullsize corn-fritters-pic1-500x333.jpg
View fullsize Corn-Fritter-Pic2-500x333.jpg
View fullsize Corn-Fritters-Pic3-500x166.jpg
View fullsize corn-fritters-pic4-500x333.jpg

Crunchy Coconut Corn Fritters

The combination of corn and coconut is something that will always remind me of childhood.  One of my favorite East African dishes growing up is called makai paka. It’s basically sweet corn on the cob simmered in a creamy, coconut-based broth with turmeric, garlic, green chilies, and cilantro.  The fun was in eating the corncobs; you could suck out the spicy coconut curry absorbed into the cobs, making ridiculous slurping noises.  Not something I can quite get away with these days…

Corn seems like a New World food, but it was brought to the African continent by the Portuguese in the sixteenth century.  Whether in South African mealies, West African maïs grille (basically grilled corn), or East Africa’s ugali, corn figures prominently.  In Ghana, the coconut/corn combo pops back up in a dish called abrow ne kokosi, where corn kernels are simmered in coconut milk with fresh pieces of coconut flesh.  Delicious.

I wanted to see the combo in a more familiar form, something easy to eat or serve as a snack to guests.  These fritters come out surprisingly light, not overpoweringly coconut-ey, and have a sweet and savoury quality to them.  With all of the beautiful summer corn, it’s also a great way to use up any leftovers you might have sitting around.  The fritters work really well with a cilantro aioli or even a spicy ketchup dipping sauce.  Enjoy!

Ingredients

Yields approximately 2 dozen fritters

1 cup all purpose flour

1 tsp baking powder

½ tsp salt

½ tsp sugar

½ tsp cayenne

1 egg

½ cup coconut milk

a few dashes of hot sauce

1 ½ tbsps butter, melted

1 ¼ cups fresh corn kernels (about 2 ears)

1 cup frozen, grated unsweetened coconut, thawed

¼ cup scallions, thinly sliced

1 tbsp green chilies, finely minced (optional)

salt

Procedure

In a bowl, sift together flour, baking powder, salt, sugar, and cayenne.  In another bowl, beat together egg, coconut milk, hot sauce, and butter.  Add wet ingredients to dry ingredients and mix until it comes together.  Don’t overmix.  Fold in remaining ingredients.

In a large heavy saucepan, dutch oven, or deepfryer, heat about 4 inches of vegetable oil to 325° F.    Carefully, drop spoonfuls of the batter and cook until golden brown, working in batches.  Remove to a towel-lined plate and sprinkle with salt.

A few things: (1) don’t overcrowd because it will bring the oil temperature too far down, and (2) be careful – it splatters when cooking.

Serve warm with a dipping sauce of your choice…

tags: corn fritters, coconut fritters, recipes for summer, corn recipes, savoury fritters
categories: all-7, appetizers, recipes, vegetarian-1
Wednesday 08.11.10
Posted by Aliya LeeKong
 

A Luscious Dessert called Om Ali

View fullsize om-ali-500x333.jpg
View fullsize Om-Ali-ingredients-500x333.jpg
View fullsize Om-Ali-cooking-500x166.jpg
View fullsize om-ali-eaten-500x333.jpg

A Luscious Dessert called Om Ali

A little while ago, I read an article that highlighted the culinary resurgence of Beirut, and I could not help but think of this dish and my visit a few years ago.  I was there at a point when the city was built up and beautiful.  Cultural, cosmopolitan.  I remember the architecture as stunning, and I endlessly wandered the streets, dipping in and out of little shops.  The shopping was amazing, and the outdoor café scene buzzing – rivaling the Da Silvano, Bar Pitti, 10 Downing trifecta…In any case, the article has me excited that chefs like Joel Robuchon and Yannick Alléno are considering opening up restaurants there.

When I went, it was for a wedding of two close friends of mine.  The wedding was a total bash, a multi-day affair with dinners and drinks and parties each night.  At one of the dinners, I had this dessert, Om Ali, and it has been literally stuck in my head ever since.  The dish is pretty much a form of bread pudding, but instead of using bread, the Lebanese use filo or puff pastry.

Seriously, a layered puff pastry bread pudding?  How ridiculously delicious does that just sound… In between the pastry layers are various nuts, fruits, and coconut, all in a custard base.  I love to eat it warm with a scoop of vanilla or cinnamon ice cream.  The dish is sooo good that this is what happens when you leave it out to cool and your significant other comes home hungry!

Om Ali is not exclusively Lebanese.  It’s also found in Egyptian and other Middle Eastern cuisines.  In my version, I use orange blossom water, which is a common ingredient in Middle Eastern desserts.  It has a beautiful, perfume-y quality that is distinct – once you have it, you’ll always be able to recognize it.  Enjoy!

Ingredients

Yields 1 9”x13” baking dish

1 puff pastry sheet

½ cup sliced almonds

½ cup pistachios, chopped or crushed

½ cup sultanas

1 cup frozen, grated unsweetened coconut*

½ tsp lemon zest

2 ½ cups milk

2 cups heavy cream

1 cup sugar

2 tbsps orange blossom water

1 tsp vanilla

½ tsp cinnamon

pinch salt

2 eggs

Procedure

Preheat the oven to 375° F.

Bake the puff pastry on a greased or parchment-lined baking sheet for 15 to 20 minutes until golden and cooked through.  Set aside to cool.

Turn oven temperature up to 400° F.

Chop pistachios into smaller pieces or place in a plastic bag and crush with a mallet.  Toast pistachios and sliced almonds in a sauté pan over medium-low heat until fragrant.  Remove from heat and combine with coconut, sultanas and lemon zest in a separate bowl.

Heat milk and cream in a saucepan over medium heat.  Add sugar, orange blossom water, vanilla, cinnamon and salt, and stir to dissolve.  Beat eggs in a large bowl.  Add the milk mixture slowly and in increments to temper the eggs, stirring constantly.  You want to slowly bring the eggs up to temperature; adding the milk too fast will scramble them.

Grease a 9” x 13” baking dish.  Rip puff pastry into pieces and create a single layer in the baking dish.   Add half of the pistachio and almond mixture to create a layer.  Cover with the milk mixture.  Repeat entire process to create a second layer of each.

Bake at 400° F for 23-25 minutes until the top browns and the dessert has set.  Serve warm by itself or with a lovely scoop of ice cream.

* I like the texture of real coconut for this dish, so I use fresh grated or fresh frozen grated coconut here.  If you like the dried version or if that’s what you have on hand, go with it.

tags: Om Ali, coconut desserts, puff pastry bread pudding, bread pudding, Lebanese desserts, Middle Eastern desserts
categories: all-7, desserts-1, recipes
Monday 08.09.10
Posted by Aliya LeeKong
 

Za’atar – Fresh Herb & Spice Blend

View fullsize Zaatar-500x333.jpg
View fullsize Zaatar-2-500x333.jpg

Za’atar – Fresh Herb & Spice Blend

I tried fresh za’atar for the first time a few weeks ago, and it was really surprising – like a taste you recognize but can’t quite put your finger on.  When I taste it, I get the pungency of oregano, the woodsiness of thyme, and a zest that reminds me of mint.  Za’atar is from the marjoram family, and it’s pretty hard to find fresh.  I lucked out with this plant because the Union Square Greenmarket happened to carry it.

Za’atar is not only a fresh herb but also a spice blend used in Middle Eastern cooking.  The blend is traditionally comprised of crushed, dried fresh za’atar, toasted sesame seeds, and ground sumac with salt and other spices or herbs.  The blend differs from region to region and even from household to household.  Lebanese za’atars include orange peel, nigella seeds, and anise, whereas the Syrian version includes roasted cumin and paprika and the Israeli version, dill weed and garlic.

Although za’atar can be found at Middle Eastern groceries and even Whole Foods, using dried or fresh thyme makes a great approximation for homemade variations.  Sesame seeds add nuttiness and sumac tartness.  In the Middle East, unleavened bread is first dipped in olive oil and then za’atar.  It’s awesome as a dip for crudités when mixed with yogurt and sour cream and also makes a versatile spice rub for anything from fish to meats.

tags: za'atar, herbs, spices
categories: spices-2, all-7
Friday 08.06.10
Posted by Aliya LeeKong
 

Sumac

View fullsize Sumac-500x333.jpg

Sumac

Sumac is a deep burgundy-colored spice powder made from crushed sumac berries.  The flavor is tangy and pleasantly sour with fruit undertones.  Sumac trees are found predominantly in the Mediterranean region and throughout the Middle East, and the spice is a staple in Middle Eastern cooking.  It is used as a souring agent and is a key ingredient in za’atar.


tags: sumac, spices, Middle Eastern cooking, Middle Eastern spices
categories: spices-2, all-7
Friday 08.06.10
Posted by Aliya LeeKong
 

Creamy Cauliflower Puree with Fenugreek

View fullsize Cauliflower-pic1-500x333.jpg
View fullsize Caulfilower-Puree-Ingredients-500x333.jpg
View fullsize cauliflower-pic3-1-500x333.jpg

Creamy Cauliflower Puree with Fenugreek

So it’s the middle of summer.  I know a bathing suit looms in the near future, and despite all attempts I’ve let things like pork buns, sausage orecchiette, a hot dog on the run, and delicious pastries from Duane Park Patisserie interrupt an otherwise (mildly) healthy flow of food.  Let’s not even bring up the subject of wine.

My fridge is loaded with fruits and veggies, sending subliminal messages of health across my apartment.  I was seriously in the throes of a carb-craving the other day, and with nothing other than fruits and veggies decided to get a little creative.  The result?  A lusciously, creamy cauliflower puree flecked with crushed fenugreek leaves.

Okay, so in reality, this still has butter and some milk, but it’s definitely better for you than equally buttery mashed potatoes.   The cauliflower, cooked until super tender, is fresh and creamy when pureed.  Fenugreek, as a seasoning, is used in so many different cultures – South Asian, Ethiopian (like in the clarified butter), Iranian, Turkish, Afghani…to name a few.  I chose the leaves here over the seeds because the flavor of the leaves is much more subtle and lacks the typical bitterness of the seeds.  Fenugreek leaves have a flavor not unlike celery, and, when warm, emit a sweetness of sorts.

This is a sinfully easy side dish to make.  Fenugreek leaves can be purchased at most specialty spice stores, and even health food stores.  Enjoy!

Ingredients

Yields 6 to 8 servings

3 small heads or 2 large heads of cauliflower, cored and cut into even-sized florets

3 garlic cloves

6 cups milk

1 stick butter

1 ½ tsps ground fenugreek leaves*

chopped chives

salt & freshly ground pepper

Procedure

In a medium pot, bring cauliflower, garlic, a pinch of salt and milk up to a simmer.  Do not boil.  Simmer covered for 12-15 minutes or until cauliflower is very tender.

Strain cauliflower and garlic from milk mixture, reserving both.  Melt butter with ground fenugreek in a small saucepot for 5 to 7 minutes.

Puree cauliflower in a blender with 1-1 ¼ cups of reserved milk and melted fenugreek butter, working in batches if necessary.  Adjust milk amount based on desired texture of the puree.  Season with salt and freshly ground pepper and garnish with chives.

*In order to grind the fenugreek leaves without any of the stems, place a small sieve over a paper towel.  Add fenugreek leaves and crush the leaves between your fingers and/or against the sieve, itself.  The ground fenugreek will fall through the sieve onto the paper towel.

tags: cauliflower puree, fenugreek, vegetarian sides, cauliflower side dish
categories: all-7, side dishes, recipes, vegetarian-1
Thursday 08.05.10
Posted by Aliya LeeKong
 
Newer / Older