X

Sign up to receive exclusive recipes, tips, updates and other goodies from Aliya!

  • Home
  • Blog
    • All
    • Recipes
    • Spices + Ingredients
    • Lifestyle, etc.
    • Travel
  • The Cookbook
  • The App
  • Media
    • All Media
    • Video
  • About
  • Passions
Aliya LeeKong
  • Home
  • Blog
    • All
    • Recipes
    • Spices + Ingredients
    • Lifestyle, etc.
    • Travel
  • The Cookbook
  • The App
  • Media
    • All Media
    • Video
  • About
  • Passions

Mujaddara with Bulgur & Yoghurt

View fullsize mujadarra-pic1-500x333.jpg
View fullsize muj-pic2-500x333.jpg
View fullsize muj-pic3-500x333.jpg

Mujaddara with Bulgur & Yoghurt

Let me just say…thank goodness for the rainbow microgreens I had stashed in my fridge from earlier this week.  Without which, this dish would not look quite so attractive!  Looks aside, this has to be one of my favorite sides – shockingly delicious (don’t let the bulgur and lentils fool you), exquisitely simple to make, and, yes, healthy on top of it all.

Mujaddara is a Middle Eastern dish that traditionally pairs lentils with rice and caramelized onions.  Certain versions, like this one, exchange the rice for bulgur wheat, which adds a sweet nuttiness and beautiful texture to the dish.  But the real star here are the caramelized onions that are cooked a bit further than you might be used to, to the point where the edges get really dark and take on a bittersweet quality.  These onions take this dish to the next level and give it that addictive quality, the kind that makes you keep going back to the fridge to nibble quick, little, cold spoonfuls of it (or is that just me?).

The dish could not be simpler – caramelize onions, cook lentils, add bulgur, mix everything together.  I do a few extra things, of course, to boost the flavor a bit: namely, use chicken stock to cook the lentils and bulgur, add a few extra spices and aromatics while cooking them, and top the whole thing off with toasted pine nuts.  But this recipe can easily be modified for vegetarians and even vegans if butter is omitted and/or vegetable stock is used.  A bowl of nice, cool yoghurt pairs beautifully with the dish, and I love a few pinches of pimentón de la Vera on top for some smoky heat.  The texture is tender and fluffy with rich bites of the caramelized onions and a hint of spice…and wait ‘til you taste it the second day, even better.  Enjoy!

Ingredients

Serves 4 to 6

2 tbsps unsalted butter

1 tbsp vegetable oil

2 yellow onions, thinly sliced

4 cups chicken stock

1 bay leaf

1 small bunch fresh thyme

¾ tsp ground coriander

½ tsp ground cumin

generous pinch chili flakes (I used Aleppo but any will do)

tiny pinch cinnamon

1 ¼ cups lentilles du Puy (French green lentils but brown ones work too)

¾ cup bulgur wheat

¼ cup pine nuts, toasted

salt and freshly ground black pepper to taste

extra virgin olive oil

Yoghurt:

yoghurt

pimentón de la Vera

Procedure

Heat a medium-sized skillet over medium heat.  Add butter and oil, and when the foam subsides, add the sliced onions and a few pinches of salt to draw out the moisture.  Reduce the heat to low and cook for 30 to 45 minutes until the onions deeply caramelize and brown.  They should go even darker than traditional caramelized onions, just before they start to turn bitter.  Remove with a slotted spoon and set aside.

While the onions are cooking, bring the chicken stock up to a boil with the bay leaf, thyme, coriander, cumin, chili flakes and cinnamon.  I like to tie the thyme bunch with a bit of kitchen twine, so I can easily toss it at the end.  Add the lentils, reduce the heat to a simmer and simmer covered for 15 to 20 minutes until the lentils are almost tender but have a slight bite.

Add the bulgur, season with salt and freshly ground pepper, and stir to combine thoroughly.  Cover and simmer for another 15 minutes.  Turn off the heat and let sit for another 10 minutes for the bulgur to finish cooking and to turn fluffy and tender.

Remove the bay leaf and thyme, and add the caramelized onions to the lentils and bulgur, mixing thoroughly, and adjust seasoning if necessary.

Serve warm topped with toasted pine nuts and a drizzle of extra virgin olive oil with a side of yoghurt sprinkled with pimentón de la Vera.

tags: Mujadarra, Bulgur, middle eastern recipes, lentils
categories: all -1, recipes, side dishes, vegetarian
Monday 02.27.12
Posted by Aliya LeeKong
 

Black Sesame Arabic Donuts w/Date Molasses

View fullsize donut-pic4-500x333.jpg
View fullsize donut-pic2-500x333.jpg
View fullsize donut-pic3-500x166.jpg
View fullsize donuts-pic11-500x333.jpg

Black Sesame Arabic Donuts w/Date Molasses

Last week I told you all about my yeast fiasco and how it wasn’t proofing, but this week I at least got that straight!  I tasted these while staying with a good friend in Bahrain – she made them for afternoon tea, and I knew I was going to come home and work on my own version.  I’ve just never tasted a donut like this – with cardamom, (black) sesame seeds for nuttiness, and, though I know it looks sticky sweet, not-too-sweet date molasses as the glaze.  It’s the perfect little treat.

The original dish is called luqaimat or luqmat, and they are often described as fermented, sweet dumplings; they’re eaten year-round but especially around Ramadan and may be glazed with sugar syrup rather than date molasses.  But as with most foods, these balls of fried dough aren’t 100% unique.  They are related to loukamades, a Greek version, and are loosely similar to Indian jalebiand even Italian zeppole.

And the reality is that what I had in Bahrain had a hollower, lighter and crisper texture.  When I watched this batter being made, it was completely by eye and water (rather than milk) was added to achieve the right batter consistency.  I turned these guys into more of a donut (much closer to zeppole) for my own purposes.  I love them this way but will continue to experiment and play around with quantities to see what I others end up liking the best.

Regardless, these are hard to resist – crispy and doughy at the same time, perfumed with cardamom and saffron, a touch of sesame for nuttiness and that tangy, addictive date molasses…Enjoy!

Ingredients

Yields approximately 2 dozen donuts

3/4 cup milk

¼ cup sugar

1 packet active dry yeast (2 ¼ tsps)

1 cup flour

½ tsp ground cardamom

½ tsp salt

pinch saffron

2 tbsps black sesame seeds, toasted

3 tbsps yoghurt, room temperature

oil for frying

¼ cup date molasses

Procedure

In a small saucepan, heat milk to just warm and remove from the heat.  If it gets too hot, it will kill the yeast – you should still be able to dip your finger in it with no problem (110°-115° F).  Add the sugar and the yeast and stir to combine.  Let sit 10 minutes.  It should start to bubble and get foamy (if not, your yeast may no longer be active).

In a bowl, sift together the flour, cardamom and salt.  Add the saffron and the black sesame seeds to the flour mixture and whisk to combine.  Add the yoghurt to the warm milk/yeast mixture, whisk to combine and then whisk it into the flour mixture.  You want to make the batter uniform and lump free.  Transfer to a greased bowl – cover and keep in a warm place for 2 hours.

Heat 2 to 3 inches of your preferred frying oil in a large pot to 325° F.  Using a small ice cream scoop (or spoon), spoon uniform balls of the batter into the hot oil.  Fry for 5 to 7 minutes until the donuts turn a dark golden brown.  Continuously move them around and flip them so that they get evenly browned.  Transfer to a rack or paper towels to degrease.

Toss the fried donuts with the date molasses while they are still warm and serve as soon as possible.


tags: black sesame, donuts, Bahrain, luqaimat, luqmat, date molasses
categories: all -1, breads & cakes, desserts
Monday 02.13.12
Posted by Aliya LeeKong
 

Green Walnuts in Syrup

View fullsize walnut-pic1-500x333.jpg
View fullsize walnut-pic2-500x333.jpg

Green Walnuts in Syrup

Although I’ve eaten my way through Greece and Turkey and have seen many, many types of preserves, this one took me by surprise.  Walnuts picked before they are ripe, in their green state where there’s only a soft covering and not a hard shell, are peeled, soaked, boiled, reboiled, and simmered in sugar syrup to produce this beautiful gem, which deceivingly looks a bit like an olive from the outside…

This preserve is a tradition (as I implied) of Greece, Turkey, Cyprus, Romania, the Republic of Armenia, and, I’m sure, other European destinations.  Fruits and nuts are preserved throughout these countries, and, much like green walnuts are gathered early in the season (spring/summer) to make nocino, or walnut liquor, these little green guys are soaked and make a beautiful preserve where the syrup is almost as tasty as the nut itself.

And, yes, I know they don’t look green anymore!  The preserving process turns them dark and removes almost all of the bitterness a young walnut can have.  They take on a maple-like quality.  I would liken them to candied chestnuts – a bit firm but with a honeyed and nutty bite.   Their texture is a bit dense and has a softened version of that crunch of a walnut.

My go-to would be vanilla ice cream drizzled with the syrup and dotted with quarters of this gorgeous confection.  Obviously, a cheese plate now requires these little guys; I can only imagine these paired with Bayley Hazen Blue.  And although I think baked in a muffin or bread would be another great option, these preserves are so stunning that I would always opt for them in their most natural state – showing off their unique texture and flavor….

tags: green walnuts, preserves
categories: all -1, spices
Thursday 02.09.12
Posted by Aliya LeeKong
 

Quick Use-Your-Veggies Quinoa Soup

View fullsize soup-pic1-500x333.jpg
View fullsize soup-pic2-500x166.jpg
View fullsize soup-pic3-500x166.jpg

Quick Use-Your-Veggies Quinoa Soup

I know what you’re thinking.  This chick went to Peru and came back plumb-quinoa-crazy since she just posted a quinoa recipe 2 weeks ago.  I feel you guys deserve an explanation, so I’m going to level with you.  I was actually working on an exciting recipe for some black sesame Arabic donuts with date molasses (sounds pretty delicious, no?), but I had a yeast malfunction issue. TWICE.  And after 2 trips to the store in the cold and a bit of heartache (I’m not a yeast novice.  I blame the yeast!), I decided to warm myself up with this soup and share it with you guys.  Donuts tbd…

I did, in fact, learn a version of quinoa soup in the Sacred Valley in Peru.  And I’ve made this soup a few times.  What I LOVE about it is that it gives you a chance to use up all of the random vegetables you might have sitting in your fridge.  I like to save onion scraps, carrot halves, any little bits of a vegetable – and all of that works well in the soup.  Not overcooking the veggies also adds a beautiful, textural crunch.

The soup I had in Peru was super rich, cooked with evaporated milk, egg, and luscious cubes of cheese.  I omit the egg, leave the cheese optional here and opt for a bit of heavy cream to thicken instead, but I have to admit the cheese is an amaaaazing part of the soup.  It’s so warm and comforting and really pops with flavor (while you get your protein punch from the quinoa).  If you keep cooked quinoa in your fridge like I do, this takes no time to make – 15 minutes (half an hour if you have to make the quinoa).  Either way, this is a perfect winter weeknight meal – enjoy!

Ingredients

Serves 4 to 6

2-3 tbsps olive oil

1 red onion, finely chopped

1 jalapeno, finely chopped

2 scallions, thinly sliced

1 ½ cups finely chopped mixed vegetables (carrot, celery, zucchini, etc.)

4 to 6 garlic cloves, minced

4 cups cooked quinoa*

2 quarts vegetable or chicken stock

1 cup cubed Monterey jack cheese (optional)

½ cup heavy cream

Handful of fresh cilantro, roughly chopped

salt and freshly ground black pepper

Procedure

Heat a medium-sized pot over medium heat.  Add olive oil and throw in the red onion and jalapeno as well as a bit of salt to draw out the moisture.  Cook for a few minutes until the red onions start to turn translucent.  Add in the scallions and mixed vegetables.  You want to cook for another few minutes but you want the vegetables to retain some crunch (so don’t overcook).

Add the garlic and sauté another 30 seconds and then throw in the quinoa and stock.  Bring the mixture up to a boil and then lower to a simmer.  Add in the cheese, if using, and the heavy cream and simmer for another 2 minutes so the flavors come together.  Add the cilantro and season to taste.

*As a rule of thumb, I assume quinoa triples in size.  So I made 1 1/3 cups of quinoa (in 2 2/3 cups water) for this recipe.

tags: soups for winter, quinoa, vegetarian meals, leftover veggies, quick soups, easy soups, weeknight meals
categories: main dishes, recipes, soups & salads, all -1, vegetarian-1
Monday 02.06.12
Posted by Aliya LeeKong
 

Unique Citrus in NYC

View fullsize rangpur-pic1-500x333.jpg
View fullsize rangpur-pic2-500x362.jpg

Unique Citrus in NYC

We are smack dab in the middle of citrus season, and, yesterday, I came across a few different types that I had never eaten, cooked with, possibly seen before!  One, called the Buddha’s hand, is not in this picture because it was $30 per lb (basically for the single fruit), and I couldn’t bring myself to spend that slash I would rather spend that on something that will last longer – say, truffle oil and some beauty products….It’s worth checking out though just for its grotesquely interesting shape and the fact that it’s used to make citron vodka.  So the citrus I ended up actually buying are pictured above and are Rangpur limes and mandarinquats.

I went all in and just bit into the Rangpur lime, which is lime in name only and is the larger rounder fruit.  Not necessarily the wisest thing to do, BUT I got a full sense of the flavor – super sour in a bright lemony way with a honeyed sweetness and perfume.  The fruit is actually a cross between a mandarin and a lemon, so, at least, my taste suspicions were confirmed (that’s exactly what it tastes like though with the lemon predominating).

The mandarinquat flesh was also shockingly sour.  As the name implies, this one is a cross between a mandarin and a kumquat and has that signature bell shape.  I grew up with a kumquat tree in the backyard and have many happy memories of illicit tree-climbing (eschewing the “fall and break your head” adage) and kumquat-eating to my heart’s content.   Here, the peel is eaten with the flesh and sweetens it up quite a bit.  In fact, the peel has a sweet spice-like quality where the flesh resembles a sour orange.

When I think of cooking with either of these, my mind straight away goes to cocktails! The thought of a Pisco sour using a Rangpur lime sounds just about right, or candying the peel of the mandarinquat and using the peel and syrup in a simple vodka-based drink.  Of course, both of these would be beautiful in desserts, as a riff on lemon meringue pie or a fruit mousse.  I think I would just pour that syrup and candied mandarinquat peel on vanilla ice cream for my very own creamsicle and call it a day.  Thoughts?

tags: citrus, Rangpur limes, mandarinquat
categories: all -1, spices
Thursday 02.02.12
Posted by Aliya LeeKong
 

Espresso-Chocolate Brigadeiros

View fullsize brig-pic1-500x333.jpg
View fullsize brig-pic2-500x333.jpg
View fullsize brig-pic3-500x166.jpg

Espresso-Chocolate Brigadeiros

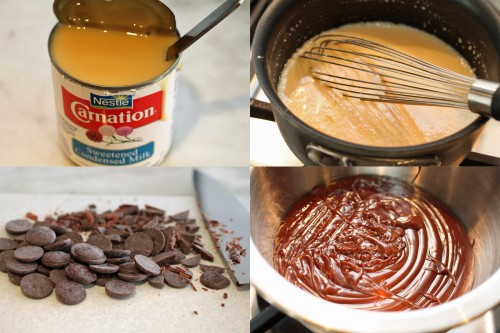
I love when I discover a food or dish that is completely a blank slate – a truly adaptable item that you can tailor to your own taste preferences with a few key ingredients.  Brigadeiros, another one of my Brazilian discoveries, are precisely that, a docinho or sweet that is enjoyed all over the country.  These are effectively little balls of luscious, milk fudge that are ridiculously easy to make and that can be layered with any flavor combo you like.

Now, when I say easy, even that might be an overstatement.  It can be as simple as 3 ingredients – sweetened condensed milk, unsalted butter, and whatever you are flavoring are garnishing these little guys with.  I found my favorite sweet shop in Rio and kept sneaking a new flavor (or two, who are we kidding) back to my hotel room each day, but my heart really settled on chocolate, which is one of the most popular versions.

So, I will admit, I made the recipe more complicated than the original BUT only in number of ingredients.  And, of course, I think using real chocolate in lieu of just cocoa (the tradition) gives it a much richer taste.  It’s seldom I go all in on just chocolate in a dessert, so the espresso powder, I think, brings out what’s best about the semisweet chocolate.  I would say that the addition of heavy cream,  vanilla, salt and corn syrup make this somewhere between a truffle and a brigadeiro – but the result is simply heavenly: rich, thick fudgy bites with that signature mocha flavor.  Next time, I plan to use Mexican chocolate, one of my favorite ingredients out there, and see what happens.  Enjoy!

Ingredient

Makes approximately 2 dozen brigadeiros

3 tbsps unsalted butter

1 (14 oz) can sweetened condensed milk

¼ tsp kosher salt

3 tbsps heavy cream

1 tsp light corn syrup

½ tsp vanilla extract

1 ¼ tsp instant espresso powder

1 tsp unsweetened cocoa powder

3.5 oz semisweet or bittersweet chocolate, chopped (approx ¾ cup)

Garnish: cocoa powder, chocolate sprinkles or vermicelli, and/or chocolate-covered espresso bean

Procedure

In a small, preferably nonstick, pot, melt the butter over medium-low heat.  Add the sweetened condensed milk, salt, heavy cream, corn syrup and vanilla extract and whisk to combine.  When the mixture starts to bubble, add the espresso powder, cocoa powder and chopped chocolate and whisk to melt chocolate.  Cook on medium-low for 10-15 minutes whisking constantly.  The mixture should just lightly bubble around the edges so reduce the heat if it’s cooking too quickly.

When it’s ready, you should see that the mixture will pull away from the sides and slide around the bottom.  Transfer to a metal bowl and don’t scrape the bottom of the pot.  Let cool for 30 to 45 minutes at room temperature.  Cover with plastic wrap and transfer to the fridge.

You want to cool the mixture completely before rolling the brigadeiros.  This will take likely between 3 and 4 hours.  I actually took the bowl out after 2 hours and used a small, greased ice cream scoop to scoop out 24 equal mounds of the mixture onto a parchment-lined baking sheet.  Then, I put it back into the fridge to firm up for another 20 minutes.  The increased surface area makes it cool faster.

Make sure your hands are greased and roll the mixture into even-sized balls.  Then, it is up to your imagination how to garnish.  You can simply roll in cocoa powder or sprinkles.  I garnished mine with chocolate vermicelli and a chocolate-covered espresso bean.  I think the little paper baking cups make it look adorable.  These are best enjoyed at room temperature.

These will keep for 2 days at room temperature if you keep them in an airtight container.  In the fridge, they’ll keep for closer to a month.  If refrigerating, bring to room temperature before serving.

tags: brigadeiros, espresso, chocolate, chocolate desserts
categories: all -1, desserts, recipes
Monday 01.30.12
Posted by Aliya LeeKong
 

Sal Rosada from Maras

View fullsize salt-pic1-500x333.jpg
View fullsize salt-pic2-500x364.jpg
View fullsize salt-pic3-500x333.jpg
View fullsize salt-pic4-500x333.jpg

Sal Rosada from Maras

When someone mentions pink salt, I tend to always think about the curing sort, with sodium nitrite.  But finishing salts do come in all colors – black, pink, red, grey – and this pink salt I happened to pick up while I was exploring Peru.  A lot of times during my spice stories I talk about unique ingredients and their extraordinary flavor.  This salt I wanted to share with you more for the story and the experience it represented for me, less for its individual influence on cooking.

To me pink salt is pink salt and perhaps my palate is just not developed enough.  My understanding is that the reason for (any) color in salt is due to the lack of a refining process, and so salts mainly differ in mineral content, size and shape of crystals, intensity and the way they disperse in foods.   One exception I know to that is kala namak or black salt from India – this type has a distinct, sulphurous taste that makes it easily identifiable.

In the Sacred Valley, near a town called Maras, I visited these salt-evaporation ponds that the locals all referred to as salt mines. Here’s a photo – and it can’t quite do it justice. I was blown away by the site (it’s massive and intense) and particularly the fact that these have been in use from the Inca times, a way of capturing salt from a nearby, super-salty spring.  I literally put my hand in the stream and minutes later my hand had dried with a thorough dusting of salt on it.  The pans need only natural evaporation for the gorgeous salt crystals to form.

What I loved was how the ponds help support the locals according to people I spoke with from the area.  Some of the pools have been passed on for generations; each family owns and harvests its own salt though it’s usually sold through the coop that manages the ponds.  One thing is for sure – labor cost isn’t figured in…Carrying those heavy bags of salt at that altitude and that distance would be no joke!

tags: sal rosada, pink salt, Maras, Peru, Sacred Valley
categories: all -1, spices, travel
Thursday 01.26.12
Posted by Aliya LeeKong
 

Quinoa Crusted Shrimp with Chipotle Mayo

View fullsize shrimp-pic11-500x333.jpg
View fullsize shrimp-pic2-500x333.jpg
View fullsize srhimp-pic3-500x333.jpg

Quinoa Crusted Shrimp with Chipotle Mayo

It feels like over the last few years, Americans have gotten really smart about the health benefits and cooking of quinoa (and, in reality, about a lot of the ancient grains / foods that are showing up in supermarkets).  Quinoa, in particular, has gotten a lot of attention because it’s a complete protein source, high in fiber and minerals and is gluten-free.  The “pseudograin” is actually native to the Andes and a big part of the diet out there, so while I was in Peru a few weeks back, I was a bit obsessed with learning traditional quinoa recipes.

I had the opportunity to cook with a few chefs in the Sacred Valley, and they gave me their creative interpretations of the grain – using it in surprisingly delicious, brothy soups, cooking it like a risotto in a dish called “quinotto”, and even sweet, in a dessert that’s not unlike a frozen rice pudding.  I too wanted to put my spin on it, so I thought replacing traditional breading for fried shrimp with quinoa would create a healthier (but still super flavorful) option.

And this recipe is almost gluten-free.  You can easily replace the all-purpose flour in this recipe with rice flour, and you are good to go.  One of the chilies used in Peruvian cooking (the “ajis” as they call it) is aji panca, a dried, smoky chili which I think has a similar flavor profile to the chipotle.  I thought a creamy, homemade mayo spiked with chipotle pepper would be the perfect accompaniment to this shrimp.  The quinoa crust is nutty, crunchy and satisfying and tastes heavenly with a bit of smoky, spicy mayo….Enjoy!

Ingredients

Serves 4 to 6

For the shrimp:

½ cup flour

1 tsp salt

¼ tsp freshly ground black pepper

½ tsp ground cumin

½ tsp paprika

¾ tsp garlic powder

½ tsp onion powder

2 eggs, beaten

1 cup raw quinoa*

1 lb medium shrimp, peeled and deveined

Olive or vegetable oil, for frying

For the chipotle mayo:

Yields ¾ cup

1 egg yolk

1 garlic clove

½ tsp mustard

1 tbsp lemon juice

150 mL olive oil

generous pinch of salt

1 chipotle in adobo sauce

Procedure

Let’s start by quinoa-crusting the shrimp.  Set up 3 bowls and a baking sheet with a rack on top.  In the first bowl, thoroughly mix together the flour with the salt and all of the ground spices.  The second bowl will have the beaten eggs, and the third bowl, the quinoa.  For each shrimp, holding by the tail dip them in the flour mixture, eggs, and then quinoa – shaking off excess at each stage.  Place on the rack on the baking sheet and set in the fridge while heating the oil.

In a heavy-bottomed pot, heat 2 to 3 inches of oil to 375° – 380° F.  The key here is that the oil has to be hot enough or the quinoa won’t cook through.  It should be crisp but not taste raw.  You want to work in batches so the oil temperature doesn’t drop too much – the overall goal is to keep the temperature above 360° F for the duration of cooking.  Fry shrimp for 3 minutes and transfer to another rack on a baking sheet.  Immediately, season with a bit of salt while it’s hot out of the oil.

For the mayo, in a food processor or a blender, blend together the egg yolk with the garlic clove, mustard, and lemon juice.  With the machine on, slowly drizzle in the olive oil until fully incorporated.  Add the chipotle and blend until uniform.

Serve shrimp hot with a side of the chipotle mayo.

*I used a combination of red and white quinoa here (and would have used black as well had I found it).  You can use whatever variety you have on hand.

tags: quinoa, shrimp, chipotle mayo, Peruvian cooking
categories: all -1, appetizers, recipes
Monday 01.23.12
Posted by Aliya LeeKong
 
Newer / Older