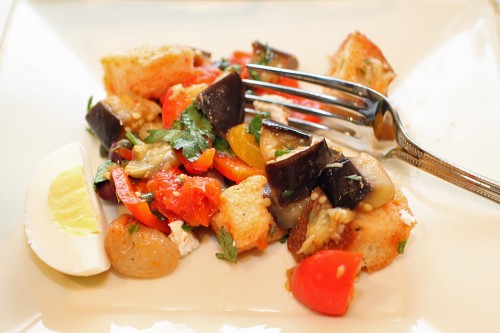


Tunisian Bread Salad
I am completely in love with the concept of “bread salad”. It feels like cheating. Like you have this healthy bunch of vegetables and you just make them so much tastier by adding chunks of rustic bread that soak up all the lovely dressing. But you still feel healthy doing it because you call it a salad. I am famous for taking leftover cornbread and making a cornbread-bread salad with honey balsamic dressing. And sometimes I even throw in a few vegetables too.
Most people know about panzanella or Tuscan bread salad, which is made from crusty Italian bread mixed with tomatoes, red onions, cucumbers and basil. Delicious. But Tunisian bread salad or even Mediterranean bread salad (similar) is less well known and equally (if not slightly more…) tasty. You take beautiful seasonal vegetables – eggplant, peppers, tomatoes – and roast them off with some aromatics. Mix those in with olives, herbs, capers, fresh cheese, and chunks of stale bread and toss with a delicious, harissa dressing and you have a beautiful, alternative, light and flavorful, bread salad.
This is a fantastic way to use up old bread (or so we all tell ourselves…). But I’ve actually seen this as a roasted vegetable salad on its own, so if no bread is at hand or you want to be even healthier, you can leave it out and still have a delectable salad. Store-bought harissa is fine, but I would suggest making your own like I do in my homemade harissa recipe; it’s cheaper, fresher, and healthier without the preservatives.
I love harissa in a salad dressing, and my dressing here has honey and harissa which, by the way, is a fantastic combination – I like to just slather the two on bread as a crostini or as an hors d’oeuvre to spruce up a weeknight dinner. In any case, this salad is bright, flavorful and beautiful – great for entertaining. Enjoy!
Ingredients
Yields 4 to 6 servings
Salad:
1 eggplant, cut into a medium (bite-sized) dice
1 red bell pepper, cut into a medium (bite-sized) dice
1 yellow bell pepper, cut into a medium (bite-sized) dice
8 oz mini sweet or cherry tomatoes
3 small shallots, quartered
3 or 4 whole garlic cloves
Olive oil
Salt & freshly ground black pepper
¼ cup niçoise olives, pitted
A generous handful of fresh mint, roughly chopped
A generous handful of fresh cilantro, roughly chopped
1 day-old round loaf of bread or whatever rustic bread you have on hand, cut into medium-sized cubes*
Garnish:
Fresh cheese (feta, goat or bocconcini will do), torn or crumbled into small pieces
2 tsps capers, rinsed and drained
1 or 2 hard-boiled eggs, quartered
Dressing:
¼ cup rice vinegar
1 tbsp harissa**
1 ½ tbsps honey
¼ cup extra virgin olive oil
Procedure
Preheat oven to 400° F.
In a bowl, toss together eggplant, bell peppers, tomatoes, shallots and garlic with olive oil, salt and pepper to coat. On a baking sheet, arrange vegetables in a single layer. Roast for 25 minutes until lightly browned.
For the dressing, whisk together the rice vinegar, harissa and honey in a bowl. Drizzle in extra virgin olive oil, whisking to incorporate.
Using a slotted spoon, transfer roasted vegetables to a large bowl. Add olives, herbs, and bread and toss with dressing. Garnish with cheese, capers, and hard-boiled eggs.
*If you have fresh bread, just put the cubes of bread on a baking sheet, drizzle with olive oil, and bake at 350° F until lightly browned. You just want it to be crisp enough to stand up to the salad dressing and not turn to mush.
**For harissa you can use my version here or use the store-bought kind.