X

Sign up to receive exclusive recipes, tips, updates and other goodies from Aliya!

  • Home
  • Blog
    • All
    • Recipes
    • Spices + Ingredients
    • Lifestyle, etc.
    • Travel
  • The Cookbook
  • The App
  • Media
    • All Media
    • Video
  • About
  • Passions
Aliya LeeKong
  • Home
  • Blog
    • All
    • Recipes
    • Spices + Ingredients
    • Lifestyle, etc.
    • Travel
  • The Cookbook
  • The App
  • Media
    • All Media
    • Video
  • About
  • Passions

Pão de Queijo (Brazilian Cheese Bread)

View fullsize pao-pic1-500x333.jpg
View fullsize pao-pic2-500x333.jpg
View fullsize pao-pic3-500x166.jpg
View fullsize pao-pic4-500x167.jpg

Pão de Queijo (Brazilian Cheese Bread)

One of my favorite Brazilian restaurants in the city is Casa.  Tucked away on a quiet block in the West Village, this cozy spot gets it right – spot on flavors, perfect portions, delicious wines, an intimate setting.  The feijoada and moqueca are killer, but I can never make it through a dinner there without ordering their little basket of farm cheese bread, or pão de queijo. These little cheesy, chewy, buttery balls are perfection, so I decided to dig further to satisfy my cheese bread cravings at home.

Brazilian cuisine is completely amazing to me because of the number and span of cultures that have contributed to it – Portuguese, African, Native American, Japanese, Syrian, Lebanese.  Cassava or yucca is a staple ingredient in Brazilian cooking, and the resulting flour is used, in its coarse form, for farofa, and its finely ground form to make these lovely rolls.

We are familiar with one form of cassava or manioc starch, which is tapioca, but Brazilians have a sour fermented version, polvilho azedo, and a sweet one, polvilho doce.  Traditionally, both are used to make this bread, but, on the fly, I only found plain manioc starch and went with it.  If you can find both kinds, I suggest using them in 2/3rd sour / 1/3rd sweet ratio.

The great thing about these is, if you have a stand mixer, they are really easy to make.  Otherwise, it’s a bit of a work out and requires some sweat to knead!  The procedure and form is not unlike those lovely, French gougères, but the result here is a lot more dense and toothsome than that.  They are the perfect dinner roll – buttery and cheesy with a delicately crunchy exterior.  I added a touch of black pepper and nutmeg, not traditional but I think gives it a balanced flavor.  Be forewarned, they are addictive…Enjoy!

Ingredients

Yields 20 golf ball-sized pieces

1 ½ cup manioc or tapioca starch

½ cup all-purpose flour*

2 tsps kosher salt

1 tsp sugar

½ tsp black pepper

pinch of ground nutmeg

1 cup milk

6 tbsps stick butter

3 eggs

1 ½ cups finely grated parmesan

Procedure**

Preheat oven to 350° F.

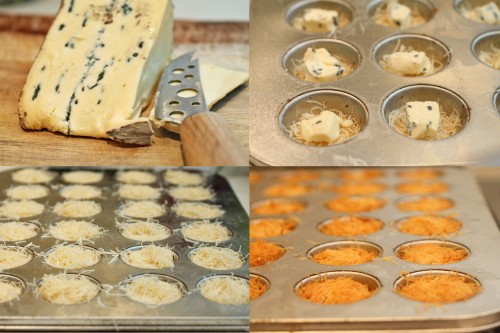
Fit a stand mixer with a paddle attachment.  In the bowl of the stand mixer, sift together starch, flour, salt, sugar, and spices.  In a small saucepan, heat milk and butter over medium-high heat until mixture comes up to a full boil (make sure it doesn’t boil over!).  Add milk mixture to dry ingredients and mix on low for 2 minutes.

In a small bowl, beat together 1 egg and 1 egg yolk.  With the mixer still running, add eggs to the dough. When eggs are incorporated, add grated parmesan and mix/knead for another 5 minutes, scraping down at intervals.  Refrigerate for a minimum of 1 hour.

Using a small ice cream scoop or your hands, portion out dough into even-sized pieces.  Heavily (and repeatedly) flour hands and roll portioned pieces into balls.  Place on a parchment-lined baking sheet.  In a small bowl, beat the other egg.  Brush dough balls with egg wash and bake for 25 to 30 minutes until browned and the outside is crisp and a bit cracked.  Serve immediately.

*If you want these to be gluten-free, just use manioc starch in lieu of all-purpose flour here.

**A few points on procedure.  The dough can be kneaded traditionally – that is, by hand – if desired.  It just takes a bit of upper body strength.  The resulting dough should be soft and very sticky.  If not baking immediately (or that day), the dough can be frozen when formed into balls and popped in the oven at a later time.  This bread is best served warm and straight from the oven as it turns a bit gummy when cold (though, of course, if can be reheated).

tags: Pão de Queijo, Brazilian cheese bread, Brazilian cuisine, farofa
categories: all-3, breads & cakes, vegetarian, recipes, appetizers, side dishes
Monday 07.11.11
Posted by Aliya LeeKong
 

Harissa-Cheese Stuffed Fried Olives

View fullsize olive-pic1-500x333.jpg
View fullsize olive-pic21-500x333.jpg
View fullsize olive-pic3-500x166.jpg

Harissa-Cheese Stuffed Fried Olives

When I opened up the menu at Balaboosta a few weeks back, the words Fried Olives jumped off the page and into my imagination.  I tasted them mentally before they even got to the table, and then when they did…let’s just say it only reinforced the fact that I’m trying these goodies way too late in life.  Why are they NOT more popular?  The world (or at least you lovely readers) should know about this delicacy…

I did a bit more research, and it seems like fried olives may have originated in the Le Marche region of eastern Italy.  There, they take pancetta, ground meats, cheese, herbs and spices and stuff large green olives, breading them and then deep-frying them to a golden crisp.  Olive all’Ascolana is the name of the dish.

I felt a slightly North African take on this tradition would be delicious.  I stuffed them with a spicy, harissa cream cheese before rolling them in breadcrumbs laced with freshly grated Parmigiano-Reggiano.  A bit of tang from the cream cheese, some fiery heat from harissa, a touch of sweetness from honey – the briny olives become even more complex and with a deeply satisfying, deep-fried crunch.  If you have never tried fried olives, now is your chance.  They are incredibly easy to make and work for everything from a movie night to an elegant hors d’oeuvres for a dinner party.  Enjoy!

Ingredients

Yields 50 fried olives

2 tbsps ricotta cheese, room temperature

2 tbsps cream cheese, room temperature

2 tbsps harissa*

2 tsps honey

50 large pitted green olives, rinsed and dried**

½ cup panko or plain breadcrumbs

¼ cup parmesan

¼ cup flour

1 egg, beaten

Oil for frying

fleur de sel (optional)

Procedure

In a bowl, mix together ricotta, cream cheese, harissa, and honey until uniform.  Transfer to a pastry bag fitted with the smallest pastry tip you have.  You can also use a Ziploc bag to do this, and use scissors to cut off a small piece of the corner of the bag.  Pipe filling into all of the olives.

Set up a dredging station.  Mix together the breadcrumbs and parmesan in one bowl.    Place the flour in another and the beaten egg in between.  Roll the olives in the flour and dust off any excess.  Dip into the egg and then roll in the parm-breadcrumb mixture until all are coated.

In a dutch oven or pot, heat 3 to 4 inches of oil to 360° F.  Carefully, drop olives into the oil, working in batches depending on the size of your vessel.  Fry until a deep golden brown and remove to a paper towel-lined plate.  If the olives are not too salty, sprinkle with a little fleur de sel.

Let cool slightly before serving / eating.

* For harissa you can use my version here or use the store-bought kind.  Feel free to adjust the amount to your heat tolerance depending on the type of harissa you end up using.

**For the olives, I like to use the ones that are oil-cured, rinsing them of any herbs and spices and then drying them thoroughly.  Water and hot oil don’t do well together, so I would avoid using olives soaked in a water-based brine that may have absorbed some of the liquid.


tags: stuffed olives, harissa, fried olives, hors d'oeuvers, holiday recipes
categories: all-4, appetizers, recipes, vegetarian
Monday 04.25.11
Posted by Aliya LeeKong
 

Savoury Blue Cheese Kunefe

View fullsize kunefe-pic1-500x273.jpg
View fullsize kunefe-pic2-500x333.jpg
View fullsize kunefe-pic3-500x333.jpg

Savoury Blue Cheese Kunefe

This dessert I had in Turkey called kunefe has been haunting me.  Shredded phyllo (think shredded wheat texture) layered with soft cheese, melted in the center, soaked in a sugary-sweet syrup and topped with crushed pistachios.  It was insane – crunchy, creamy, sweet, nutty – and you could literally only have a small bite before immediately falling into a food coma of sorts.

Kunefe is also called kanafeh or kunafah and is found in many different cultures including Egyptian and Israeli.  I couldn’t help thinking how incredible this tradition would be in a more savoury form, something small that could work as a fun hors d’oeuvres.  Replace the soft, sweet cheese for a lovely blue, leave out the sugar syrup and drizzle instead with a touch of balsamic and honey – bite-sized deliciousness!

The “dough” that’s used here is called kadaif, kadayif or shredded phyllo and resembles vermicelli.  Most Middle Eastern grocers carry it in the frozen section, near the regular phyllo.  It’s incredibly versatile and is lovely wrapped around jumbo shrimp or even layered on top of a casserole for crunch.   Here, I combine it with a bit of butter and cream, press it into a mini muffin pan, layer with blue cheese and bake.  Once it’s cooled a few minutes, I remove and drizzle with the honey and balsamic.  This is a really quick recipe for an elegant and tasty little hors d’oeuvres.  Enjoy!

Ingredients

Yields 1 24-cup mini muffin pan

¼ box of shredded phyllo / kataifi*  (¼ lb)

½ stick butter, melted

1 ½ tbsps heavy cream

pinch of salt

¼ lb blue cheese, cut into ½-inch pieces

honey, for drizzling

balsamic vinegar, for drizzling

Procedure

Preheat oven to 375° F.  Grease the muffin pan with melted butter.

Using a sharp knife, cut the shredded phyllo lengthwise and then crosswise.  You want to create approximately ½-inch strands, so that the dough will fit easily into the muffin tins.

Place shredded phyllo in a bowl and break up strands that are stuck together using your hands.  Add melted butter, cream and salt and combine thoroughly.  (I use my hands for this to achieve even coverage).

Take small bunches of the shredded dough and press down into the individual muffin tins, so that the dough is packed tightly and comes up about 1/3rd of the way up in each one.  Place blue cheese pieces into all of the muffin tins, and top each with the remaining phyllo dough.  Pack the dough down tightly, so that it’s flush with the top of the pan.

Bake for 20 minutes.  Cool for 5 to 7 minutes, and carefully lift the little kunefes out of the tin using a small spoon.   They are delicate at this stage.  Drizzle with honey and a few drops of balsamic and serve warm.

*If you aren’t using the phyllo immediately, once removed from the box, cover with a damp paper towel.  Like regular phyllo sheets, this dough has a tendency to dry out quickly.

tags: blue cheese, kunefe, Turkish recipes, Turkish desserts, kanafeh, kunafah
categories: recipes, appetizers, vegetarian, all-5
Monday 01.24.11
Posted by Aliya LeeKong
 

Homemade Strained Yoghurt

View fullsize yoghurt-pic1-500x333.jpg
View fullsize yoghurt-pic2-500x333.jpg
View fullsize yoghurt-pic3-500x166.jpg
View fullsize yoghurt-pic-4-500x333.jpg

Homemade Strained Yoghurt

When I was in Bodrum, I got to visit a little agricultural village called Sazkoy, explore the area and have a delicious(!) homemade lunch with a family well-known for the Milas carpets they weave and sell.  The village is largely self-reliant, with most families having their own chickens, goats, cows, and sheep.  Many grow vegetables and some even have their own citrus trees, ripe with mandarins while I was there.

I got a tutorial in the tradition of yoghurt-making from a woman named Emine.  She also uses her fresh cows’ milk to make butter and curd cheese from whey on a regular basis, like most of the families in the area.  The yoghurt process was completely intuitive for her, reflexive after obvious years of making it.  Where I use a thermometer in my recipe, Emine dips her finger and instinctively knows the right temperature.

The key to yoghurt is that you need some to make some.  A little “starter” yoghurt is necessary and adds the appropriate bacteria.  I like to use a bit of Turkish or Greek yoghurt to start the process because they contain only live yoghurt cultures and not the preservatives, stabilizers or thickeners that other types do.  That said, basic store-bought yoghurt will work perfectly well here too.

The process is incredibly simple – heat milk almost to a boil, cool, add a bit of yoghurt, and keep warm to ferment.  To get a thicker consistency, I like to strain my yoghurt like they do in Turkey (as well as Greece, South Asia, the Middle East and even Mexico).  This yoghurt keeps for about 7 to 10 days, and you can use some of the homemade yoghurt to start the next batch!  It also has an incredibly creamy sweetness to it, slightly less tangy and fresher tasting than the store-bought kind.  Cheaper, tastier, and how cool is it to make your own.  Enjoy!

Ingredients

1 ½ quarts whole milk

2 tbsps starter plain yoghurt, room temperature

Procedure

In a saucepan, heat milk over medium heat until it starts to bubble and foam, almost at a boil.  It should reach 180° F.  Remove from heat and cool to 110° F.  (The woman I saw making this knows the temperature from dipping her finger in the milk, not from any thermometer.  It’s still hot but she could hold her finger in it comfortably.)  This temperature is important – significantly hotter and the bacteria will be killed and the yoghurt won’t set.  If the temperature is too low, again the bacteria won’t ferment, and the yoghurt won’t set.

In a ceramic bowl or pot that has a lid, add the 2 tablespoons of yoghurt.  Add a few spoonfuls of the milk to the yoghurt and whisk to combine.  Pour the rest of the milk in using a strainer to catch the skin that forms on top.  Whisk to combine thoroughly.

Cover with a lid and swaddle in thick kitchen towels or a blanket.  You want to keep this warm for the fermentation process.  I keep mine in the oven (off) with just the oven light on.

Yoghurt time can vary.  Mine took around 12 hours to set, but it all depends on the temperature, the climate, and the yoghurt starter you used.  It could take as little as 6 hours, and some people even claim as long as 24 hours.  I like to make it in the evening, so it can set overnight.

Once it’s set, refrigerate immediately.  It will firm up a bit more as it cools.  I like to then place it in a strainer lined with cheesecloth in the fridge for about 3 hours once it’s cooled to get a thicker consistency but feel free to use as is.

Store in an airtight container; it lasts for about a week.

tags: homemade yogurt, homemade yoghurt, yoghurt recipes
categories: all-5, breakfast, recipes, vegetarian
Friday 01.14.11
Posted by Aliya LeeKong
 

Spiced Sunchoke Soup

View fullsize sunchoke-pic1-500x333.jpg
View fullsize sunchoke-pic2-500x333.jpg
View fullsize sunchoke-pic3-500x333.jpg

Spiced Sunchoke Soup

I am still in the aftermath of my holiday party, and this is yet another dish I served that people seemed to really enjoy.  Yes, soup can be a fantastic hors d’oeuvres – I served this in little demitasse cups with some chopped cilantro and homemade croutons.  It looks elegant, and you can make it in advance and keep it warm, which for me is ideal when other items require more maintenance…

Sunchokes are root vegetables and look a lot like ginger, though taste nothing like it.  They have been popping up all over menus in NYC and Brooklyn.  My husband and I hit this adorable new place in Fort Greene called Roman’s (amazing, chocolate sorbet to die for), and he was shocked to see sunchoke soup on the menu.  He acted like they were biting my style (I almost cried laughing)…and I had to explain that they are seasonal and delicious and that’s why they are everywhere.

You might also see sunchokes labeled as Jerusalem artichokes, and their flavor does resemble the artichoke heart though they are not related at all.  I picked mine up from the Union Square Greenmarket, and they were perfectly sweet and creamy.  This soup incorporates some key spices – cumin, coriander, and turmeric – that really bring warmth to the dish but still allow the signature sunchoke flavor to shine through.  The coconut milk bumps up the sweetness and gives it a beautiful, creamy mouth-feel, and the shot of lemon juice brightens up all of the flavors.  This is easy enough as a go-to weeknight soup but refined enough for a dinner or holiday party.  Enjoy!

Ingredients

Serves 4 to 6 / Yields approximately 5 ½ cups

3 tbsps unsalted butter

1 onion, finely diced

½ tsp ginger, minced

1 small green chili, finely chopped (preferably thai or serrano, to your heat preference)

¾ tsp ground cumin

1 tsp ground coriander

¼ tsp turmeric

pinch of cayenne

3 or 4 cloves garlic, minced

7 medium-sized (12 oz) sunchokes, scrubbed, peeled, and thinly sliced*

1 bay leaf

2 ½ cups chicken or vegetable stock

1 can coconut milk

a few squeezes of fresh lemon juice

salt to taste

chopped cilantro or parsley

Procedure

Heat a dutch oven or other heavy-bottomed pot over medium-low heat and add butter.  When foam subsides, add onion and a bit of salt to draw out the moisture.  Let sweat for a minute or so.  Add ginger, green chili, cumin, coriander, turmeric and cayenne.  Cook for 5 to 7 minutes until onions are translucent and super soft.  Add garlic and cook for 1 minute until fragrant.

Add sunchokes and stir to combine.  Let cook for about 2 minutes until sunchokes begin to soften.  Add bay leaf and stock, bring up to a boil, and lower to a simmer.  Simmer covered for 20 to 25 minutes.  You want the sunchokes to easily break apart with your wooden spoon, which will really depend on how thinly you sliced them.

Remove bay leaf, and, in a blender or using a hand blender, puree until smooth.  Add coconut milk, lemon juice, and adjust seasoning to taste.  Serve hot with a little fresh chopped cilantro on top.

*After peeling the sunchokes, keep them submerged in cold water until ready to use.  Thinly slice right before throwing into the pot.

tags: soups for winter, sunchoke soup, sunchoke recipes, Jerusalem artichokes, weeknight meals, holiday recipes
categories: all-5, soups & salads, recipes, vegetarian, main dishes-1
Wednesday 12.22.10
Posted by Aliya LeeKong
 

Chili Cheese Toast

View fullsize cheese-toast-pic1-500x333.jpg
View fullsize cheese-toast-pic2-500x333.jpg
View fullsize cheese-toast-pic31-500x333.jpg

Chili Cheese Toast

I absolutely love when you are feeding someone who has no idea what cooking requires, and you serve them something sinfully easy to prepare, and they take a bite and look at you as if you performed a miracle of sorts.  That’s what happened the first time I gave my husband these cheese toasts…for breakfast no less.  You would have thought I had prepared foie from scratch.

Although these might look like a kicked-up pizza of sorts, chili cheese toasts are actually a very popular South Asian snack.  Every cook has her or his own version – perhaps a dash of chili powder, a touch of turmeric , some curry leaves.  My grandmother used to make a delicious version and bound all of the ingredients together with egg.  She then fried it on the stove top for ultimate crispiness.

I kept this version relatively simple, so feel free to modify to your heart’s content.  I didn’t feel like frying as I wanted this to be a tad healthier, so these are baked.  I also used sundried tomatoes instead of fresh ones to minimize the moisture, but feel free to use fresh tomatoes  – just try to remove as much liquid as possible before adding to the cheese mixture.

You get heat from the chilies, delicious green onion flavor, a bit of sweet and tart from the tomato, of course, lovely, tangy, bubbly cheese, and a nice satisfying crunch from the toast.   These make an amazing afternoon snack, but I love them for breakfast.  If you’ve got knife skills, you can make this in 10 minutes with the cooking time!  Enjoy!

Ingredients

Serves 2 to 4

1 jalapeno or Serrano pepper, finely chopped (any chili of your choice)

2 sundried tomatoes, finely chopped

1 scallion, green and light green part only, thinly sliced

1 cup mozzarella, shredded (preferably low-moisture)

3 tbsps cream cheese, room temperature

¼ tsp salt

freshly ground black pepper

4 slices white bread, toasted

chopped cilantro or parsley

Procedure

Preheat the broiler.

In a bowl, mix together chopped chilies, sundried tomatoes, scallions, mozzarella, cream cheese, salt and pepper.  Spoon equal amounts of mixture onto 4 slices of toasted white bread.  Spread to create an even layer on each piece of toast.

Place cheese toasts on a baking sheet and place under the broiler.  Broil for anywhere from 3 to 5 minutes until cheese has melted – keep it under a bit longer if you like your cheese to brown (like I do!).  Sprinkle with a bit of fresh cilantro or parsley before serving.

tags: South Asian snacks, Chili cheese toast, cheese toast recipe, South Asian cheese toast
categories: all-5, breakfast, recipes, snacks, vegetarian
Wednesday 12.01.10
Posted by Aliya LeeKong
 

Saffron & Roasted Garlic Spaghetti Squash Gratin

View fullsize squash-pic1-500x333.jpg
View fullsize squash-pic2-500x333.jpg
View fullsize squash-pic3-500x166.jpg
View fullsize squash-pic4-500x333.jpg

Saffron & Roasted Garlic Spaghetti Squash Gratin

Saffron, without a doubt, is an expensive spice to work with.  I’m a bit of a deal hunter when it comes to it and always search around when I’m traveling to see if I can get it on the cheap.  I remember spotting it in the medina in Marrakech for a ridiculously low price and basically carting home a bushel full.  It wasn’t incredibly fragrant (and quite frankly the color was off) but eh, it was saffron!  It’s been sitting in my spice cabinet ever since – the lousiest, tasteless saffron I’ve ever met…and somehow I still won’t part with it.

The saffron for this dish I picked up during my visit to Mercat de la Boqueria a few months back.  I still trekked around to each stall that sold it to make sure I got the cheapest one!  Got it right this time.  This stuff has an incredible perfume and was beautiful in this dish.

When I dug deep into why I thought spaghetti squash and saffron would pair well together, I realized the mental origin of this dish might seem a bit strange.  There’s a South Asian pudding that can be made with either rice or vermicelli called kheer; it’s often scented with saffron.  This, to me, was like a savoury version of it.

The saffron, of course, compliments the flavor of the spaghetti squash, which I boost a bit with a touch of brown sugar.  The sweet, roasted garlic adds a lovely nuttiness and works incredibly well with the freshly grated parm.  I love this dish.  It’s a bit sinful, but healthier as far as gratins go since we’re using squash.  Cheesy, creamy, nutty with the perfume of saffron – Enjoy!

Ingredients

Yields 1 2-quart casserole dish

2 medium-sized spaghetti squash

5 garlic cloves

olive oil

salt and freshly ground pepper

½ stick butter

¼ cup all-purpose flour

2 cups milk

¼ cup crème fraiche

generous pinch of saffron

pinch of cayenne

a few dashes of hot sauce

1 ½ tsps light brown sugar

½ cup freshly grated parmesan

Procedure

Preheat oven to 375° F.

Poke holes with a knife into the spaghetti squash on all sides and place on a foil-lined baking sheet.  Season garlic cloves with a little olive oil, salt and pepper and wrap separately in foil.

Bake the squash for 1 hour turning every 15 to 20 minutes.  Cooking time may vary depending on the size of the squash.  Let it cool.  Split the squash lengthwise (should easily cut) and remove the seeds.  The flesh should be easy to pull out – if not, place it cut side up back on the baking sheet and cook for a bit longer.  I like to use a fork around the edges to pull out the squash flesh.  You want all of it to be separate, like spaghetti.  Reserve in a bowl.

Remove the garlic after another 15 minutes or so.  It should be soft, caramelized, and smell nutty and fragrant.

Reduce oven to 350° F.

In a saucepan over medium-low heat, melt butter.  Add flour and cook 2 to 3 minutes, whisking continuously.  Add milk, crème fraiche, saffron, cayenne, hot sauce and sugar.  At this point, you can purée the roasted garlic and add it.  I actually just added the cloves right in and used my whisk and the heat to break it up.  Continue to whisk and simmer for 5 to 6 minutes.  It should be at a slow bubble.

Combine béchamel mixture with squash and transfer to a greased 2-quart baking dish.  Sprinkle the freshly grated parmesan all over the top, and bake for 45 to 50 minutes until brown and bubbly.

tags: spaghetti squash gratin, squash recipes, spaghetti squash recipes, gratin recipes, saffron
categories: all-5, vegetarian, recipes, side dishes, main dishes-1
Monday 11.22.10
Posted by Aliya LeeKong
 

Lemon-Fennel Israeli Couscous Risotto

View fullsize risotto4-500x333.jpg
View fullsize risotto-pic2-500x333.jpg
View fullsize risotto-pic3-500x333.jpg

Lemon-Fennel Israeli Couscous Risotto

Risotto is one of my favorite things in the world to make.  It’s one of those dishes that has endless permutations.  It can take on any flavors you desire, can be simplified as a side dish, beefed up for a main, and is always creamy and satisfying.  I can get a bit heavy-handed with my risottos (a jumbo lump crab and smoked mozzarella iteration comes to mind…), so I wanted to create a slightly lighter dish here.

Israeli couscous is a tiny, pearl-shaped pasta that was created during a period in Israel when rice was scarce.  It has a slightly toothsome texture when cooked and a nutty flavor.  Because of its small size, it cooks up a lot quicker than most pastas.  That’s why I decided to use it here – instead of 30 plus minutes of constant stirring, you get a similarly delicious dish in about 15 minutes from start to finish.  You definitely still want to stir to develop the creamy texture, but it requires a lot less maintenance and time than traditional risotto.

When thinking about this dish, my mind immediately went to fennel since it’s in season.  Paired with bright lemon zest and a bit of juice, the result is a much lighter and fresher risotto than I typically make.  I cooked up a simply seared piece of fish, and it worked perfectly with the light and creamy, lemon-y couscous “risotto”.  Enjoy!

Ingredients

4 tbsps unsalted butter

2 small shallots, medium dice (2/3 cup)

½ medium fennel bulb, medium dice (2/3 cup)

3 or 4 garlic cloves, minced

2 cups toasted Israeli Couscous

1/3 cup white wine

3 cups vegetable or chicken stock

juice of half a lemon

1 tbsp lemon zest

finely chopped parsley, chives, and/or cilantro to finish

salt and freshly ground black pepper

Procedure

Heat a nonstick sauté pan over medium heat and bring the stock in a separate saucepan up to a boil.  Add 3 tablespoons of butter, and when foam subsides, add diced shallots and fennel and a pinch of salt to draw out the moisture.  Cook for 5 to 7 minutes stirring often until vegetables have softened.  Add garlic cloves and cook for 30 seconds to a minute until fragrant.

Add couscous and cook for a minute stirring to coat with the fat.  Add white wine and reduce completely.  Reduce heat to medium-low.  Add boiling stock in increments of one cup or so, stirring often.  Repeat until all stock has been incorporated and couscous has cooked for about 10 minutes.

Remove from the heat.  Stir in lemon juice and lemon zest.  Taste couscous and add salt and pepper as needed.  Add remaining tablespoon of butter and chopped herbs.  Serve immediately.

tags: israeli couscous recipes, couscous risotto, lemon risotto, risotto recipes, fennel
categories: recipes, side dishes, vegetarian, all-6
Monday 10.25.10
Posted by Aliya LeeKong
 

Sweet Apple Couscous

View fullsize couscous-pic1-500x333.jpg
View fullsize couscous-pic2-500x333.jpg
View fullsize couscous-pic3-500x333.jpg
View fullsize couscous-pic4-500x333.jpg

Sweet Apple Couscous

I sort of jumped the gun and went apple picking this past weekend.  I couldn’t help myself.  I’m a sucker for fall, the first cool change of temperature and all the apple picking, pumpkin patch wandering, and wine-tasting (I threw that in there…).  It’s a bit early in the season, so where I usually come back with several different varieties I ended up with who-knows-how-many pounds of Honeycrisps.  They are literally overflowing in my kitchen, so I’m pressed to find ways to use them up…Luckily, they are delicious, the perfect balance of sweet and tart, and hold up well to cooking.

Couscous, while a North African staple, has truly become popularized and is found throughout parts of France, Spain, Portugal, Italy, Eastern Europe, and across the Middle East.  Here, in the States, I’ve seen it creep onto dinner tables because of its incredible versatility and high nutritional content compared to rice and pasta.  North African cooking, particularly Moroccan, is full of sweet and savoury dishes – with spices like cardamom or cinnamon bridging the gap.  So couscous as a sweet side dish or a dessert does exist, though I surely haven’t seen any Berber recipes with apples…

For this dish, I was inspired by (obviously) the mass of apples in my kitchen, the sweet couscous recipes of North Africa involving dried fruits and nuts, and even the rice puddings of American and South Asian cultures (though this has no cream or milk).  This dish is extraordinarily simple, healthy and delicious.  It’s basically cooking a warm, buttery apple pie filling, folding it in to light, fluffy, sweetened couscous, and topping it with nutty, crunchy thin almond slices.  The textures are beautiful and who can resist the combination of apples and cinnamon.  A great fall dish… enjoy!

Ingredients

Serves 4 to 6

2-3 tbsps butter

5 cups apples, peeled, cored, and cut into a small/medium dice

½ cup brown sugar

¾ tsp cinnamon

¼ tsp nutmeg

¼ tsp salt

½ tsp vanilla extract

2 cups couscous*

2 cups water

3 tbsps butter

1/3 cup sugar

½ tsp salt

½ cup sliced almonds, toasted

Procedure

Place a skillet on the stove over medium heat and melt the butter.  When the foam subsides, add the diced apples and stir to coat.  Turn temperature slightly down and cook on medium-low heat for 10 minutes, stirring every few minutes to make sure the apples evenly cook.  Add brown sugar, cinnamon, nutmeg, salt, and vanilla to the apples and stir to coat.  Cook for another 5 minutes.  The apples should be soft but still hold their shape (not complete mush).

In a casserole dish, spread couscous out to an even layer.  Cooking it in this type of dish will increase surface area and keep the resulting texture light and fluffy.  In a saucepan, bring water, butter, sugar and salt to a boil.  Pour over couscous, stir briefly with a fork, cover tightly with plastic wrap, and let sit 5 minutes.  After the 5 minutes, remove the plastic wrap and fluff couscous with a fork – the butter should keep the grains separate and prevent any clumping.

In the same dish or another serving bowl, mix together the couscous with the apple mixture and top with the toasted sliced almonds.  Serve warm.

*I used the typical, plain, non-whole wheat, pre-steamed variety from the grocery store.  Be careful not to use the tri-color type, which has spinach and tomato flavoring, or Israeli couscous, which is larger and requires a longer cooking time.

tags: couscous, sweet couscous, apple couscous, recipes for fall, apple recipes
categories: all-6, desserts-1, side dishes, vegetarian, recipes, breakfast
Wednesday 09.22.10
Posted by Aliya LeeKong
 
Newer / Older