Kerala Shrimp Curry
Most of the time, what I make for you guys is a very personal interpretation of a dish. I think of it like my little fantasy, how I’d like to eat a dish regardless of its origin or culture and using ingredients I can get to. I think everyone that loves to cook does this on some level – cooks things the way they like it. But, there are times when I do crave the original! That’s when I research (eating and reading) and try to recreate it from scratch, adjusting the spice level and seasoning where necessary but keeping to the unadulterated tradition as much as possible, which is the case with this Kerala-style shrimp curry.
This is actually a traditional curry I created for Junoon. I did a ton of research and found out that in the south of India, in Kerala, they use this (very hard to come by) ingredient called kodampuli, which is also called Malabar or smoked tamarind. And smoky is right – it’s used as a souring agent and has a tart, smoky, complex quality that I love! That said, if you can’t find it, kokum or regular tamarind also works really well here to create that tart flavor.
People usually think curries are heavy, and they certainly can be. I know I have to be in a mood to eat them. But not so with this one – despite the coconut milk, this curry feels a lot lighter. The flavors are bright and fresh and not overly spiced. There’s heat from the chilies, depth from the curry leaves, and that brightness from the cilantro. I like to sear the shrimp and develop a nice brown on them before putting them into the curry. Some simply fried shallots create a beautiful crunch on top and spooning this over some warm, basmati rice is pure heaven. Enjoy!
Ingredients
Serves 4
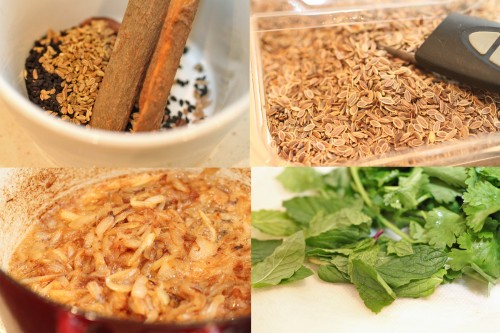
4 pieces kodampuli*
3/4 cup boiling water
1 yellow onion, peeled and roughly chopped
2 shallots, peeled and roughly chopped
1 2.5-inch generous knob of ginger, peeled roughly chopped
8 cloves garlic, peeled
1 Thai green chili, stemmed
5-7 tablespoons coconut oil
2 teaspoons brown mustard seed
1 tsp white cumin seeds
pinch of fennel seeds
10 curry leaves
2-3 dried red chilies
¼ tsp Indian hot chili powder
½ tsp paprika
1 tsp turmeric
1 tsp ground coriander
1 tsp ground cumin
½ tsp garam masala
1 ½ cans coconut milk
1 ½ tsps palm sugar
squeeze of lemon juice
1 ½ lbs shrimp, cleaned and shelled
kosher salt and freshly ground pepper
small handful of cilantro, chopped
fried shallots (optional, as garnish)
grilled lime (optional, as garnish)
Procedure
In a metal or heat safe bowl, pour boiling water over the kodampuli. After 10 minutes, remove one piece from the water. Blend remaining in a blender and strain. Set aside strained liquid and one piece.
To the bowl of a food processor, add the onion, shallot, ginger, garlic, and green chili. Process to a smooth paste.
Heat 3 to 4 tablespoons of coconut oil in a medium pot over medium-high heat. When hot, add mustard seeds, cumin seeds, fennel seeds, curry leaves, and dried red chilies. Move around in the pot – it will sputter and pop so be careful! Cook for about 30 seconds and then add the onion paste along with all of the dry spices. Cook until the paste dries up and the onions turn golden brown, stirring to make sure it isn’t sticking too much or burning.
Add the single kodampuli, the strained liquid, the coconut milk, and the palm sugar. Lower heat and simmer for 8 to 10 minutes until the sauce thickens. Squeeze in a bit of lemon juice, and adjust the seasoning here adding salt and freshly ground pepper as necessary.
Dry shrimp and season with salt and freshly ground pepper. Heat a skillet over medium-high heat. Add 2 to 3 tablespoons of coconut oil and sauté shrimp, working in batches if necessary. Cook for 2 to 3 minutes, drain of excess oil and then transfer to the pot with the curry.
Add the cilantro to the curry right before serving and remember to remove the hot, dried red chilies so no one eats them! Serve hot, preferably with basmati rice or naan, garnished with fried shallots and a grilled lime.
*Kodampuli is not the easiest to find, so you can substitute kokum or a piece of a tamarind block in its place. You want a relatively tart liquid to flavor the curry.